Tag: tourniquet

“All I could think was, stop the bleeding!”

Share
Injured boy with young man attempting to stop the bleeding.

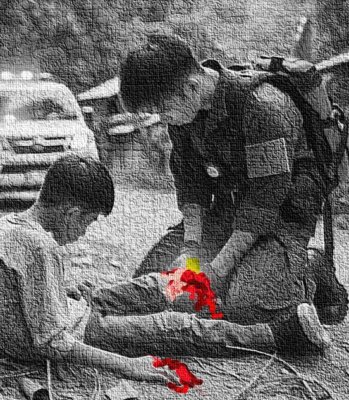
Imagine you are the young man in the image above. Can you stop the bleeding and save that boy?

I have known these statistics for a while. And I knew that if I were the person kneeling by the boy in the image, I would not be ready to save him.

So last week, Joe and I signed up for a Stop the Bleed training put on by our local fire and police departments as part of the CERT program.

What I remembered from “tourniquet training” in the old days.

If you’re over 70, you may recall how early first aid classes dealt with severe bleeding. (My older brothers were both Eagle Scouts, so I got the training when they did, sometime in the 50s.) That training was simple. First, try to stop the bleeding by pressing down hard on the wound with a towel. If that didn’t work, tie your belt or even a bandana around the bleeding limb, above the wound, and twist it tight.

Really, that is pretty much all I remember about using a tourniquet. But it came with a vague warning about “not leaving the tourniquet on for too long.”

Concerns about leaving a tourniquet on “for too long” were legitimate, of course. We all understood that limbs denied blood could ultimately be lost. And in those days, when response times for medical help were probably in hours, not the minutes we expect today, this warning was enough to turn us off to this first aid option.

Today we have new data, new tourniquets, and new training.

It was the military experience – and data capture – in the wars in Iraq and Afghanistan that re-established the value of the tourniquet as a life-saver in situations of severe trauma. Today, not only do all soldiers carry tourniquets – and know how to use them – but so do police officers and other emergency responders. (I checked with my local traffic officer, and sure enough, he had one on his belt!) And in 2015, ordinary citizens were invited to participate through the Stop the Bleed program.

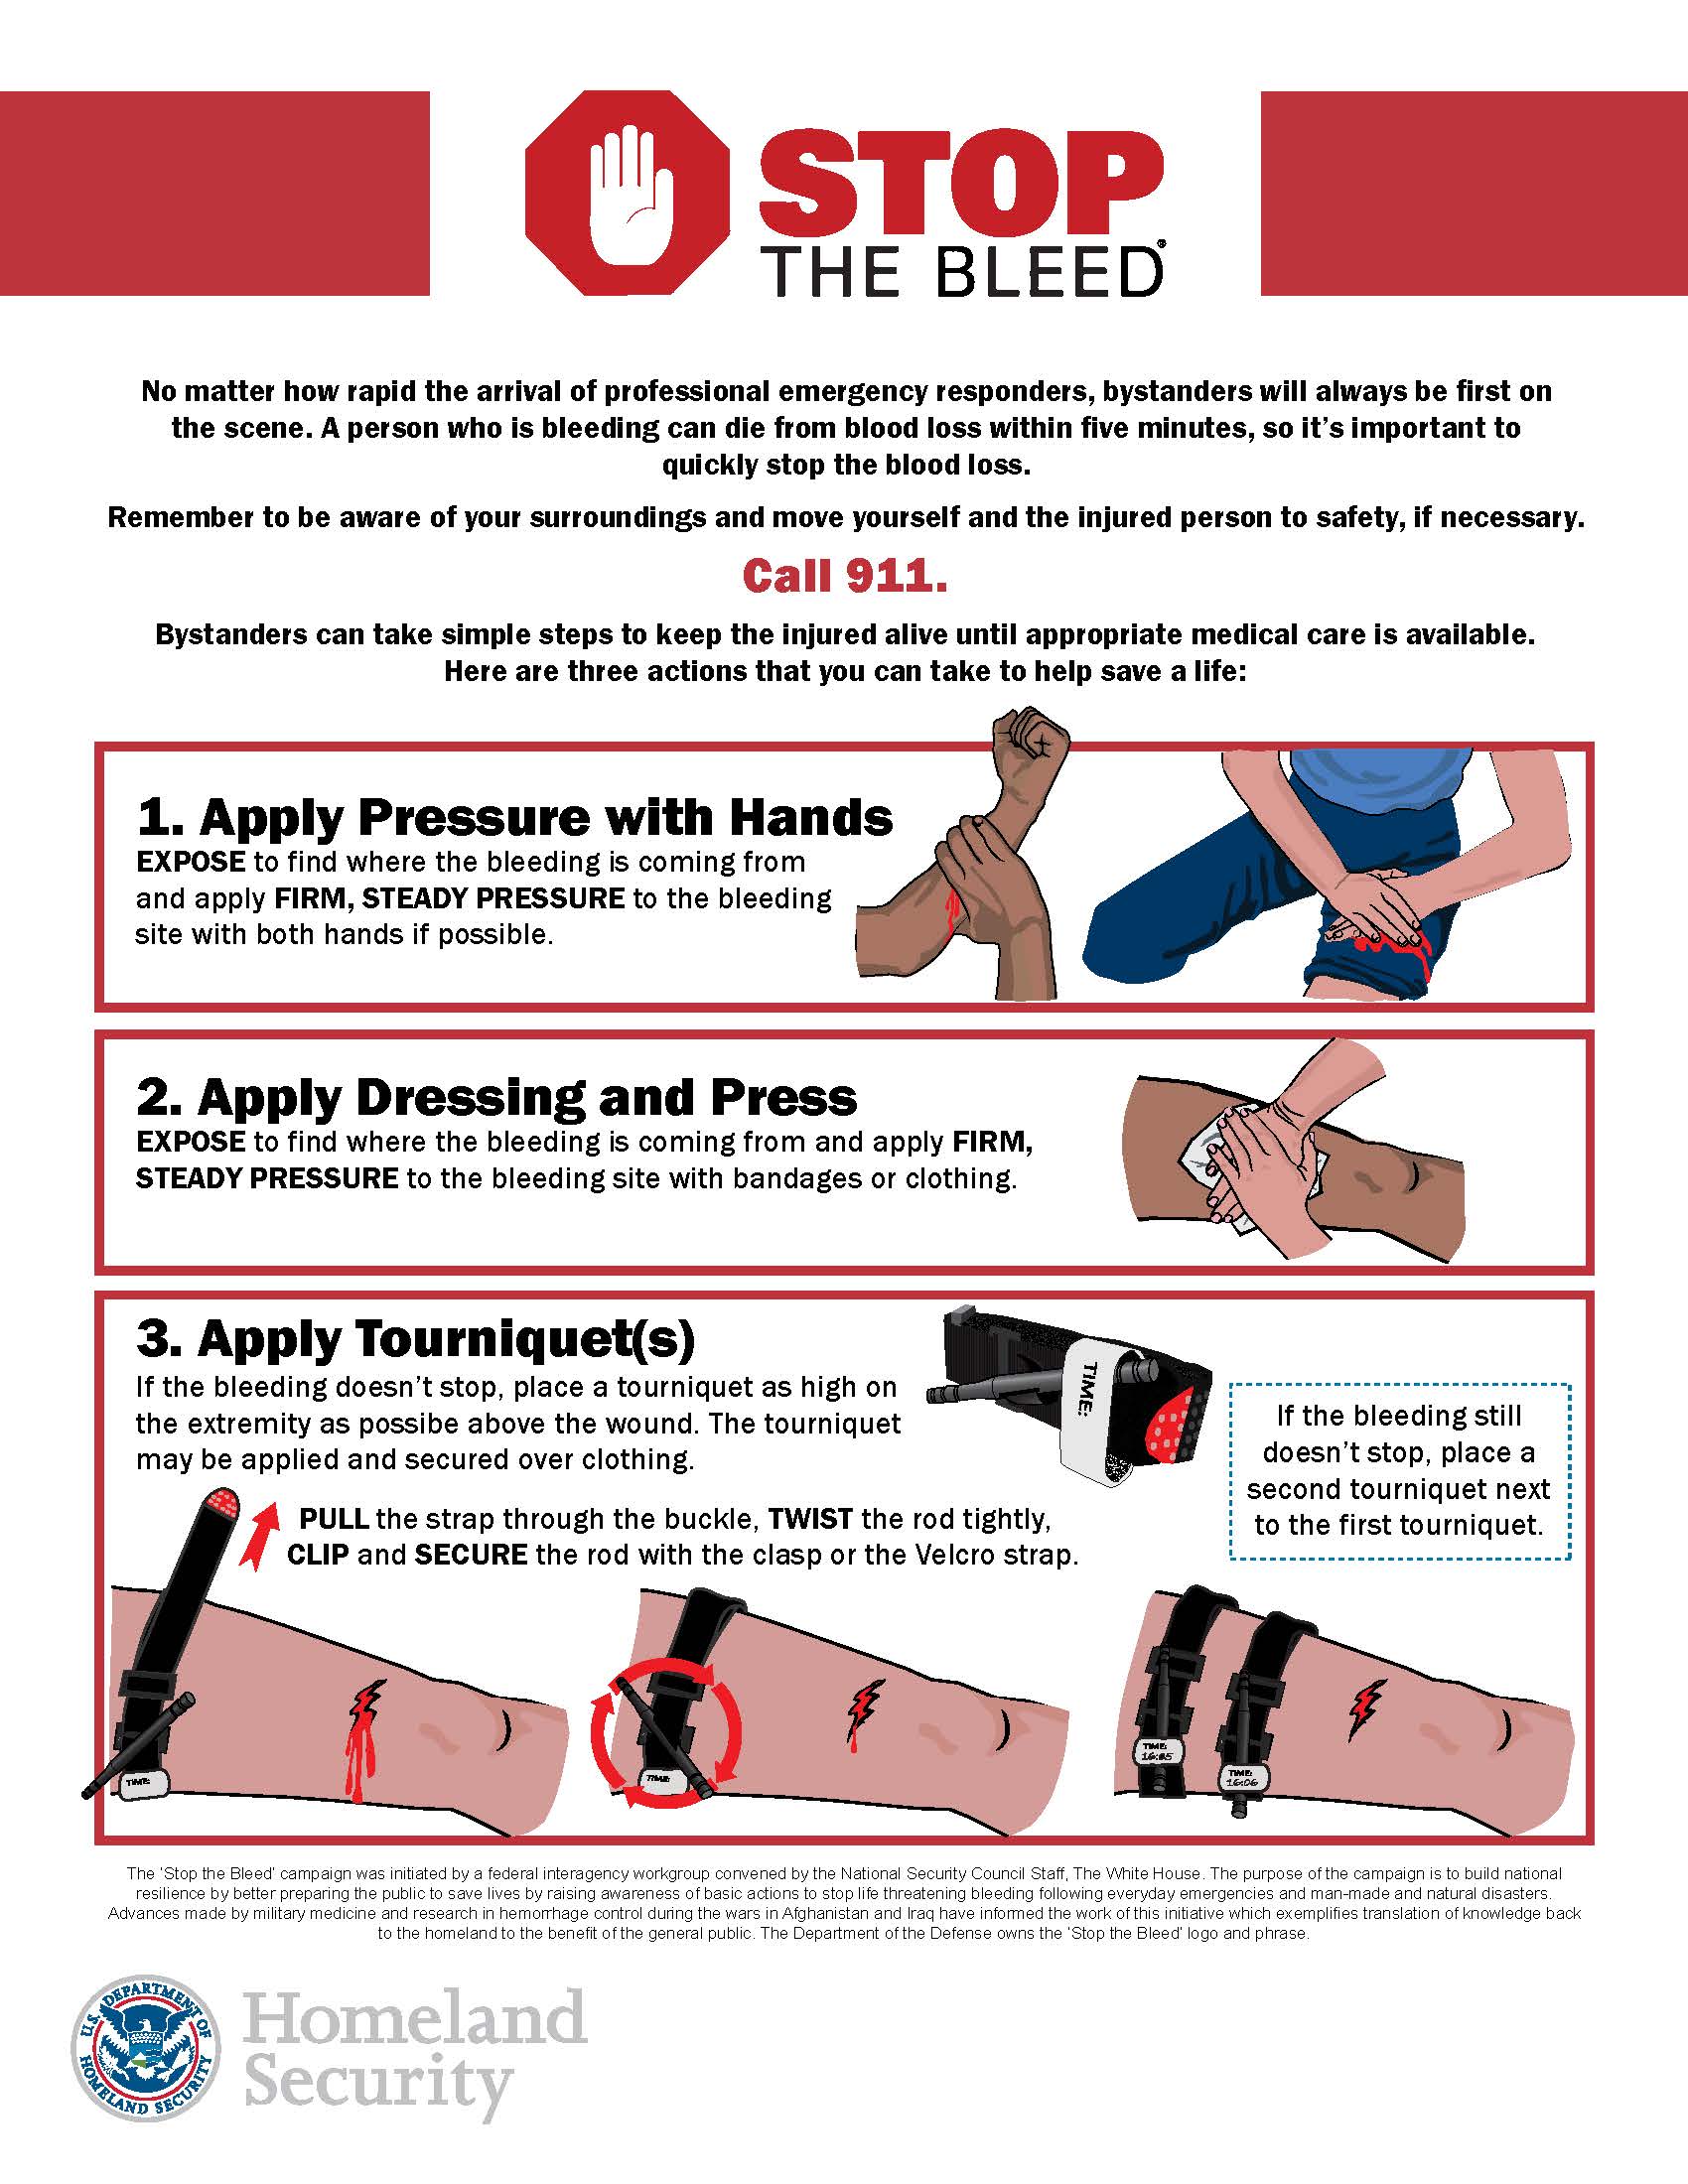
Step One – Analyze the situation.

  • As noted, in a bleeding emergency, time is of the essence. You, as bystander, are going to be there before First Responders arrive. YOU ARE the first responder in this emergency!
  • Before you do anything else, check that you are safe and that nothing else is threatening you or others.
  • Faced with a wound that is seriously bleeding – pumping out, pooling on the ground — Call 911 or tell someone else to do it.

Step Two — Decide how to stop the bleeding.

Consider these three actions designed to squeeze the artery that’s emptying the blood out your victim’s body. All three of these take PRESSURE!

  • Apply direct pressure on the wound using your hand/s. You can use a big bandage, a shirt, whatever. PRESS HARD on the wound and don’t quit. Tell the victim it will hurt, because it will.
  • If the wound is a deep cut or deep hole, a surface bandage or pressure won’t work. PACK THE WOUND with gauze, a towel, a t-shirt, whatever . . . until the wound is fully and tightly packed and has stopped bleeding. Again, this will hurt the victim – it’s the cost of staying alive!
  • If neither of these efforts works, and the blood is still pumping from an extremity (arm or leg), APPLY A TOURNIQUET. This is where practice is essential. Your face-to-face course, the online course, or YouTube videos will demonstrate where to apply a tourniquet (loop the strap above the wound on the arm or leg), how to tighten it (using the buckle and then the windlass), and to fasten it securely. Once again, the purpose of the tourniquet is to stop blood from flowing out of a wound in an arm or leg. Once it’s on, don’t loosen it or take it off – that’s the job of an emergency medical professional.

You won’t be able to apply a tourniquet unless you have one. So let’s look at adding a tourniquet to your first aid kit.

We tested two different types of tourniquets in our class, and I have since then done a fair amount of research to see what’s available online. Here’s some of what I found.

  1. First thing you’ll notice is that tourniquets seem to come in two types: American-made at around $30 each, and foreign-made costing as little as $6 each. Cheap tourniquets look very similar to “real” ones – but they can actually not fit right, wrinkle, or even break. My recommendation: budget $30 – $40. If you need a tourniquet, you want it to work!
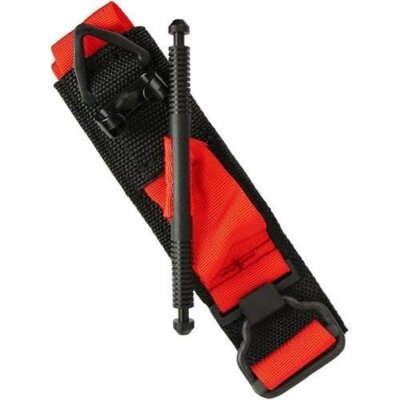
  2. American tourniquets come in two colors, black and orange. Color doesn’t seem to make a difference in quality. I like orange because it’s a lot more visible in a dark pack.
  3. The two most popular tourniquets do have slight differences in how the strap goes around the arm or leg and fits into the buckle, and how the windlass (the bar that you turn to create the pressure) is fastened. Both have a place to write the TIME the tourniquet was placed.

Some examples to look for:

American-made CAT tourniquet, black.

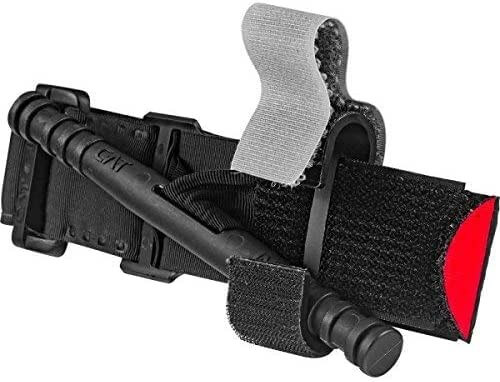
The CAT, or Combat Application Tourniquet, is a true one-handed application (meaning you could put it on your own arm or leg) to stop the bleeding from a serious wound. To get to Amazon’s sales page, with more details for this classic tourniquet, click here. As you know, if you purchase through this link, we may get a small commission – which helps me do all the research for these Advisories!


Here’s a second, American-made tourniquet, the SOFTT-Wide, Gen 4. This tourniquet comes in several models; I like the bright color and, in particular, the extra fastener that keeps the windlass secure once the tourniquet is applied. (Hands slippery with blood, etc . . .) Again, head to Amazon for details and prices.

American-made SOFTT tourniquet, red.

At our class we practiced with both models. It took me about 4 minutes to get the tourniquet on the dummy arm and properly tightened. Too long, of course. But that was my very first try. I am confident that now I’ve done it once, I could do it again, twice as fast.

In closing . . .

A tourniquet isn’t for every first aid kit. You will have to be determined and confident to use one in the midst of a frightening, perhaps shocking, emergency involving massive bleeding. But if you are prepared, you may be able to stop the bleeding and save a life that will otherwise surely be lost.

Virginia
Your Emergency Plan Guide team

P.S. If you are investing in a tourniquet, consider adding gauze strips to your purchase. Better than a t-shirt for packing . . .

Add a Tourniquet to your Survival Kit

Share

Quick, before you have to think much . . .

Bloody faceWhere is the nearest first aid kit?

Is it up to date? Do you know what stuff is in there, and how to use it?

I added “Update your First Aid kit” as No. 4 on my Preparedness Checklist for 2018. That was partly because OSHA has new requirements.

But there’s more to this Advisory.

There have been so many violent incidents in the past 12 months. Hurricanes, floods, the shooting in Las Vegas. And yet,

People’s lives have been saved by quick bystander action.

In particular, bystanders have jumped into action, stopping bleeding until victims could get medical help.

I want to be one of those bystanders who is able to help – and I realized I don’t know enough about stopping bleeding.

Thus, this Advisory.

Some of this Advisory may be review. But some of it may be new. For sure, some of the items below are being introduced for the first time to Emergency Plan Guide families.

Let’s start with a new item for your first aid or survival kit: a tourniquet.

From the Department of Homeland Security: “A person who is bleeding can die from blood loss within five minutes.”

Five minutes!

If someone is bleeding heavily from a wound, with blood spurting, soaking clothing or pooling on the ground, you can’t wait for the professionals to arrive.

Certainly, some of the people in the Las Vegas shooting and the Boston Marathon bombing were saved by bystanders like you and me, operating on instinct and some basic understanding. That’s what I was looking for as I began this Advisory.

Disclaimer: I am not a trained medical professional, so I read many articles and watched a number of videos about the use of tourniquets. I recommend you do the same before you think you know what to do and when to do it. BUT, having studied at least this much, it appears to me that as a possible bystander to a mass shooting or big wreck some basic knowledge is better than none!

Bloodied girlProfessionals don’t all agree about exactly how to handle severe injuries. But they seem to agree on  . . .

Steps for stopping severe bleeding.  

1-Be sure you and the victim are safe. If this is a terrorist or accident scene, you may have to move the victim to a protected place.

2-Figure out where the blood is coming from. Open a shirt or slit a pants leg to find the wound. Then,

3-If blood is coming from the head or torso, apply pressure to the wound to keep that blood in the body!

Having a first aid kit with large-sized pressure bandages to place on the wound would be best. (See below.) But you can use a towel, clothing or even your hands. Yes, you may be introducing germs into the wound. Better to introduce a few germs that can likely be dealt with later than to lose the patient to shock from immediate blood loss.

4-Press hard with both hands and don’t quit. Use the weight of your body on your locked arms or even your knee.

Pressure on a wound will hurt. Be strong and confident and tell your patient that help is coming and that you need to do this to save his life.

5-If blood is coming from an arm or leg, first try pressure. If pressure doesn’t work, consider a tourniquet.

We used to be taught that a tourniquet could somehow damage the limb. There still could be damage, but now we know that saving a life is better than losing a limb. A tourniquet – a simple cord or strap wrapped around the limb tightly enough to stop blood flow – can work if you know what you are doing. And to repeat, for the purposes of this article, we’re talking about a mass situation where victims outnumber medical personnel but professional medical help will soon arrive.

Again, having a professional tourniquet in your pocket or pack would be optimal. But you can make a tourniquet from a scarf, a belt, a shoelace, the strap of a purse, a bra, whatever. Simply wrap the tourniquet a couple of times around the arm or leg at least 2-3 inches above the wound (between the wound and the heart), not over a joint. Tighten the strap, then tie a partial knot, place some sort of bar onto the wrap and tie a second knot over it. Twist the bar until you feel no more pulse below the wound. Tie the bar or tape it down so the tourniquet doesn’t loosen. Don’t open to check!

If you can, use a marker to flag the fact of the tourniquet (write a “T” on the patient’s forehead), and write the time when you started its use. Give professional medical personnel a heads up to know what they are dealing with!

Stop the bleedThe Department of Homeland Security has an infographic that covers the above steps with simple diagrams. Click the picture to get the full-sized image.

Where to get a tourniquet.

See below for examples of tourniquets that are readily available as additions to your first aid kits. The two most common are called CAT — Combat Application Tourniquet and SOF® Tactical Tourniquet. The SOF TT Wide version (1.5″) seems to be preferable to the narrow (1″) version.

It is particularly important that when you get your tourniquet to open the package, unwrap everything and “prep” your tourniquet so it will be ready to use at a moment’s notice. You will not be able to get the package open if you have only one hand and/or everything is slippery with blood.

Training videos to view before you buy.

I found these two videos to be very helpful for the non-professional. Each makes it clear that you have to practice with a tourniquet to be able to apply it correctly and quickly. Professionals aim to get it on in less than 30 seconds!

https://youtu.be/pDP5Cy0nguU  — Video – 17 minutes. Goes through the “prepping” process and makes clear the difference between the two different tourniquet models.

https://youtu.be/TqUI1xeMKRU — Thorough and detailed presentation by 20-year veteran. At 25 minutes the video starts coverage of a third type of tourniquet. My research suggests the first two would be better for non-professionals.

Examples of two popular types of tourniquet.

This CAT tourniquet (image below) comes in a variety of colors. As the long description says, this is for “pre-hospital hemorrhage control,” which is what we’ve been talking about. This model costs less than $20. (A number of tourniquets LOOK similar. One thing to watch for — a metal windlass instead of plastic.) The picture doesn’t tell the whole story! Be sure to watch the videos to see what the tourniquet really looks like.

Tourniquet -(ORANGE) Recon Medical Gen 3 Mil-Spec Kevlar Metal Windlass Aluminum First Aid Tactical Swat Medic Pre-Hospital Life Saving Hemorrhage Control Registration Card 1 Pack

I’ve shown two SOF tourniquets (below), one in orange and one in  black. You’ll notice that the tourniquets are unpacked, giving you a better idea of how big and how complicated they are. I like orange because it’s a lot more visible in a backpack or kit. The SOF technology is different from that of the CAT, and this tourniquet costs about twice as much as the CAT above. Click the links for more details and exact prices.

SOF Tactical Tourniquet – Wide

SOFTT-W Tourniquet 1.5 – Black

More items to add to your kits.

You’ll notice we are using the plural form: kits.  We’re assuming you have several kits to be sure one is immediately available no matter where you are – in the house, in the garden, at the office, in the car, on a hike or backpacking.

Commercially available kits are usually more like “starter kits.” You’ll want to add your own specific medicines and/or supplies, like sunburn cream, bug spray, and antibiotic cream.

Also, consider the items below as additions to your kits.

  • Pressure bandage — Israeli bandage. Get the 6” size. These bandages have multiple layers, a sterile pad that goes onto the wound, and then wrapping that acts as compression and secures itself.
  • Good multi-purpose knife – like the classic Swiss Army knife – that has  tweezers and scissors as well as the usual knife blades, bottle openers and punch. Get several so you have one for each kit.
  • Flashlight or even better, headlamp. Emergencies don’t happen in the daytime; they happen in the rain or at night, too. Being able to see, and to have both hands free to cope, just makes sense. Same advice about multiples.
  • Survival lighter can be used to provide light, start a fire for heat and/or comfort, and to sterilize equipment. (Even the Tesla electric lighter could sterilize whatever tool you could fit between the points, like a needle or knife tip.)
  • Self-adherent bandages. Tape is important to have, but these bandages stretch to fit then stick to themselves, making them convenient and quick for holding dressings. Most kits won’t come with any of these – add them yourself.

And finally, as for your “regular” first aid kit items . . .

First aid kits have some sort of shelf life, like maybe 3-5 years. During that time, every tube of ointment, every packaged wipe, and every band aid is likely to degrade.

It’s easy enough to check the components of your kits, toss those that are out of date, and replace them with new. Toss items that have been opened, used and then re-closed. If you have powdered gloves in your kit, you may want to toss and replace them, too. (The FDA has banned them as of January, 2017.)

You may even want to invest in a new kit altogether, one that has room for some of your new items. But don’t delay on any of these decisions. When you need that kit, you NEED it!

Virginia
Your Emergency Plan Guide team