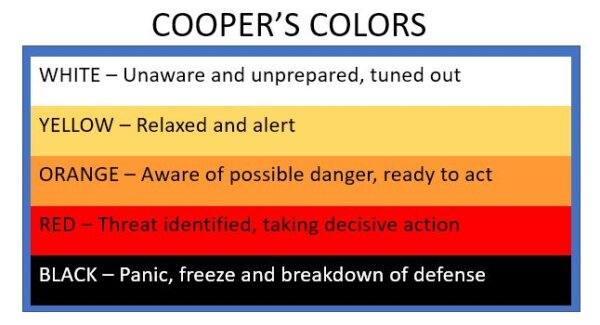
Connect in an emergency with a Baofeng walkie-talkie!


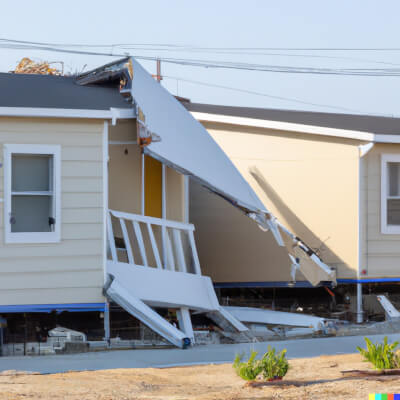
In January we saw dramatic photos of people in L.A. struggling to escape the flames swirling around them — flames higher than the tops of their houses and gusting up to 100 mph! Last week we saw people hanging onto their front porches as rivers poured past their houses, carrying cars and trees along at over 9 feet per second!
What were people in those disaster zones doing? They were trying to connect with family!
In many places, cell phones didn’t work. Service was out because towers fell, the network was overloaded, or because service was turned off on purpose by the utility. (This happens not infrequently here on the west coast.)
In an emergency, if your cell phone isn’t working, you may be looking for another option:
Use a hand-held radio or “walkie-talkie.”
Over the years we have often described how our local CERT-trained emergency team members use simple walkie-talkies to share information about the neighborhood. Joe and I use them regularly just as a convenience tool. Most recently we used simple walkie-talkies to find each other at a big indoor car show!
In a widespread emergency, though, simple walkie-talkies aren’t going to be satisfactory. That’s when both amateurs and professionals turn to radios that can operate on more frequencies with more power.
What’s the most popular walkie-talkie for citizens and amateurs these days? We think it is the Baofeng UV-5R.
(Starting from scratch? I recommend you jump to our Walkie-talkie reviews page. The six questions listed there are meant to make you aware of some of the issues – and the choices – associated with using walkie-talkies. If you’ve used walkie-talkies before, you already know that basic info. So keep on reading here about the Baofeng walkie-talkie. This will bring you up to a different level of operator knowledge!)
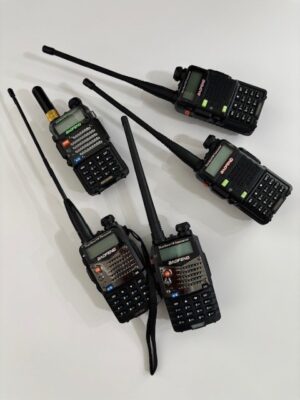
Baofeng walkie-talkies have a particular “look” that you’ll recognize immediately. They are squarish, squat, solid. Here’s a photo of some from our collection. (Two sets of UV-5Rs – different years.) We have replaced some of the stubby antennas that come with the handsets with longer ones.
Licensing for the UV-5R — you’ll want at least one license!
- The Baofeng UV-5R radio operates on GMRS frequencies. It requires a license from the FCC. (License costs $35, is good for 10 years, covers your whole family. And there’s no test.)
- If you’re interested in using your radio for more than just family communications, you’ll want to find out about Ham Radio Operations. Hams pass an exam to get their Amateur Radio Operators License. There are three levels of license. The higher the level, the wider the reach — up to worldwide! For more on licensing, see https://www.arrl.org/ham-radio-licenses.
- Not sure which license you need? Work out answers to these questions . . .
- How do you intend to use the radio — family, business, emergency group?
- Which frequencies (channels) are best suited to your use — outdoor, indoor, maybe for a repeater?
- How will you program the radio for your needs?
Programming your Baofeng walkie-talkie. You’ll need to do this, too!
Frequencies for radio or walkie-talkie use are assigned by the FCC. Some are for official use, such as for marine or aviation distress, public safety, and medical devices. (There are many more.) You don’t want to be caught messing around in frequencies you’re not allowed to be in — so you program your equipment so you’re always operating in the right frequency bands!
You can program your own radio (see the books mentioned below for guidance), but most groups we know use the free programming tool called CHIRP to set up their radios. Once one radio is set up, the settings can be transferred directly to the other radios in the group, one after the other, using a cable. All group members want to be on the same primary and back-up frequencies.

Here’s a good basic Baofeng package.
If you click this link to go to Amazon, you’ll see this pair of UV-5Rs. If you spend any time there, you’ll see many different models and combinations, from single handsets to group packages — and, of course, with different accessories and different price points! Don’t get overwhelmed! We think you’ll want to consider starting with the basic Baofeng UV-5R! The package shown includes a pair of handsets, earpieces and antennas and comes with batteries, battery charger, belt clips and user manual.
OK, so you have the radio in your hand. You’ve got the license in your pocket. Now what?
As with any new device or technology, you’ll need to practice!
To be sure you know how to handle your radio when it really counts – you’ll have to handle it in non-emergency situations, too! Practice would include learning the basics (on/off, volume, changing channels), push-to-talk (PTT) etiquette, radio “lingo,” managing your battery and charging, etc. without having to look it up each time. You’ll also want to know what accessories to consider.
Above all, you’ll want to know how to troubleshoot your radio when something just isn’t working!
What additional resources might be helpful?
Your user manual just won’t be adequate for all the training and practicing you’ll want to do. And while knowledgeable friends will likely be the best help of all, you can’t keeps calling them for help! Here are two resources we can recommend. Both are easy (enough) to read. They include step by step instructions. Plenty of detail to enjoy as you get more and more familiar with your radio. Above all, these books are both written with emergency use in mind.
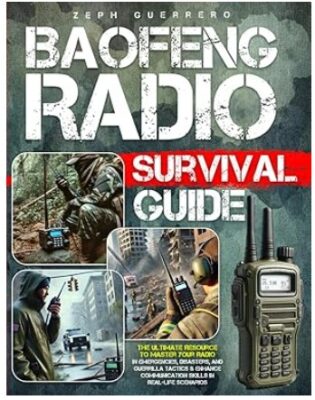
Baofeng Radio Survival Guide, by Zeph Guerrero, covers the basics as you’d expect, adds tons of detail that you might NOT expect. And nearly every one of the 9 chapters ends with additional resources or tips. Chapter 7 includes three case studies that will remind you WHY you are getting involved with emergency radios in the first place! Click here to go directly to the book at Amazon. As you know, we are affiliates and may earn a small referral fee if you buy. Your price isn’t affected.

Baofeng Radio , Your Secret Weapon for Safety and Connectivity, by Bradley Preston, covers the basics again – and you will appreciate that repetition! In addition, it describes some of the other Baofeng models for those who are ready. In particular, it provides extremely detailed set-up information, compares additional equipment (antennas, etc.) and provides troubleshooting tips. I find myself going to this book if I have a specific question. Click here to get more details and current price.
Ready to get started?
Click on one of the links above to go to Amazon (and perhaps to the Baofeng store on Amazon) to look at the different options available. Make a decision and buy. Start practicing! If you want to delve deeper, or expand your reach, you’ll find plenty more options and people to help. You may find that your interests lead you to becoming a licensed Ham Radio Operator, talking with other hams around the country or even around the world!
But get some familiarity in your own community first, so you can enjoy every step — and in the meanwhile, you will be able to connect with YOUR family or neighborhood team when the next emergency hits!
Virginia and Joe
Your Emergency Plan Guide team
P.S. If you have experience with walkie-talkies, feel free to share below! You’ll help the other folks who are ready to get started.