Category: Preparing for Earthquakes

Prepare Your Home for Earthquake – Second Edition!

Share
Mini-book: Prepare your home for earthquake. Second Edition.

We like Q & A! The fifth question in this new edition is: “Will I get any warning before an earthquake?” How do YOU answer?

Virginia’s earthquake backstory . . .

Years ago the condo building I moved into in the Bay Area was balanced right over the now-famous San Andreas fault. It was at the second meeting of the board of the homeowners’ association that I became aware of that fact! My interest in earthquakes began that day!

As it turned out, on the day the Loma Prieta quake hit California in 1989, its epicenter was about 50 miles away from our building. The building came through. But we all felt that quake. We felt aftershocks. We slept outside that night for fear of more to come. And of course, then we had to clean up.

My understanding of preparing for earthquakes began that day!

Fast forward to today . . .

In 2000 Joe and I moved to Southern California. Again, we find ourselves within shaking distance of the San Andreas. But through our CERT training and our neighborhood preparedness group we have expanded our knowledge about earthquakes and earthquake preparedness. In 2020 we added another book — Prepare Your Home for Earthquaketo the Q & A mini-series we were working on.

This year, only 3 years later, we have had to add a couple of new questions, and update and revise every one of those earlier answers!

There’s just too much happening not only around the globe but right here on the west coast. Plus new neighbors just keep asking these same questions — and new ones.

“What will I get with this 2023 Second Edition?”

As always, we expect you live a really busy life.  So, this mini-book . . . 

  • Has only 62 pages, and a largish font. It’s an easy read.
  • Is built around a dozen or so common questions so you can pick the ones you are interested in.
  • Offers straight-forward answers that you can apply or not depending on your living situation and your budget.
  • Refers you to detailed resources if you want more info.
  • Encourages you to add chosen “to-do” items to your personal emergency planning. As we’ve said before, we see emergency preparedness as a lifestyle, not a project!

Finally, we try to keep all our mini-books as easy to get and as inexpensive as possible by distributing them through Amazon. We want people to buy multiples as gifts and share with family, friends and neighbors!

The links below take you directly to the mini-book. Price right now is $5.99 for paperback, $3.99 for ebook.

Prepare Your Home for Earthquake, showing cover and interior pages

Paperback version – Recommended. Use a highlighter and/or take notes right on the page.

Ebook version – Tap in for another question when you have a few minutes to spare. Convenient. Efficient.

In case you’re wondering about the questions, here they are. How would you answer if asked about preparing your home?

  • Do I really face earthquake danger?
  • Aren’t there other ways of reacting to an earthquake besides DROP, COVER and HOLD ON?
  • What should I assume will happen after the earthquake?
  • Will I get any warning beforehand?
  • How do I know if I’m actually in an earthquake zone?
  • OK, I’m in an earthquake zone. What changes should I be making inside my house?
  • What about strengthening the basic structure of the home?
  • How does earthquake insurance work and how expensive is it?
  • Why was the 1906 San Francisco earthquake so destructive, and what have we learned from it?
  • What role can a Community Emergency Response Team (CERT) play in preparing for earthquake?

This mini-book won’t have every answer to every question about earthquakes. But after you’ve read it, you’ll know more about the risks. If you take some of the recommended actions, you’ll be better able to handle them!

The upcoming earthquake may catch you off guard. But don’t let it catch you unprepared!

Virginia
Your Emergency Plan Guide team

P.S. If you want to take a look at the whole collection of mini-books, you can read more here on our site, or you can go directly to the “series” page at Amazon.

Immediately After the Earthquake

Share

Dear Neighbor,

As you know, Joe and I continue to support our local Neighborhood Emergency Response Group and its new leader, Laura. Today, I’d like to share a very detailed post earthquake list that Laura and I put together for mobile home dwellers in earthquake country!

(Don’t live in a mobile home? Probably three-quarters of these suggested steps apply to every style of dwelling, so don’t stop reading yet!)


House showing detached porch, common damage after earthquake
Detached porch – common damage after earthquake

Immediately After the Earthquake

List of Post Earthquake Steps for Mobile Home Safety from Emergency Plan Guide

If you’ve seen any detailed images of what happens in a hefty earthquake, you realize that your world will within seconds be TOTALLY CHANGED!

Do you really know what to expect? Do you know what to do first? This step-by-step post-earthquake list may help you avoid injury and reduce further damage to your home. Please check it out now. If you are unfamiliar with your utility turn-offs, or unsure of mobile home terminology, take the time now to find out more!

You may be caught unawares when the next earthquake hits, but you don’t need to be unprepared!

Start: CAUTIOUSLY assess your new situation.

  1. Be ready to Drop, Cover and Hold On for aftershocks!
  2. Do NOT light a candle, DO NOT flip any electrical switches, DO NOT start your car or car radio.
  3. If it’s dark, grab a nearby flashlight or activate a glow stick. (You should have several stashed around the house, and one in every room.)
  4. Now, check yourself for injuries. Control bleeding with pressure.
  5. LOOK OUT BEFORE YOU MOVE. Look ahead for fire, broken glass, fallen objects, and liquid spills as you move to . . . 
    • Immediately get and use fire extinguisher on small fires.
    • Get a first aid kit if injured.
    • Help another person in your home.
    • Change into long pants, long sleeves, sturdy shoes, and work gloves.
  6. Perform inside smell, visual and hearing checks:
    • Smell gas? Hear hissing that could mean a gas leak? Grab your shut-off tool, head outside to meter. Leave door open to ventilate.
    • Does water work? Check a faucet.
    • See electrical sparking or broken walls? Shut off electricity at breaker panel or nearest main (could be inside or outside), exit home. Do not reenter until declared safe.
  7. Continue with outside check (Take a light and gas shut-off tool):
    • Can you go safely outside? Is porch stable? Are steps secure?
    • Do you see fire?
    • Do you hear/smell gas from under the home?
    • Is home skirting bent or buckled?
    • Do you hear water rushing or dripping?

Pause to evaluate. If you extend your evaluation to neighboring homes, be sure to partner up for safety.

Then: TAKE ACTION if you think you detect leaks . . . !

  1. Power Off cell phones or walkie talkies before checking meters.
  2. Do not approach utility tower /utility pedestal if damaged, leaning, or broken!
  3. GAS. If you are sure there is a gas leak, whether inside the home, under a home or in the street, grab shut-off tool or wrench (or find it attached at meter) and shut off gas at Gas Meter Main Valve. ONLY GAS COMPANY CAN RESTORE GAS SERVICE so don’t take this step unless you are sure of the leak.
    Also shut off at Gas Meter Main Valve if skirting has buckled, piers have collapsed, floor has sunk. Gas lines underneath home may have been crushed.
    Know when gas valve is open or closed!
  4. WATER. Shut off Water Main if detected water leaking within your home or hear it/see it outside your home foundation. Look at your Water Meter Main DIAL to see if numbers are spinning.  (Spinning means there is a water leak.)
  5. ELECTRICITY. Shut Off Electricity Main Switch of the Utility Tower if you have broken inside walls, ceiling has fallen, piers have collapsed with buckling of skirting or dropped floors. (Under the meter reading face is an enclosure box. Pull UPWARD on the panel door to open it by grasping it from below. Turn off service disconnect switches inside this enclosure.)

Finally: ORGANIZE for extended inspection and post-earthquake clean-up.

  1. If it’s safe, take photos to document damage for insurance.
  2. Clean up any bleach or flammable liquid within your home.
  3. Text your Out-of-State Emergency Contact.
  4. Set battery powered or crank radio to local Emergency Broadcast channel.
  5. Sweep (slowly!) broken glass and small objects out of your frequented paths inside your home.
  6. If no water leaks, check water pressure:
    • Partially fill a small sink with a stopper then release the water. If it flows freely, the line is clear within your home.
    • To prevent sewage leak, plug sinks and bathtub.
    • If sink faucet water is still flowing and pipes not leaking underneath the sink, get containers and fill with water and fill a bathtub half full for washing. (No more than half full – remember, there may be aftershocks!)
  7. Survey your home for partial damage, which will be made worse by aftershocks. Remove objects blocking your exits.
  8.  Outside, push broom broken glass aside carefully, on your own home site.
    • Do not place any debris on the street as it will impede emergency personnel. 
    • Wait for park management directions before transporting any debris off your home site, especially broken glass.
  9. Cooperate with officials and follow their instructions.

Some final comments on the Post-Earthquake List, and a freebee

This Post-Earthquake List deals with only a few minutes or hours AFTER the shock. There’s obviously much more to be done BEFORE the next earthquake hits. I have news about that coming soon. In the meanwhile, take a good look at this Advisory and share with neighbors.

Speaking of neighbors, we have worked with ours over the years to be sure they know much if not all of this . . . but every neighborhood changes! We have folks new to mobile home living and new to earthquakes – so we touch on one or two of these steps every chance we get.  (The various links in the body of this email give you an idea of how we’ve addressed many of these topics in the past!)

If you are working with a group, and in particular a mobile home park with seniors, you may want to turn this post-earthquake list into a series of programs. It lends itself to discussion and to show and tell – particularly from contractors.

Click to download a free pdf of the Immediately After the Earthquake List for easier use with your group.

And as always, let me know what your group comes up with in terms of concerns or more suggestions. I’ll share.  The more we all know, the safer we all will be!

Virginia
Your Emergency Plan Guide team

P.S. In case you wondered, the image of the broken porch was created using artificial intelligence. You can see that Dall-e doesn’t really know what American mobile homes look like. Even after multiple tries, it couldn’t come up with skirting! Still, using AI to generate images as well as content is something I’m enjoying testing.

P.P.S. In the first paragraph above I mentioned I’m busy “keeping up.” I’ve found myself researching fire ball fire extinguishers, the steps someone should take to fight back against a donation fraud (a $2,500 real-life crisis for one of our neighbors), the latest earthquake alert technology, and whether security film makes sense for residential window use! None of that research was AI assisted! Stay tuned for more Advisories.

And finally, a disclaimer. Every earthquake is different, every home is different. We have drawn from what we consider “reliable sources,” but our list can’t cover every possible circumstance. Use your own experience and common sense when addressing any of these steps.

Three Ways to Survive An Earthquake — Which two are wrong?

Share
How to respond to an earthquake!
Earthquake? Act IMMEDIATELY to save your life!

If you exchange personal emails with family or friends and you live in any earthquake-prone corner of the world, you no doubt have heard various recommendations for surviving an earthquake. Let’s look at the three most popular. And let’s make sure you realize which ones are likely to hurt you, not help you survive!

(And if you are tempted to skip this Advisory, because you think you don’t really live in earthquake country, you may want to check out this Advisory. It talks about the risk in areas outside California.)

1.  Triangle of Life.

Doug Copp’s “Triangle of Life” method to survive an earthquake became popular, was questioned, then disproved. But still it lingers. You should know the story so you can make sure neighbors don’t try to sell you on this one!

For the reader who hasn’t been subjected to this idea – or the urban-legend discussions around it – the Triangle of Life (ToL) method for surviving an earthquake goes something like this. According to Copp, when an earthquake hits . . .

  • Find a solid object to cozy up to, such as a piece of heavy furniture, an interior wall, staircase, etc.  That way, when the building collapses, there is a good chance that you will be in a triangular open space or void.
  • Getting under a table, for example, actually puts you in more danger of getting crushed in a collapsing or pancaking structure.

Now there are a couple of serious problems with this theory. First, in a real shaker you will not be able to travel to a chosen place in the room or building. Rather, you will be thrown off your feet and will likely hurt yourself in the fall! Moreover, the piece of heavy furniture you are next to will to move — either away from or maybe right over on top of you. Second, Mr. Copp based his theory on data that he — ahem — “adjusted” to fit his solution. You can read more about this whole theory on Wikipedia.

The upshot — as a theory for how to survive an earthquake, the Triangle of Life just isn’t reliable.

2.  Get under a doorway.

In the “old” days, an exterior doorway in a brick or adobe building might have been the only place that was reinforced.  Today, that could still be the case — but you won’t really know. Moreover, there are fewer and fewer brick and adobe buildings being built. The entire frame of modern buildings, built to earthquake codes. is meant to withstand the shaking and trembling. (No guarantee that the building will actually be habitable afterwards, though.)

And frankly, if you’ve ever been in an earthquake (which I have), you discover that it’s really tough to move across a room to a doorway in the first place.  (Same problem as with Triangle of Life, above.) And if you do happen to be conveniently standing in a doorway when the quake hits, you will immediately discover that a swinging door may want to take the same spot you are in! (The door will win.)

3. DROP! COVER! HOLD ON!

Just last week a 4+ quake hit just south of Los Angeles. I personally didn’t feel it, but my ShakeAlert earthquake app did — and gave me a voice warning! (BREAKING NEWS: As of May, 2021 the entire U.S. west coast now has access to ShakeAlert earthquake early warning system! Find out more and get signed up.)

Some neighbors did feel the quake last week. Given social media, they naturally had to write about their experiences. One person wrote as follows: “I felt shaking and suddenly I couldn’t remember what to do! Drop, roll? Drop, cover? I was terrified!”

By now, you have come to the conclusion that the Drop! Cover! Hold on! advice is the advice I’m recommending as the best way to survive an earthquake. It comes in particular from the Earthquake Country Alliance. (Also from the American Red Cross, the U.S. Geological Survey, and others)

A powerful earthquake creates strong shaking — sudden, sharp, back and forth movement. If you try to stand, you will be knocked right off your feet. So the first action is to drop to your hands and knees. That way you are stable and can move as necessary.

Most injuries in earthquakes come not from the building collapsing, but from articles being thrown across the room! Imagine being bombarded by the TV, your computer screen, a bookshelf, a vase off the mantle, the microwave — even the refrigerator! You must cover yourself — and in particular your head — to protect from flying and falling objects! Hence action two: Cover. Best place is under a sturdy table, in the footwell of your desk, etc. away from windows. (If you can’t get onto your hands and knees — because you’re in a wheelchair, for example — protect your head with your arms as best you can.)

Then, because your “shelter” can move, hold on to it and move with it.

IN CONCLUSION . . . skip the controversy for the moment.

In a major calamity, we know that split-second decisions can make the difference between life and death. When a quake hits, you do not have time to look around to figure out a place to be. You are not likely to be able to even get there!

So, DROP, COVER and HOLD ON. Do it immediately, without trying to move to another place or another room. If you’re in a workplace setting, ignore your co-workers who are hesitant or embarrassed to crouch down under the desk. We’re talking about being safe, not being cool!

Action Item: Right this minute, raise your eyes from your device and take a quick look around. Look behind you, too. If the earthquake were to hit right now, where would be the safest place for you to get to, get covered, and hang on???

In any case, do be knowledgeable about these different recommendations. They provide a great centerpiece for discussions that will raise people’s awareness.  The discussion alone will save some people’s lives by getting them to think about the real dangers of earthquakes before they experience a serious one.

Virginia
Your Emergency Plan Guide team

P.S. This post is about immediate response to an earthquake. Most of us want to think more strategically about managing in a earthquake — and that means doing some thinking and some planning and some preparing IN ADVANCE. That’s what our Q&A Mini-Series booklet can help with. “Prepare Your Home for Earthquake” covers.

  • Toughing it out (supplies you need)
  • Preparing the interior of your home
  • Strengthening the basic structure
  • Earthquake insurance
  • Finding our about YOUR risk at YOUR location

 You can grab the new, Second Edition of our earthquake book right now at Amazon for only $3.99!

The Big One: It’s not if, but when . . . an earthquake will strike.

Share
San Andreas earthquake fault will likely be the reason for the Big One
This fault is quiet for now . . .

Taking the long view. . .

These last few months have been consumed with COVID and with politics and it’s tough to escape from the grip of what’s happening this week, this day, even this hour.

From an emergency preparedness standpoint, we can always profit by taking a step back and looking at the bigger picture. So today, readjust your focus to consider earthquakes, and the inevitable “Big One.”

In California

We happen to live in Southern California where earthquakes are more frequent than in other parts of the U.S or some parts of the world.  We know, for example, that a major quake (7.8?) along the San Andreas fault (which runs right through the City of Los Angeles) is due sometime in the not too distant future. 

That “distant future” may be a lot closer than we think. Consider this: the “average” time between big quakes in California is 150 years. The last big quake took place in 1851. When you subtract 1851 from 2021 you get 170. So, we are now 30 years overdue!

We’ve had some warnings along the way: Northridge, in 1994 and then Ridgecrest, just a couple of years ago in 2019. (That one offered plenty of warnings, if you want to know! Virginia wrote several Advisories about the 2019 experience!) So we know we have to be prepared for the Big One. 

People who live in Northern California had a major earthquake over a decade ago — the Loma Prieta quake that hit during the 3rd game of the 1989 World Series. That quake was caused by the San Andreas fault, too. (It runs up through the state and then heads out into the Pacific right at San Francisco.) So Northern Californians know they have to be prepared.

In the Northwest

More and more in the news lately — the Cascadia Subduction zone.  This very long fault slips a couple of hundred feet every three hundred years or so. (Last big “slip” was in 1700 — so again, it’s overdue.) When the next one occurs, it will likely measure 9.0 and impact Washington and the whole Pacific Northwest. This will truly be The Big One!

In the Midwest

If you live in the Midwest near the Mississippi River, you could be at risk from one of the most dangerous faults of all.  Even though we don’t hear too much about it, the New Madrid fault in the central United States is among the most active in the country, running from St. Louis to Memphis.

And those of you who live in fracking country have become increasingly aware of the — heretofore small but now increasing in number and in intensity — earthquakes in your region. States most impacted: Ohio, Pennsylvania, West Virginia, Oklahoma and Texas.

In the Mid-Atlantic

And, imagine the surprise of people living in the Mid-Atlantic area when Washington D.C. experienced a significant – but non-lethal – 5.9 earthquake on August 23, 2011.

How to prepare for the Big One?

The fact of the matter is that we know all too little about the existence of earthquake faults around the world. New faults are discovered on a regular basis, even right here in the middle of earthquake country!

And we have even less ability to forecast earthquake activity level. Yes, new technology continues to be developed, including the ShakeAlert Early Warning System. Its collection of sensors up and down California could give us a few seconds or even a few minutes warning. (We have had this system on our smart phones for over a year, but it alerted for the first time just a couple of weeks ago!)

Other iPhone apps track quakes worldwide. Nearly every morning I get an alert on my phone from QuakeAlert, with maps, info, etc. Just look for “Earthquake” in the app store to see a number of options. Caution — some of the apps are free, and others not.

The bottom line? Everyone has to take some responsibility for knowing what the earthquake threat is in their own region of the country. And we all have to take some responsibility for our own survival and well-being when the Big One hits. There is only so much our government agencies can do — and most of that help will come well AFTER the fact!

Five Action Items to help prepare for the Big One.

  1. Find out about the history of earthquakes where you live. You may never have experienced a quake — but there are likely people who have!
  2. Analyze your day. If a quake hits at 10 a.m., what problems would you encounter? What about if it hits at 1 a.m.?
  3. Do you, and family members, know how to protect yourself when you feel the shaking? You don’t really have time to think much about what to do! You want your response to be immediate! (And you want to avoid the discredited theories like getting into a doorway!)
  4. In a severe quake, power will be out and roads may be impassible for hours or days. Do you have supplies to carry you though as you shelter in place?
  5. Should you plan now to make changes to your home that will make it safer in an earthquake?

We have written again and again about earthquakes here at Emergency Plan Guide. (Use the Search bar to find some of those articles.) We’ve discussed earthquakes again and again at our neighborhood meetings, where we focus on what to expect from the authorities, and how we need to prepare to take care of each other!

Most recently, Virginia and I published a whole booklet as part of our Mini-Series, titled “Prepare Your Home for Earthquake!” We certainly can recommend that as an easy and complete resource that will address all the 5 action items above. And more . . .!

However you decide to prepare for the Big One, you can feel justified in starting any time. Think long-range. Because the Big One is bound to come!

Joe Krueger
Your Emergency Plan Guide Team

Sign up for our weekly Advisories below. They are free. And you’ll get a LOT more information about earthquakes as well as other potential disasters!


Emergency Kit for School

Share
Emergency kit for school
Any emergency supplies in that backpack?

Is your child missing an emergency kit for school?

The first time I did research for this Advisory, I was shocked to read comments like this:

“Wow, an emergency kit for school. What a good idea! I just thought the school would be taking care of this!”

These were comments from people reading articles online!  What about all the other parents who don’t have time to spend online?!

First things first. What emergency supplies does your school store?

A year or so ago I attended a training put on by the Earthquake Country Alliance, and sat next to a woman who works with schools. She told me about a school that called to ask her to inventory their emergency supplies shed. “How long has it been since you checked it?” she asked.  The answer was, “Uhhhh…”

When she opened the shed she discovered what she called “a hazmat situation.” The shed had leaked and everything inside was completely spoiled and contaminated!

That story should encourage you, when you go to your Back to School night, to ask not only what supplies are kept at school but also how often they are refreshed.

Next, what emergency supplies does the school want children to bring? Are they adequate?

In some schools in our area, each child is required to bring an “emergency kit for school” at the start of the school year. Reading the instructions closely, I discovered that the kit is to consist of a quart-sized resealable plastic bag with the child’s and teacher’s name on the outside, some snacks, and a personal note from the parent to the child.

This “kit” would sustain the kids I know for about 15 minutes.

Here’s another list from a school district in the mid west: ”A little food, some water, a space blanket or large plastic trash bag, a non-toxic light stick and a letter or photograph from home.”

As a parent, you need to find out about “required kits” at your school. The questions to ask:

  • What goes in the kits?
  • How are they stored?
  • What about kids whose parents send nothing at all?

Third, what sort of PERSONAL emergency supplies make sense for YOUR child?

Here at Emergency Plan Guide we talk about survival kits frequently, so none of this should be new or different. In this section we’re not talking about the “required kit” that the school wants to collect and hold. Here, we’re talking about emergency supplies specifically for your child. A few things to consider:

  1. Your child may need access to emergency supplies at any time! An emergency could happen on the way to school, or on the way home, not just while the child is in class. So, the best place to have supplies is in the kid’s bookbag or backpack.
  2. Of course, this kit is meant for emergencies only. It’s not to be shared or talked about at recess. This means the kit has to be separated from the rest of the stuff in the bag.
  3. Every kid’s personal emergency kit will be different. Your first-grader just won’t need or want the same stuff that your 6th-grader wants! And, of course, that kit’s contents will have to change regularly.

Some suggestions from parents for customizing an emergency kit for school.

The kit needs its own pocket.

Pick a backpack or book bag or rolling cart with a zippered pocket for the emergency kit.  A bottom pocket would work, as well as an outside pocket of the right size.  You’ll have to shop for the right backpack based on your your kid’s size, sex and whatever is in fashion at the school! 

An older child may like a “tactical” bag with mesh and lots of pockets – as long as it has one pocket for the survival kit.

Find a sensible container for the personal emergency kit.

Depending on the size of your kid’s backpack, you will very likely be able to find an individual zippered toiletries bag or one in a set of organizers that will fit perfectly in the pocket or on the bottom of the bag. You might want to use a clear bag (meant for travelers) and a couple of sets of compressible “packing cubes.” If you’re packing a jacket or other emergency wear, being able to compress it would be a great space saver. ( Here’s the link to an Advisory with some handy packing tips and organizers.)

You may even be able to pack supplies in a tin box that will fit in a particular pocket.

In any case, the idea is to avoid your child having to paw past the kit to get to books and papers, etc.

What goes into the personal emergency kit for school?

If the student carries the bag every day, it can’t be too heavy. (That’s why a rolling cart is a good idea!) Still, the kit should include items from this list:

  • Food – energy bars, non-perishable snacks. Hard candies. Get some protein bars and not just carbs!
  • Water – if your child carries a water bottle every day anyway, that may suffice. Otherwise, consider packets of water.
  • Warmth – Poncho, space blanket, extra jacket. Maybe hand warmers.
  • Light – Pen with light; light stick.
  • Emergency whistle – good quality. Cheap plastic whistles are hard to blow and may not give the sound quality your child needs.
  • First aid items – Most children won’t be able to use a full first aid kit, but they certainly know and love band aids and maybe anti-bacterial cream.
  • Face mask for emergency use.
  • Wet wipes individually packaged.
  • ID card with emergency contacts and family photo – protected from getting wet.
  • Emergency phone if allowed and if the kid knows how to use it.
  • Small toy, book or comfort item.

Warning: The emergency kit for school is NOT the place for medicines or drugs. Most schools have strict rules about how student prescriptions are to be handled. Be sure you find out about those rules.

Suggestions for parents whose kids walk home alone . . .

Phone Wristwatch.

The minute school lets out I have two young neighbor children who immediately call their parents using a phone wristwatch. Children aren’t allowed to have phones at school, but the watches are allowed. I’ve interviewed the parents, who REALLY like being able to check in via voice and talk with the kids as they head to their after-school care locations. Questions to have in mind:

  1. Is the wristwatch phone limited to a particular carrier?
  2. Can you connect the wristwatch phone via app to YOUR phone? (iOS or Android)
  3. Does it monitor the child’s location via GPS? Can you set limits and get an alert when the child goes out of area?
  4. How many phone numbers can be programmed into the wristwatch phone?
  5. What sort of access to the internet (games!) is available through the phone?

The phone below is a good example. I was attracted because this phone limits calls to 10 known friends or family, and blocks all others. It also can block calls during class time. Naturally, I was looking for different colors, too! Click on the image or the link to check out all the details at Amazon.

Cosmo JrTrack 1 Kids Smartwatch | Pink | Voice & Video Call | GPS Tracker | SOS Alerts | Water Resistant | Blocks Unknown Numbers | SIM Card Included | Class Mode | Perfect for Back to School

Welcome-home doorbell Camera

By now we’ll all seen the home security cameras that can alert you when your kid steps through the front door. Again, parents whose kids arrive home to an empty house are really comforted by this technology. Of course, you’d want to get the kind that allows for two-way conversation.

We’ve written many times about front door security. New models are coming online all the time. The Ring model shown below does what I was looking for for parents wanting to know their child is home safely after school.

Ring Video Doorbell – newest generation, 2020 release – 1080p HD video, improved motion detection, easy installation – Satin Nickel

Special needs kid?

If you have a special needs kid, please take a look at my recent Advisory that describes a particularly powerful tracker for kids who need close supervision.

Let me know of other suggestions you have for items for kids, or what your school requires. I’d like to include that research next time!

Virginia
Your Emergency Plan Guide Team

Welcome to new readers! If you’d like more on the topic of kids and school, you may want to check out this Advisory with Preparedness Questions for Back to School.


The Best Generator for Emergencies

Share
Emergency generator
What should I be looking for???

More on electricity?

Emphatically, Yes!  Why do we dwell so much on electrical power? It’s simple.  We depend so much on electricity for just about everything we do that it becomes a major concern in an emergency. And the news about power outages is ominous. But is a generator the solution? If so, what’s the best generator for emergencies? Let’s take a closer look.

First question: what’s your neighborhood like?  

If you live in a single family home with a lot of space around it, having a generator may make sense for emergency power. If you live in a multi-family unit (an apartment, for example, or in a mobile home park), it’s unlikely that a generator will work for you.

Why not?  Mostly, it has to do with logistics.

Second question: What different kinds of generators are there to choose from?

A home stand-by generator is about as big as a stove, and weighs twice as much.  It will be permanently installed outside, probably on its own pad. It’s hooked up to a permanent source of fuel (probably natural gas) and switches on automatically when power goes off. Depending on the size of your home, you are looking at at least a 10,000 Watt generator, and more likely 20,000 to run nearly every appliance and system. These are big, heavy (like 600 lbs.), and are relatively noisy. (Like your A/C.) As you can imagine, a whole-house stand-by generator is also a big investment – typically in the thousands of dollars.

Even the more efficient portable emergency generators for sale today — meant to power a few essential appliances — are about as big as a filing cabinet, and weigh close to 100 pounds. You plug your appliances or equipment into the portable generator using extension cords. Most run on gasoline; some are dual-fuel, which adds a propane option. Costs range from around $500 (which would be a real bargain) to as much as $2,500. Portable models are just as loud as the stand-by generators, too — so you’ll be bothering the neighbors if they are at all close to you! Even if you could stand the noise, you can’t run these inside the building due to emissions and perhaps fire danger.  Every year, people die from carbon monoxide poisoning because they run a generator in the garage!

A third type of emergency power supply is the inverter-generator. If your major concern is keeping your computers and telephones running, you’ll want an inverter style in order to be sure the power going into your devices is “clean.” Inverter-generators are generally smaller in size, weigh less, and are a lot quieter. This makes them a favorite for week-end camping and tail-gating! Prices for inverter-generators start at below $400 and go up.

Still interested? Here are a few other issues to consider.

Can you handle the weight?

First off, how much does the generator weigh? As mentioned, even the “small” generators are heavy, often over 100 pounds. (That’s why most portable generators come with wheels.) This is one hefty piece of machinery to move around. Can other family members move it without your help?  Can you move it even with everyone helping?

How much fuel can you store, and where?

The real issue here is how long will you be without power and how much gasoline or propane can you store safely? Even the most efficient portable generators, run at 25 or 50%, will empty their gas tank in a day or two. To refill the tank during an extended outage you’ll need to be able to safely (and, we hope legally) store several gas cans or propane tanks.

What size generator do you really need?

By now, you should have realized that there’s a great variety in generators — in size, weight and price. One thing we haven’t mentioned yet — and maybe should have started off with — is the amount of power you require.

Generators’ capacity is measured in Watts. Look at the appliances you want to run and pull the wattage requirement from the labels. Note: appliances or tools with a motor take about TWICE as much power to get started up (surge capacity) as they do to keep running (continuous capacity)! That’s why you’ll see generators advertised with two different wattages.

For example, I recently checked on our house, taking a look at keeping just the refrigerator and freezer and some lights going in an emergency. We need about 2,400 Watts to get everything started — but less than 1,000 to keep everything running! So I was searching in the 2500-2000 Watt range.

The only way you can figure out what size you need is to add up all the appliances/equipment you intend to run. Here’s a wattage chart to get you started. As you’re making your list, consider how many appliances you’ll need to plug in at the same time. (Judicious scheduling can give you better efficiency.) And note what sort of plug each appliance requires. Every generator will have a variety of plugs but it’s limited.

How much generator can you afford?

A stand-by generator will be a custom install, so I can’t anticipate what it might cost. As mentioned above, it will be in the thousands of dollars.

The cost for the dual-fuel generator shown below is around $600. Other similar units won’t cost much less but may cost as much as $2,000, depending on where you live. (We’re having a hot summer here in California, and are anticipating power outages, so prices are higher than usual.)

Prices for the inverter-generator start low, but also go up sharply. It all depends on how much power you need.

Finally, don’t overlook the fact that different states have different emission requirements – notably California. This can also change the prices.

As you consider price, compare to what you might lose if you don’t have a generator. A freezer full of food? Days worth of work?

What to look for in the advertising?

Good advertising is helpful. Look for the wattage output, size of the gas tank, noise in decibels, and safety features like overload and oil sensors, CO sensors, and surge protectors.

Example of a dual-fuel portable generator

This generator could easily serve to get you through a temporary power outage. I’d certainly consider this one for myself.

It’s one of the mid-size models from Champion. If you click the image or link and head to Amazon, you’ll find smaller and larger versions on that same page. Read everything, including reviews, and compare! It’s worth learning all you can before making a buying decision!

Champion Power Equipment 76533 4750/3800-Watt Dual Fuel RV Ready Portable Generator with Electric Start

Example of an inverter-generator

In our household we spend hours everyday at our computers, and we have an office full of printers, lights, fans, etc. For us, a power outage is above all a business disaster! So we’ve also been looking at generators that will provide high-quality power for devices. The model below looks as though it would fit our needs well. And I could lug it around!

WEN 56203i Super Quiet 2000-Watt Portable Inverter Generator w/Fuel Shut Off, CARB Compliant, Ultra Lightweight

The real solution to whether you need a generator for emergencies will be a personal one.

You final decision will require some advance planning. You’ll need to figure out what size you need (based on what appliances or equipment you want to run, and how often), where you’ll store the generator and fuel when you don’t need it, and how you’ll start, refill, and maintain the machine. The best generator for you might be very different from mine.

Full disclosure, we haven’t yet made our final decision!

Virginia
Your Emergency Plan Guide Team

P.S. Please share your personal experiences with home generators! We need more information to make a decision about the best generators for emergencies.


Camp Stoves in a Disaster

Share
Cam stove for cooking in an emergency

Cooking in an emergency

I’ve spent much of this past week working with our community on preparing for upcoming power outages. The short checklist from last week’s Advisory just wasn’t enough on cooking without power, so here’s additional info!

I’ve written before about using camp stoves in a disaster, but I’ve focused on the kinds I’ve used personally. Since I’m not a frequent back-packer, I don’t own an alcohol stove. And since I only occasionally cook outside (though I love being invited by a backyard chef!), I have limited experience with grills, too. But I have friends who do all these things, so their stories are incorporated here!.

Time to take another look at using camp stoves in a disaster!

Alcohol stoves for cooking in an emergency

An alcohol stove is perhaps the simplest way to heat water in an emergency! Here’s a basic alcohol stove that I really like. See how compact and handy it is?!! Makes you want to hold it in your hand, doesn’t it? Read below for more details about alcohol stoves, then click to head to Amazon for current prices. (This one seems to be on sale right now.)

REDCAMP Mini Alcohol Stove for Backpacking, Lightweight Brass Spirit Burner with Aluminium Stand for Camping Hiking, Silver

Basics of all alcohol stoves:

  • Round metal fuel container weighing only a few ounces, often just 1 ounce. (Imagine a cut-off soft-drink can.) Different versions have double walls, a top with a chimney, holes punched in the sides to create a ring of flames like a gas stove. The more “designed” the heavier it’s likely to be. I chose this one because it’s just about the simplest version available.
  • Fuel to put into the container. Denatured alcohol (toxic to drink!), methanol (also toxic – sold as anti-freeze), ethanol. Fuels are readily found at sporting goods stores, Walmart, auto supply stores.
  • Way to light the fuel.
  • Stand to hold cup or pot above the flame. Again, my example has a companion stand that comes as part of the package.

Alcohol stoves are simple. Because they are so small and lightweight, you have to be careful not to tip them over, and you have to watch out for spilled fuel. You may need to shelter your stove from the wind. And you have to have the right size cup or pot to fit over the stove.

The key: even the simplest alcohol stoves can boil water in 5-6 minutes, enough to make hot drinks or soup for 1-2 people.

I really like the idea of something compact, light, and simple to operate in an emergency. You can actually build your own out of soda cans! (Great 3-minute video: https://youtu.be/wdGu_0eJr3k You’ll see an ad before the video starts, of course.) Or, you can buy a stove. Many are less than $20!

The stove shown above costs around $20. For about $10 more you can get the Vargo Triad, shown below. It’s made of titanium, with folding arms and legs that double as pot supports and anchors. This stove burns more than one kind of fuel. It also gets the best ratings on a variety of review sites.

Vargo Triad Multi-Fuel Stove

Either of these two small stoves would make a great gift for a scout, a camper, or someone putting together a (better!) survival kit for the car!

Wood-burning stoves for cooking in an emergency

If you’ll be outdoors in at least a semi-wilderness setting, with fuel sources available, having a wood-burning camping stove makes lots of sense. No storing of fuels, no worrying about leaks.

Like the alcohol stoves, wood-burning camp stoves are very simple. Imagine a coffee can with some holes punched in it to let grasses or sticks and air in, and smoke out.

Like the alcohol stoves, these stoves also have ONE burner. You will be using ONE pot. Experts seem to be able to boil, fry and even bake – all on one burner. If you have a larger group, you may need more than one stove or take another look at the classic Coleman two- or three-burner box later on in this article.

I picked the wood-burning stove below because it got very high reviews from users. It’s meant to burn twigs, leaves, grass, etc., but can also burn alcohol. Easily add fuel, and air holes around the bottom keep the fire burning hot. I’d get some special camping ware to go with this stove to be sure everything fits and balances securely.

TOMSHOO Camping Stove Camp Wood Stove Portable Foldable Stainless Steel Burning Backpacking Stove for Outdoor Hiking Picnic BBQ-Upgraded Version

Cooking with classic camp stoves in a disaster

I pulled out our camp stoves. We have two of them, collected over the years. The pictures with dark backgrounds aren’t links – they are from my own camera!

Three burner camp stove

This shows our trusty Coleman stove. It’s a three-burner which makes it really convenient. You can see how my own everyday small pot fits on the stove; with those three burners, we can use a large frying pan or even a griddle. Sometimes adjusting the flame takes some careful effort.

Here’s a link to the current Coleman 2-burner. (Maybe 3 burners are out of style?) It comes in other colors, too, but I wanted to show you a classic Coleman.

Coleman Gas Camping Stove | Triton+ Propane Stove, 2 Burner

Our second stove is a one-burner model that we purchased across the street at an Asian market. It is smaller than the three-burner (Note the pot and the water bottle that appear in each photo for comparison.) and it weighs half as much, making it easier to pack and carry.

One burner camp stove

With either stove, we can accomplish the essentials: boil water for coffee, cook ramen noodles with dried vegetables (from the same Asian market), and have enough water left over for some washing up.

Here’s the current version of that same stove from Amazon (at today’s prices!) It comes with a carrying case.

Gas ONE GS-3000 Portable Gas Stove with Carrying Case, 9,000 BTU, CSA Approved, Black (Stove + 4 Fuel)

Backyard BBQ for survival cooking

If you already have a backyard BBQ, whether fueled with charcoal or gas, you are probably already prepared for some cooking in an emergency when the power is out! Most of the gas powered grills use propane or butane. Some are connected to your natural gas supply.

These grills can be just the size for a steak or two, or big enough to feed a crowd. They can be on a rolling frame that holds the fuel tank and a couple of side table, or built right into a larger backyard entertainment center.

Just a couple of weeks ago I picked out a charcoal burning BBQ that I thought would be a great gift for Mothers’ Day! Remember that one?

Having any of these stoves will give you more flexibility for summer entertainment, for camping, and, of course, in an emergency. All of them require some experimenting and practice before they will work exactly as you expected.

Hope you can find the right one to supplement YOUR emergency cooking needs!

Virginia
Your Emergency Plan Guide team

P.S. Write and let us know what experiences you’ve had with camp stoves. Every bit of knowledge helps!


Garlock – A Major Earthquake Fault Awakened

Share
Original map from Math/Science Nucleus showing major faults in California

During the summer I wrote a couple of times about the earthquakes we experienced on the 4th and 5th of July. If you recall, those quakes, a 6.4 magnitude followed the next day by a 7.1, were centered in Ridgecrest, a town of about 30,000 located north of Los Angeles. (I added the approximate location to the map above.)

At the time, we saw news videos of homes on fire, store shelves emptying onto the floor, and images of cracks in local highways.

Ridgecrest faded from the front page of the news, but suddenly it’s right there again because there have been over 110,000 aftershocks in the web of interconnected faults in the Ridgecrest area. And as a result:

A once dormant fault has been awakened! And it’s a major one!

Look just below the red Ridgecrest label on the map to see the Garlock Fault. For well over 500 years the fault, running in an east-west direction for nearly 200 miles, has been silent.

But since the Ridgecrest quakes, that major earthquake fault has begun to move. Garlock has been reported as capable of producing a magnitude 8 earthquake!

Here are the questions I’ve had, and the answers I’ve found.

Is the Garlock Fault actually part of the Ridgecrest network?

No. The Ridgecrest network of smaller quakes stopped a few miles from the Garlock. But their activity destabilized the Garlock fault, which is a major fault. And as you can see on the map, the Garlock fault DOES connect to the San Andreas fault.

What kind of movement does the Garlock show?

The Garlock fault is just creeping at a slow pace, without any shaking going on. No one living in that area has really noticed it. But satellite imagery is so precise that it can measure the movement. Add the satellite info to measurements taken from seismometers and scientists now have an accurate picture of what’s happening. The fault has crept about .8 of an inch since July.

Doesn’t creeping lessen the strain on the faults?

Apparently not. Sometimes creeping can reduce the strain on the faults, but it could also trigger an earthquake.

Does all this mean that a major quake is more likely?

All the reports that I read said the same thing: “We just don’t know. The chances of ‘The Big One’ hitting are the same as they have been for years. It could arrive at any minute.”

What should we be doing as a result of this discovery?

Let’s review. When a major earthquake hits, buildings and roads collapse, cutting off communications and transportation and causing injury.  However, most injuries are not from falling buildings. Rather, they are from items flying across a room or falling from shelves. Preparing in advance can reduce these dangers.

The good news is if you haven’t started preparing yet, you can start today using the step-by-step list below! (Find more to-do lists at BusinessInsider and also at Earthquake Country Alliance.)

Do a few things every day. Any preparations we make give us a better chance of making it through.

Step 1: Secure your house and where you work.

Just stand in the middle of a room and slowly turn around, and you’ll see what needs to be done to protect yourself from falling or moving items!

  • Fasten down heavy pieces of furniture (refrigerator, bookcases, computer stands) using earthquake straps.
  • Anchor light fixtures to the ceiling.
  • Hang heavy items using brackets and screws and special earthquake hangers (monitors, mirrors, pictures).
  • Remove heavy books and decorative items from high shelves and move to bottom shelves.
  • Put small items into cupboards or use Museum putty to stick them to shelves (vases, collectibles).
  • Store glass food containers in closed cabinets with latches.

Step 2: Have supplies to carry you through.

After a major earthquake, you are likely to be on your own, with no immediate help, for hours or even days. (1) Build a 72-hour survival kit that you can grab if necessary. Have one for each person at home, at work and one in the car. (2) Store other supplies in convenient places so you’ll be able to shelter in place for at least 10 days.

Here are the 8 categories you’ll want to consider for both the kit and for the shelter-in-place supplies: water, food, shelter/warmth, health/safety, light, communications (assume no power), sanitation, and personal items. (You may also want to add tools to help you make repairs after the quake.) Here’s a link to our two complete lists with dozens of items to consider.

This is a lot of stuff to think about! Make your own customized list and start to pull things together day by day. Don’t forget pets.

Step 3. Make a disaster plan.

Decide on an out-of-town friend or relative as the contact person for your family. Be sure everyone knows the contact’s cell phone number! Teach everyone in your household how to text, because when communication lines are overloaded a text may get through when a voice message won’t.

Train family members on how to use emergency equipment that might be necessary after a major earthquake: emergency radio, fire extinguisher, gas turn-off wrench.

Step 4. Start now to protect yourself financially.

This can include reviewing insurance coverage, setting aside emergency funds, and organizing all important documents. (Many disaster victims can’t prove they own their home, don’t have car ownership documents, lose IDs showing eligibility for pensions, etc.) Scan important documents and store them on an easy-to-manage flash drive or “in the cloud.”

Step 5. Know what to do when the quake hits! 

There are many out-dated notions still floating around about standing in doorways, finding a “triangle of life,” etc. In a major earthquake you will NOT BE ABLE TO MOVE SAFELY. Try to keep away from glass windows and doors as you . . .

How to respond to an earthquake!
Earthquake? Act NOW to save your life.

If you are outside, stay away from buildings, power lines, etc. that could fall.

Step 6. Organize your neighborhood for more resilience.

Recent disasters of all kinds have shown that neighbors can and will help, particularly if they know each other and have trained on what to do. (1) Get CERT training as a start. (2) Get one of Emergency Plan Guide’s Neighborhood Disaster Survival guides and use its suggestions to help your neighborhood get organized.

And something new if you are in California: the MyShake cellphone app.

Last Thursday was Great California Shake-Out Day. Over 10 million people participated! And Governor Gavin Newsom announced the launch of the nation’s first statewide earthquake early warning system.

The ShakeAlert system, developed by the University of California Berkeley and the Wire Emergency Alert system, has been available for schools, hospitals and other public agencies for a while. Now it has been made available to all citizens through a simple cellphone app – the MyShake app.

The MyShake app can be downloaded from Google Play (Android) and through iTunes from the Apple app store (iOS).

Basically, hundreds seismic sensors track ground movement, transmit it for analysis, and then if a quake of 4.5 magnitude or stronger is expected, the system sends an alert to selected grid locations. The alert message will be simple: “There is an earthquake. Drop, cover and hold on.”

(It all works because shaking waves travel at around .5 to 3 miles per second — but electronic transmissions are instantaneous. Want more details about ShakeAlert? Get this fact sheet from the US Geological Survey. )

What good will a few seconds warning do?

In a few seconds . . .

  • You’ll be able to grab a child and huddle under a sturdy table or desk.
  • You will have time to turn off the stove or blow out a candle.
  • Doctors and dentists can lift the scalpel or drill.
  • Officials can slow or stop trains.
  • Elevators can be shut off.
  • Automatic doors can be opened.
  • Equipment can be shut off or set to safe mode.

What would YOU do right now to protect yourself if an earthquake were arriving in 5-10 seconds?

Virginia
Your Emergency Plan Guide team

P.S. During the time I was working on this Advisory, two more quakes were felt in Northern California – 4.5 and a 4.7 magnitude. Earthquake activity is continuous. You can be prepared.

Earthquakes continue in Southern California

Share

Even as I write this, aftershocks are showing up, one after another, on my live earthquake map. Make sure you and the ones you love are always ready to drop, cover and hold on, even on a holiday!

Virginia
Your Emergency Plan Guide team

P.S. More info in case you need it:


Day 4 of Summer Vacation: A time for some shorter and lighter Advisories as a welcome change-of-pace!

CERT Challenge: Overcoming Apathy and Procrastination

Share
“How prepared are they?”

We sat at the 2nd Wednesday monthly meeting of our CERT Leaders and stared gloomily as one of our members gave yet another status report about some of “her” residents in the community. “Not one extra can of food. Not one extra bottle of water.”

Her neighborhood had many elderly residents. In some cases, residents are handicapped by lack of funds. In others, the reason is plain apathy, procrastination or worse. You may hear: “It’s the government’s job to provide for us in an emergency.”

Are “governments” responsible to care for us in a disaster? How capable are they?

We saw an answer to the second question in interviews by the media following Hurricane Sandy’s damage in New Jersey. Local and state governments were overwhelmed and unable to respond. Likewise, relief agencies like the Red Cross and Salvation Army were also overtaxed by the enormity of the event. Some people went weeks without services.

More recently, we watched the Federal Government pretty much abandon the victims of Hurricane Maria, in Puerto Rico.

And here in California, huge fires have pulled emergency responders from communities distant from the fires and even from other states — leaving the people left at home without full protection for days and even weeks.’

These disasters damage communities and even destroy them. And usually, it’s people who are less affluent who suffer the most.

And these disasters pose an important question for all of us: What can we do to help? Are we doing it?

And the most difficult version of that same question:

Are we prepared to share with people who ignored warnings?

Are we ready to care for irresponsible neighbors as well as ourselves in a disaster scenario? That question presents responsible citizens with untenable choices.

Here in our neighborhood we are admittedly better prepared than most. Over 70% of our residents indicate that they have some food and water set aside for emergencies, largely as a result of ongoing education programs that span a decade.

But 70% isn’t 100%. More needs to be done.

Never stop educating people on the realities of a disaster.

Here in our neighborhood we regularly publish “educational bulletins” and, when circumstances allow, bring in guest speakers to talk about preparedness. Some of the best bulletins:

  • Recognize a gas line leak. (Gas company)
  • Clean up around the house to prevent a wildfire. (Fire Department)
  • Vial of life — important emergency info for the refrigerator.

Some of our most successful meetings:

  • What’s in your emergency kit? (Show and tell!)
  • Try out a fire extinguisher! (Thanks to Fire Department)
  • Retrofit your home to withstand an earthquake. (Neighborhood contractor)

Maybe if we make a party out of preparing for emergencies . . .

Every neighborhood volunteer group is always looking for ways to engage new neighbors. We hear about some of the good ones!

During a power outage, one neighborhood held a “Power Outage Picnic.” People brought meat to the party and a couple of volunteers with gas-burning grills cooked it up for everyone to share! By lantern light!

We held an “emergency preparedness fair” sponsored by the local hardware store. They brought dozens of items as demos, then handed attendees a coupon for 20% off if they would come to the store to buy.

After all these years of coming up with educational ideas and trainings, we finally put together a whole book with ideas for 21 activities to help overcome apathy and procrastination. That book has been our consistent best seller! If you are looking for some inspiration, consider getting a copy for YOUR neighborhood.

Emergency Preparedness Meeting Ideas

Each one of the activities comes with objectives, procedures, materials you’ll need, and commentary. And there’s a separate planning sheet for each activity to make it easy for volunteers to step up and take a turn as host. You can find out more about Meeting Ideas here.

The point of all this? Leaders have to recognize that preparedness is an ongoing challenge. You may have to wheedle or even use a little guilt now and then to get people to take action. But with a few ideas and some energetic team members, you can make a big difference in how resilient your community will be.

We think it’s worth it. That’s what this website is all about!

Covered for a natural disaster, or not?

Share

Covered for natural disaster

Time for an insurance review.

I’m putting together my to-do list for the holiday vacation. After all this year’s natural disasters, first on the list is an insurance review. I started the review, and more and more questions kept coming up! Naturally, this led to an Advisory!

Ask your insurance agent these 7 questions to see how well YOU are covered for a natural disaster.

“How many of your clients are under-insured? Am I one?”

This is a tricky question, of course! Maybe you could soften it starting with this quote from Nationwide:
“I understand that 60% of American homes are under-insured by an average of at least 20%. I want to be sure I’m not one of them!”

“I’m worried about all the recent (fill in the blank: wildfires, storms, tornadoes). Am I covered for a natural disaster? What if my house is totally destroyed?”

This is the main question you want answers to. Start with these sub-questions . . .

  • What is the amount of my home coverage?
  • Is that based on the value of the house, or replacement cost? (Be careful. “Value” of a home could include the value of the land, in which case your coverage might not be enough to replace the house.)
  • Exactly how is replacement cost figured in my policy? (It turns out that there is “replacement cost” and then there’s “extended replacement cost.” Make sure your agent can explain which you have, and the difference between them.)

“If I have to live somewhere else while the house is being rebuilt, will my policy cover additional living expenses?”

How much and for how long? Any restrictions on where I stay? How do I get the money in my hand?

“Will my policy cover (fill in the blank: floods or storm surge from a hurricane, earthquake, land slide following rain, volcanoes)?”

You will probably NOT BE COVERED for a natural disaster from the list above!

I love this paragraph from esurance

Homeowners insurance typically doesn’t cover landslides or mudslides. That’s because both are considered a form of “earth movement”, and like an earthquake or sinkhole, they’re generally excluded from a standard homeowners insurance policy. Flood policies often don’t cover damage from landslides or mudslides, either. And earthquake policies only offer reimbursement if an earthquake caused the events.

Quiz your agent closely on coverage for natural disasters. Be sure you know just where “water damage” (covered) leaves off and “flood water damage” (not covered) starts, where “rain damage” (covered) ends and “mud damage” (not covered) starts – on YOUR policy!

Perhaps you need separate policies to be sure you are covered for natural disasters?  We have addressed some of these special threats, including insurance policy info, in earlier Advisories about Volcanoes, Earthquakes , and Floods.

“What else don’t I know about? What about . . .”

  • Mold
  • Sewage backups
  • Debris removal after a disaster
  • Lightning
  • Hail
  • ????

Get your agent to mention some of the frequent problems he or she has encountered here in your neighborhood. Some of these may be covered by your policy, others not. You may want to add an endorsement to your policy to cover a specific risk.

“This is adding up. What can I do to reduce premiums?”

The first thing to discuss are your deductibles, particularly if there has been a change – from dollar amounts to percentages, for example. A 5% deductible may sound better than a $15,000 deductible, but not if your house is worth $400,000!

Generally, the higher the deductible, the lower the premium. You want the highest deductible you can afford.

And you may want to check with your agent to see if you can make changes or improvements to your home that will improve your coverage for natural disasters while lowering the insurance company’s risk. These might include replacing the roof, upgrading the electric system, clearing brush around the house, retrofitting for earthquake, or installing storm shutters. Ask for a list of all the home discounts you’re eligible for, not just those associated with natural disasters!

Now, I don’t review my insurance every year – but this year I’m going to with the help of these questions. I hope you use them, too!

Virginia
Your Emergency Plan Guide team

P.S.  If you discover that you seem to be well covered for natural disasters (Hooray!), you still might want to pose this last question:

“Is the bill for my current homeowner’s policy going up?”

If the answer is YES, and it’s more than 5% or so, ask why. You might hear these reasons:

  • Recent disasters have made prices rise for all insurance companies.
  • Risks have gone up in your neighborhood.
  • Your personal risk profile has changed. (Confirm what’s changed – is it your credit score? That could have an impact in some states.)

P.P.S. Consumers Reports says that people who shop for better deals on property insurance can save hundreds of dollars a year. You can get quotes for free through insure.com or InsWeb.com. (as recommended  by This Old House)

And finally, a disclaimer. I am not a licensed insurance agent, hence all the links in this Advisory to what I trust are reputable sources. Be sure to get advice on insurance from professionals.

Where to put Mom? Emergency Preparedness in Care Facilities

Share

What are the chances of you or Mom ending up in a nursing home?

Man with disability in wheelchair

Updated statistics will be coming out after the next census, but right now it looks as though the chances of a senior citizen spending time in a nursing home or skilled care facility are about 1 in 4.

This should immediately bring to mind the 14 people who died last year in Florida when their nursing home air conditioning failed. You may even remember tragic images from Katrina.

Reassure yourself about emergency preparedness in care facilities you are considering!

I’ve been searching for professional advice on this topic, and I found it on one of my LinkedIn groups.  After a series of back and forth messages, Nicholas Thorpe kindly agreed to provide Emergency Plan Guide readers with questions to ask.

You’ll see that his questions fit right in with the way we try to learn more about being better prepared.  Please check out his expert article below, and share with other family members and friends. 

Long-Term Care and Emergency Preparedness — Knowing the Right Questions to Ask

By Nicholas Thorpe,  8/2/2018

When considering long-term care facilities, we all look to ratings, accreditations and high standards.  One of the most overlooked considerations, however, is emergency and disaster preparedness.  Does the facility you are considering have plans in place for adverse conditions, be it man-made or natural disaster?

New rules for emergency preparedness in care facilities are now in effect.

Following Hurricane Katrina, the Center for Medicare/Medicaid Services (CMS) began to work on new rules to govern how emergency preparedness should be handled at various medical facilities. In the fall of 2017, the new rules for emergency preparedness went into effect for seventeen (17) health care provider types (to include long-term care facilities). These rules are meant to correct the lack of preparedness that was seen following Hurricane Katrina and other major disasters.

These seventeen (17) provider types are now required to be in compliance with the emergency preparedness rule as part of their eligibility to receive reimbursement for services and care through Medicare and Medicaid. These rules can be found on the CMS website at New Rules .

My role now in a health care preparedness coalition in central North Carolina is to work with health care facilities so they are better prepared for emergencies and disasters and to help them comply with the new CMS emergency preparedness rule.

Ten questions to ask as you evaluate emergency preparedness in care facilities.

The following questions will help you evaluate the level of emergency preparedness as you consider care facilities for your family member:

  1. Are you regulated by CMS and do you comply with the new Emergency Preparedness Rule?
    1. Have you been surveyed recently?
  2. What methods will you use to contact me should something happen to my family member or following an emergency or disaster?
    1. Do you have any additional methods you can utilize to contact me?
    2. Who/how can I contact the facility to learn the status of my family member during/following an emergency or disaster?
  3. Does your facility have a way to transport residents that is not reliant on local emergency services agencies in the event an evacuation is necessary?
  4. Does your facility have any agreements in place with other sites to relocate residents in the event of an evacuation?
  5. Does your facility have a generator that powers the HVAC system (heating and air conditioning) and refrigeration for the entire facility?
  6. How many extra days of food do you have on site should your supply chain be disrupted?
  7. How is security maintained in the facility?
  8. Has your staff had active shooter response training?
  9. Is your staff trained in providing first aid, CPR, and applying tourniquets?
  10. How often do you practice emergency procedures that aren’t fire drills?

Choosing a facility should not be solely based on how prepared it is for an emergency. How it is prepared, however, should be high on your list of criteria when deciding who should take care of the people who mean the most to you.

Nicholas Thorpe works for the CapRAC Healthcare Preparedness Coalition in Raleigh, North Carolina.  He has completed more than 1,000 hours of emergency preparedness training, trained over 200 first responders and over 1,000 volunteers in emergency management procedures. Nicholas holds a Graduate Certificate in Homeland Security from the George H.W. Bush School of Public Service at Texas A&M University, and a Bachelor of Arts in history with a minor in political science from The American University in Washington, DC.

Please share this important information widely. There are other questions you can add to this list, but these will get the conversation started.

Thanks again to Nicholas!

Virginia
Your Emergency Plan Guide team

A couple of years ago we wrote an article that’s a good companion to this one: Leave the disabled behind? 
This is a topic we’ll be addressing more in the future.


Urban Survival Tools

Share

Wilderness survival is still — and always — a hot topic. But according to the most recent census, only 14 percent of Americans live outside a metropolitan area — 86 percent of us look to a metro area for jobs, activities and amenities. So when it comes to disaster preparedness, we need urban survival skills!

storm damage

A safe room anywhere?

As far as I can tell, urban or suburban survival translates directly into being prepared to shelter in place.

Let’s take another look at some of the requirements for being able to effectively shelter in place.

First choice for a great place to shelter — a safe room

Even in an urban setting, you may be able to construct a traditional safe room inside your house. If you are in full construction or upgrade mode, you would build your room to code and include safety and comfort features.  You might even go to the effort to make the room unobtrusive or even invisible, with a hidden door.

If you live in an apartment, though, choices are different. For you, the best idea would probably be to turn an existing room or an interior walk-in closet (big enough for everyone)  into a strengthened room that could better withstand a storm or even an incursion by bad people.

In either case, designing and creating a special room would take money — probably anywhere from $1,000 (VERY low end) to as much as $10,000.Whatever your budget, and whatever the home you’re starting with, here are 5 major areas to focus on.

1. Door and walls: reinforced steel door frame, exterior-style reinforced door that opens INWARD, and heavy-duty deadbolt locks. Get the best you can afford that won’t totally overwhelm the space or stick out like a sore thumb. Whatever you do, be sure to secure hinges with 3-inch screws and use 3 inch screws on the strike plate of your lock, too. Here’s an example of a deadbolt lock highly rated by Consumer Reports. The lock is expensive — over $100 — but as Consumer Reports points out, it’s probably not more than your insurance deductible.


Paint the door and trim to match the rest of the house. You may even want to consider a hidden door; take a look at this model, built by the well-known Murphy bed company:

As for walls, they can be reinforced by pouring concrete into the spaces between the studs, or adding a layer of kevlar or steel sheeting and then covering it with drywall.

2. Windows are difficult to reinforce, so plan a safe room with NO windows.

3. Water and sanitation: It would be great if you had a bathroom built in. If not, store water and get a camping potty, realizing you’ll have to empty it at some point. I’m a big believer in 5-gallon buckets for a variety of uses. Here’s one that serves as a portable toilet. (If you already have a bucket, you can probably get an attachable toilet seat for about $10.)

4. Ventilation: If your room is too tight, you won’t be able to breathe. Figure out appropriate ventilation (not requiring fans — remember, the power will be off).

5. Food and other emergency supplies: Your room is a good place to store your emergency supplies — food, emergency radio, lights, first aid, warm clothing, tools, etc. Don’t forget your prescription medicines.

Interested in more about safe rooms? FEMA has produced some very detailed plans, suitable for a professional builder. (Start your search here.)  And Wikihow’s article about building a safe room, here, is a good overview.

In the aftermath of the storm

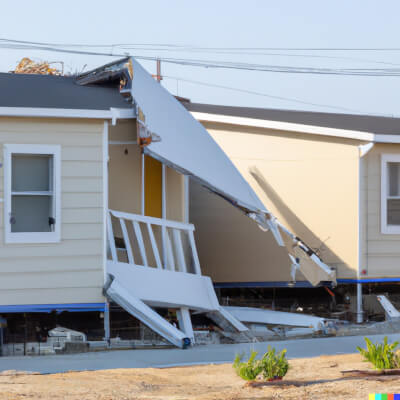
Assume the storm is over, you and your family are safe, but your home or building has been partly damaged. What might you need in order to make sure it’s habitable for a while, since you have no place else to go?

1, Basic hand tools and construction supplies

If the power is out, power tools are out, too. You’ll need battery operated tools to start — and you’ll soon be down to hand tools. You probably have some of the following tools at home now, or can get them locally. Just be sure to have them BEFORE the disaster threatens. Your local hardware stores will sell out immediately.

And as you shop, consider quality. Poor quality tools are dangerous and ineffective.

This is a simple starter list. The more skill or experience you have, the more you’ll want to add.

With a good hammer, saw and/or hacksaw, and pry bar you can remove debris. I have used tools like these many times, and as a non-professional I’ve found that the right weight and size is really important. Too heavy, you just can’t wield the tool for very long.  Too light, it won’t do the job. Below, you’ll see some examples along with my comments.

  • Hammer 16 oz one piece flat for ripping. We’ve all used hammers, but the standard home hammer has a rounded head (so it doesn’t damage the wood) and a rounded claw (for pulling out nails). If you build a lot, your home hammer probably has a wooden or a rubberized handle to lessen the vibration. If you’re not really into tools, you may have a short handled hammer or tack hammer that you use to hang pictures. But for emergency use you need something different — something  TOUGH and HEAVY enough to rip apart debris. This one looks great, and isn’t expensive. (Click on the image to get current prices.)

  • These days we don’t use hand saws much, since everybody has a power saw. However, in an emergency your power tools will be useless. You’ll need a traditional, all purpose saw. This Stanley version is only 18 inches long, not as long as a carpenter’s serious wood-cutting saw, but I think it would be just right for in-close work.


  • Use leverage instead of your own muscle power!  Again, the right length and weight of a prybar is important. We have several prybars in our shed, from 12 in. long up to 30 in. (and one giant one for rescue). I find that a 24 inch bar is carryable, packable, and still long enough so you can apply the pressure you need.
  • You will definitely want a tarp and tape to keep out the weather. This tarp is big enough but not too big, and it’s not too thick, either. (The heaviest quality might work fine for a semi-permanent install, but in our experience is just too difficult to work with in a temporary emergency situation.) As for duct tape, I just assume you already have some!  (Again, click on the image below to see full details and price for this tarp, and to compare to others.)

Store these materials where you’ll be able to get to them when the storm is over.

2. Specialty tools for dealing with debris

Work gloves – get the right size!  These gloves, for example, come in six different sizes; they have a wrist adjustment, leather palms for a good grip, etc. Actually, Joe and I  have two pairs of gloves each in our Survival Kits, to start with.

3. Dealing with metal

Not everything can be disassembled by force. In an urban setting you may need to open metal cabinets, remove fallen ceiling ductwork, get into utility closets, etc.. To do this, you’ll need to unscrew, unlock or cut wire or metal. (A pair of safety goggles is a good idea, here.)

A very good multi-tool can be easily stored and can serve a number of these construction purposes. (Avoid a multi-tool with hammer. It won’t be heavy enough to do the debris management we’re talking about.)

Some of the very best Swiss army type tools have the usual blades and saws, including metal saws, and also include different size screw drivers plus a ratchet with multiple bits.  There are different models, and prices vary from around $120 to over $200, so it’s a good idea to shop.

Start your shopping by looking at the Victorinox Spirit Plus model, shown below. This is one of the very few products on Amazon that gets awarded five full stars by users. I’d look carefully at this one. It’s pretty pricey (around $150 as I write this), but superior in every way. Click on the image to get current pricing.


As a comparison, the Leatherman Wingman Multi-tool is one we recommend for carrying in your 3-day survival kit.

It has basic blades and screwdriver, and costs $35 – $40. (Click image to get exact pricing at Amazon.) Both the Leatherman and the Victorinox weigh about the same amount – 5-7 oz. – so that’s not a deciding factor.

As always, pick tools appropriate for the person using them.

Good tools leverage the strength of the user, but only when they are properly used. Be sure children know how to use any tools before including them in a child’s survival kit or handing them over for a child to do a job. (As I am sure you  have found, some kids are really very capable — but they need training!)

OK, that’s it for now. In an upcoming Advisory we’ll be talking about staying warm in an urban setting. Stay tuned. . . and in the meanwhile, get those multi-tools!

Virginia
Your Emergency Plan Guide Team


Battery Failure Ruins Flashlight

Share

We Test More Batteries

If you’ve been following our blog entries you know that over two years ago we ran some tests on our Emergency Response Team’s battery purchases and the batteries’ life expectancy.

Battery failure

Recent failure of one battery ruined the entire flashlight

What we found was that performance between Duracell and EverReady batteries was pretty much equal, and both outperformed their private label versions sold through the big box stores (Costco & Sam’s Club).

The one dramatic difference was a higher failure rate (i.e. leakage and corrosive damage to our radios, flashlights and other tools that we relied on) for the Duracell batteries than for the EverReady batteries.

It’s important to note here that our Neighborhood Emergency Response Team typically has close to sixty active volunteers. We issue each team member a radio (FRS/GMRS) and a flashlight. We run active monthly drills with the radios and recommend that members check their batteries regularly and change them twice annually. The result is that we spend almost $1,400.00 annually on AA, AAA, C & D batteries and replacement radios, flashlights and other devices.

Batteries Die and Fail

While most batteries simply die and are unable to produce sufficient voltage or current to power the devices, we experience a 15% (+) failure due leakage and corrosion. We are able to “repair” about half of the radios using baking soda & water paste applied with Q-tips to dissolve the corrosion confined to the battery compartments. Flashlights are usually a total loss.

You can easily see an example of corrosion on the black flashlight in the photo. It takes a sharper eye to spot the point of failure of the Premium AAA Duracell battery. The arrow points to the cavity where the casing failed at the bottom (negative pole), under the silver strip.

We Switch to Premium Batteries

Lately we have been using only the premium Duracells (red/gold, 10-yr guaranteed shelf life) since the EverReady batteries are no longer available through Sam’s Club (where we used to find the best price). Our hope was that by purchasing the higher-priced premium Duracells, we would experience a longer life and a reduced failure rate. So far we have no evidence that this will indeed be the case and, to date, the failure rate seems to be about the same as the regular Duracells.

As of this week we are stocking up on additional EverReady, Amazon, Ikea and Orchard Supply Hardware batteries to measure longevity. We will share our methodology and results in a future post.

And, while the comparison on battery failure rate will take longer to measure, the results will be more anecdotal since the sample size of our tests will be smaller and subject to individual team members’ actual usage and care patterns. We will share our experience in this regard as well with the caveat that it’s not possible to completely separate individual user habits from the failure rate experience.

Joe Krueger
Your Emergency Plan Guide Team

P.S. If you’re asking yourself why we don’t use rechargeable batteries, that’s a good question. But we think the answer makes sense. It’s this: We’ll only be using these radios and flashlights in a real emergency – most likely, after a major earthquake. We expect all power to be out for an extended period, days if not weeks. As soon as our rechargeables are dead (and they don’t last as long as disposables, anyway), we’ll be stuck. We don’t want that to happen! (Yes, we DO have some solar chargers. That’s a topic for another Advisory!)

P.P.S. If you are interested in the results of our planned test, be sure to sign up below to get our weekly Advisories.

Secure Your Space

Share

The Great ShakeOut Hits California

Our community is “celebrating” the annual earthquake drill here in California on October 20. We are joining a crowd of 9.4 million participants (so far).

Secure Your SpacePlus, just two days ago we emerged from a heightened earthquake alert resulting from a swarm of 140+ small quakes near the base of the San Andreas Fault. That’s the seismic fault that’s going to give birth to the long-overdue “Big One.”

So it seems time to take another look around the house to Secure Your Space, as the ShakeOut people say.

We put together a worksheet for our neighbors, and I thought it would be a good tool to share with all our Emergency Plan Guide readers.

(The form I created for our neighborhood group has a space for recommendations to be made by a handyman that we’ve engaged to go to people’s homes. The version shown at the left in this Advisory is a little different. It figures YOU will be making the changes, hence the “to-do list” terminology!)

No and Low Cost Recommendations for Quake Safety

These are all pretty straightforward. It just takes setting a time for a “walk-through” and then making obvious changes to your living space.

As you do your walk-through, look at furniture placement, and not just heavy or decorative items that could fall and break.

When we returned home after the San Francisco quake in 1989, one of the most dramatic things that had happened was we couldn’t get into the bedroom because a bookcase had fallen over, completely blocking the door.

Handyman Help for Quake Safety

You may or may not already be a handyperson, so some of these suggestions may require that you get a few simple tools. Generally, the idea is to stand in the middle of the room and imagine that everything loose starts flying at you.

How do you tether or fasten down the items that could hurt you?

Keep in mind:

• Flexible fasteners may be better than stiff ones, which can break in a large jolt.
• Rubberized pads may stop heavier items from shooting across the room, but of course won’t keep them from falling to the floor.
• A wire barrier or a lip may keep items on a shelf as long as the shelf stays on the wall.

This Secure Your Space list is aimed at simple things you can do to improve your chances. It doesn’t get into major improvements, like blocking and strapping your water heater, or reinforcing your foundation. We’ve covered some of those elsewhere.

Today, let’s just take care of a few items that should not be left unaddressed.

Need a shopping list of earthquake safety items?

Here are some items from Amazon. You could click on the links, order them all, or items like them, get them delivered within just a couple of days, and have everything you need for an earthquake safety family activity!

Picture or Mirror Hanger

The usual hardware or hobby pack of picture hangers is designed for light pictures, but the sawtooth version of a hanger, or any hanger that counts on simple gravity to hold the wire on the hook, will not be adequate in an earthquake. You are looking for something that can carry 50, 70 or maybe even 100 pounds, and keep it on the wall!  Here are some ideas for hanging heavy items.

Hangman 3-Inch 100-Pound Walldog Wire Hanger (WDH-100-2)

And the wire to go with it . . .
Hillman Fasteners 121128 Mirror Hanging Set Heavy Duty

Big Stuff on Shelves

When it comes to electronics on the shelves in our office, we start with rubberized mats under our printers and computers. We also have a mat under the one desktop tower that is still on the desk. (The other tower is on the floor.) I also use rubberized shelf paper in the kitchen under my plates, and actually between some of the serving platters.

I really love this stuff. Get enough of it because you’ll find many uses for it.

VViViD Non-Slip Rubberized Plastic Mesh Shelf and Drawer Liner Non-Adhesive Sheets (12″ x 20ft, White)

Appliances and Furniture

I said above that for our computers, we “start” with rubberized mats. The next step is to fasten all appliances and furniture down with flexible safety straps, so they won’t go anywhere when the world starts shaking.  Of course, what you use to fasten things down depends on their size, their weight, where they are located (how far to a wall stud), etc.

TV monitors are probably the most likely thing to fly in an earthquake. Tie ’em down! Next most important are bookcases, appliances and other furniture. Here are several models of straps and cables to consider.

QuakeHOLD! 4520 Universal Flat Screen Safety Straps

Quakehold! 4163 15-Inch Furniture Strap Kit, Beige

Quakehold! 2830 7-Inch Steel Furniture Cable

And one model of strap (not from Quakehold!) that seems to be all-purpose:

TV and Furniture Anti-Tip Straps | Top Quality Heavy Duty Strap, All Metal Parts | All Flat Screen TV/Furniture Mounting Hardware Included | Lifetime Guarantee (2 Pack, Black)

Objets d’art and Collectibles

Every home has a shelf or cupboard with beloved figurines, plates, vases, whatever. If the shelf falls, or the cupboard opens, these precious items will be destroyed. So, some suggestions:

  • Can you place these objects in a closed cupboard instead of on an open shelf?
  • Run a wire or fishing line barrier along the front of the shelf to keep books from falling.
  • Add a simple lock to be sure the cupboard or cabinet door won’t swing open in an earthquake. (Check under “child-proofing your kitchen.”)

Most important, “glue” treasures down with museum wax from your local hardware or craft store. It holds!

Quakehold! 66111 2-Ounce Museum Wax

Kitchen

I mentioned above what we found in the bedroom when we got home after the 1989 earthquake. In the kitchen was an astonishing mess of broken dishes, broken jars of pickles and peaches, flour and spices, appliances and potted plants.

Again, all kitchens are slightly different. Do a kitchen walk-through. What could fall or move? What will happen if cupboard doors come open? Moving heavy items to lower shelves is the obvious first step. Selectively applying child-proof locks or safety straps may be the next best improvement.

A Weekend’s Worth of Work

Doing the appropriate moving, measuring, drilling and installing will take more than 5 minutes. Depending on your level of skill and interest, it might take all day or even all weekend.

But all it would take is one good shake and EVERYTHING ON THIS LIST  — mirrors, pictures, bookcases, furniture, computers, cupboards, TVs, food, glassware, souvenirs, collections — could end up in a jumble of broken trash in the middle of the room. And you’ll be lucky if you aren’t in it somewhere.

So, join in your own region’s Great ShakeOut and make some safety improvements. You’ll sleep better for your efforts.

Virginia
Your Emergency Plan Guide Team

I mentioned some articles on more serious infrastructure improvements for your home. Check these out: