Author: Volunteer

Two-way radios: Walkie-talkie or CB?

Share
Man standing in disaster setting, using two-way radio
Full disclosure: This image was made for me by the Artificial Intelligence program Dall-e! I asked for “disaster scene, man using hand-held radio with antenna.” Not sure how accurate the image is, but it sets the tone, doesn’t it?!

Let’s get clear about radios for emergency use.

The radios we refer to often, and describe in detail on our Emergency Radios Reviews page, are one-way radios. They can only receive messages. Today, we’re talking about CB radios and walkie-talkies, which are two-way radios. That is, with them you can both receive in-coming messages and send out your own messages. (In radio speak, that means you can receive and transmit. Combine both features into one word, and you get transceiver!)

Two-way radios are commonly used for emergency communications and, for that matter, for everyday communications in many settings. Joe and I have used two-way radios on a construction site, in a convention hall, and on road trips. Our grandchildren use them when they’re playing in the park. Nearly every day you can see news reports with first responders using two-way radios at some disaster setting.

And maybe you’ve seen the 1977 classic trucker movie, “Smokey and the Bandit,” with Burt Reynolds and Sally Field! That’s how we were all introduced to CB radios and trucker lingo. (See P.S. for some examples.)

What’s the big advantage to two-way radios?

As long as all parties are tuned to the same channel, and are within range, one person can push a button and send out a message and everyone else can hear it instantly. There’s no need to dial numbers, wait as the phone rings, repeat your message over and over again to every member of your group. Just push the transmit button, wait a second, then speak.

That’s the famous PTT or “Push to talk” feature that everyone who uses walkie-talkies is familiar with. (Some advanced models also have a voice-activated “talk” feature as well.)

So what’s the difference between CB radios and walkie-talkies?

Pretty much, it’s size and weight!

As the name suggests, a walkie talkie is compact enough to carry and use easily with one hand.  (Hence, “walk” and “talk.”) Small CB radios look and act pretty much like walkie-talkies. (Note that radio in the AI image above! It does the job of showing how convenient walkie-talkies can be.)

The classic CB radio isn’t a one-piece hand-held!

Most CB radios have two connected components – the rectangular box that is the “radio” plus the microphone, attached by a coiled cord. (Sometimes the faceplate of the radio can be removed from the actual radio itself, to make installation easier.) And there will also be an attached external antenna which would make carrying the unit even more awkward. So, a CB radio may be mobile – that is, you may be able to carry it – but it sure isn’t convenient!

Let’s look more closely at some of the differences.

Number of channels. Both CB radios and walkie-talkies have a number of channels to choose from, as assigned by the FCC. CB radios typically have 40 channels in the low frequency band. The walkie-talkie for public use has fewer channels (typically 22) in the ultra-high-frequency band.

Signal range. How far your radio will reach depends first on the amount of power of the model (.5 up to 4 watts), then on the environment through which the signal is passing. Because these radios operate on a line-of-sight, whatever interrupts that “sight” weakens the signal. Higher frequencies tend to work better when you’re transmitting in or around buildings, such as schools, hospitals, etc. Lower frequencies tend to have a wider range across countryside – sometimes carrying for miles. “It all depends.”

Power source. Both CB radios and walkie-talkies can be powered by direct current from batteries or by an AC to DC power converter. A CB radio installed in your car runs from the car battery, so it can have far more power than can be jammed into the batteries of hand-held radio. Note, however, that some walkie-talkies have a solar panel for charging batteries, making them particularly useful in off-grid or disaster scenarios.

Antenna. An antenna is important for both CB radios and walkie-talkies. Generally, the longer the antenna the better. Most walkie-talkies have stubby, built-in antennas. Only a few walkie-talkie models allow you to add an external antenna. A CB radio in your truck or car, though, can have a much longer antenna. Long whip antennas can become a hazard to garage doors and bushes!

License requirements. CB radios do not require a license. Some walkie-talkies operate on frequencies that do require a license. For more about the different levels of two-way radios and their licensing, check out this review from the Federal Communications Commission.

Cost. Both CB radios and walkie-talkies range widely in price depending on features. Simple walkie-talkies start as low as $30 for a pair; a simple CB radio set-up may cost as little as $50, but you’ll want to add an antenna, which might easily double that price.

Which two-way radio is best for emergency use?

There’s no one answer. Review your own likely needs – and your budget – to see which radio might work best for you and your group. Talk to other preppers or neighborhood emergency teams to get their input. As always, you may want to test before you make your final purchase.

For more details on walkie-talkies, check out our Walkie-Talkies Reviews page. Below, see an example of a well-regarded CB radio, available at sporting goods stores or on Amazon. As you know, we are Amazon Associates and may receive compensation if you purchase through our link.

Basic CB Radio from Uniden

This radio seems like just what you’d want for common family usage. Note that it has an instant switch for emergency channel 9. It weighs about 2 pounds, comes with mounting bracket and will need to be wired into your vehicle.  (We recommend having that done by a qualified professional, although it’s apparently not too difficult to do.) The feature that attracted me: an option for public address system. Click on the image to check for more details and pricing. (This radio was on sale when I added it to this Advisory!)

Basic antenna for CB radio

This antenna has a magnetic base, making it easy for you to mount effectively. It’s about 24 inches tall, comes with the coax cable that connects the antenna to the radio inside the vehicle.

The antenna arrives in pieces and has to be assembled. I found a helpful video on Amazon (from YouTube) to help you get it set up and installed!

Have you used a CB radio? Do you use one regularly? Have a story about how you’ve used a two-way radio in an emergency situation? Please pass along your experience!

Virginia
Your Emergency Plan Guide team

P.S. I promised some CB trucker lingo. Recognize/remember these? Not exactly designed for emergencies, but great for listening in on!

  • Catch you on the flip flop!
  • Bear in the air!
  • Chicken truck heading your way!
  • What’s your 20?

On oxygen and the power goes out!

Share

PART ONE: WHAT HAPPENED HERE LAST WEEK WHEN WE HAD AN HOUR-LONG POWER OUTAGE

We experienced a short power outage a few nights ago. Afterwards we collected stories from neighbors about how prepared they had been. The results?

  • Most neighbors had flashlights or lanterns, and they waited calmly for the lights to come back on.
  • A few neighbors had NO lights – and they have since hustled to get batteries and/or lights – particularly, lights that attach to mobility devices!
  • But one group of neighbors had no easy solution. These were people on oxygen when the power went out. Their stories were painful. They came to our neighborhood meeting with this question:

“What do I do if I am on oxygen and the power goes out?”

We didn’t have a good answer for these folks! In fact, in a previous emergency we had faced people having to evacuate without their oxygen, and we were unable to identify them, much less help all of them.

This time, we’re making another effort to find out how to help. As you will see, it comes down to this:

Your personal emergency plan has to have a way for you to manage without your oxygen or to have a way for you to continue to get it!

Remember, I am not a medical professional, so I do not present this information as a complete, medical answer. Please do your own research with your doctor and trusted caregivers and suppliers. This could be a life-or-death situation.

We have done a lot of research on this topic, and this is what we have discovered so far. These questions will give you a head start on putting together a PERSONAL emergency plan for yourself or another person on oxygen for how to respond if the power goes out.

Your first question should be: “How long can I go without my oxygen?”  

Contact your doctor. Emphasize that you need to plan for a power outage. Find out what you can expect if your oxygen is stopped for whatever reason. It’s possible you could cut back on activity and make it through OK – but only your doctor can answer this question.

Second question: “Can I get a reserve or back-up supply for my home?”

The answer here depends mostly on whether you own or rent your oxygen equipment. Here are three possibilities:

  1. If you own your equipment, go back to the manufacturer for help buying a back-up solution. They may want to see a new prescription from your doctor to be sure they are giving you the correct solution.
  2. Don’t forget to check with your utility company to see if they have special programs for people using “qualifying medical devices.” You may be able to sign up for a battery back-up or generator for when the power goes out. Some utilities offer rebates to help you buy a back-up power source. You’ll have to get approved for any of these programs in advance.
  3. If you rent or your equipment is paid for by Medicare or insurance, ask your oxygen supplier about getting a back-up. Unfortunately, the stories from people about getting back-up equipment in this situation are patchy. If your supplier seems hesitant or unhelpful, keep reading!

“If I don’t have a back-up supply at home, where could I go to get the oxygen I need during a power outage?”

If you have to leave your home, we are now talking about evacuation. All the planning for evacuation comes into play, with the added concern about your oxygen supply. Specifically . . .

Your oxygen concentrator needs electricity. A safe place to plug in your equipment might be available at a local emergency shelter, a church, or a hotel in your town or nearby. But call in advance before you set out, to be sure they have the type of connection you need. And don’t plug into a multi-plug or extension cord!

If you use an oxygen tank, you may need to go to the emergency room at a hospital or an urgent care facility for direct access to oxygen. Some sources suggest you might get help at a local police or fire department. I checked with our first responders they said they are not set up to offer oxygen and they would have to direct you to a medical facility.

Again, find out NOW where medical facilities are located near you. Find out if they have emergency power. Find out if they might be able to help if you are on oxygen and the power goes out or you are worried about running out of oxygen. 

How will I get there? Who will take me? Will they be able to explain my needs if I can’t?

These are all important questions for anyone with a mobility or medical issue. The challenge: thinking it through and making arrangements with a neighbor, friend or family member BEFORE the power outage hits! You’ll probably want to make a list with all the key info about your oxygen use, including a copy of your oxygen prescription. Attach your list to your emergency go-bag.

If you have the answers to all these questions, you will know what to do and when to do it in a short or extended power outage.

PART TWO: WHAT I LEARNED IN RESEARCHING THIS ARTICLE

If you are already on oxygen, you probably know much of this. But your friends and/or family may not – so share it with them! Also, consider sharing with neighbors who are talking about having to go on oxygen. These are the basics all of us should know about!

“What’s the first thing people need to know about emergency oxygen?”

This was the first question I asked of one of the oxygen concentrator sales people I talked to. (I talked to a half dozen of them. They were all extremely helpful.) Her immediate answer: “When a patient needs oxygen as part of medical therapy, it is prescribed by a doctor and delivered through a medical device. To get oxygen, you need both the prescription and the device. ” (In other words, you can’t prescribe it for yourself – and you can’t just simply order a device online.)

“What kinds of devices deliver oxygen?”

The two most common devices are an oxygen tank and an oxygen concentrator. The patient breathes in the extra oxygen from the device through a tube – a small clear tube that goes into the nose (called the nasal cannula) or a tube that feeds some sort of face mask. The amount of oxygen is carefully monitored. It is measured in liters per minute. Baseline amount seems to be 2 liters/min. and it can go up from there.

Man with nasal cannula delivering oxygen during a power outage
Nasal cannula delivers supplemental oxygen

(There are also small bottles and cans of liquid oxygen available as non-prescription supplements. They are only a very short term solution to an immediate medical issue and don’t fit into this discussion.)

“What’s the difference between a tank and a concentrator?”

Tanks deliver a steady stream of oxygen. A concentrator can deliver oxygen in a steady stream or in “pulses” that fit to the way you breathe. Your prescription will specify how much and what sort of delivery pattern you need.

Now, as I was studying this, I was mostly thinking about preparing for emergencies. So with preparedness mind, here’s more  . . .

  • An oxygen tank is the simplest device for oxygen therapy. The tank – called a cylinder – holds oxygen under pressure and releases it in a steady stream when the valve is opened. Ultimately the cylinder will run out of oxygen, so you’ll always want to have the next one ready. Big cylinders are heavy and pretty much stationary. Smaller cylinders can be wheeled around. Depending on how much oxygen you use, your tank could last for days or be empty after only hours!
  • An oxygen concentrator is a machine with a motor that, when it’s on, pulls in the air around it, filters out particles and nitrogen (which is what makes up about 80% of our air), and delivers nearly pure oxygen. The concentrator can run as long as it has electric power. That power usually comes from a plug or from batteries. (It could come from your car battery – but you can’t drive while using your concentrator!) Obviously, if you are on oxygen from a concentrator, and the power goes out, your oxygen supply will stop.

“Should I buy or rent my oxygen device?”

That depends on several things. First, on how long you might be using it. Second, on how much flexibility you want (stationary model, different sized mobile models, a light-weight model to carry around with you, etc.) Third, on how much you can afford. You’ll always need a prescription to rent or buy.

Medicare and private insurance companies typically pay some or all of the cost of long-term rentals – but apparently, not so often or not at all for the higher-priced mobile concentrators. Those you may have to buy on your own. Costs for concentrators start in the hundreds of dollars and quickly move into the thousands.

“I’m on Medicare and use an oxygen tank. How do I get a back-up tank?”

When it comes to getting an extra tank for back-up, here’s what I have learned. I haven’t experienced this myself so your story may be different. But to start with the basics regarding Medicare . . . 

  1. Your doctor issues the prescription for your oxygen: how much, how often, etc.
  2. The doctor sends the prescription to a Medicare provider.
  3. The Medicare provider delivers to you the device that fits the prescription.
  4. Medicare pays the provider on your behalf. (You may have a co-pay.)

Now, providers don’t like to “lose” their customers. They want to keep you satisfied. However, Medicare wants to pay the minimum for your care. Medicare doesn’t want to pay for anything “extra.”  

So your provider typically gives you just what the prescription requires. When you ask for a better model of equipment, or an “extra back-up tank,” your provider may say, “No, not approved by Medicare.”

To be fair, some providers seem to schedule deliveries in such a way that they deliver multiple tanks at once.  In that case, you might have the extra tank you want during a power outage.

“I’ve already asked for and been refused a back-up oxygen supply by my Medicare provider. Any suggestions?”

Go back and take a look at the recommendations in PART ONE about having a plan to get to where you can access the oxygen you need.

Then, consider the following.

Isn’t the government constantly urging us to prepare for emergencies? At the same time, Medicare (the government!) seems to resist helping us get a back-up supply of prescriptions – including a back-up supply of oxygen! Doesn’t make a lot of sense to me – and I’ve worked with my own doctors, and worked around them, to try to build my own back-up prescription supplies.

But one person’s complaints are not likely to really go anywhere when it comes to making a change. To have a real impact, we have to put on our organizing hats and find others with the same concerns! Here’s how a group might go about making a change.

Start with your doctor. Find out why the doctor recommends a particular Medicare provider. Explain that your provider doesn’t seem able to give you what you might need for oxygen in a power outage (for example, extra tanks or extra batteries). See if you can be assigned another provider willing to provide back-up oxygen for emergencies.

Push harder. Find out who else in your neighborhood or community is getting oxygen from that same provider. AS A GROUP, go back to your doctors and share your concerns about the provider. As a group, file a complaint with the provider company – it should have a grievance procedure. Or call 1-800-MEDICARE to file a complaint against the provider company or even against your insurance plan! (For more suggestions, check out this resource.)

“That’s a lot of activism!”

Yes, it is. And there is no guarantee that your activism will make a change.

But if you are on oxygen and the power goes out, you need a plan. This sort of activism may be necessary. Certainly, everyone involved will become more knowledgeable. And you can be sure that everyone involved will be better prepared when the next power outage hits!

Virginia
Your Emergency Plan Guide team

P.S. The number of power outages is going up because of new, more violent storms and fires, and because our grid is aging. Don’t postpone planning for an outage, particularly if you are on oxygen.


E-bike batteries – what you need to know

Share
Ready for new adventures?

Yesterday I put the finishing touches on a long Advisory about e-bike batteries. Joe took a look and pronounced it too long and too “educational.” I accepted these comments with hardly a grimace because by the time I had put the work in, I felt the same way!

So today, the new, shorter and I hope punchier version. With one simple message:

An e-bike is a significant piece of machinery with lots of promise – as long as you take care of it! At the top of the care list: the lithium-ion battery.

(Note: This post is meant to serve as a supplement to any materials provided by the e-bike manufacturer. It does not replace manufacturer recommendations!)

Short background from 2005. I was an early adopter of e-bikes. My first bike featured a heavy and off-balance acid-lead battery, but how I loved riding it! My only problem: wrestling the bike up onto the porch!

Jump to 2022. E-bikes are clearly the rage – “… the largest growing transportation sector in America. (ABC, August 26, 2022. https://www.abc10.com/article/news/local/e-bikes-are-gaining-popularity). At the same time, if you dig a bit deeper (as I did), you’ll discover some disquieting news. Lithium-ion e-bike batteries can catch on fire and even explode!

My initial question was: Are these batteries really dangerous?  

My research shows that it’s not fair to think all e-bike batteries are just waiting to explode. In fact, many of the fires (and there have been hundreds) have actually been associated with lithium-ion batteries in scooters, hover-boards, etc. and NOT bicycles.

Unlike these smaller device manufacturers, the bicycle industry has been busy setting safety standards for its batteries and charging procedures. Those are what this post is all about!

Every e-bike rider needs to know these basics. They should be in the manual. Read everything and follow the directions!

What should you be looking for? For sure, your e-bike manual should have plenty of clearly spelled-out details regarding battery use and maintenance:

  • The initial charge, when and how often to recharge, where to charge, how to store the battery, etc. Always use the original charging cord.
  • Regular checks for punctures, swelling, weird smells or sounds. If you find any damage, stop riding and get that battery checked out.
  • Recycle your dead battery through your manufacturer’s program or at a hazardous waste collection center. Do NOT throw it into the trash!

If the bikes you are looking at don’t seem to provide all these details, do more research yourself online. Remember, battery size and design vary – they are meant to fit the way you want to use your bike. But whatever style bike you’re looking for, experts recommend you only consider an e-bike whose battery has been certified to UL (Underwriter Research Labs) standards. That battery will probably be a name brand – and not the cheapest.

(The battery is probably the most expensive component of the e-bike. This comment from e-bike industry consultant Mike Fritz makes the relationship between cost and quality pretty clear: “ . . .a quality battery pack sells (edit added: to the manufacturer) for about $300, so it’s unlikely that a complete bike that includes such a battery could retail for $800.” https://www.bicycleretailer.com/industry-news.)

The one piece of info that you probably will NOT find in the manufacturer’s materials – what to do if your battery actually does catch fire.

Yes, it’s rare. But we’re into preparedness, right? A lithium-ion fire is extremely dangerous. You probably can’t put it out yourself. Evacuate the area and call 911. Above all, do not put water on a lithium-ion fire! Professionals know how to smother the fire or let it burn itself out.

OK, that’s it for today. I hope you’ll get the right e-bike and enjoy its benefits: efficient commuting, improved air quality, great exercise. And so much fun! Just treat it with the respect it deserves!

Virginia
Your Emergency Plan Guide team

P.S. I’m not an expert on e-bikes or their batteries. This information came from a variety of sources “deemed to be reliable.” As you consider your own purchase, please don‘t treat it casually. Do your own homework and ask your own questions.


The Joy of Giving — to Senior Citizens

Share

As a senior citizen, you can give others the chance to experience the joy of giving to YOU. Here’s how . . .

When we get to November, we know that “holiday season” is just around the corner. So every year here at Emergency Plan Guide we remind you that preparedness items make good stocking stuffers for kids as well as smart “thank-you gifts” for employees.

This year, though, we are turning things around. We’re not suggesting that you experience the joy of giving to others.

This year, we want to help others get the joy of giving . . . to you!

This is an idea that came up at a recent neighborhood meeting, here in our senior community. (Since everyone at the meeting was a senior citizen, they agreed it was a GREAT idea.) It was such a good idea that we turned it into a newsletter article to share with all!

So here’s what our group will be publishing the first week of December, in time for Hanukkah and Christmas. Today, though, as a reader of Emergency Plan Guide, you’re getting this good idea early.

The Holiday List for Seniors . . .

My Neighbors Helped Me Make this List!

  • Show me how to QUICKLY call 911 using my cellphone.
  • Make sure my doors aren’t blocked with furniture, boxes, etc.
  • Help me get rid of trip hazards — throw rugs, pet dishes, etc.
  • Can you bring me some half-gallon bottles of water?
  • Do all my windows open? Do all my lights work?
  • Grab a towel (to muffle the sound) and test my smoke alarms.
  • Be sure I have a working flashlight in every room.
  • Help me pack an “Under the bed” kit in case a disaster hits at night: flashlight, shoes, sweater or jacket, whistle, gloves, list of emergency contact names, and some water.

This checklist is a great preparedness exercise for an older friend or family member.

Here’s the step-by-step . . .

  1. Are you, or do you know, someone who could use a helping hand to make sure their home is as safe as it ought to be? Cut out this list and hand it to them.
  2. Tell them to check off small safety or preparedness jobs that just aren’t getting done around the house.
  3. Finally, mail or hand the list to younger friends or family members who are planning a holiday visit. If they arrive with list in hand, they will easily get these simple jobs done!

I guarantee that this list has the chance to produce a big WIN-WIN!

Virginia
Your Emergency Plan Guide team

P.S. In this case, the joy of giving is actually a 3-way win!

  • If you’re the one receiving these small gifts, you’ll be so much more comfortable and more confident as you head into a new year.
  • If it’s your mother or father or another older relative that gets these small safety gifts, you can feel satisfied that you have done a good turn – or two.
  • If it’s a neighbor who receives these gifts – your whole neighborhood will be safer in the future.

Take advantage of this simple giving opportunity. Such opportunities don’t come along every day.


Top 10 List of Emergency Preparedness Items

Share

Back to the Basics – Updated 11-2022

Matchbook - one of top 10 items for emergency preparedness
But will they light?

At least once a year, we try to quickly go over the top 10 items that belong in every survival kit. If you have a basic pack in the car, one in the office, and one in the house FOR EACH FAMILY MEMBER, you can breathe a lot easier when someone asks, “Are you really prepared for an emergency?”

Here’s this year’s basic top 10 list, with some suggestions about how many of each item to get, where to get them and what they might cost. You’ll notice that the list categories stay pretty much the same, but a new item is added from time to time, and our top recommendations change as new products become available.

New items for 2022 have pictures and prices shown below.

As always, if you click on the product links, you’ll go over to Amazon, where you can shop for just what you want and likely get the best possible price, too. And as we’ve explained, Emergency Plan Guide may get a small commission on the sale — a commission that doesn’t affect your price.

You don’t have to do it all at once!

If you’re just starting to put together your survival kits, consider doing the research and getting just 2 or 3 items a week. Some of them you may already have — they just need to be assembled in one place. Or, build a list and shop at Amazon and have everything within a couple of days. (Black Friday specials may save a lot of money!)

We’ve added these symbols –  〈〉 – so you can check off each item as you get it!

〈〉  1 – Water

This has to be first on your top 10 list of emergency preparedness items. If you can grab a bottle of water, or store one with your emergency supplies, great. But bottled water gets old, and is really heavy. What you CAN pack so it will always be ready is a water filter. We’ve written a whole review of water filters, here, explaining and showing the different types. For all-purpose use, we like this one, built right into a plastic bottle that can be refilled over and over again. It’s priced around $25, which is what most filters cost.

LifeStraw Go Water Filter Bottle with 2-Stage Integrated Filter Straw for Hiking, Backpacking, and Travel, Blue

〈〉  2 – Food

Frankly, MREs (Meals Ready to Eat) with a 25-year-life sound pretty awful. The ones I’ve tasted all seem to resemble cardboard. Still, if you’re really hungry, having a couple of them handy make sense. Easier and tastier: sealed bags you fill with dried fruit, trail mix, or energy bars. Buy your family favorites and replace regularly — and after the bag gets raided by hungry kids.

This year I’ve discovered one bar that tastes particularly great.

It’s not the most nutritious, but it is the most delicious! I’d recommend a box. (Add a second box of YOUR favorite bar. When you click the image you’ll get right to all the goodies made by KIND.)

〈〉  3 – Warmth

Camping out in the car overnight in a storm . . . uncomfortable at best. Stuff a warm coat into the trunk, or a blanket.  And for your emergency kits, grab a pack of Mylar survival blankets (preferably the sleeping bag model) and put one in every kit you are building. Shiny side out when you want to reflect the sun, shiny side in to trap body heat.

This year we’ve also added a NEW item to the warmth category — the BIVVY BAG.

It’s a small, waterproof sleeping bag packed in its own tiny bag. This product stands out as being practical and packable! You can combine a mylar sheet/bag with this Bivvy Bag, too. This model comes from Survival Frog and includes a whistle. Click the image to check price at Amazon.

〈〉 4 – Light

Light is actually number 2 on my personal list of top 10 items for preparedness. Flailing around in the dark is plain scary and not very smart. I could hurt myself!  So I recommend having an easy-to-reach flashlight — in the glove compartment of the car, in your bottom drawer at work, in every room of the house. Plus one for every survival kit. Yes, you need at least a half-dozen flashlights, and maybe more! Their prices range from a low of $4 to well over $100, depending on power, different light features (pulse, zoom, etc.) and size.

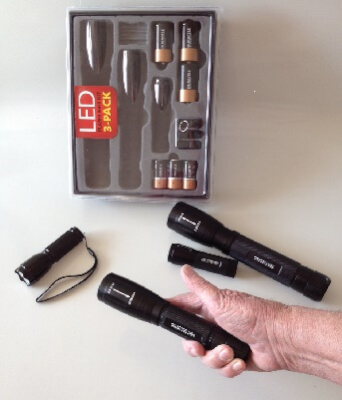
Below is what I consider the best of the basic flashlights. Not too big. Not too fancy. Easy to tuck in a pocket — or a Christmas stocking. This GearLight TAC LED Flashlight 2-Pack uses AAA batteries, so as long as you have batteries, you’ll have light! (Remember, in an emergency, the power will be off so rechargeable batteries won’t get recharged after they wear down.) Click on the image to check the price at Amazon.

We have also reviewed of a number of emergency lanterns. You’ll need lanterns in a longer power-outage situation. Check them out.

〈〉 5 – Communications

In a widespread emergency the only communications you may be able to receive will be those being put out on official emergency channels. To get them, you need a radio – preferably one that operates with batteries, solar, and a hand crank. You may not need one for every person, but certainly you need a couple of radios, stashed intelligently at home and at work.

Our review of different emergency radios will give you a run-down of all the available features and prices. (As you can imagine, you can spend anywhere upwards of $25 dollars on an emergency radio.)

Last year we added more info about using your cellphone as an emergency communications device. Portable rechargers, or “power packs” work VERY WELL and are amazingly compact and amazing reliable. They get their charge from being plugged into your electrical system.

Here’s another phone or tablet power source, with charging from the sun!

There are many, many of these solar charger at Amazon. Click the image to check out the model shown here, but don’t hesitate to shop further. Specials are coming online every day.

〈〉 6 – First Aid

You may be caught in a storm or other disaster and only be inconvenienced. But the chances of someone needing first aid are pretty good. Buy a kit, go through it, and add extras that you think you’ll need. Typically, purchased kits (ranging from $10 to over $80) are really skimpy on bandages, first aid creams, bug spray, etc. Once again, you’ll want multiple kits: one for the car, one for the office, one for the house. You could start with one like this:

Coleman Expedition First Aid Kit (205-Piece), Red

〈〉 7 – Matches/fire

The warmth and light of a fire may be very welcome. They could also be life-saving. But don’t even light a candle inside unless you are SURE there are no gas leaks! And watch out for open flame in a closed-in area. You can kill yourself with carbon monoxide.

Assuming it’s safe, though, here’s what you need to get that fire started. You may need to practice getting a fire started BEFORE the emergency hits!

Magnesium fire starter with some extras:

#1 BEST Fire Starter – SurvivalSPARK Emergency Magnesium Fire Starter – Survival Fire Starter with Compass and Whistle

All-weather matches (not like the ones in the photo above!):

UCO Stormproof Match Kit with Waterproof Case, 25 Stormproof Matches and 3 Strikers – Orange

〈〉 8 – Shelter

Your kit doesn’t have room for a tent. The best suggestion: another simple survival blanket that you can string up as a lean-to. (A tarp might work better, but if you’ve really managed tarps before, you realize they are too big and too heavy for your survival kit.) You’ll need a rope or some bungies to build your lean-to, of course. You could also use duct tape to turn the blanket into a sleeping bag.

Emergency Mylar Blanket 52″ x 84″ – Pack of 12 Blankets

And here’s the cord you could use for your lean-to. Paracord bracelets are cool, too. All under $15.

Paracord Planet 100′ 550lb Type III Neon Orange Paracord

〈〉 9 – Personal items

This category could include extra eyeglasses, medicines, small tools that you know how to use, toothbrush and toothpaste, soap, toilet paper, sanitary items. (For children, it could include a favorite stuffed animal.) Include a list of important contact information, too.

Everyone needs a pouch for personal items (use baggies) and everyone’s pouch will be different!

We really like these wet wipes that are individually packaged, easy to tuck in your survival kits:

Wet Ones Antibacterial Hand Wipes Singles, , Fresh Scent, 24-Count (Pack of 5)

〈〉 10 – Something to carry it all in

A fully packed survival kit or go-bag, with everything possible in it, probably weighs more than you can carry. For sure, it weighs more than your mother can carry, or your 5 year-old. So, keeping their weight and size in mind, consider the best container for each person and each kit.

The best thing is to assemble the supplies for each person, and THEN decide how big a carrier you need.

A simple backpack is probably the best all-purpose carrier. Dig through your closet or head to your local sports shop or big box store and get a pack that fits the person who’s going to be carrying it. Here’s a new resource about backpacks: One Size Does Not Fit All.

Some packs have wheels. It makes them heavier, but may make them more flexible.  Here are some wheeled carts we’ve seen being used, too. Consider whether you will be in an urban setting, where you’ll be hiking along a road or sidewalk, or in a more rural setting, where wheels just won’t work.

The main thing is that . . .

Each person must carry his or her own survival kit.

Please use this top 10 list as a quick reminder. If you can check off each of the ten items, congratulations! You’re ahead of about 90% of the rest of the world! But let’s not stand around feeling smug. Share the list with other family members, clubs you belong to, etc.

The safer the people around us are, the safer we ALL will be!

Virginia and Joe
Your Emergency Plan Guide Team

If you are interested in more details about any of these items, we probably have written at least one Advisory on it! You can use the search box at the top of the page or skim the list in the Advisory Archives. Or, drop a comment with your question and let others chip in.

Would these “election observers” intimidate you?

Share
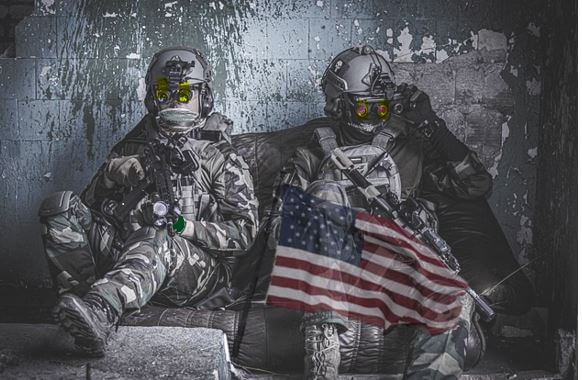
Armed, camouflage-dressed election observers, sitting quietly along road to polling place.

So you’re on your way to vote. It’s late. As you hurry toward the voting site, you suddenly become aware of people along the path dressed in full-on military gear! They are sitting quietly, watching you. Oh, they’re “election observers!” And you think they may have taken your picture!

Would you feel intimidated walking by these guys???

I admit I would. But . . .

Have they infringed on your rights by sitting there in this way?

Well, a judge in Arizona just ruled that their looks and behavior are perfectly legal.

I was surprised at that verdict. So I had to take deeper look at what really makes up voter intimidation.  This Advisory covers some of what I’ve learned. Disclaimer: I’m not a legal authority so this is an ordinary citizen’s understanding based on reasonable research from sources I think are reliable. You can see some of the sources in the P.S.  

First of all, since 2020 voter intimidation IS illegal under federal law.

When there’s a federal office on the ballot, federal rules apply.

But your state may set slightly different rules about, for example, how many feet from the voting place election observers have to remain. And, as we have seen, a judge may find, as the Arizona judge did, that observers are allowed by the first amendment to simply sit there, to watch and even to take photos. While many voters may be alarmed by the presence of the observers, the Arizona judge ruled they do not present a “legitimate threat.”

What would those election observers have to do to be committing clearly illegal intimidation?

I found several definitions. Here are examples of intimidation that different sources seem to agree on:

  • Behaving violently inside or outside the polling site
  • Verbally threatening violence
  • Confronting you face to face
  • Spreading false information about voting requirements
  • Pretending to be a voting official
  • Brandishing firearms
  • Approaching your car and writing down your license plate number
  • Blocking your access to the polling place
  • Questioning you about your right to vote
  • Following you into or from the polling place

Illegal activity seems to be defined as ACTIVE physical or verbal confrontation.

If you are aware of what’s going on around you, and experience any illegal activities when you go to vote, you need to let authorities know. As always, the better you can document what you saw or experienced, the more likely the illegal activity will be stopped.

If you are in immediate physical danger, or someone else is, call 911. Be ready to describe what is happening, where, what the criminals look like, how many potential victims there are, etc.

Be willing to report intimidation to election authorities, too, particularly if other voters were discouraged from voting. Here are some places to report:

  • Your local election official at your polling place.
  • The Election Protection Hotline: 1-866-OUR-VOTE or 1-888-VE-Y-VOTA (en Español)
  • The U.S. Department of Justice Voting Rights Hotline: 800-253-3931; TTY line 877-267-8971

To sum it up . . .

Voting and elections are what we use in this country to make decisions – at school, in our cities, states and, of course, at the level of the federal government.

Democracy requires the ability to vote. If voters are intimidated because of violence, then violence will become the way decisions get made.

Personally, I prefer elections to violence. If you do too, know your rights when it comes to voting. Don’t let those guys sitting in the shadows intimidate you!

Virginia
Your Emergency Plan Guide team

P.S. Some sources for this Advisory:

P.P.S. Are you participating as a poll worker?  I am sure you have been briefed about safety. If not, or if you are curious, take a look at this 14 min. video put out by the Cybersecurity and Infrastructure Security Agency (CISA). It has some good ideas about “non-confrontational techniques.”


Cooper’s Colors

Share
Image of woman walking, unaware of surroundings
Look familiar?

Even after years of involvement in emergency preparedness, I can always learn something new. Today’s “NEW TO ME” is Cooper’s Colors.

I don’t know how I missed them. But suddenly they are in my face.

In just the past week two totally unrelated friends have made reference to “being in the orange.”

The first comment was from a retired policeman who now trains organizations in violent intruder response. The second comment was from a utility company employee who mentioned it in reference to his wife. I felt embarrassed to admit I didn’t know what they were talking about!

If Cooper’s Colors are new to you, too, please keep reading!

Cooper was a retired military colonel and gun expert. In the 70s he came up with four colors (later versions added a 5th color) to represent levels of readiness for violence. The levels have come to be connected to “situational awareness,” which we have talked about a lot here at Emergency Plan Guide.

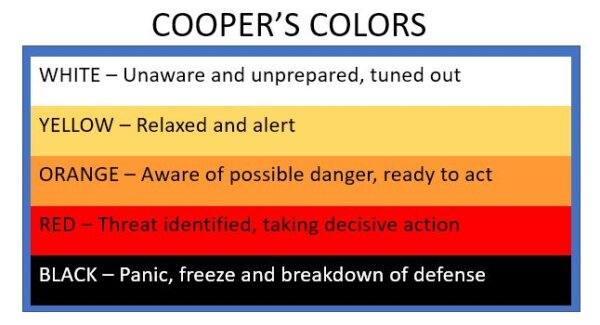
Here are the common definitions associated with the colors:

Chart showing 5 levels of Cooper's Colors, with definitions for each

The goal is to move consciously between colored zones as appropriate.

It may take effort for you to get into yellow. But with practice, you should be able to operate comfortably there most of the time, with just occasional forays into orange. (Keeping out of RED is the real goal!)

I found a short video that does a good and simple job of illustrating the colors. The video is aimed at business travelers but works for everyone.

Here’s the link to the video. (It’s 1:33 min. long.) https://youtu.be/8xMyj1eyLuk

If you’d like more about Cooper’s Colors or situational awareness, there’s plenty of info available! Here on Emergency Plan Guide we’ve written about situational awareness multiple times. (Article with my favorite photo: https://emergencyplanguide.org/situational-awareness/) And there are many longer videos on YouTube on the topic, too.

Now is a good time to be in the yellow or orange, don’t you think?

It seems to me that heightened awareness just makes sense as we head into the midterm elections. Crazy things are already going on. We’ve seen shocking verbal and physical threats being made against candidates, election workers and . . . VOTERS! (That’s you!)

Let me know in a comment if you knew about Cooper’s Colors, and how you have used them in your own life!

Virginia
Your Emergency Plan Guide team

P.S. Joe says that Cooper’s levels of awareness remind him of the DEFCON system – “Defense Readiness Condition.” It’s used by the U.S. Armed Forces. It has 5 levels that increase from DEFCON 5 (least severe) to DEFCON 1 (most severe = nuclear war). As of June, 2022 we are at DEFCON 3, largely in response to Putin’s nuclear threats associated with the war in Ukraine.


Ready for an emergency rescue?

Share
Storm surge from hurricane
“What should we do next?”

Dear Neighbor,

Little did I think that last month, when I announced I was going to focus on “Bigger” issues, the first one would be Hurricane Ian. Joe and I have been absolutely glued to the television and to social media. Throughout, I kept thinking about preparedness basics. And added a new focus on being ready for an emergency rescue!

So many of the people being interviewed simply weren’t prepared – even those who said they had experienced many earlier hurricanes!

Here are some of the obvious basic preparedness weaknesses that jumped out at us.

Did you notice some of these same things? Which of these would apply to you?

  • Despite what appeared to be timely warnings of the danger to come, many people shrugged off evacuation orders. “We’ll just hunker down and stick it out,” seemed to be the attitude.
  • One reason behind that attitude? Evacuation was simply too expensive. No place to go. Too many miles worth of gasoline, too many nights in a hotel. “It’s not worth it,” we heard again and again.
  • When asked about preparations for sticking it out, most people seemed to have considered storing food and water. Of course, many of those supplies were ruined when flood water rose much faster than anticipated. And people who had invested in generators could run them only if their property remained above the water line.

What about actually being ready for an emergency rescue by First Responders or Good Samaritans?

Planning for evacuation is one thing. But what’s the planning for emergency rescue?

  • This morning I heard one group say that they had performed over 700 helicopter and boat rescues! Neighbors did their share, too, pulling people and pets off of boats and out of houses even as they were being washed away. Amazing and heartwarming to see.
  • Although many people were being rescued from their own homes, did you see how many of them came out in flip-flops or even barefoot? And how many had their personal belongings simply stuffed into plastic bags?
  • In all the pictures I saw, only one person had a pet in a container. All the other pets required two arms for carrying.

Do people have insurance that will help them recover?

So far, all I’ve hear about are abject failures of the whole Florida insurance situation! Here’s a quote from a Bankrate article dated just about a month before the hurricane hit:

Since 2017, six property and casualty companies that offered homeowners insurance in Florida liquidated. Four more are in the liquidation process in 2022. Other insurance companies are voluntarily leaving the state. Still, more are choosing to nonrenew swaths of home insurance policies, drastically tighten their policy eligibility requirements or request substantial rate increases.

Reading more deeply into the problem, I found that Florida seems to have had way more than its share of insurance fraud – and thus huge litigation expenses on top of claims due to natural disasters.

OK, so how should we respond to what we’ve just learned?

Here’s what I propose to do about my own situation! Mostly, it’s a review of the basics, but with a few new twists.

Do I need to add new threats to my “usual” list?

Here in California, we’ve always focused on earthquake (still at the top), but over the past couple of years we have had to add evacuation due to wildfire (even though we don’t life at the Wildland-Urban Interface). And heavy rain could be a problem even as we struggle with an historic drought. We are NOT set up for rain!

What disasters are on YOUR list? Have you added any new ones? (By the way, we have built a list of over 90 possible threats in our Neighborhood Disaster Survival books. That threat list includes a lot of “social” disasters as well as what I would term “natural” disasters. Want a copy? Drop me an email and I’ll send it.)

Have I thought about being ready for an emergency rescue?

Here at Emergency Plan Guide, and in my neighborhood, we mostly focus on preparing to shelter in place. Food, lights, warmth, water, etc.

We also plan for evacuation: car ready to go, backpack or rolling cart with basic personal needs, important papers, container for pet, etc.

However, we have NEVER really discussed how to be ready for a dramatic rescue by first responders, when seconds count! When I see people hauled aboard rubber boats or helicoptered clinging to a wire basket, it is so clear that they too need to be prepared. At the minimum they should be wearing shoes, have a waterproof bag for ID and medicines (simple fanny pack?), and a phone.

What else would make a difference? Let’s put together a training for emergency rescue! Send your suggestions via comments or email!

Do I need to revisit my insurance?

First, of course, you need to know what you need to insure. Earlier this year I wrote about one of the most efficient ways to create a digital home inventory – one that would be available “in the cloud” even if you lost all your records.

If you haven’t yet done a personal inventory, now’s the time.

Head back to my January Advisory  https://emergencyplanguide.org/your-home-inventory/. In particular, scroll down to the section on PINVENTORY. That program is thorough and doable. If you follow up, tell founder Carol Kaufman that I sent you!

Even before you finish your inventory, you can call to set up a meeting with your insurance agent.

Review your homeowner’s coverage with particular attention to flood damage that might apply:

  • Water damage (rain vs. flood – they aren’t the same!)
  • Wind damage (wind vs. rain – again, one may be covered but not if the other is present)
  • Coverage for soil displacement due to water, plantings that are destroyed, etc.
  • Any new requirements for “maintenance” or “building standards”

As I get this Advisory off, Hurricane Orlene is approaching the coast of Mexico from the Pacific – and it’s now a category 4.

Be ready and be safe out there!

Virginia
Your Emergency Plan Guide team

P.S. This Advisory is a very quick response to a very big disaster, one that we’ll be living with for years. I do hope you will be able to add what we’ve learned to your own list of emergency preparedness actions. Please share good ideas with the rest of us!


Big Changes Ahead!

Share

Dear Neighbor,

As always, welcome to new neighbors here at Emergency Plan Guide. Our community has been growing slowly and steadily over the past 10 years and I hope everyone has made some smart moves toward being better prepared!

I know that I have! And often, I have made those moves after learning about some new technology or participating in some new activity and writing about it in an Advisory. Can you believe it? I have written well over 600 Advisories, one nearly every single week since 2012!

Today, though, I am announcing a change. For the next few weeks I am going to be taking a deeper dive into some of the BIG CHANGES that are going on around us. Changes that are so big that our usual “smart and sensible steps toward emergency preparedness” just don’t meet the challenge!

Here are just some of the big changes – and the threats –  I have on my list to learn more about:

  • Climate Change and its impact on the weather: more violent hurricanes, unusually high temperatures, flooding where there’s never been flooding before.
  • Financial Stress caused by pandemics, supply chain blockages, the work-from-home phenomenon, a shifting energy supply – and, again, climate change.
  • Political Unrest and the emergence of domestic terrorism that is threatening different segments of our society and, in fact, threatening our whole democratic system.

If there was ever a time for increased “situational awareness,” this has to be it! And as a writer, I feel the pressure to learn more, know more and share it.

You can help! I want to be learning and writing about things YOU care about — big changes or traditional concerns. So can you take just a quick moment and let me know what changes, risks and threats YOU are worried about these days? Or changes you want to know more about because you see them possibly affecting you?

This is by no means a formal survey. But your feedback will help keep me headed in the right direction.

I look forward to your email reply!

Virginia
Your Emergency Plan Guide team

My email: virginia@emergencyplanguide.org

Will insurance cover it? Wait til he sees the fine print. . .

Share
Broken down car in the desert. Will  roadside assistance help?

Have you ever just had a plain, bad week? Like this guy in the photo, car broken down miles out in the desert. Will his roadside assistance even come to help him, this far away from anything? What do you bet he has never read the fine print . . .!

This photo instantly reminded me of the older Prius we drove some years ago. Its battery died at 154,000 miles. We confidently pulled out the warranty. When we read the fine print on that one, sure enough. It had expired at 150,000 miles!

The point of these examples: It’s always a good idea to know what your insurances really cover . . . and when it’s time to make some changes.

So let’s take a quick look at some coverages you may have been taking for granted.

Let’s start with the small print of Roadside Assistance.

When I was a kid, and the ’37 Chevy stopped running, my Dad would get out, raise the hood, and was almost always able to get things working. At least, we got to the nearest garage. Today, though, drivers old and young are pretty much thwarted by the modern car’s computers. Their only option: Roadside Assistance!

I personally couldn’t get along without it. (If you don’t have it now, consider getting it. Check first with your insurance company, then with an organization like AAA or Good Sam, maybe even with a premium credit card where it could be included for free. As with everything related to insurance, coverage and prices vary.)

With the man in the photo still in mind, I took a quick look at the “towing limits” for my own program and coverage from several other roadside assistance programs. They varied widely! One covers costs of a 5-mile tow (pretty much useless, I would think) to a 1,000 mile tow to a tow to “the nearest qualified repair facility.”  (How do they define “qualified?”)

So questions you should be asking about roadside assistance for your own car or cars:

  1. What is actually covered?
  2. What (or who as driver?) is excluded?
  3. How much are you paying, and does it make sense given your car and your driving habits?

Next, let’s take a look at Health Insurance, on my radar since I got an update from my own plan last week.

(How often do you get updates from your own insurance? How often do you actually read them? I admit to filing most.)

This report caught my attention because it was about “Getting Care During a Disaster.” If they are sending me a special report on this topic, I assume coverage might not be what I would normally expect! Close examination led me to these interesting facts:

  • A “disaster” is only a disaster if the state governor, the U.S. Secretary of Health and Human Services, the Centers for Medicare & Medicaid Services or the President of the United States declares it. (A localized flooding or fire may not reach “disaster” proportions.)
  • My insurer will try to keep facilities open and will post schedules and access info online. (Not going to be very helpful if there is a widespread power outage . . .)
  • If I can’t get to my insurer’s regular facility or office or pharmacy, I was pleased to see that I can get care elsewhere, without a referral or prior authorization, and will only have to pay my usual amount.

Once the disaster is over, however, or after 30 days have passed and there is no end date declared, I’ll be on my own if my provider hasn’t been able to re-open!

So these questions should immediately come to your mind:

  1. How does my insurance carrier define emergency?
  2. Where can I get care if my usual doctor’s office or pharmacy is closed?
  3. What WON’T be covered in an emergency?

Makes you think about taking another first aid course, doesn’t it?!

Finally, what about a longer-term emergency at my workplace?

Small businesses, in particular, are often so busy keeping everything going day to day that they simply overlook anything beyond standard property and liability insurance.

Here at Emergency Plan Guide, we have looked more closely at what happens when you experience a business interruption. As you might expect, business interruption insurance has even more than its share of fine print.

Basic business interruption insurance is meant to help support the business and you only for “covered perils.” So, anything not listed as covered won’t be covered!

Reading the fine print may reveal that some interesting things are NOT included in “basic covered perils.” For example . . .

  • Utility service interruption may be covered (as an add-on) – but it may not cover you if power to the business comes through overhead transmission lines.
  • If your business is only partially closed, but customers can find a way to get in, your business interruption insurance may not kick in.
  • What if your business is closed due to a cyberattack? Given that small businesses seem to be the target of most data breaches (43% of all of them in 2019), this is protection you need to consider. However, note that you may not be able to get coverage if your business hasn’t set up industry best practices for protecting your data and computer systems.

The above details are random examples, selected to make the point about knowing exactly what your various insurance policies cover. As you review that fine print, check for a waiting period before the coverage takes effect . . . or an end period after which it stops. And all insurance coverages may include deductibles and/or maximums.

It’s up to you to fit the policy to your own likely needs.

Insurance is an essential piece of your emergency preparedness. But you can’t rely on last year’s policies!

These days we are experiencing such rapid changes – from weather to first-ever political and public health events. Values are rising and falling in unprecedented fashion. New insurance coverages are being developed while others are shrinking or have even disappeared!

Staying on top of your insurances takes more effort than every before. If you haven’t done a recent insurance review, September is a good time to get one scheduled and dig into the fine print of each of your policies. After all, it is “Emergency Preparedness Month!”

Good luck!

Virginia
Your Emergency Plan Guide team

P.S. It pays to remember the underlying fact about insurance: the agent works for the insurance company, and not for you. The more you know about your situation, its peculiarities, and way insurances work, the better you’ll be able to work with the adjuster when you have a claim. If you have a very big claim, you may want to consider hiring a private adjuster to represent your interests.

P.P.S. There’s more about insurances here on our site, by the way. You can check on these Advisories:


New CERT Graduates!

Share
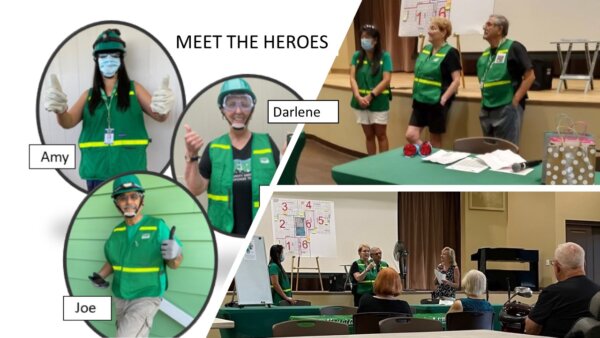
new graduates of the Community Emergency Response Team course celebrate with their neighbors
They made it through!

When you write a book, you get the chance to include a dedication. Every one of the first books in our Neighborhood Disaster Survival Series is dedicated not to mothers or fathers or each other, but to our friends and colleagues at CERT, the Community Emergency Response Team training offered through FEMA and our city!

Twenty years ago CERT was the impetus that moved us from helping big enterprises with disaster recovery to helping improve emergency preparedness for neighborhoods.

Over the years, our own southern California neighborhood has benefitted from adding nearly 4 dozen CERT graduates from our city’s training program. We’ve also welcomed a few new neighbors who brought their training with them from other cities.

Of course, in any neighborhood, people come and go. In a senior community like ours the “going” may be more frequent that the “coming.” Whatever, even after the nearly total shutdown of our emergency group activities because of Covid, here in our small neighborhood we still count 21 active CERTs.

As of this month, our current neighborhood CERT total went up to 24!

Time to celebrate!

The images above show our three new “heroes” and the meeting that featured them. People were interested to hear how the training had gone. Here are some of the questions that came up:

  • “What did you like best?”
  • “What was the biggest surprise about the course?”
  • “Were you worried about anything before you started?”
  • “What was the hardest part?”
  • “Was it really free?”
  • “Why did you take the course in the first place?”
  • “Have you added any new gear to the stuff you got from the training?”

We use these questions whenever we get the chance. CERT graduates like to talk about their experiences – and folks considering the course want to hear about CERT “from the horse’s mouth.”

(No matter how much written material we provide, it’s the fact-to-face interaction that makes the difference!)

And although Joe and I took the training years ago, we too are interested because it’s changed. For example, while medical, fire suppression, and search & rescue are still key components of the course, a whole section on “Terrorism & Disaster Psychology” has been added since we took it.

In any case, as far as our neighborhood is concerned, the more CERT graduates we have among us, the safer and the smarter we feel.

How do we get more neighbors involved in emergency preparedness?

Here’s the way it has worked best for us.

First, we have kept our city CERT leader on speed dial. (Or speed email, whatever.)

Joe and I were in Class 3. A couple of years later, by the time we got to Class 7, our neighborhood graduate group had grown to a half dozen. (Our city is now on class 88, and has trained well over 2,000 people.)

The advantages of having a “core” neighborhood group are clear. Graduates share the same vocab.  They have learned the same basic info. Perhaps most important, they have been exposed to the “Incident Commander” concept. That is, if you are first on the scene, you step up to take charge. Being a leader comes from the CERT training . . . and it is essential.

The core group becomes the engine behind building a community group. And we’ve added Mandarin speakers to our core group!

Next, we focused our promotion activities on the value to individual community members, not just the benefits to the city.

Some CERT trainees finish the class and never join in any further neighborhood or community activities. That’s fine. Their families get the benefit.

Most CERT graduates, however, are enthusiastic about what they have learned. They  realize what an impact they could have in an emergency! These folks often express their commitment to “being of service” to the community, and CERT fits that mindset.

Core group members with a service mentality find it easy to work together to develop a plan, and programs, for their neighbors. We have counted on them year after year.  

Then we planned regular neighborhood activities around scheduled CERT classes.

We’ve used a number of ways to let people know about CERT. Just like we did last week, we take advantage of every chance we get to celebrate course graduates!

Leading up to that, though, takes repeated reminders, stories, and show-and-tells. And once we’ve welcomed new CERT graduates, we continue to involve them in these activities.

I just checked. In our Neighborhood Disaster Survival Guides, we share over 25 of the different activities we have developed to engage neighbors and meet a neighborhood’s particular needs and interests! (We’ve shared a lot more ideas via these Advisories, too. Look for “What are you interested in?” in the sidebar, click the down arrow, and choose “CERT.”)

We have been instrumental in helping build emergency preparedness groups for a variety of neighborhoods. Of course, every neighborhood is unique – but we believe CERT, as a foundation, works for nearly everyone.

These books are updated regularly. (We keep having to add new items to the “threats” list!) Find out more about the books in the series here, with links to get them at Amazon.

As long as our city is offering classes, we have a reason to talk about CERT, emergency preparedness and response. It is an ongoing effort.

What about those neighbors who may not take a CERT class but still want to be part of the team?

In our neighborhood we have busy neighbors who want to be a part of the preparedness activities but make it clear: “I don’t want to take the course but I will be here to help out when you need me.”

This is a problem.

When the emergency hits, these folks will have no idea of how to help and there will be no time for training!

So, we have used material from the CERT course as a framework on which to build a bare-bones custom neighborhood group with a place for everyone who wants to be a member. Interested neighbors agree to participate as volunteers in whatever category makes sense for them. We provide as much training and as many supplies as we can. For example, they get walkie-talkies and fluorescent emergency vests. (We don’t give official CERT gear to people who haven’t taken the full training.)

In addition, our team regularly offers “general education” for everyone on emergency preparedness. People may not want to be part of a group, but they seem to appreciate in-depth climate reports, suggestions for home safety, and hearing about new threats.

Whatever you can do to improve neighbors’ awareness of potential emergencies, and to get them to take steps to prepare, the safer you all will be.

CERT is the best foundation for effective community action that we have found.

Find out about CERT in your town or city!  Simply type into a browser [Your city CERT]. You can also head to the FEMA website for more information: https://www.ready.gov/cert/.

Virginia
Your Emergency Plan Guide team

P.S. Do you have some “old-timers” in your neighborhood with CERT credentials? Consider acknowledging them with an enamel CERT pin or perhaps a safety item with an embroidered CERT patch. You can find these, along with other CERT gear, at my friend Susan’s site: 2BeReady.com/cert-products/.


Feeling threatened by violence?

Share
Threatening hand

Have you noticed a change in online commentary from preppers and survivalists? I am seeing more stories that show writers feeling threatened by violence.

Bloggers who used to write about uses for duct tape are sending out repeated posts about stockpiling emergency supplies. I am getting promotions for guns (“add a red dot laser scope”), specialty ammunition and last week, “the knife assassins love.” (What?!) One of my favorite writers has been telling readers about searching for an additional bug-out location for his family.

I’ll admit to more concern for my own personal safety since the violence of January 6. And while I’m not ready to start actively promoting lethal weapons here at Emergency Plan Guide, I have considered and bought for myself a couple new, inexpensive products for self-defense. That’s what I’m discussing today.

All of these products are meant to be used BEFORE you get close enough to be touched by an assailant!

Don’t be caught empty-handed when you are feeling threatened.

Here’s a look at the self-defense items I now have, and why and when I want to have them with me.

OMG, threatened by a pack of coyotes . . .!

No, I don’t mean the human kind! You’ll recall that last week I mentioned that coyotes might be a danger to children walking to school. Well, I personally wouldn’t worry about one skinny coyote. But I sure would get animated if I looked up and suddenly there were 3 or 4 of them waiting for me!

In past years, I took my evening walk with an empty soda can in my pocket, filled with a few coins. Makes a great rattle that scares coyotes away. Turns out that coyotes get used to just one hazing method, so it’s good to have several! (If you’re worried about coyotes in your own neighborhood, you can get some good hazing info at the Humane Society.)

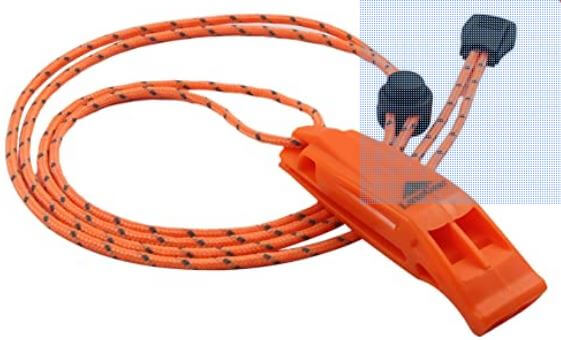
orange plastic emergency whistle as call for help when feeling threatened

So nowadays I’ve added my orange emergency whistle as a hazing device. You may have read how our neighborhood emergency group delivered an emergency whistle to every one of our neighbors! People really like them. Because they are flat, they tuck into your shirt and can be easily pulled out when needed — to call for help or scare off coyotes.

Scary dudes on the street in your own neighborhood

We’re hearing all kinds of stories of single women being hassled or threatened in parking lots. Sometimes the hasslers stay in their cars, other times they hide between cars. These incidents take place at all hours.

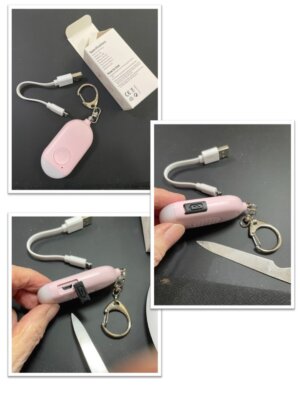
I am NOT interested in dealing with a potential threat when I’m carrying groceries, getting ready to open the trunk of the car, etc. So here’s my latest purchase – a Rechargeable-Self-Defense-Keychain-Alarm.

Keychain alarm with flashlight warns against threat
Chose from a variety of colors.
How to recharge the key-chain alarm

I got this three-pack from WETEN at Amazon, where we are associates. The alarm is small and smooth, and comes with a short cable for recharging. You press the button or pull the chain and the alarm goes off – at 130 decibels. Plus the white end is a handy flashlight – steady or blinking LED.

The photo shows how I used a nail file to pry open the little black cover so I could connect the cable to recharge the alarm.

Here’s the link to the alarm again. You might consider buying up a whole collection of these alarms in different colors. Pass them out to your children, family members at Thanksgiving dinner, etc. Easy to attach to key chain, strap of backpack, etc.

When a crowd turns ugly

I’ve written before about using pepper spray in a crowd situation. I like the Sabre red-topped spray I have, but today I’d like to show you a sprayer that uses GEL instead of spray.

can of Sabre Pepper Gel for self-defense when feeling threatened

The advantages of gel: it stays in a stream rather than dispersing as a spray. This allows you to focus on a particular target. This particular model shoots a full 18 feet and can deliver up to 18 bursts. (According to Alcohol Rehab, crime data shows that around 40% of violent crimes are committed by people under the influence of alcohol – so they may not respond with just one blast.)

This canister also has a sturdy clip to go over a belt. Safety flip-top. Bonus from SABRE — some excellent videos. Here’s the link to this Sabre Crossfire Pepper Gel.

Potential threat at the front door

This spray is another step up when it comes to power and effectiveness. It’s actually a pepper gel that contains a dye to help you see where it’s landing. The canister is about the size of a slim bottle of hair spray. You pull the safety pin and squeeze the handle to shoot the spray up to 35 feet – twice the range of the one-hand Sabre spray described above.

Here’s the link for full details at Amazon. AIMHUNTER Home Self Defense Unit, Tactical Pepper Gel with Ultraviolet Dye, Maximum Strength 35-Foot Range 35 Bursts, Quick Release for Easy Access Pepper Spray Self Defense. I hope you’d consider storing this canister right at the front door so it’s within easy reach if you’re ever feeling threatened.

If you’re feeling threatened, you want some protection.

These four self-defense items are meant to discourage an attacker before he comes near enough to touch you. They aren’t life-threatening, but they aren’t toys, either. Please read the disclaimers below in the P.S. before you finalize your purchases.

Virginia
Your Emergency Plan Guide team

P.S. Two disclaimers:

  • Your state may restrict purchases of pepper spray by size of the container and age of the purchaser. (In California you can get it at age 16 with parental permission.) Check to be sure.
  • Don’t use the sprays without having studied how to use them! There are plenty of videos available (see the Sabre sales material) about how the spray and gel travel and how to protect yourself from blow-back.

Prepare your kids for school-related emergencies

Share
Young student prepared to respond to emergency
Will she know what to do?

Today let’s take a look at individual students’ readiness for a school-related emergency.

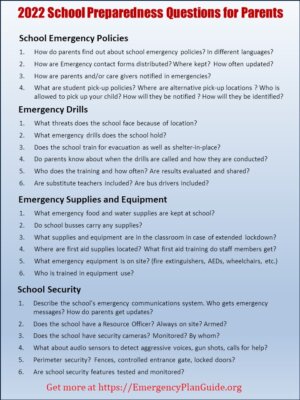
Last week I reviewed preparedness actions schools should be taking or at least considering. I hope you grabbed a copy of School Preparedness Questions to take with you to a Back to School meeting. This week, we’re taking a look at some ways you can prepare your kids for handling emergency decisions on their own!

How well your kids respond will depend on how well YOU have prepared them!

If you live in the country or spend time camping or even scouting, your family may “score” well on most of the following questions. But many of the kids I engage with as a school crossing guard don’t have access to physical challenges. Many are protected from dangerous/decision-building experiences. You’ll see that bias reflected in these Advisory questions!

Obviously, the “correct” answer to any of these school-related preparedness questions depends on the age of the child, where you live, your home environment, etc.

Are your kids aware of emergencies that could arise on the way to school?

  • What are realistic threats that your child could face on the way to (or from) school? Depending on your child’s age and where you live, the trip to or from school might include:
    • Dangerous traffic or street crossings
    • A car, bus or bike accident
    • Being approached by a stranger
    • Falling ill or getting a scrape or cut
    • Witnessing a fight or other violence
    • Being harassed or bullied by other children
    • Being threatened by a dog or wild animal
    • An unexpected weather event or road closure
    • You fill in the blank!
  • Do you prepare your kids for these “daily” possibilities as well as major threats like earthquake or fire? You’ll probably want to discuss likely threats one at a time. As your child gets older, the list of threats might change. Plan to have this potential “threat” conversation multiple times.
  • Does your young school-aged child know his or her full name and address? In an emergency, just a first name won’t do!
    Crossing Guard speaks: When your young child is asked, “What’s your name?” give them the space to answer! I make it a point to learn all my kids’ names. Every year, I am frustrated because so many protective parents jump right in with answers to ANY question I ask!
  • Has your child memorized at least one or two key phone numbers? In an emergency you may lose your personal phone, or it may not work. Emergency personnel will likely have the ability to connect.

Are your kids prepared to get home from school on their own?

  • In an emergency, could your child find his way home from school? Walking, or directing someone to take him? Under what conditions would you want your kid to walk home alone?
    Crossing Guard comment: Sometimes, when busy parents drop off kids at my corner before speeding off to work, I ask the kids: “So if you had to get home on your own, do you think you could find your way?” They mostly just shake their heads.
  • Do your walk-to-school children know more than one route home?
  • Is there a way your child can get home by taking a bus? Which bus? Which bus stops?

Does your child know what to expect in an emergency at school?

  • Does your child understand the what and why of school safety drills? Do you practice together at home to show you think the drills are important?
  • Do you prepare your kids for the fact that in an emergency they might have to stay at school for a long time? Or leave the school and go somewhere else?
  • How well would your child take emergency direction from someone new? (Teacher, crossing guard, police officer, school volunteer, etc.) Would your child be willing to come home with a neighbor? (You may have to adjust your teaching about “Don’t ever get into the car of a stranger.”)

What emergency supplies will your children have?  

Your questions to the school board should have resulted in answers about emergency supplies maintained by the school. Here are some questions about individual student supplies.

  • Does your school require that children bring an “emergency kit” to be kept in the classroom? What is in it? (Our research suggests that often it’s a couple of items in a zip lock baggie, almost totally useless.)
  • Does your child have personal emergency supplies in his backpack? How often do you replace and replenish the kit? Given the comments above, should your child’s personal kit contain an emergency phone?
  • Are all the items in your student’s kit allowed by the school?
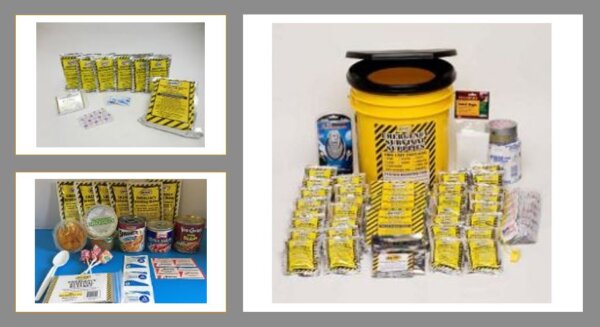
Prepare your kids with a kit from this collection of student emergency kits from 2BeReady.com

What would you want in your kids’ school kit? These photos show examples of some of the Student and Classroom Kits from 2BeReady.com. (Best seller, upper left.) See P.S. and the bottom of this page for more details.

Final question: Does your child know how to call 911?

It seems so simple in the movies. But it’s not, for a child!

First, the kid has to have a phone. Landlines are easiest to manage and more reliable but there are hardly any around any more. So that means the call will likely be made on a cellphone. That phone has to have battery power and the child has to know how to get to the emergency keypad.

Once the child has reached emergency services, she’ll be asked many questions. The first question will be, “What is your emergency?” That will be followed by questions requiring name, address, location at that address, details about the emergency. Above all, your child mustn’t hang up!

Have you practiced making emergency 911 calls with your kids? (Don’t actually call, though.) We’ve all heard the stories of toddlers dialing 911 and saving a parent. It wasn’t luck. Those kids were trained!

School will be starting soon. Take this time to help prepare your kids for emergencies!

Virginia
Your Emergency Plan Guide Team

P.S. I mentioned that typical school “emergency kits” are often pretty meager. My friend Susan at 2BeReady has researched and developed a selection of complete school emergency kits. Please take a look at her full page of different school kits from 2BeReady.   There’s a list of Frequently Asked Questions for school emergency supplies there, too. Order now and you’ll have what you need in time for the first day of school.


School Preparedness Questions for Parents – 2022

Share

This will be my 7th year as an elementary school crossing guard. Here I am in the crosswalk on a rare drizzly day in 2019 – fluorescent suit (“one size fits all”), red stop sign (“Hold it up HIGH!”) and whistle. Big grin.

But today, in 2022, things look a little different. These days I carry an electronic pushbutton whistle because you can’t blow a whistle while wearing a mask. With so much school time lost because of the pandemic, our school is starting two weeks earlier — at the height of the summer heat. And this year, on our first day of school, every parent and teacher will still be reeling from the terrible school shooting in Uvalde.

These school preparedness questions are updated for 2022.

These are questions primarily for parents, but if you are in any way connected with schools or students, school security or health care, you’ll want to take a look.

In fact, after you’ve read the whole Advisory, you’ll see a link to a one-page summary of the key questions. It’s meant for you to download. Take it to school. Forward it to a friend who has children. We all need a better grasp of these issues.

Get answers to these preparedness questions from your school

I recently watched a video about our district’s School Safety Plan. It was a 2-hour presentation featuring school staff, local police and fire department representatives. It focused on what they called the threat of a “violent intruder.” Even after 7 years on the street out front, talking with parents, kids, teachers and the occasional police officer, I was amazed at how little I knew about how my school operates behind the scenes.

Of course, every school district and school is unique, so you may not have the opportunity to hear about your own local school’s safety plan.

Moreover, school or law enforcement personnel may be hesitant to answer your direct questions. They may not want to share details, they may be uncomfortable with preparedness issues in general, or they may simply not know the answers.

Still, these are your kids. Your taxes pay for schools and staff. If you feel good answers to your preparedness questions are not forthcoming, don’t be intimidated. Patience and persistence will pay off.

General school emergency policies.

  1. Policies. How do parents find out about emergency policies? Are materials available in different languages?
  2. Emergency contact forms for each child. How distributed? Where kept, under what security? How detailed? How often updated?
  3. Emergency communications. How will parents be notified in emergencies? (As crossing guard I made sure I am on the list to get emergency notifications, too.)
  4. Student pick-up policies. What are alternative pick-up locations if school has been closed? Who can pick up your child if school is shut down? How will they be notified? How will they be identified before your child is released? What if your child won’t go with them?

Emergency drills.

  1. Does the school face any particular threats because of its location? (near railroad tracks or airport, environmental hazards from industry, flood plain, wild animals, etc.)
  2. What trainings does the school hold? Does the school train for any emergencies other than fire or severe weather? (Earthquake, tornado, wildfire, bomb threat, active shooter?)
  3. Does the school train for evacuation as well as shelter in place?
  4. What should parents know about how these drills are called and how conducted?
  5. Who holds the training and how often? Are results of the drills evaluated and shared?
  6. Who is included in the drills? Substitute teachers, maintenance staff and bus drivers?

Emergency supplies and equipment.

  1. What food and water supplies are maintained in the school? How often refreshed?
  2. Do school busses carry any supplies?
  3. What food, water and hygiene supplies are in the classroom in case of extended lockdown?
  4. Where are first aid supplies located?  Do staff members get first aid training? Again, what about bus drivers?
  5. What emergency equipment is available? (fire extinguishers, AEDs, wheel chairs, etc.)
  6. Who is trained in equipment use?

Security features.

In recent years, many schools have made changes to provide more physical security. These questions cover some of the changes that can be considered or implemented. School budgets may limit making any of these changes. In some cases, these ideas may simply be inappropriate. But asking questions can lead to productive discussion. (Want more in-depth information on any of these features? Take a look at Security Magazine.)

  1. Does the school’s emergency communications system include direct connections to other classrooms? To law enforcement and/or emergency services? To other schools?
  2. Does the school have a trained Resource Officer? Is that officer always on the premises? Is the officer armed?
  3. Does the school have security cameras? Are they monitored? By whom?
  4. What about audio sensors to detect aggressive voices, gunshots, calls for help?
  5. Has the school made any changes to the way visitors are allowed onto the campus or into the buildings? (Open campus or one controlled entrance? Fences? ID badges?)
  6. What policies are in place regarding locked or locking doors? Who made these policies? How well are policies followed?

Getting back to business as usual after an incident.

Sometimes it’s easier to focus on immediate protective actions and overlook what it will take to recover once the event is over. A good preparedness plan will have procedures in place to help parents and students “get back to business as quickly as possible.”  We are learning, of course, that overcoming the trauma of a violent school disaster takes months if not years. We touched on that topic last week in our Advisory about gun violence.

Next steps for parents

List of emergency preparedness questions for parents

Share your list of questions with other parents and approach teachers and administrators for answers. Download and print this convenient one-page summary of School Preparedness Questions.

You may want to insist on special presentations on these emergency topics. Guest speakers could be school staff and a member of the police or fire department. You might volunteer to help design and put on parts of the presentation, yourself.

Presentations could be held on Back to School night, at a PTA meeting, and, of course, in the classroom. A presentation could be videotaped for later showing or showing online, as well.

Working together, schools, students, parents and other community members can keep emergencies from becoming disasters and do the best possible job of protecting students when disasters do occur.

Virginia
Your Emergency Plan Guide team

P.S. This list of “Preparedness Questions for Parents” deals primarily with the school. I am updating my list of “Preparedness Questions for Parents about Their Own Children.”  Watch for it coming soon!


Overwhelmed by the news? Or just stressed?

Share
Image of pages from Atlas of the Heart by Brene Brown, showing highlighting of key themes.

So much bad news over the past month! I have been overwhelmed.

As you have noted by now, I monitor emergency preparedness news all the time. TV, other writers’ blogs, and LinkedIn posts from professional emergency managers are some of my sources. I’m always on the lookout for ideas for Advisories. This past month, thought has been so full of emotional incidents that’s I’ve actually been overwhelmed by the news.

At the same time, add in stresses at the personal level.

I just had cataract surgery. Nothing life-threatening, but . . . fasting for an early morning appointment, being hooked up to an IV, knowing I’m “under the knife.” There’s no way to pretend that’s not stressful. And, of course, with only one eye to work with, my usual reading and writing habits are affected. (In my case, so I could plug into Audible books and iTunes podcasts, I had to conquer air pod technology. That in itself was a huge frustration!)

Have you been overwhelmed yourself by these same stories and developments?

Some of my friends have!

Late last month a long-time friend from college phoned me, and we spent a good 15 minutes trying to pinpoint exactly how we were feeling. It was a back-and-forth conversation, as we tried out and then discarded different descriptions.

Then, just 4 days later, my neighbor Carol and I were having pretty much the same conversation, standing on the sidewalk as she watered her roses. Again, a back and forth about how overwhelmed we were by the news. But it didn’t take long before Carol turned off her hose and ran into her house. Out she came with a new book all about emotions and the fine distinctions between them.

Oh, I love words. I love their history and nuances. I was smitten and promptly ordered my own copy!

So, my neighbor Carol’s recommendation became the source for this week’s Advisory!

Brené Brown is the author of Atlas of the Heart. You may already know her work, or have heard her well-known TEDx talk from 2010.

In this recent book, she lists and looks carefully at 87 different human emotions. Her theory, if I may sum it up, is that you can’t really experience life if you can’t describe it. Moreover, if you can’t describe life, you are pretty much lost when it comes to charting a new path forward.

The sobering reality, according to Brown, is that most people can only come up with about 3 emotions: “happy,” “sad,” and “angry” are the most common. How can ANY three words help me manage how I am reacting these days to surgery, gun violence, political upheaval, and natural disasters?! 

Are you, too, experiencing stress or overwhelm, or uncertainty or dread, or some other hard-to-pin emotion? Are you looking for some help in coping? Please consider getting your hands on this resource.

Yet another important book for this summer. I am so happy to have found it and to be able to share.

Virginia
Your Emergency Plan Guide team

P.S.  As a taste of how Brown helps distinguish between different emotions, here’s the very first of the 13 lists she introduces. Are you feeling any of these? And are you sure of the differences between them?

  • Stress
  • Overwhelm
  • Anxiety
  • Worry
  • Avoidance
  • Excitement
  • Dread
  • Fear
  • Vulnerability

Brown adds another list of 7 more emotions that fit into this discussion of troubled times. Which of these might be an exact fit for what YOU are experiencing?