Tag: survival kit

April – Who’s the Fool?

Share
Girl embarrassed

Embarrassed???

British Columbia recently completed a poll to gauge the extent of personal preparedness throughout the province.

Now you may not live in BC, or even in Canada. But Canada’s history of developing a culture of preparedness pretty much mirrors ours in the U.S., with some of the same ups and downs.

And Canada has experienced many of the same kinds of disasters: floods, fires and terrorist attacks.

So, their surveys are worth looking at.

Unfortunately, this survey led me to this “April Fools Day” theme.

Pretend these are answers YOU are giving to survey questions.

“Sure, I know the threats we face.”

The British Columbians identified their top hazards as earthquakes, wildfires, extended power outages and severe weather. And they distinguished between these based on where they lived: residents living in Vancouver and on Vancouver Island (on the coast) listed tsunamis and earthquakes as hazards; people living in the interior and the north cited wildfires and floods.

So far, so good. But let’s take a closer look in the mirror.

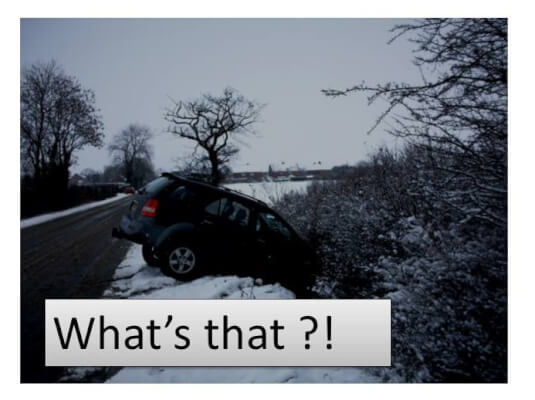
Take me as an example. Here in Southern California even I think first about the risk of earthquake. But as we have reported repeatedly, the most LIKELY emergency is power outage. (Already 3 this year.) Second could be a railroad car accident, since tracks run right behind our neighborhood. Third, a gas line break since there is major construction planned right across the street!

Drive just 2 miles east, and you’ll be in a wildfire area and you’ll face the possibility of flash flooding – even though we get less than 15 inches of rain a year!

Turn around and head 5 miles west, and the list of hazards changes again. First, you’ll be in a liquefaction zone, so if the earthquake hits, damage will be different, and greater. Second, you’d be within the reach of a tsunami.

The point of all this? A simple answer may be TOO simple. You may be fooling yourself if you think your first fast answers are sufficient.

“I know who will be there to help out.”

Most people make some poor assumptions, here, because they are used to one-off emergencies, where police and fire respond, often within minutes.

In a major emergency, First Responders will NOT be able to come by to give you a hand! They will be stretched out serving the entire community – often, with fewer than a half dozen First Responders per 1,000 residents!

In a real disaster, it will take hours, maybe days, for the first wave of organized assistance to arrive. Then, it will take days and maybe weeks for real support — food, water, utility repair crews, etc. – to show up. Yes, Puerto Rico breaks all records for non-response in the U.S. But some people in Texas and Florida are still in short-term housing. . .

The correct answer to the question of assistance is actually two-fold. First YOU are responsible for helping yourself. Second, you and your neighbors may be able to help each other.

And that takes planning in advance!

“Of course I’ve got a personal emergency plan.”

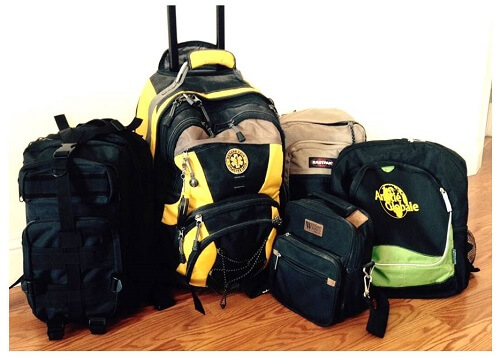
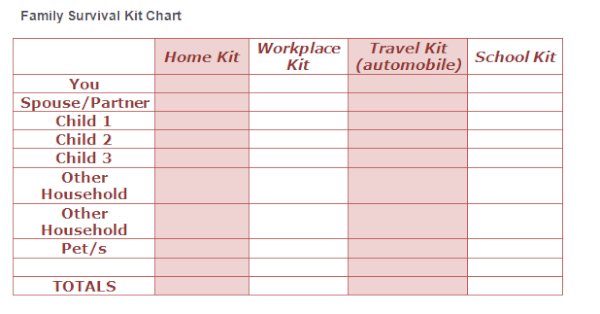
In the Canadian survey, 54% of respondents said they had an emergency plan. . . but only 13% said it was complete. Most households had emergency supplies for up to 3 days, but often with some important items still missing. As for emergency kits in the car, at work, or for evacuation, only about 30% had them.

When it came to insurance for the likely hazards (flood, earthquake) only about half the Canadian respondents had any.

How well do you compare?

“I admit I’m not fully prepared. You wanna know why not?”

The Canadians said they weren’t prepared because of “personal laziness” and “apathy.” And before we point derisively at the Canadians, let’s look at the reasons Americans give for not being prepared. (Thanks to Lucas Gregson for some of these.) Do any apply to you?

• There’s no real threat of the world ending. Maybe not, but what about “minor” disasters, like being laid off your job? Construction that tears up your street? A wreck that takes down the power grid? It doesn’t take total annihilation to mess up your plans for life.
Too complicated — I can’t prepare for everything. I’ll just deal with it when it comes. Hm. Well, a 72-hour survival kit will address the majority of issues that you’ll encounter. Kits will give family members a chance, too.
I have faith in the government. Talk about April Fool!
My sister is prepared; we’ll just go there. What if the disaster hits her, too? How will you get there if roads are impassible? And how welcome will you really be?
I was a boy scout (alternative: I was in the military). I know how to survive. Starting from scratch, with no tool or supplies? And what about your family if something happens to take you out of the picture?
I don’t want to be one of those weirdo preppers. Well, you probably buy insurance. Does that make you a weirdo home or car owner? Same concept . . .!

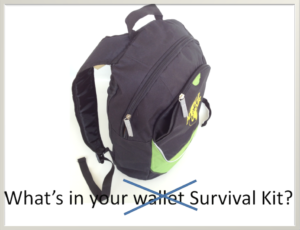
“I’d find it easier to build a survival kit if . . .”

These answers come from the Canadians and from my neighbors, over the years.

If I knew how to get started.. That’s why we publish so many lists! Survival kit items, step-by-step preparation for a hurricane, etc. If you haven’t yet found a list that works for you, I think that may lead back to the first excuse above, that is, “personal laziness.”
If I had money to spare. No one has all the cash available for an instant, complete survival set-up. But everyone can add one or two survival items to the stash every month. Start slow – just start!

“What would really get me started on disaster preparedness would be . . .”

• If I had experienced a disaster myself.

Do you detect the problem here?!?  (We do regularly start our meetings by hoping for just a small earthquake!)

OK, back to April Fools’ Day.

Wikipedia defines it this way: “ . . . an annual celebration commemorated on April 1 by playing practical jokes and spreading hoaxes. The jokes and their victims are called April fools.”

This Advisory shares some long-standing hoaxes — not to mention some delusions — about the topic of preparedness. Most aren’t really jokes, although I tried to give them a touch of humor. The problem? You could be a victim of any of them!

I hope you’ll treat this seriously so you don’t become one of those April fools.

Virginia
Your Emergency Plan Guide Team

P.S. We regularly involve members of our HOA in discussions like this one. Here’s a true story about emergency supplies from about 6 months ago:

“Raise your hand if you have emergency water supplies at home.”  (Just about everyone raises their hand.)

“Raise your hand if you would be willing to share your water with a neighbor who runs out.” (Every hand goes down.)

Makes you think, eh?


Lessons from Harvey – The First Week

Share

Flood Hurricane Harvey


How well would you have done?

“I’ve heard it a hundred times: Be prepared for emergencies!”

I’m sure you have. And I’m sure the people in Texas had heard it, too. But what we witnessed this week suggests that a whole lot of them were caught unprepared.

Let’s take a look at some of what we saw just this week. It might be useful for all our neighbors and friends, not to mention ourselves.

We have learned a lot about Houston, Texas.

So many people who had been through past storms just weren’t ready for this one. Why not?

This is turning out to be an historical event. That is, NEVER BEFORE SEEN!  Not a hundred year rain, or a 500 year rain, or a 1,000 year rain. Amounts of rain outside the insurance guidelines; amounts that required weather forecasters to tear down their charts and build new ones, live on the air!

One simple fact stands out to help explain the event. Sea surface waters near Texas rose as much as 7 degrees Fahrenheit above average, creating some of the hottest spots of ocean surface in the world. This heat is what caused the storm to develop so rapidly into a Category 4 storm. (Read more at The Atlantic: https://www.theatlantic.com/science/archive/2017/08/did-climate-change-intensify-hurricane-harvey/538158/

One neighborhood after another fell victim to flooding. Why is flooding so widespread in Houston?

Again, one fact seems to stand out: “over-development.

Houston has been called “The Wild West” of development. It’s the largest U.S. city to have no zoning laws. As millions of new residents have moved in, development has been allowed in flood-prone areas. Water management seems to be built on a patchwork drainage system of bayous, city streets and a couple of 80-year-old dams. (Looking for more background? Check out this article from the Washington Post: https://www.washingtonpost.com/graphics/2017/investigations/harvey-urban-planning/?utm_term=.f2848cb00326)

The city just isn’t able to handle a big storm like Harvey.

(With more and increasingly violent storms on the horizon, you should be asking yourself about your own city’s plan and preparedness.)

Then we learned a lot from individual families.

From TV footage you could see and hear the differences between people who had prepared and those who hadn’t. Here are some of the images that stick with me, and questions we could all be asking ourselves.

1-We didn’t hear from people who actually evacuated safely before the rains hit. We did hear about some people who refused to evacuate. (One man was quoted as saying, “I got food and I got my gun. That’s all I need.”) Ask yourself: “Am I prepared to evacuate if word comes down – or would I resist, delay or flat-out not go?”

2-Many people were not prepared because they weren’t expecting a disaster. (“Lived here 20 years, assumed we’d be fine.”) Even if their homes weren’t flooded, when their neighborhood was surrounded by water, these folks hadn’t set aside enough supplies to shelter in place for more than a few days. Ask yourself: “How many days’ worth of supplies do I REALLY have?” (Follow-on question: What about supplies, including flashlights and batteries, for if the power is out?)

3-We heard so many stories from people who said they’d gone to sleep and then somehow, in the night, had wakened to find water in the house. If course, you don’t leave your TV on all night for weather reports. In an emergency, though, getting important communications in a timely fashion could mean the difference between considered action and panic. Ask yourself: “How do I plan to get emergency news?” (We’ve written before about emergency and weather alert radios that could be left on all night if need be! And here’s an Advisory with alert app info. And does your community have a Reverse 911 system, that is, an automated message delivery system that could notify you via telephone about impending flooding or other emergency?)

4-We saw image after image of people climbing out of boats with just the clothes they were wearing, perhaps gripping a small plastic bag with “valuables.” And did you see how many of them were barefoot?! Ask yourself: “Do I have an evacuation bag or backpack compact enough to carry or wear onto a boat or bus or even into a helicopter rescue basket?” (And does it have shoes in it?)

5-Pets were visible in nearly every shot. I saw a boat going by that carried probably a dozen animal carriers – just pets, no people! By the same token, I’m sure we all saw the image of the dog swimming at the end of his leash. If you have a pet, ask yourself: “Does my pet have a carrier? Can I get my pet INTO the carrier? Can I handle the carrier myself while helping my other family members?”

6-People were using landlines to call 911, and cell phones to share emergency messages via Twitter and/or Facebook. Ask yourself: “Do I know how to use social media in an emergency? Who would I send a message to? What’s their number/address?”

7-In the midst of everything, I heard newscasters mentioning that people were being urged to apply for disaster relief – like, immediately! (FEMA anticipates some 450,000 people will apply.) Ask yourself: “If I had to apply for relief from an evacuation shelter, would I be able to supply the necessary information?

Here’s a brief list, taken from the DisasterAssistance.gov website, of what you need for the application:

  • Social Security Number
  • Proof of citizenship (non-citizen national or qualified alien)
  • Insurance coverage you have (type, amounts)
  • Damage you’ve sustained (photos?)
  • Household income at time of disaster
  • Contact information

You might be able to provide direct deposit details, too, if you have them.

Don’t let Harvey get by without doing something about your own preparedness.

So do you know people who STILL haven’t done any preparing for an emergency because they “can’t imagine it happening?”

If you do, and if you care about them, please forward this article while Houston is fresh in everyone’s minds.

If you know people who need even more of a push to build a simple evacuation bag, send them to EmergencyPlanGuide.org with the recommendation that they buy our guide to building a custom survival kit. (Actually spending a few dollars may be the impetus they need to take this seriously.)
Build Your Custom Survival Kit
If you need to refresh your own kit, or build MORE kits so you have one for each family member, the workplace and your cars, our workbook will help sort it all out. (It has pictures, lists, charts, product reviews and recommendations – everything you need to approach this systematically and get it done!)

⇒    Here’s the link to the Guide: http://EmergencyPlanGuide.org/custom-survival-kit/.

Let’s all of us use Houston’s story to add to our own knowledge and resolve. And let’s contribute to helping residents of Houston however we can. They are going to need help for a long time.

Virginia
Your Emergency Plan Guide team

P.S. One other thing we learned about Texas is that people pitched in to help their neighbors. It was inspiring. Let’s hope that our neighbors would help us and we’d help them in the same way.

One size does NOT fit all

Share

Take a look at your collection of Emergency Kits

Survival kits

Which bag still works?

We regularly (although not often enough) pull out our various emergency kits to see what’s in them, whether they need re-stocking, or maybe even replacing.

Some change is always required!

So over the weekend we took a look at what’s in the various closets and trunks of our cars. The photo shows five of the current collection.

It should raise some questions for you, like it did for us!

1-How many survival kits do we need, anyway?

Joe and I are a two-person household. We’ve written often about the different items that you’d find in our kits:

  • The Commuter Bag, stays in the car, designed to get us safely home if something happens when we’re on the road. One 2-person kit per car.
  • The 72-hour Survival Kit, the true “Grab and Go Bag” for immediate use in an emergency. We each have one.
  • The 14-day Survival Stash – food and other supplies that will carry us through in the case of massive storm, big earthquake, etc. The Stash is spread around the house, and doesn’t leave it.

When it comes to Survival Kits, we have published a whole workbook. Below is one of the charts from it. You’ll see that the chart adds a Workplace Kit and a School Kit to the other two.  Now, we work from home, and don’t have kids at school, so they aren’t on our own list. Nor do we have pets. But what about your family?  (Get the details of the workbook here. If you haven’t really begun assembling your preparedness items, this may be just the kick-start you’re looking for.)

Family Survival Kit Chart

2-So are the kits different?

I think EACH kit needs to be unique!  Not entirely, of course. We’ve written before about the top 10 items to consider for each short-term kit. (Here’s the Top Ten list of Emergency Kit Starter Items, with discussion.) Some of these, for example knives or other tools, might be inappropriate for small children or older people.

But as soon as you stop to think about it, you will want other stuff in YOUR kit that no one else might think of. And there are things others in your family might need that you have no interest in packing for yourself. For example:

  • Personal items — toothbrush, floss, tampons, diapers, eye shades, sunscreen, glasses/contacts, dark glasses, chewing gum, etc.
  • Medical items – pills, allergy cream, bee sting kit
  • Comfort items – candy, toys, a book

Most of these extras don’t take up much room, but without yours you’d be miserable!

3-What’s the best container for a kit?

So again, it depends. How much needs to go into the kit? Who is going to be carrying it and how far? If you look again at the photo, you’ll see some kits which have turned out to be pretty good for us, and others that really don’t make the grade. Here’s some of what to consider.

SIZE – We got the Big Yellow/Black Banana Pak Kit (center of the photo) early on. It was designed and sold by a thorough professional – everything you’d need, of the very best quality including the bag itself. Unfortunately, the minute it arrived we realized it was TOO BIG AND TOO HEAVY. I’ve kept it in the back of the closet because I really like some of the specialty items (whistles, binoculars, knives) but it is now relegated to the long-term, permanently stored Survival Stash. I can hardly carry the darn thing. Fortunately it has wheels.

Other kits in the photo are at the other end of the scale. For example, the small black kit with green base was one that we actually sold on Amazon as part of a “starter kit.” It works fine as a Commuter Bag – room for snacks, water bottle, flashlights, radio, a jacket. But with only two compartments, it’s not very flexible.

My latest acquisition is the black “Tactical Bag” at the left in the photo above, and here in a closer look.

I just received it (That’s why it’s empty!) and it seems to have a number of attractive features:
Tactical Bag Survival Kit

  • All the straps are adjustable, and the body of the bag is expandable. (I adjusted the shoulder straps. Took a while, what with all the buckles and loops.)
  • It’s made for carrying long distances – with a front chest strap and a belly strap, padded shoulder straps, etc. Everything cinches down tight for comfort and control.
  • The bag has 9 different pockets of varying size. The larger pockets zip all around for easy opening.
  • Multiple straps and loops make it possible to easily attach more gear: a jacket, bottles, blanket, lights, boots, weapons, whatever.
  • Bag is waterproof. (I always pack a couple of large trash bags so I can cover the whole pack in one fell swoop!)

A quick detour for vocabulary:

I described this bag as a “tactical” bag. This definition of tactical comes from The Free Dictionary:

Tactical — characterized by skillful tactics or adroit maneuvering or procedures especially in military or naval operations.

Molle — And in reviewing backpacks I also discovered the word “Molle” which stands for Modular Lightweight Load-carrying Equipment. It refers to the ability of a  backpack like this one to attach other modular gear components: vests, pouches, etc.

QUALITY – As I already mentioned, the big yellow pack is made of the highest quality materials. It rolls like luggage, has shoulder straps, and can be carried by a top handle or a side handle like a duffle bag. Its zippers are industrial strength, as is the canvas bag itself. Real leather zipper pulls. Special separate pockets for different items: glasses, water, etc. Top quality, top price, heaviest by far!

The green/black “starter kit” is medium grade nylon material, with ordinary zipper and fabric zipper pulls. Medium quality, inexpensive, very lightweight.

The other bags in the photo lie somewhere in between.

If you are going to store a kit in the car and only grab it in an emergency, a medium quality bag will work fine. (Keep it out of the sunlight, of course!)

On the other hand, if you plan to carry your bag on arduous hikes or use it camping, or even as a daily carry full of books, invest in the best quality you can afford. Nothing worse than a broken zipper when you need reliability!

So go back to your chart. You are likely to need multiple kits – for different needs, for different people. (You may want to start with some used backpacks you already own, just to get a better idea of how much each pack needs to hold and thus how big it needs to be.)

Start building your kits. Soon, you will have a collection just like ours!

4-Consider a “Tactical Bag” for your collection.

There are plenty of backpacks out there labeled “tactical.” Some are absolutely huge! For your first survival kit purchase, you might consider something smaller, like this one, available from Amazon at what appears to be an excellent price. And this one gets some of the best Amazon reviews I’ve seen. (I always read all of them.)

Click on the link for details and the current price. (Remember, we’re Amazon associates and may get a small commission for sending you there to buy.)

Military Tactical Assault Pack Backpack Army Molle Bug Out Bag Backpacks Small Rucksack for Outdoor Hiking Camping Trekking Hunting Black.

Over the years we’ve worn out a number of bags and backpacks, so we’re always on the lookout for new ones for our stuff. And our “stuff” has changed, too, as we’ve moved around the country.

No matter where or when, however, we try to have a survival kit handy. When the emergency hits, it’s too late to start searching for what you need!

Virginia
Your Emergency Plan Guide Team


How to Light a Flare

Share

Accident in Darkness

Winter darkness makes accidents on the road hard to see and even more dangerous.

Having a good accident kit in the car can help protect YOU, and might help protect others if you come across an accident scene.

An accident kit is different from a car survival kit. The survival kit has stuff for YOU – warm clothing, flashlight, food, water, etc.  The accident kit has stuff for the CAR, like jumper cables, emergency reflector triangles, flat tire inflator, and flares.

Does your car accident kit have road flares?

When it’s dark, there’s nothing better than flares to warn oncoming vehicles of an accident, a stranded car or even an injured person. Flares are easy to get, easy and safe to store, and they last a long time. The problem that people have with ‘em is . . .

How to light a standard industrial flare?

Our CERT group had the opportunity to practice one evening with the police department. We hung around in our official vests, enjoying the cool evening and the chance to see each other again. When it came time to light the flares, however, some of us looked pretty dumb.

It’s not as simple as you might think!

Here are some guidelines that I took away from that evening.

1Have more than one flare so you can warn oncoming vehicles and direct them around the accident.

2-Pick where you want each flare to go BEFORE you attempt to light it. Once the flare is burning, you will not want to carry it around to be positioned! It’s BURNING and shooting off white-hot bits!  Some things to keep in mind:

  • If there’s spilled gas, don’t use a flare nearby at all.
  • Keep flares on the road so they don’t roll into a ditch or catch vegetation on fire.
  • Go to where you’ll place the flare, and then light it.

3-Remove the cap on the flare to expose the rough striking surface.

A flare has a plastic cap. Part of the cap contains a rough “striking surface.” Under the cap is the “igniter” end of the flare. You want to hold the striking surface in one hand and the flare in the other.

4-Light the flare by scratching it across the striking surface.

Extend both arms and scratch the flare across the striker in a movement going away from your body.

It’s rather like striking a very large match. Too soft a strike, nothing happens. Too hard, and you can break the “head” off the match.

In our group, most people had trouble getting the right amount of pressure and speed to get the flare to light. One person actually broke the head off the flare because he “scratched” too hard.

5-Place the ignited flare where you had planned to place it.

Put the cap back on the non-burning end of the flare. If you’re carrying it, keep the flame pointed down so you don’t get any drips on your hand.

Don’t drop the flare – you could break or extinguish it. Don’t place the flare in a puddle – it could go out.

If it’s raining, place the flare so any running water goes around the base of the flare and not directly against the flame end. You can prop it up to keep it dry.

6-The flare will burn for 10-30 minutes.

When you’re ready to extinguish it, break off the burning end and let it burn out. You cannot easily smother this flame.

(In our group, we picked up the burning flares and carefully tossed them a little ways down the road. When they landed the burning end broke off.)

After practicing, we all felt more competent.

It’s like so much else. Until you’ve practiced, you really can’t count on being able to make it work! So here’s a suggestion:

Buy a supply of flares and set up a practice. Even if everyone doesn’t attempt to light a flare, everyone in the group will clearly see how it’s done – and what NOT to do! A great CERT group exercise, and a great family exercise, too.

Hi-tech No-Flame Alternative  — LED, Battery-driven Flares

Obviously, First Responders use “real” flares because they work! Everyone recognizes just what they mean, and starts paying attention as soon as they become visible.

But not everyone is ready to handle industrial flares as described above!

If you find this just too challenging, consider a good alternative: plastic strobe light flares that are safe and comfortable to use.

These flashing, reusable flares come in two styles – stand-up flares with a tripod base, and round, disc-style flares that lie on the ground or attach magnetically to a car.

I personally prefer flares that are really bright and can be seen from all sides – so the disc style would not be my first choice.

In fact, here are flares that we own. (We also own reflective triangles made by the same company). I particularly like that they come in their own case; otherwise, the flares (and their bases) can get lost in the trunk of the car.

Click on the link or the image to get full details. (As you know, we’re affiliates at Amazon so this link will take you there.)

Magnatek LED Flashing Roadside Emergency Beacon Flares-Two RED Flares with Solid Storage Case

A couple of hints if you’re considering flares like these.

  • Each flare has 3 different settings, one of which converts it to a flashlight. Handy.
  • The flares use AAA batteries. If you leave the batteries installed in the trunk of your car for weeks and months, ultimately they will corrode. So, store the batteries in a baggie UN-INSTALLED but in the package with the flares. Of course, it makes sense to PRACTICE installing them as soon as you get the flares so you’ll be able to do it in the dark and when you’re nerves are frazzled because of an accident.
  • These flares also have magnetic bases so you could place one on TOP of your stranded vehicle for more visibility.

(This image – for one order — shows the front and back of the case. It’s misleading. Each individual case comes with two flares. If you want more than two, then you’ll have to order more cases.)

Another good idea for a stocking stuffer!  (A very large stocking, perhaps!)

Virginia
Your Emergency Plan Guide team

P.S. Again, a reminder to check the status of the batteries in your emergency lights, flashlights, etc. They ultimately do go bad if not recharged or replaced. Now’s a good time to do that.

Coconut Oil for Your Survival Kit

Share

“Good to know about” or “Essential” ?

When I’m writing about items for a survival kit, I often have to distinguish between “good to know about” and “essential to have.” Today, I’m writing about coconut oil. It straddles the line between “good to know about” and “essential to have.”  I’ll let you decide!

Coconut Oil

From my stash . . .

Coconut oil has been popular in health and beauty news for several years, and a couple of years ago coconut water emerged as a very popular drink. (I don’t care for it, myself.)

Coconut Oil for Emergencies

Lately articles about coconut oil as a survival item have jumped out at me. Then, when I got a sample recently — as a unique favor at a wedding party! — I looked into it at more depth.

Here’s what I’ve found out, and tested for myself. See if any of these work for you – then try some of the oil!  It’s inexpensive and available everywhere.

First Aid with Coconut Oil

Coconut oil is claimed to have antiviral, anti-fungal, antimicrobial, antioxidant, antibacterial and anti-inflammatory properties!  Whew! Makes me wonder how I got along without it so far!.

Some simple ways to use it that certainly sound sensible:

  • Apply to a cut to prevent infection.
  • Dot on bites, stings or rashes to relieve itching.
  • Rub between toes to prevent athlete’s foot (a fungus).
  • Relieve chapped lips with a thin coating.
  • Apply to scalp to kill lice (and get rid of cradle cap).


Shelter-in-Place with Coconut Oil

Coconut oil has an extended shelf life (up to two years, maybe longer), doesn’t need refrigeration, hardens at temperatures below 76 degrees and is liquid at temperatures higher. The image above shows my two bottles — the one I’ve been using and the one I stuck in the refrigerator.

Some excellent survival or camping ideas:

  • Rub into wood or leather to condition and protect.
  • Use to season pans and in fact, as a substitute for butter or oil for frying.
  • Use as the basis for a candle. Just add a wick to liquid oil, then allow oil to harden.
  • Use coconut oil to clean your hands – of dirt, wax, paint. (It works great as a make-up remover, too, but you won’t be needing that in an emergency!)


Eat Coconut Oil

I’m not a trained dietitian or a doctor, so I’m not making any recommendations about taking coconut oil internally. Certainly, there are many, many testimonials on the internet and on TV about its ability to improve your health. I suggest you simply research on your own. (Try looking up “coconut oil + _____” and fill in the blank with your own condition: constipation, diabetes, cancer, acne, etc.)

I did find an article that laid out healthy limits for a daily dosage of coconut oil based on your weight. Find out more about this, too, before you start taking it.

Finally, consider the quality of the coconut oil you buy. While there are no internationally agreed-upon quality terms (like “extra virgin” vs. “virgin” olive oil), it does make sense to read about how the oil is captured and processed. It all comes from the coconut — but can be washed, steamed, pressed, bleached, etc.  For our survival purposes, I would look for virgin oil for the best benefits.

Here are some examples of what look like good buys in three different categories. Click on the image to get full details and current pricing.

Island Fresh – Virgin

I selected this because its labeling specifically calls out some of the survival uses discussed above. Note that some other jars of coconut oil at Amazon refer only to their use for COOKING. In fact, some of them add extra flavors to the coconut! Anyway, this is the one I would start with for my own survival kit.


Majestic Pure – Fractionated

Note that this oil has been treated to remove certain fatty acids, rendering it odorless and greaseless and permanently liquid. So-called “fractionated” oils like this may be more convenient for cooking or general purpose beauty care, but may have lost some of their anti-oxidant properties.


Nativa – Refined, in Gallon size!

If you are planning on cooking with coconut oil (French fries!), you may want to purchase refined oil in much larger quantities. Here’s an example of an oil that has a high smoking point, no coconut smell or taste. The customer reviews are very positive.


Note: At Amazon many of the coconut oil product distributors assume you are going to want to sign up for a regular delivery, and they offer a discount for that purchase. My recommendation: try out ONE item first, or even better, try out at least TWO so you can compare, before you sign up for monthly delivery. Don’t accidentally click the wrong box!

I think you’ll end up adding coconut oil to your survival stash, just as I have!

Virginia
Your Emergency Plan Guide Team

P.S. If you have discovered great uses for coconut oil, write and let us know in the comments!


Off to College? What’s in your survival kit?

Share

Pretty exciting, isn’t it? New freedom, new friends, new food (!).

And, new dangers.

Survival kit for collegeWe can’t deal here with all the social issues on campus. But there are some things you can do to make your life away at school a bit safer and more secure. Take the time to check these out.

1-Be Ready For An Active Shooter on Campus

The news has been full of shooter incidents lately, so perhaps you’ve spent time talking about what YOU would do in that situation. But maybe you haven’t.

People most at risk are – OBLIVIOUS!

  • Walking around with their eyes glued to their cell phones.
  • Chatting or goofing off with friends and not paying attention to their surroundings.
  • Half asleep, waiting for somebody else to tell them what to do.

Time to change those habits!

Here’s a video put out by the University of Alberta that is pretty effective at reminding you what to do in case you hear what sounds like gunfire. The best stuff comes after the 2 minute intro.

Action item: Take 8 minutes right now and watch this video.

https://youtu.be/gHNApS-MC18

And then consider these actions for when you get to campus:

2-Secure Your Dorm Room or Apartment

Let’s assume that any room you are sleeping in has normal locks, and that you use them. However, if you want to be more secure – and particularly if you have been notified of danger on campus – you want to be sure you are extra safe inside.

Depending on the construction of the door, here are three things to consider.

= = > Barricade the door.

Somebody dangerous threatening you? The classic chair under the door handle really DOES work, as long as the angles are right. In an office setting, though, you may not find the stiff chair you’re looking for. So, in an emergency, don’t hesitate to pull a HEAVY piece of furniture (table, copy machine) in front of the door. Add a second heavy piece behind it.

= = > Disable the mechanism.

Keep door from opening
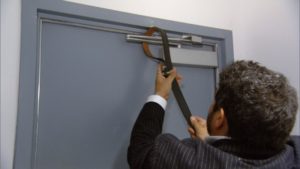
The working of a typical commercial door hinge may be defeated by use of a belt. Tighten it down to prevent the door from opening, as shown by Bill Stanton, safety expert.

= = > Get a door wedge.

In your bedroom or dorm room, a simple investment in a rubber door stop may be all you’ll need. (This one looks as though it will work on any surface.) Click on the image for details.

Keep intruders from coming in through a balcony with the help of a sliding glass door bar – you can place it in the track of the door, or, if you’ve bought one for that purpose, lock it across the center of the door. Obviously, a determined intruder can break a glass door if he or she has the tool to break it with.

3-Be Prepared For Evacuation or An Extended Lockdown

It’s far more likely that your college stay could be impacted by something less dramatic than an active shooter. But it might be equally serious – like a storm, flood, electrical outage, or even some sort of disease outbreak.

Be ready to respond to a call to shelter in place or to evacuate by having your own survival kit. Figure you need to take care of yourself for at least 72 hours – and remember, you will have no access to electricity, water or food. Or a toilet.

Stuff your kit (use a backpack) and have it handy so you can grab it at a moment’s notice.

What should be in your kit?

Basic Emergency Supply Checklist

  1. Water – 1 gallon per day. (Tough to fit in a small backpack, admittedly!)
  2. First Aid Kit with fresh supplies.
  3. Food – Canned or dried foods that you like and that don’t require cooking.
  4. Clothing – A set of warm, comfortable clothing. Extra sunglasses, glasses or contact lenses.
  5. Medicine – At least a two weeks supply of any prescription medicines.
  6. Sanitation – Garbage bags, including small, compactor-strength bags for waste. Sanitary supplies. Toilet paper, baby wipes, paper towels.
  7. Flashlights, emergency radio that operates with batteries, solar or by hand crank – NO CANDLES!
  8. Car – Always ready with half tank of gas.
  9. Cash – No electricity = no ATM, no credit card.
  10. Telephone numbers – Write on paper. Your cell phone and computer will run out of battery unless you have a solar charger.

You should be able to collect just about everything on this list right at home, before you leave for school. There’s one possible exception — the emergency radio.

Here’s a link to Amazon that will get you one of the best ones we’ve found. It operates using AA batteries, its own solar panel, or you can crank it for power. You can even charge it from your computer. Click on the image for details. (If you buy through Amazon we may get a small commission. It won’t impact what you pay.)

OK, we know you have put in a lot of effort to get to where you are. Don’t overlook some of these common-sense preparations that will KEEP you at school just the way you have planned.

Best of luck,

Virginia Nicols
Your Emergency Plan Guide Team


P.S. Please share this article with friends. It’s possible they won’t have thought of all these things, either!


Emergency Radio Update

Share

Panasonic Emergency Radio

How old do you think this radio is?

Radios — The Most Popular Piece of Emergency Gear

More of our readers “invest” in emergency radios than in any other one piece of emergency equipment. (Makes sense, of course. Without a reliable emergency radio, when disaster hits you could be completely cut off. Without a good emergency radio, you may not even know that a disaster is COMING!)

Because of this interest, we continually comment on what to look for when you’re shopping for a radio. And we regularly update our Best Emergency Radios review page to be sure the radios listed there are still available.

So it’s time for yet another radio update.

Status of our long-time favorite emergency radio

The Ambient Weather Adventurer, original cost around $30, has been our favorite for a while. We own more than one, and many of our readers have them, too. It’s a great radio to tuck into your pack or simply have on the kitchen counter.

Bad news! This model seems to have been discontinued. Here and there online you can find one for sale, but their prices make no sense! I saw one yesterday at $281!

So we aren’t recommending this model anymore. (Maybe you want to try to sell yours for a profit???)

New favorite, the Eton FRX5

Eton makes several different radios, and the brand carries a number of labels including one from the American Red Cross.

The FRX3 costs about $10 more than the original Ambient Weather, and has most of the very same features.

The one we’re recommending today, though, is the Model FRX5.  It costs nearly twice as much, but for that you get double the power, more lighting options, the ability to charge a smart phone, capture localized emergency alerts, etc.

Here’s a link to the radio: Eton FRX5 Hand Crank Emergency Weather Radio with SAME Alerts

And here’s what it looks like:

This is a very compact radio, just over 7 inches tall and a couple of inches wide. It operates on battery, AC, solar and crank. In fact, this radio earned the best score in a recent test measuring how much listen time was created by 2 minutes of cranking. (In this case, something like 10-12 minutes.)

What I like is the SAME Alert feature — stands for Specific Area Message Encoding. You enter in your county and the radio will automatically send alerts for that area.  (Seems to me this would be essential in Tornado Alley of the U.S.!)

When you click the link above, you’ll go directly to Amazon. Scroll down to the bottom of the Amazon page for a full description of this radio, with several more photos.

First time radio purchaser? Get answers to 7 important questions.

If you haven’t yet added a radio to your survival supplies, check out the Eton model above. Just click on the blue link to get started.

If you have NEVER shopped for an emergency radio before, go first to our Best Emergency Radio Reviews page because you’ll find there the 7 questions you need to consider before adding a radio to your pack, or to the survival kit of any of your family members. And you’ll see a number of other radios that we have reviewed and recommend.

The radio we would upgrade to if we were flush

I’ve mentioned before that we have an old Panasonic shortwave radio. (Joe’s had it ever since we’ve been together, and that’s over 33 years now, so its age is something older than that!) That’s the radio in the picture at the top of this page. Joe was changing the batteries, which explains the red ribbons at the bottom.

We have hauled this radio from coast to coast and back again, and Joe loves it.

Yesterday Joe handed me a spec sheet for the radio he would LIKE to have. It’s also available at Amazon, and also made by Eton. As far as I am concerned, it certainly looks a lot like the old Panasonic (!), but . . .Joe assures me that it’s “the ultimate” in radio receivers. It gets AM, FM, Aircraft, Longwave and Shortwave bands, has a rotating antenna plus you can tune-in stations by keying them in or searching for them. You can actually store 1000 stations!

If you’re really serious about emergency radios, check this one out.

Alert – Prices for the SAME RADIO vary considerably. Shop carefully to get the best deal!

Eton Grundig Satellit 750 Ultimate AM/FM Stereo also Receives Shortwave, Longwave and Aircraft Bands – Black (NGSAT750B)

And doesn’t it look a LOT like the Panasonic collector item above?


You need at least one emergency radio, and probably several. The good thing about radios is you can select the features you need (for each use or each person) and not have to buy features you don’t want, and you’ll save by choosing carefully.

Do you already have an emergency radio? Would you recommend it?  Let us know in the comments!

Virginia
Your Emergency Plan Guide Team

Don’t miss any of our equipment updates. Sign up below to get our Advisories directly into your email each week.


Plastic Bags – Use or Reuse for Emergencies

Share

PlasticBagsToday I stuffed 20 or so plastic bags into one, so I can take them back to the store to be recycled. It’s amazing how many accumulate in just a couple of weeks – and we carry reusable shopping bags!

Be that as it may, I always keep some bags handy for emergency use! Here are 20 ways they can come in handy or even save the day!

And the best part? You can collect these bags and add them to your kit for free. (Or at least you MAY get them for free. A new law was just passed in California to ban free plastic bags . . .)

Keep out moisture

  1. Use a plastic bag to line your Bug Out Bag, to help keep it water proof.
  2. Use zip-lock bags for storing food, small items, cosmetics, etc. in your bag.
  3. Put a plastic bag OVER a backpack to keep out the rain.
  4. Turn a large plastic bag – like a trash can liner – into a rain poncho. Just make a slit along the seams for your head and arms.
  5. Use bags inside your boots to keep your feet dry.
  6. “Wear” underneath your clothes for extra insulation.

Protect from dirt

  1. Pull a plastic bag over your hand before picking up something dirty. Then just turn the bag inside out and dispose of it.
  2. Tie a bag over your face to keep out blowing dirt or sand. (Of course, don’t use thin plastic that clings for this!)
  3. A plastic bag can work as a diaper. (Why, I remember the earliest plastic diapers that I used on my daughter really weren’t much different!)
  4. Water out of order? Use plastic compactor bags in the toilet to capture waste. (These won’t likely be bags that are reused. But having a supply is essential for your emergency stash.)

Aid for First Aid

  1. Use zip-lock bags to store different first-aid supplies, keeping them clean and dry. You can pack full small bags into a larger bag for easier and more efficient access. (For example, pack gauze in one bag, band aids in another, tape and scissors in a third; put them all in one larger bag.)
  2. Fill a bag with ice and apply over an injury to keep swelling down.
  3. Turn a plastic bag into a sling.
  4. Tie a bag over a bandaged wound to help keep it dry.
  5. Somebody sick? Use a bag to catch vomit or diarrhea. Yukky, but better than having it spread all over the car or your living area.

Other smart uses

  1. A bag with no holes can be a temporary carrier for water, snow, berries, etc.
  2. Twist a bag or two together and use them as a belt or a carrying strap.
  3. Fasten a number of bags together end to end to use as rope. Braid several strands for more strength.
  4. Use a white bag as a signal or strips of bag to mark the trail.
  5. If an emergency keeps you trapped in the house, use trash bags – for trash! You can always dispose of it later.

As you’re packing your Survival Kit, use a few extra bags as padding, to cushion the sharp corners on tools, keep shoes separate, etc. That way you’ll always have some at the ready.

And one last note about the “secret ingredient”

Many of the ideas above would work a lot better if, in addition to the right sized bag, you have DUCT TAPE. (That’s an old roll in the image, above. Recognize it now?)

Use duct tape to close gaps, make sure the bags stay put, and even to seal them up when they’re full of waste.

These two essentials – plastic bags and duct tape — should be in every one of your kits. And the good news? They’re practically free!

Virginia
Your Emergency Plan Guide Team


Readers and friends send me ideas all the time. Don’t hesitate if you have one. And don’t miss ANY of them. Sign up below to get all our Advisories.


Pedestrian Killed In Accident

Share

When you’re driving, how well do you see pedestrians or bikers?  How about at night?

Man in darknessIt’s raining in California – at last! Yesterday our day was wet and gray and darkness came early. We stuck close to home and didn’t even take the car out.

Probably a good idea. According to Marc Green, legal expert in “Human Factors” (vision, perception, memory, etc.), “ [the] pedestrian fatality rate is three times higher at night.”

Darkness, smoke, fog, rain = all mean lower visibility and even greater danger for pedestrians.

Somewhere someone is experiencing these conditions right now.

In an emergency, conditions will be worse.

Imagine yourself on foot, either as a victim or as a responder. Street lights are out. The roadway has buckled and cracked so vehicle headlights are jerking and flashing in all directions. Blustery rain is coming down and water is pooling everywhere.

Drivers don’t know what to expect — so their reaction times are slower than ever.

What can you do to protect yourself? Wear high-visibility clothing.

We see safety vests every day, worn by people working in construction, landscaping, traffic control and clean-up. These workers’ vests are required by OSHA (Occupational Safety and Health Agency) and, in fact, they must “reflect from all sides for 1,000 feet” in the dark.

Smart joggers and cyclists have taken to wearing reflective clothing as a safety precaution when they are out in the dark. Typically they have wrist or ankle bands or reflective tape on a backpack or fender. High-fashion garb has stripes, sometimes even small LED lights built in.

(As a driver, I appreciate their efforts, and find myself yelling at those who DON’T make it easy for me to see them.)

The BEST gear is both fluorescent and reflective, or retroreflective.

Fluorescent materials actually emit light by converting invisible ultra-violet rays to visible light. They work best in low natural light, particularly dawn or dusk. Reflective materials bounce a beam of light off their surface – thus they only work as long as a light is shining on them. Retroreflective materials combine both fluorescent and reflective properties.

Get high visibility gear into your emergency kit.

Some popular high-visibility “vests” really look just like a pair of wide suspenders and belt. Convenient to carry and easy to slip on and fit. Here’s a popular one from Amazon: Rioa Best Reflective Safety Vest – Stay Safe Jogging, Cycling, Working, Motorcycle Riding, or Running – Elastic and Easily Adjustable Means the Best Running Gear Around


In my estimation these belts, even with wrist or ankle bands, may not provide enough coverage.  In fact, if you are moving in an emergency situation – crawling, running, bending, digging – the viewer may see movement but not be able to tell what it is he or she is actually seeing.

I prefer a full vest, like the one pictured below: High Visibility Gear Set of Reflective Safety Vest with Pocket + 2 Wristbands+Bag | Perfect for Running Walking Cycling Jogging Motorcycle | Fluorescent Yellow | Size L/XL This vest will make it clear that you’re a person. It has a pocket for your phone or keys, and comes with a small storage pouch.  The hourglass design leaves your sides less visible, so arm/wrist bands help fill in that gap.

Adding a high visibility vest to your emergency kit is easy, and you will find that you pull your vest out more often than you might have thought. For example, I’ve used mine just to walk from a distant parking lot to an event, and I’ve lent it to a friend who found herself drafted to direct traffic during a race. Of course, for CERT trainings I wear my CERT vest, but it is bulky and no where near so comfortable (!).

Virginia
Your Emergency Plan Guide Team

P.S. Be sure to consider what you might be wearing UNDER the vest to be sure you get the right size.


Hang On To That Swiss Army Knife

Share

A Gift for a Lifetime

I got my first Swiss Army knife when I was about 8 years old, a gift from a friend of my mother’s. (A boyfriend? We’ll never know!) I don’t think I’ve been without one in my pocket since.

When I say without “one” I should really be saying “without several” since there are so many different models, each with some special feature, that you want to own one of each! (Well, maybe not every one. Read on . . .)

Real Swiss Army knives, brand name Victorinox, last nearly forever if you don’t lose them.

If a part breaks or goes missing, you can fix it!

Replace scissors spring on Swiss Army Knife

Replace scissors spring on Swiss Army knife

Here’s what got me started on this Advisory. I had to . . .

Replace the broken scissors spring

in one of my favorite small knives.

I use these scissors a LOT, for cutting everything from paper to fingernails to packaging tape.

(Once I even used the scissors to give myself a quick haircut when a posh restaurant thought my hair was too long to let me in.)

Where to find the spring

In years past I have found the scissors spring at hardware or sporting goods stores, but for the last three years I’ve had no luck. (Maybe people prefer to sell a whole new knife rather than a $2 set of springs!) I( knew I could get them from Victorinox, but that involved more shipping that I wanted to fool with.)

This time, I went to Amazon to get what I needed. Here’s the link to the purchase, for a grand total of $2.95. Victorinox Scissor Spring, Small

How to replace the spring

Replacing the spring takes four things: a new spring (image 1 shows the package), some sort of round file or punch (image 2) , a pair of needle-nose pliers (3) and a little dexterity.

And here are the steps to replacement.

  • Open the knife so that the scissors extend at a 90% angle.
  • See the round hole near the base of the scissors? One side of the hole has sharp edges; on the other side, the edges have been rounded.
  • Use the pliers or a punch to push/pull the old spring out so it comes out the rounded side of the hole. I found that the tip of a small round file worked perfectly for me.
  • Use the pliers to press the new spring into place from the rounded side of the hole.
  • Be patient and persistent. You may need to flex the spring slightly to get it into the hole.

Knife like new, back in my pocket for another day!

What about other models of the Swiss Army knife?

Victorinox (and competitor, now partner Wenger) has produced many different models since the company started in the late 1800s. All have a main blade plus various auxiliary tools – as many as 30 in various combinations! Most also have the familiar red handle with white cross logo.

Most practical multi-tool

While it’s great to have different tools all in one, the largest Swiss Army Knife that I find practical is the Swiss Champ. It costs $73.49, and its holster adds another $8.34.  (Yes, I own both.)
Victorinox Swiss Army Swiss Champ Pocket Knife (Red)

If you want more tools, of course, you can get more. In 2006 Guinness World Records recognized a knife (made by Wenger) that had 87 tools and 141 different functions and that cost upwards of $1,000!

Best for everyday use

And for everyday use, I carry the “Midnight MiniChamp” version with built-in ball point pen and flashlight . . .

Victorinox Swiss Army Midnite Minichamp, Sapphire

(This picture shows the knife in blue, but of course, it comes in red, too.)

If you’re shopping for yourself or for a gift, take the time to review all the different models to get the exact knife you need. Again, a small convenient pocket knife is one thing, and a versatile multi-tool for your survival kit and/or emergency kit for the car serves a completely different purpose.

Either way you can rest assured that this will be something to treasure.

And one final note, just for fun. It turns out that the name “Victorinox” is a combination of the original owner’s mother’s name – Victoria – and the French word for stainless steel, “inoxydable“, shortened to Inox. (Stainless steel was invented by an Englishman in 1913.) Oh, and the clever family that named the company still owns it, four generations later.

Joe Krueger
Your Emergency Plan Guide Team

P.S. I’ll bet you have a favorite Swiss Army knife. Which one and why? Your comments may help others decide which one(s) to get!


Pack Your Survival Kit for Evacuation

Share

At our neighborhood CERT meeting yesterday, the question came up about the best emergency supplies kit.

Whatever kit you have is better than none.

If you are forced to leave home (or work) in a big hurry, you’ll only have time to grab “the kit,” and hopefully a bottle of water. Whatever is in the kit is what you’ll have to work with. You won’t have time to do any packing!

If you don’t have a kit, you’ll be worse than useless – you’ll be a burden on others.

Assume you have to manage your kit yourself.

Here in California nearly every trip I take is in my car, so I have several types of emergency stuff packed in the trunk. But what if roads are impassible, or the car is disabled, or we are asked to evacuate ON FOOT?

The only solution: ONE bag that I can carry myself.

Can you carry your kit?

At our meeting, several people stated flat out, “I can’t carry anything.” These were people who need a cane or a walker, who have back problems, or who are simply not very strong.

How many people in your family or your team at work would have trouble carrying a bag?

Which survival kit option would work best for you?

The best option . . .

for a survival kit is a backpack that will leave both your hands free.

When Joe and I decided to put together our kit  we looked for a backpack that was light, flexible and NOT TOO BIG. (Our build-it-yourself kit, shown in the image with its accompanying book, has sold out at Amazon.)

If you’re a hiker, you’ll be familiar with much larger and sturdier backpacks, with many more features. Maybe you even have one you can use for a survival kit. But we looked for a pack that the ordinary person could (1) afford and (2) be able to manage.

Because your backpack needs to be compact, you have to be deliberate in selecting what needs to be in it. It’s easy to lay out too much stuff!

Second best option . . .

in my opinion is a rolling cart. You can select something as sturdy as a rolling suitcase, but for emergency, infrequent use you likely will want something simpler, smaller and lighter. Here’s what looks like an excellent choice. This one’s called the  California Pak The Big Eazy 20 Inch, Navy Blue, One Size
and it comes in various sizes and colors.


Some things to consider about a rolling cart:

  • Does the cart/bag have a handle so it can be carried by hand if necessary?
  • Could you fit it on your lap in a bus?
  • Does it zip up or otherwise close completely?
  • Is the handle long enough for you?

Each person needs a kit, and each kit will be different.

What you think is important and are willing to carry is up to you. Your 10-year-old child, though, probably needs a few different items (including snack food!). And your 79-year-old grandmother needs other items altogether.

Action Item: Build a basic kit for each person, and then add those individual items to customize the kit to its owner.

Store the kit near the exit door, so you can grab it on the way out. You’ll only have minutes – but you’ll feel a lot more secure heading out if you have your survival kit in your hands.

It’s always back to basics, right?!

Virginia
Your Emergency Plan Guide Team

P.S. Your pet needs an evacuation kit, too. Here’s a link to more about your pet’s survival kit.


Stocking Stuffers for the Whole Family

Share

Traffic was CRAAZY today, and it’s not even Thanksgiving! Everywhere the news is about early shopping (plus some football games, of course).

If you’re ramping up for some holiday shopping of your own, I’d like to suggest the following . . .

Emergency survival kit items

“Makin’ a list . . .”

Small, very cool, dual-purpose gifts

By which I mean, gifts that are fun to receive and even to play with, but which have a much more lasting value because they become important items for a survival kit!

Here are seven such treasures, each under $25

If you need a shopping list, just print out this page!  If you want to shop (which I recommend!), click on the links below each item description.

Clicking the links will take you to Amazon, where you can compare and combine items for the best possible pricing plus free shipping. Just so you know, if you buy from Amazon, we may receive a small commission.  It doesn’t change the price you pay.

 *  Headlamp – Of course you have a flashlight in every car and hopefully one in every room of the house. And, we hope, with at least 200 lumens. Now, consider how handy a HEADLAMP will be when both arms are full of blankets, children, toys, or other supplies!

LE LED Headlamp, 18 White LED and 2 Red LED, 4 Brightness Level Choice, LED Headlamps, 3 AAA Batteries Included

*  Magnesium lighter – Hold a fire-lighting contest for all your teens on Christmas Day. This 3-pack of magnesium lighters gives you the chance to compete – and learn an essential skill!

The Friendly Swede Magnesium Emergency Fire Starter Blocks (3 Pack), Black

*  Paracord bracelet – Totally cool, totally comfortable, and very handy in an emergency, these bracelets contain 17 ft. of strong cord and come in just about any color you – or family members – could want! This link is to a braid-it-yourself kit, which would be a great holiday activity. Or pick out an already-made one.

Paracord Planet 550lb Type III Paracord Combo Crafting Kits with Buckles (ZOMBIE)

*  Tin of hard candies – Chocolate melts, caramels ooze and stick, mints crumble. But hard candies withstand all sorts of weather and when you need a pick-me-up in an emergency – or on the long drive home after the holidays! – this will do the trick. Top quality, top flavor.

Cavendish And Harvey Candy (3 Pack) Fruit Hard Candy Tin 5.3 Ounces Imported German Candy (Orange Drops)

*  Swiss Army Knife, the classic – We all love our Swiss Army knives. Whether you get this simple, efficient one or a giant, every-tool-in-the-toolbox version, it will be a welcome gift. And a great addition to a survival kit.

Victorinox Swiss Army Camper II Folding Camping Knives, Red, 91mm

*  Walkie-Talkies — Favorites of children, parents and CERT members, these handy radios work for fun games around the house, at the mall for keeping track of the family, and in an emergency when all other phones are out!  (We have several pairs, with pre-arranged channels in case we are separated.) (As you shop, consider the range figures as approximations only, achieved under “optimal conditions!”)

Midland LXT118 22-Channel GMRS with 18-Mile Range, E Vox, and Channel Scan (Pair)

*  Water Bottle with Built-In Filter This may not fit in your traditional Christmas stocking, so add it after everything else has been opened. We know water is essential, but bottled water gets old, and is really heavy. What you CAN pack so it will always be ready is a reusable water bottle with built-in filter.

LifeStraw Go Water Bottle with Integrated 1000-Liter LifeStraw Filter

Now, if you’re VERY detail oriented . . .

. . . you will have compared this list with the photo and you will have discovered two discrepancies. First, the list contains a water filter bottle that isn’t shown. (Too big to fit in the sock, and too big to fit in the picture!) and Second, the image shows a radio that’s not listed.  This happens to be one of our favorites, so I included it because I do as often as I can.  Find out more here on our radio review page.

Do you have recommendations we can add to our list of “Favorite Survival Kit Goodies Under $25?”  Send them along!


Virginia
Your Emergency Plan Guide team


Don’t miss any of our free Advisories. Sign up below to get them every week.


Value of Employees . . . Before and After a Disaster

Share

If you’ve been following this blog for the past several weeks you know that we’re big on coordinating Personal Survival Plans with Business Emergency Planning.

The reasoning is simple . . .

Businesses depend on their Employees and Employees depend on their Employers.

But it’s pretty well known that most small businesses don’t have adequate Emergency Response Plans.  (Only around 67% have any plan at all.)

Small businesses never reopen after a disaster.

The future of your business?

Worse, statistics show that following a catastrophe, half of the businesses affected NEVER re-open their doors!

Why are businesses at such high risk?

  1. Owner attitude.

First is the attitude of some owners that they’d rather just cope with an emergency when it hits rather than make any plans to prevent or mitigate it. (We have to ask, if this is you or your boss, are you really a business person?)

  1. Emotional impact.

A second factor to business survival is that a major emergency has a dual emotional impact on employees.

Beyond their direct experience at the workplace, with damage and possible injuries, is the safety of their family members who may have been affected, too – but are spread out in the community somewhere.

Since communications are likely to be disrupted, employees will want to leave the workplace immediately to check on their loved ones. Once they disappear, the business has little chance of maintaining critical functions.

Improve the odds: integrate personal emergency planning with business survival planning.

Anything the business principals can do to facilitate employees’ family and neighborhood emergency planning will work to the benefit of all concerned.

One way to begin is by making sure that all employees have adequate Personal Family Survival Plans. This includes:

  • Personally-tailored survival kits at home
  • Kits at work and/or in their cars
  • Communication Plans for family members.

Take advantage of holiday timing.

Now might be a way to kick-start this by seizing on the holiday spirit.

Since we do not advocate buying pre-made, one-size-fits-all, survival kits — which typically include a lot of useless (or low quality) items – we strongly recommend that you consider getting them started with an empty backpack like this one from Amazon. It is big enough, but not too big, and has the advantage of opening from the top to give easy access to everything inside.  And if your company gift policy limits employee gifts to a maximum of $25, you’re in luck!  (Click on the image to get full details, price, etc.  Different colors have different prices.)

As a gift, the survival kit meets important criteria.

  1. It’s meaningful.

Every step that an employer can take to help employees prepare their own personal disaster plan will be meaningful for both.

  1. It’s personal.

Some people really like clothing with logos, or parties, but others don’t appreciate those gifts at all! Candy? Cheese? Wine? These all depend on people’s personal tastes.

The survival kit is a backpack waiting to be filled with items that the employee chooses!

How to add value to this gift.

The business can use the survival kit to kick-start a more in-depth discussion of preparedness. Setting up an emergency supplies fair at lunch or after work, for example, can improve the odds of employees actually building their kits.

The business can do even more by adding an item to go into the kit – for example, a flashlight or solar-powered or hand-crank radio. Here’s a link to our updated list of the top 10 survival kit items.

And an additional benefit. . .

If your business is one of the 37% of businesses without any business continuation plan at all, this whole campaign could be the impetus to get a company plan started!

If this idea makes sense, you can head directly to Amazon to take a look. Here’s the link: Fuel Top Loader Cargo Backpack (Black)

And if you want to talk over some ideas of how best to present the backpacks to your employees, or how to speak to your employer about providing them to the workforce — just give us a call.  We have a lot of good experience with “employee gifts” that we will be happy to share!

Virginia
Your Emergency Plan Guide Team

P.S. I mean that about the call!


Survival Kit Missing Item

Share

Prescription medicines

Do you recognize this warning?

Do you have basic survival gear packed and ready? The dozen or so basics plus personal items? Water for at least three days?

What about supplies for the longer term?

Enough for 10-14 days

We work on a 10-14 day plan, since that’s how long it could take in a widespread emergency for rescue workers and government agencies or the Red Cross to reach us. And when we look at that time frame, we see an immediate problem. It’s medicines.

Many prescriptions can’t be renewed in advance.

Most medical and pharmaceutical offices have a policy of not renewing prescriptions until the last possible minute – that is, not until the current supply is exhausted, or, at the most, 2-3 days before the last pill or dose is due.

On its surface this seems like a rational policy, and, of course, is probably the best way to manage inventory.

But, on closer examination, the logic breaks down completely. If the disaster hits when you’re down to your last 3 or 4 pills, you could be facing a compound emergency.

“Do not skip doses or discontinue.”

You may survive the disaster only to have created a medical emergency for yourself! How often have you seen a message like the one in the image:  “Do not skip doses or discontinue unless directed by your doctor.”

Power outages will make purchasing medicines impossible.

Following a major disaster, entire regions may be without electricity. This means ATMs, credit cards, and gas stations won’t be working. Mail won’t be delivered.

This also means medical offices and pharmacies, along with all other businesses in the region, may be closed entirely. It could be days or weeks before life returns to normal – and thus days or weeks before you can get your prescription refilled in the normal way.

Discuss this with your physician and pharmacist.

Could your first prescription be renewable after two weeks instead of only after 30 days? Or could the initial prescription contain enough for 45 days, and not just the usual 30? You’d then at least have a chance of having enough pills so you could continue your prescribed treatment even if your normal source of medicines is unavailable.

We suggest that you have this discussion with your physician and/or your pharmacist. Surely they will see the logic of your request — unless they simply don’t see the benefit of preparing for emergencies. You might want to put your request in writing to get “on the record” and give them something to work with.

Consider this fall-back strategy.

In the face of this problem, we order refills as soon as we can: in 25 or 26-day increments. This gives us the chance to build up an extra 14-day supply, 3 or 4 pills at a time.

We keep the extras in our survival kit, rotating them regularly to be sure they are fresh. Naturally, this means the kit has to be opened up and closed up again pretty often.

It seems a shame to have to “outwit the system” this way, but when health (or even survival) is at stake, it’s simply necessary.

Don’t overlook this survival kit item.

If you know friends or family dependent on medications, send this post to them and suggest they print off a copy for their doctor and their pharmacist. And encourage them to consider how they will get that extra 10-14 days’ supply of prescription medicines to keep them going in an emergency.

Emergency Plan Guide
Joe Krueger and Virginia Nicols


Survival Kit Stories

Share

Real life emergency stories, from real people.

Thumbs down Survival Kit StoriesSetting: In the rental office, talking to the woman behind the desk.

“Do you have some food for if you were trapped here in the office in an emergency?”
“Well, no. I thought that was the job of the Red Cross.”

Setting: Talking to a featured speaker at my recent Las Vegas conference.

“You’re living on the beach in North Carolina, right? Do you have emergency food set aside for when the next hurricane hits?”
“Well, not exactly. But I did unplug the freezer so I don’t have to throw all the spoiled food out, like I did last time. That cost me $300!”
“But what about food supplies for after the storm?”
“We eat only healthy, fresh food, so there’s no way I can store anything . . .”

Setting: Video snippet from a recent training held here in our neighborhood. The TV camera is trained on a hysterical woman in New Jersey, after Sandy:

“Where’s the government!? We’ve been waiting three whole days . . .!”

What’s your survival kit story?

If you and I were to meet on the street, and I posed these questions to you, how would you respond?

  • How many 3-day survival kits do you need for your family?
  • Where does each kit need to be? At your home, in the car, at the office?
  • How many kits have you actually put together?

As I’ve mentioned before, our local fire department has told us flat out:
“When the big one hits, you’re going to be way down on our list.”

All this points to our having to manage by ourselves for the first 72 hours.

You know that we have done a lot of research on pre-made kits, and generally find them lacking when it comes to quality and quantity.

Worse, having a pre-made kit may give you a false sense of security.

So our recommendation has been, and remains:

Build your own customized 3-day survival kit.

Here’s a link to an updated list of our favorite starter items : Top 10 Survival Kit Items

It may take you a few days to a week to assemble all the items for your kits. Turn kit-making into a family “pick and pack” activity!

Three days.

Easy enough to get through when you’ve got the basics: food, water, light, communications.

Really tough when you have nothing . . .

Virginia Nicols
Your Emergency Plan Guide Team