Tag: survival kit

Commuter’s Go Bag — Will the road home get you there?

Share

My daughter’s long commute by car.

Commuter's Go Bag MapOne of my daughters is an executive and works in Beverly Hills, California. With no real public transit available she is forced to drive over 100 miles to and from work, spending a total of almost four hours on the road every day. Every morning she sets out in her executive clothing and footwear and with a list of business phone calls to make along the way.

With two children in separate schools and on different schedules, her chances of a speedy reunion with family following a major earthquake are slim. Roads and freeways could be restricted for use by emergency vehicles responding to calls . . . or even possibly blocked by collapsed bridges and overpasses. At the very least, if the earthquake happens during the workday, roads will be massively congested with people trying to reach home.

If she had to walk to get home . . .

. . . she could. But 50 miles could conceivably take days.

Fortunately, she is conscientious and, of course, has me to help keep her on track!

What’s in her personal Commuter’s Go Bag?

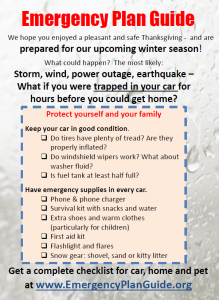
In the trunk of her car she carries a Commuter’s Go Bag that we put together just for her. It has the usual Survival Kit items that you’d expect: walking clothes including comfortable shoes, a jacket, some energy bars and water, a portable radio, and a flashlight with extra batteries. There’s a notebook and pen. And because this is California, she has a space blanket AND an extra pair of sunglasses.

In addition, she carries extra prescriptions for a medical condition, and some cash (coins and small bills).

And because she is competent to deal with it, she has pepper spray.

Perhaps most important, she has paperwork: a list of contact numbers including some for family out of state, and maps that show her route and alternate ways to get home. (GPS may well be out.) She has teamed up with other employees who live in the same general area so they could travel in groups, and they have made note of “safe house” locations along the way where she — and any companions – can stop and rest.

She is good about keeping her car’s gas tank at least ¾ full at all times. If there is a general power outage that could last for days, neither ATMS, Credit Card Processors nor gas station pumps are likely to be operating, of course. I have suggested to her that a small, plastic, fuel canister and siphon hose that could siphon gas out of other stranded commuters’ cars may come in handy along the way! (She gets the concept, but hasn’t been ready to practice siphoning yet . . .!)

Finally, my grandchildren also have emergency supplies at home and know where to go and whom to call following a major emergency because neither mother nor dad is likely to get home any time soon.

Doesn’t it make sense for the commuters you know to have such a kit?

Putting together all the items mentioned above would cost about the same as a tank of gas. Naturally, you’ll have to complete your kit with more personal stuff.

Let us know how it goes!

Joe Krueger
Your Emergency Plan Guide Team

P.S. We added an emergency kit to our granddaughter’s car too. Here’s the story!

LifeStraw Personal Water Filter

Share

Show and Tell

At our recent neighborhood meeting, our CERT leader asked me to do a “show and tell” on the LifeStraw® that I have in my emergency supplies. The photo shows what I shared with the group.

Lifestraw

My LifeStraw: mouthpiece open at left

The LifeStraw is a tube you suck through (the “straw”) to filter water when you’re out camping or in an emergency.  I discovered it about three years ago after my son became very ill from swallowing water on a hiking trip. (He spent 5 days in hospital; his organs started shutting down due to dehydration.)

LifeStraw features

There are other products that look the same, but the LifeStraw appears to be “the original.” It won awards when it came out in 2005, and was chosen by the U.N. to provide clean drinking water in developing countries. Later was it made available in the U.S. by manufacturer Vestergaard Frandsen. It costs about $20.

The LifeStraw is handy and simple:

  • It is small and lightweight, so fits into anyone’s survival kit.
  • It requires no batteries or replacement parts.
  • It filters up to 1,000 liters – about 265 gallons.

You can stick the straw into a puddle or stream and drink directly, or scoop up water into a bottle and then stick the straw into the bottle. It filters out 99.99% of bacteria (for ex., e coli and salmonella) and protozoa cysts (Giardia), which is what made my son so sick. It does NOT filter out viruses, which are too small to be caught. And it does not make salt-water drinkable.

How to use it

Since there are no chemicals in the straw, the water coming through has no chemical taste. You remove the caps at both ends and sip through the mouthpiece. It takes a good 4-5 pulls to get the water started. To keep the filter clean, you blow back through the straw to unclog it.

You can use the Straw over and over again.  Just keep it clean and let it dry out before you recap the ends.

Here where we live in Southern California, we are not likely to have puddles to drink from in an emergency since we get so little rain! However, in an emergency, we might be forced to look for other sources of water: water heater, toilet tank, or big water barrel. Getting water out of these tanks would likely involve some dirt, grains of rust, sediment, etc. Filtering the water through the LifeStraw would be a reassurance of its quality.

If you or family members live stormy areas or hike or camp a lot, this is a no-brainer addition to your emergency kit. Get more information at Amazon:
LifeStraw Personal Water Filter

Next time: Water from Swimming Pools

I’m on a roll now about water. Next blog will be about how to use SWIMMING POOL WATER in an emergency.  Can you?  Should you? How to treat it first?

Stay tuned.  (If you don’t want to miss that next Advisory, sign up right now on the form below.)

And do check out that LifeStraw. It just feels right.  It makes a great gift!

Virginia Nicols
Your Emergency Plan Guide team


Ouch! What I found in my Survival Kit!

Share

As a part of National Preparedness Month, we’re going to be staffing a table at a neighborhood preparedness faire. So I pulled out of my car the emergency kit I had first put together after my Community Emergency Response Team (CERT) training.

Outdated CERT gear

Don’t use these!

Look at the photo and you’ll see some of the yucky things I found!

* Corroded batteries in my flashlight! (Upper right arrow) The kit actually has two flashlights in it. One was the high-tech model (from Sharper Image, no less) that holds AA batteries. Look closely and you’ll see the totally blown-out end of one of them! We find that batteries need to be replaced every 6 months if they are in a light or radio.

* Dried up and useless first aid items! On the left in the photo you can see the shriveled up antiseptic wipes and the stained band aid packages. Although they had been stored in a plastic bag, not one of them was usable.

* Melted and leaking pens! CERT training reminds you to have a way to write on a door when you’ve searched the room, write on a piece of tape to label someone, or write right on their skin. We assembled a variety of writing implements for these purposes, including crayons and permanent markers. Again, stored in a plastic bag, they melted and leaked. I could hardly get that one crayon out to be able to photograph it!

What’s the state of your Survival Kit? How about your CERT bag? (These are two different things, of course. Survival Kit is to help you; CERT bag is to help others.) Consider setting up a schedule to update and refresh your kits.

Use the twice-a-year time Daylight Savings Time change as an update reminder.

In addition to replacing old items, here are a couple of other suggestions for keeping your kit ready for use:

1. Best battery solution. Store batteries in a bag taped to the flashlight or radio. Whereas they seem to deteriorate quickly when stored INSIDE the device, they keep much longer when stored separately.

2. Rubber gloves. Your CERT kit will have disposable nitrile gloves — the thin rubber kind that your doctor wears – for use in an accident. These gloves are very fragile; replace every six months.

3. Environment. Think about where the kit is kept. I keep my kits in the trunk of my car – where temperatures reach over 100 degrees. Obviously, crayons aren’t going to be happy in this environment.

4. Backpack. If your kit lies in direct sunlight (in your car, for example), the duffle bag or backpack material will deteriorate over time. The first to go on my CERT kit were the carrying straps.

5. Clothing. I have a long-sleeved shirt, a sweatshirt, and hat in my kits. While they don’t deteriorate, a wash and fluff keeps them more usable.

Reviewing and updating your kit takes only a few minutes – less time than it has taken me to write this article! You’ve made the investment – be sure to keep it tuned up.

What have YOU found in unattended survival kits that we should be warned about?  Let us know in the comment box below!

Virginia Nicols
Your Emergency Plan Guide Team

Lessons from the Village of Cold Spring – Seven Steps for Eastern Cities

Share

An excellent article by Michael Turton came out today in the Philipstown.info. It hit on important preparedness issues for cities in the east – or anywhere, for that matter.

Map of Cold Spring NY

Thanks to Wikipedia for this map.

(In case you aren’t familiar with this part of the country, the Town of Philipstown is in Putnam County, New York. Two incorporated villages lie within the Town. The Village of Cold Spring, focus of Turton’s article, is one of them. It lies across the river from the U.S. Military Academy at West Point.)

If you don’t have time to read the whole article, here are highlights, with my comments. Every single one of these points could be an action item for your group or community!

1. Leadership. Set up a local committee if you don’t have one yet. Turton’s article refers to a specific committee being put together for the Village of Cold Spring. The Mayor and a Trustee sit on the committee, as well as residents.

2. Registry. Find out who in your community needs special care. First Responders need to know who lives where and what special circumstances exist, such as a need for oxygen or wheelchair access. Having this information allows them to check even before a storm hits. The Cold Spring committee is starting with volunteer participation in assembling a resident registry – but the committee is willing to consider a local law if necessary.

3. Local centers. Identify local venues that could serve as temporary respite centers – but not necessarily “shelters.” As reported in the article, a formal “shelter” may require security and medical personnel.

4. Emergency supplies. Put shelter in place as first priority, evacuation as second. Of course, shelter in place requires that people have survival kits for the first 72 hours, enough to get them home safely. And then, at home, they need more emergency supplies to carry them through.

5. Priorities. Set guidelines for the distribution of community resources: sandbags, medical supplies, pumps, fuel supplies, etc. Who gets first access?

6. Gawkers. Educate the community about the dangers of gawkers. (Aside from Virginia Nicols – This is a tough one! We’ve had neighbors get all in a huff when our local team kept them from driving right up to the site of a fire, impeding the fire department and hindering rescue efforts!)

7. Authority. Make sure people know HOW to turn off community utilities (gas, lights, etc.) and that the turn-off switches work in all conditions. (Another aside from Virginia: Authority to turn off community systems – such as natural gas distribution systems — needs to be limited, and those people need to be properly trained.)

Here in the west, more groups are forming this month to do precisely what the Village of Cold Spring has begun. What’s going on in YOUR community?  Let us know by sending a comment.

Virginia
Your Emergency Plan Guide Team

Survey Shows Half of American Families Without Survival Supplies

Share

Which half do you fall into?

A poll conducted first in 2012 by the Adelphi University Center for Health Innovation — and repeated since then with the same results —  revealed the following:

Equation
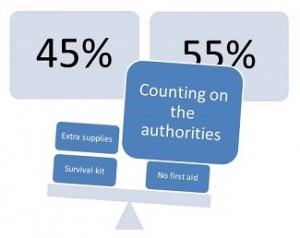
◊  48% of Americans don’t have a survival kit or emergency supplies.
◊  Americans believe they can survive an average of 16 days in their homes . . .but over half don’t have even a 3-day supply of non-perishable food and water.
◊ 55% of Americans believe that “authorities” will come to their rescue when disaster strikes.

If you had been a part of this poll, which half of the group would you have fallen into – the half with a survival kit and emergency supplies, or the half counting on someone else to take care of them?

Are you a “taker?”

There has always been political talk about our American Society being “a society of takers.” Most of the rhetoric has been distasteful, some has been ridiculous.

But when it comes to disaster preparedness, there does seem to be a “taker” group — a group that somehow expects others to take care of them. In my estimation, that “taker” half of the population seems to be either lazy, in denial or just plain . . . well, you add in your own best word there!

September is National Preparedness Month. People around the country are planning events to get neighbors and neighborhoods involved. Joe and I will be part of the activity: we typically have three different activities on our calendar this month!

When it comes right down to it, though, there’s only so much we can do. Ultimately, it is up to individuals.

It’s up to individuals . . . meaning you.

Remember that great advertising line, “He ain’t heavy, he’s my brother.”? Here’s another version aimed at disaster preparedness: “It’s not hard, it’s just common sense.”  The first three steps are particularly easy:

1. Build or buy a survival kit for yourself and for each person you care about. Here’s a link to our updated Top 10 List Of Emergency Items for your kits. Or, if you just don’t have time to put them together, buy pre-made kits. Check out our emergency supply kit reviews to be sure you’re getting the most for your money.

2. Buy some extra food and water every time you shop, and stick it in the back of the cupboard. Eat from the front.

3. Get to know your neighbors. They are the ones who will already be there in an emergency. They are the ones who will come to your rescue, not the authorities.

Three simple steps will put you in the other half of the equation – where you belong!

Please share this article with the people around you. The more prepared they are, the safer YOU will be. And the better you’ll sleep at night.

Virginia Nicols

Your Emergency Plan Guide Team

Coming soon to a location near you!

Share

Today as I write this, the news is amazingly full of bad weather reports!

  • Wet weather for parts of the Eastern U.S.
  • Showers, along with chances of thunderstorms from the Carolinas through areas of the Southeast
  • Heavy rain and thunderstorms from areas of Nebraska through Oklahoma and into the Mid-Mississippi Valley
  • Risk for severe thunderstorm development in the South-Central Plains through the evening with chances of damaging wind gusts and severe hail
  • A cold front ejecting form the Northern Rockies kicked up showers and thunderstorms in North Dakota
  • Out West, monsoonal moisture will maintain chances of showers and thunderstorms across the Four Corners, including the Southern and Central Rockies

And Hawaii is shaking off the arrival and passing through of Tropical Storm Flossie!
Flooded street
Do you know what to expect in your town tomorrow?

In your community, what’s the likelihood of damaging winds? Overflowing creeks and rivers? Flooded streets and intersections? Traffic lights out? Widespread power outages including your home or business?

Action Item: Check the weather report now, and every day! Download a severe weather app onto your phone. Simple, sensible, free!

 What emergency plans have you made for tomorrow?

Do you start off each day as always, trusting that you, your family, your neighbors and your car will get through OK? Or, do you consider alternatives, based on the weather report?

Action Item: Alert family members to the weather report. As appropriate, remind them of your family communications plan, change travel plans, check to be sure family members have their Survival Kits with them or nearby before they set off.

What’s the worst that can happen?

In most weather-related emergencies, a 72-hour period is all you’ll have to deal with. After three days, ground water will have dried up, streams will be back within their banks, the utility company will have restored power, and stores will reopen with full shelves.

If the worst happens, though, take a leaf from the book of Hurricane Sandy survivors. Even those whose homes were undamaged waited days and weeks for normal services to be restored!

A Survival Kit will keep you going for 3 days. Planning for a long-term emergency requires a lot more thought and the stockpiling of a few more items.

Sorry to nag, but . . . Do that emergency planning now. Better to have prepared or even over-prepared BEFORE the emergency hits than to not have prepared at all!


Virginia
Your Emergency Plan Guide Team

You may want to take another look at the Shelter-in-Place section of

Our Best Long-Term Emergency Supplies Checklist


Trapped In The Car

Share
Cars in flooded street

Trying to escape!

How many stories have you heard in just the past few hours about people trapped in their cars due to severe weather? I’ve heard about hundreds, even thousands, of people — racing to avoid an oncoming hurricane, carried off roads by flood water, or just stuck for hours in massive traffic jams!

If you find yourself in one of those traffic jams . . .

and you are unable to escape before the storm hits, or unable to get home after the storm hits, what condition will you be in?

  • Do you know what action you and your family members in the car should take, and when?
  • What about being in touch with other family members that are outside the car?
  • What supplies will you have in the car to help you make it through the hours until you can get back home or to another safe place?

What can you do now, before the next storm hits?

Here are some very basic preparedness actions that the recent storms have reminded us about. You can take these steps NOW before the next storm hits!

1. Keep the car at least half full of gas at all times.

2. Have a map of the area in case you need to find alternate routes to get around traffic jams, road blockages, etc.

3. Know which radio channels broadcast weather information. On CNN we heard weather broadcasters telling people exactly what to expect by the minute.

4. If you get in your car, take your Survival Kit with you. Knowing you have some food, some water, some sanitary supplies, and some cash will be reassuring, at the very least. If you have to manage in the car for many hours, having this Kit will be a huge comfort.

5. If you take your pet in the car, take the Pet Survival Kit, too. I saw one man in flip-flops and a t-shirt whose passenger was his dog. Did the dog have food and water? An adult can understand that doing without is necessary for a while; an animal – or a small child – cannot.

Flooding facts, for review – thanks to FEMA.

More people drown in their cars than anywhere else.

Know the difference between a WATCH and a WARNING. A flood watch means a flood is possible in your area. A flood warning means flooding is already occurring or will occur soon in your area.

Six inches of water will reach the bottom of most passenger cars causing loss of control and possible stalling. A foot of water will float many vehicles. What looks like six inches may not be; the road may be washed out below the water surface.

Two feet of rushing water can carry away most vehicles including sport utility vehicles (SUV’s) and pick-ups.

Stay in the car or get out?

Do not drive into flooded areas. But if floodwaters rise around your car, abandon the car and move to higher ground if you can do so safely. Do not stay in the car: it may stall or get stuck in the water, and then get pushed off the road. Once off the road, cars often start to roll, making escape impossible.

What’s your story?

What experiences have you had being trapped in a car? Share your stories with us and our readers. It may help save lives.

Thanks, Virginia

P.S.  If this article strikes a chord, please pass it along to friends and family.  Just copy this link and send it in an email:

https://emergencyplanguide.org/trapped-in-the-car/


CERT Doorhanger

Share
Bright yellow doorhanger captures attention

Doorhanger breaks preparation into four stages.

When it comes to being prepared, storing water and food are just the beginning. Unfortunately, many people stop there.

Our neighborhood CERT team wanted to get a better result. We researched and then broke preparation down into four stages to make it easier for people to get started building their emergency survival kit.

Our Doorhanger

Detailed instructions were published on a bright yellow doorhanger, distributed by the local block captain. Each hanger had the name and contact information of the  block captain, along with other emergency phone numbers.

The Process

Completing the four stages will take people several weeks. But they will be well prepared when they have accomplished it. Here’s how the doorhanger was laid out.

Stage One: Stay-at-Home Stash. Eleven things you and your family (including pets) need to Shelter in Place for at least a week. Superstorm Sandy showed just how important the Stay-at-Home Stash is.

Stage Two: Medical and Personal Care. These items – seven categories of them — will keep you alive and functioning. For senior citizens, this list includes spare glasses and hearing aid batteries.

Stage Three: Important Papers. Collecting papers and having them in one location, preferably protected from fire AND available to be moved, is the biggest challenge for everyone. Certainly, you can’t pull them together in just a few moments, and that may be all the time you have.  (We are working on getting electronic copies of important papers onto flash drives that would be easy to carry.)

Stage Four: Evacuation Kit. A bag or backpack contains items from the earlier stages, plus extra car keys, computers, etc.

Action Step for YOUR neighborhood

What would it take for YOUR neighbors to get prepared? You can download and duplicate excellent “Be Prepared” lists from the Red Cross, from CERT, and probably from your city.

We believe that customizing the message to our neighbors will make it more likely that they will follow through. Printing the list on a brightly colored door-hanger, instead of on a sheet of paper, makes it memorable. And delivering the message door to door is an important way to introduce and involve our CERT team.

P.S.  We’ll keep you updated on our progress!

UPDATE: It has been two years since the first Doorhanger was distributed. This year we updated, reprinted and distributed it again. So many people remembered it and still had the original in a drawer or on the refrigerator!