Author: Volunteer

Get an Emergency Kit!

Share

Tell the truth.  Do you agree that an Emergency Kit is a good idea?

Do you need one for the car/s as well as for the house?  Do you need one at work as well as at home?  Do you need to protect all the members of your houslehold in an emergency and not just a few?

All reasonable people must answer YES!

So putting together an emergency kit makes sense …

But it’s just not simple!

Emergency supplies

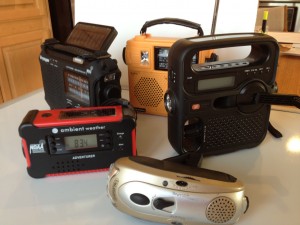
Kits packed and ready to go!

First, you have to pull together a list of what is needed. That list starts with basics: water and food. From there, it varies quite a bit depending on where you live, the make-up of your family, your commute patterns, etc.

Second, you have to shop for and/or assemble all the items on the list. This may take several days or even weeks, depending on how much stuff is required and how much money you will have to devote to this action. Many people build a plan and then lay out a purchase schedule to fit their budget.

Third, you need to get the right size container for each kit. The family kit is likely to be the largest; car kits, smaller. A child’s kit, smaller yet.  A workplace kit could be much larger, depending on how many people it is meant to serve. Of course, your kits need to be manageable; a backpack or rolling cart seems to be the favorite container.

Can you do all this? Of course! But will you?

If you haven’t done it up ‘til now, what would make a difference for you?

Consider this game-changer: Invest in a ready-made kit!

Then, improve it or personalize it as you go.

Yes, there’s an upfront cost, and it may be more than you would like. And yes, you could probably save money by assembling the kit on your own. But frankly, if you value your time at, say, $20/hr. you will save money by simply taking action now to buy a ready-made kit!

So consider getting a kit without further delay.

Five popular kits compared.

We have taken our time to look closely at five of the best-selling family kits on the market. We compare them as regards to contents, quality and price.

  • We start with the “basic” list of necessities, and note extras that some kits include.
  • Quality is sometimes not the best because these providers are competing on price. But some kits are better than others, and we’ll point that out.
  • Price ranges from $50 to $250 for a kit. Mostly the price depends on how many people the kit is meant for.

In our estimation, it doesn’t matter whether any given kit is perfect. What’s important is to have one for basic necessities, and then improve upon it when you can.

No more excuses.

If you haven’t put together your kit by now, you’re not going to…so be realistic! “I had it on my list of things to do…!” or “I was just trying to save money!” will be weak excuses when your family looks to you for help.

Check out our review of the Best Emergency Kits right now, pick the one that’s best for you, and get it. You will have taken a big step toward sensible preparedness.

Virginia
Your Emergency Plan Guide Team

When you buy your kit, let us and all our readers know what you got and how you found it, OK?? We appreciate your feedback!


Family Communications Plan — An Overview

Share

Timing is everything. Where will you be when the disaster hits?

You can almost assume that when an emergency hits, your family will not be together. Depending on the circumstances, you may not be able to get back together for some time. And whether you get together at home is yet another question.

  • Students and teachers may be held in school, perhaps in a locked-down situation.
  • Employees may be required to stand by to help protect co-workers as well as the business itself.
  • City employees and First Responders are likely to be called into action and kept away from home for hours or days at a time.
  • Any family member could be away from the home on travel, shopping, or vacation.

Immediately following the disaster, your concern will be to find out where everyone is, their condition, and the condition of your home. This is natural and normal . . . and without a plan, this difficult period may be far longer and more painful than necessary.

A Plan Speeds Communication

Your plan could contain a number of important steps.

  1. Sign up to receive emergency communications from your local police department via email or phone. This could give you an important head start.
  2. Set up an Out-of-Town Contact , someone who:
    • Lives out of the immediate area. If local phones are out, getting through to someone via a long-distance connection may be easier.
    • Owns a smart phone that can receive a text or SMS message. (SMS = Short Message Service). Of course, any phone is better than no phone.
    • Is able to keep track of calls that come in and share info with others. Not all family members are able to do this.
  3. Create Emergency Contact Cards for every member of the family.

Everyone needs a wallet card that can be carried for identification and that will have the Out-of-Town Contact’s number.

Below is a sample Emergency Contact Card.  Include a similar card in backpacks, briefcases and purses.

Emergency Copntact Card

Sample Front of Card

 Special for Families with Children

Being separated from parents during an emergency will be an emergency itself for many children. If you have small children, your family plan needs to be more extensive than simply an Out-of-Town Contact name and number.

We recommend that you:

  1. Review the list of “approved people” that is on file at your child’s school. Should it be expanded?
  2. Confirm with neighbors or relatives that they are on the “approved list” and be sure they agree to be there.
  3. Go over the list with your children so they know what to expect in an emergency.

Update your information

Like all contact information, your emergency contact information needs to be regularly updated. Reaching an old, disconnected number may be more upsetting than not having one at all!

NOTEThis Advisory is only an overview. You can find more on what happens to phones in an emergency, which ones are best to have, where to look for missing family members in a wide-spread U.S. disaster, and a suggested agenda for a family meeting about emergency communications on our website.  Click here to jump to the three-page Family Communications Plan.


Emergency Supplies List

Share

If you’re looking for a checklist, you’ll find many, many of them online. FEMA offers up a 26-item list; the American Red Cross has a 36-item list, and different commercial companies (selling tools, pre-made kits, insurance, dried food)  have their own lists, some of which extend to hundreds of items.

Different lists serve different purposes

Comprehensive checklist

Page One of list

Over the years we have created or used different lists for different purposes. For example,

* At an introductory neighborhood meeting, you may wish to distribute a simple, one-page list with items that apply to everyone and that won’t appear too intimidating.

* In a community where people have had some training, a more comprehensive list would be a good idea. (We wrote earlier about the “door-hanger list” that we created for our community.) Naturally, adding items appropriate for the geography would make sense: rain gear, for example, or cold-weather gear.

* In a senior community, a list might focus on items that apply to older people: 14-day supply of medicines (and how to get your doctor to give you extras), extra eyeglasses, batteries for hearing aids, etc.

* A community with pets needs a completely different set of reminders. (You can get a copy of our Emergency Pet Supplies Kit here.)

* A quick reminder card, useful for teaching, might have only a half-dozen items or a specific, focused list of supplies (for example, what you need in your first aid kit).

Our Emergency Supplies List

The Emergency Plan Guide has prepared its own comprehensive list. We have found that breaking it into three sections makes it easier for people to focus on. The three sections are:

 17 basic items for a 3-day emergency

 11 more categories for managing an extended, 14-day emergency

 10 essentials to take if you must evacuate

What’s important is to get your list, and then take the time to see what’s missing from it based on your family’s needs. Add those items to the list, and start assembling!

Like many families, you may need to prepare not only for the three situations listed above, but you may also want to put together specialty kits to carry in your cars, for students away from home, or for the office.

Get started now!

There is no time to assemble emergency supplies after the earthquake, after the storm has hit, after the fire has forced you out of your home.  Action item:  Download the Emergency Supplies Checklist and get started.

Virginia
Your Emergency Plan Guide Team

P.S.  I am not called the “Queen of Lists” for nothing!  Stick around Emergency Plan Guide and you will discover a number of them. Lists help me think, and keep me on track.  I hope you’ll find them useful, too!


Simple Business Continuity Plan – Validation

Share

Your Business Continuity Plan is drafted.  Now what?

Once you have created a Plan Draft, you may want to turn to outside experts for review and confirmation. These experts could be your local fire department, county emergency management or disaster response team. The list could also include a Business Continuation consultant that specializes in your industry.

The right expert could add detail to your plan as well as validate what you’ve put together. For example, the right expert could:

1. Review your list of threats and suggested actions and add to it, if appropriate.

2. Suggest costs for implementing these recommendations.

3. Make sure your plan is meeting any legal requirements for your industry and your size business in your state.

Get the full plan approved by management.

This should be a formality, since we assume management has been included all along the way.

Turn the plan into a useful tool for your co-workers.

Simple Ac tion Steps

Only SIMPLE steps can be followed.

A Plan is one thing.  If it’s well done, it’s a big binder full of stuff.  But your co-workers have no interest in reading or storing a binder!  What they need is simple instructions of what to do in an emergency.  Draft ACTION STEPS for workers as a series of one-page instructions.

A one-page set of instructions, written in large text and in simple language, is all they will be able to follow in the excitement of a real situation!

You or someone in your organization is likely the best candidate to draft those instructions. You know your people, their language capabilities, their familiarity with various processes, what emergency equipment you have and where it is located, etc.

Practice following the ACTION STEPS.

Schedule a series of “emergencies” over the course of the year. Be sure each person has an alternate to perform his or her job, since in a real emergency some people will be gone.

In the case of a real emergency, people are often shocked to inaction, or frightened into dangerous reaction. People who have practiced will be able to take action immediately and will be better able to make good decisions.

Improve the plan with new information.

The Pan will no doubt have to be updated on a regular basis. But keep the ACTION STEPS to one page, and keep practicing! It’s your people who will save themselves, save each other and save the business.

Disclaimer: This is a very simplified outline of how to build a Disaster Preparedness or Business Continuity Plan. Depending on your business, you will want to expand it as necessary. Still, if you see that the plan you now have is missing some components, or if you have no plan at all, this is a good place to start.

If you would like a copy of our full 6-page Report: How to Build a Simple Business Continuity Plan, you can sign up here to get your free copy.


Simple Business Continuity Plan – Development

Share

Developing your Business Continuity Plan In-House

If you are the person who has been placed in charge of developing a Business Continuation or Disaster Recovery Plan from in-house, take a deep breath — and then relax.  You won’t be responsible for finding all the things that need to go into your Plan — your co-workers will be providing most of it!

Step One:  Identify a core group of co-workers.

Your first task will be to identify a core group of co-workers – people who are interested in planning, know something about responding to disasters, etc. The members of your core group could come from anywhere within the organization, and may not be from the ranks of management. For example, your team might have someone with medical training, someone with military experience, or someone who is a retired First Responder.  You can work with HR to identify some of these people, or maybe send out a brief email questionnaire, or simply talk it up in the coffee room.  The key is to get people who are interested in the topic, not people who are “assigned” it!

Step Two: Provide your core group with training.

Training may be available locally, in person, as classes offered by the Red Cross or CERT training offered by your City. Training is also available online. Check out the American Red Cross’s Ready Rating program for business, and Citizen Corps Online CERT training. These programs also offer suggestions for procedures and sample forms you may find useful. Dig deeper and review from FEMA (Federal Emergency Management Agency) the National Incident Management System and Incident Command System, so your core group will be comfortable communicating with other professional organizations.

People who are genuinely interested will value this training, particularly if the company provides them some time to get it, and recognizes their progress.

Step Three: Now, involve the rest of your co-workers.

With your core group in place, now you can involve others. After all, if you want your co-workers to understand the risks faced by the business, they need to be involved in identifying them.

And if you want to find the best ways to prevent emergencies from turning into disasters, again, just ask your co-workers! They will know more than any outsider about the equipment and materials they use, the state of the building, the potential for fires or floods, and the challenges associated with an evacuation.

The missing piece in most Plans.

We have seen a lot of plans and nearly all of them are missing one key component that dooms them to failure! It is a consideration for the peace of mind of employees regarding their own families. Until that is assured, you cannot count on employees paying attention to their responsibilities at the business! Be sure to include a family communications plan and invest in whatever it takes to make it functional.

Step Four:  Develop the content of the plan.

1. Lay out a schedule for “building the plan,” starting with a series of brainstorming sessions. (Remember the definition of brainstorming: coming up with as many ideas as possible, without any attempt to judge them!)

2. Hold these brainstorming sessions and their logical follow-up sessions. Here are some of the topics you would want to cover. Each could be covered at a different meeting. Some input might even be assessed via email or questionnaires.

a. Identify threats to the business

 b. Rate threats based on likelihood of risks

 c. Rate threats based on impact on the business (hours, days, weeks or longer to recover?)

 d. What can we do to avoid these threats altogether?

 e. What can we do to mitigate/lessen the impact of these threats?

f. What response procedures work best for our business?

 g. Special procedure: How will we manage communications with families of employees?

 3. Document the threats, the avoidance or mitigation measures, and the response procedures that have been suggested.

4. Set out a list of recommendations that result from the brainstorming session.

5. Draft the first version of the Plan.

Step Five: Now, ask for input from outside experts.

Having put together the guts of your Plan, you can be confident that it is meaningful for your co-workers and for your business.  Still, it is important that the Plan pass whatever “official standards” it may be held to.

The next installment of this series will discuss who should be invited to take a look at your Plan before you consider it finished.

Here’s the link to Installment 3 – Validation

If you’re in a hurry to get all this information in one convenient package, check out our free, 6-page Report: Simple Business Continuation Plan. 


Simple Business Continuity Plan – Preparation

Share

Who’s in charge?

The person put in charge of coming up with a business Disaster Recovery or Continuity Plan is often not an expert in the field. In fact, most often in a small business the job is simply “assigned” to someone in the company – someone in IT, or human relations, or facilities management. But “Business Continuation” means a whole lot more than simply saving data, or meeting OSHA requirements. It means keeping the whole organization functioning so you will all be employed six months or a year from now!

Unfortunately, statistics on going out of business as the result of a disaster are not reliable – but it appears that even in the best of cases, your business’ chance of survival after a disaster without a plan are only about 60%. (“Business Continuity Statistics: Where Myth Meets Facts” documents often-quoted reports.)

Typical first step: Hire an expert — but with what result?

Thick Business Continuity Plan

Comprehensive Business Continuity Plan — How useful?

The logical first step for the newly-assigned person is to hire a consultant, who IS a specialist. That individual or group submits its proposal, wins the contract, and then gets down to the research necessary to draft “The Plan.” Some weeks or even months later, “The Plan” is submitted.  It may be approved and accepted.

In our experience, this method handicaps the consultant, who faces a dual challenge.  He or she doesn’t know all the subleties of your business operations.  And he or she may be forced to bid on putting a plan together that covers a number of bases without having access to all the factors that will impact the veracity of the plan.  As a result, the needs analysis task is underestimated and the final plan misses some of the subtle but important factors that make the plan meaningful and credible.

If you go the route of seeking bids from consultants, you can help avoid this pitfall by doing some of the homework in advance.  That way when (and if) you bring an expert planner into the organization they start with enough facts to bid realistically on pulling the plan together and are more likely to produce a real working plan that will save both lives and property.

Nevertheless, the result of these challenges is that most outside-developed plans we have seen (and we have seen many of them) are:

Very thick and intimidating (to justify the fee?)

Complex (to cover all the bases or the rear of the consultant)

Filled with jargon and therefore unreadable by the very people the plan is meant to protect!

Result: Plan goes onto the shelf.

Isn’t there a better process? Of course, and particularly for small businesses. Our recommendation is as follows.

Alternative method: Create the plan in-house.

Creating the Plan in-house requires more time and more dedication from the person in charge than simply hiring an outside expert to put it together for you.  And it requires that employees at all levels be involved.

Over the years, we have found some good ways to encourage participation from within the organization — ideas which we’ll be sharing in the next Advisory, and also in a more complete form on our website.

If you’re in a hurry to learn more about the In-House Planning Method, here are links to the next two installments in this series:


And if you know you need to get started right now, find out more about our free 6-page report: How to Build A Simple Business Continuation Plan.


Emergency Preparedness Vocabulary for Business

Share

More words to know!

The more you read about Disaster Recovery and Emergency Preparedness, the more abbreviations and acronyms you come across. Many of them are already in use in business – like KISS , or Keep It Simple Stupid. But as in every industry, some words creep in that are not explained, and that you are simply expected to know. If you don’t know them, you feel stupid or confused or both.

Here are some of the common words I’ve come across in dealing with preparedness in the workplace. (It’s a companion piece to our earlier list of emergency preparedness vocabulary.)

This is by no means a complete list, but it’s a good start for talking with or or writing to industry professionals!

Risk Analysis Chart

Simple tool for assessing risks facing the business

Business Acronyms and Definitions

BAU – Business As Usual. If this is the state you want to return to AFTER the emergency, then it’s considered something positive. However, BAU is often used when projecting what the future will be like if we go on with BAU instead of making suggested changes.

BIA – Business Impact Analysis. One step in the process of building an Emergency Preparedness Plan. It describes and measures what would happen to the different business functions in the event of an accident, disaster or emergency. The analysis covers both financial impacts as well as non-financial impacts, such as loss of customer or supplier confidence, etc.

BP — Best Practices. Methods or techniques that have shown the best results over time and around the country (or world) and that have become the standard for the industry.

CBCP – Certified Business Continuity Professional. This is the most well-known certification in the industry. It is offered by DRI International (Originally the Disaster Recovery Institute). The certification requires more than two years of experience, with proven expertise in five different subject areas, and requires continuing education.

DR/BC — Disaster Recovery/Business Continuation. These two expressions are often used together, but DR seems more closely tied to the protection and restoration of data and information technology systems, whereas BC refers to the whole business.

KISS — Keep It Simple Stupid. A classic reminder for educators, salespeople and for those who design Emergency Plans!

RA – Risk Analysis. Risk analysis is one of the first steps to building an Emergency Plan. Risks are identified and rated by likelihood and by likely impact, often using a matrix showing frequency/importance.

RM – Risk Management. This is closely tied to Risk Analysis, and typically covers actions the organization can take to prevent or lessen the risks identified in the analysis.

SME – Subject Matter Expert.  You? Your local Fire Chief? Head of a department? Facilities manager? Whoever knows the most about the topic/risk/equipment/impact under discussion!

SOW – Statement of Work. If your organization decides to hire a consultant to help in developing your Emergency Plan, you’ll likely ask for, or actually provide yourself as part of the consulting contract, a statement of work that outlines exactly what is to be done by the contractor.

Action Item: This is a list that can easily be shared with co-workers or with your boss. It will give everyone a sense of confidence in dealing with Emergency Preparedness, particularly if it is a new subject.

Virginia
Your Emergency Plan Guide Team


PR for Emergency Preparedness

Share

Getting press coverage has a dual purpose.

Of course, it’s always gratifying to find yourself in the news – as long as the story is a positive one, of course. But when it comes to pulling together a neighborhood team, there’s a lot more to getting an article than simply a “feel-good” moment.

News article about fire rescue

Article about fire rescue

Your main objective is to inspire others to form their own neighborhood CERT program. Why is this so important? Simple. The more people in your community are prepared and organized for survival, the less pressure on your community’s First Responders and the less danger to you personally.

Remember the fire?

I wrote about the fire that happened here in our own neighborhood several months ago. The older woman living in the home was pulled to safety by the mail carrier, but the house burned to the ground. It was dramatic and scary for all concerned. We got a photo in the news that time, too . . .

Four months later, more news

Last week I was invited to attend a special breakfast held at the local post office. It was to recognize the mail carrier’s quick action in saving our neighbor’s life. Once again, an article appeared in the newspaper. Definitely a “feel good” article that was a change from the negative news that seems to proliferate.

But there was a lot more to the event. Before the presentation, I had the occasion to talk to the local fire authority, in the person of the Division Chief. Here are some highlights of that conversation:

  • I talked to him about the fast action of his people, but more importantly, he and I had the chance to confirm a number of fire safety issues that apply specifically to the people who live in older homes.
  • The Chief reiterated that the 5-minute response time to the fire was in part possible because of the actions of our local Emergency Response Team. (We have just under 100 Members.) Not only did several of them call 911, but team members jumped into action at the site of the fire, pushing curious by-standers away from the home and clearing the streets so the fire engines could access the fire without delay. The real key is that, because of our training, everyone knew what to do without dithering around! One team member’s nearby home became not only a refuge for the lady whose home burned, but also a headquarters of sorts for the incident.
  • The Chief had heard about our Emergency Response Team before, but was very interested when I mentioned that we were holding a training meeting in February to discuss the high-pressure gas line that runs near our community. In fact, he immediately invited himself to attend.

What’s the value of all this to our organizing efforts?

First, our entire team and their work have been validated! They were mentioned in the Chief’s remarks to a large gathering of community leaders, and briefly mentioned in the newspaper article. (We have heard from readers across the state who saw the article!)

Second, having the Chief attend our upcoming meeting will reinforce the sense of cooperation and coordination with authorities that we work so hard to build. Not only will the fire department be represented, but our invited “experts” are from the local police department and the city’s emergency preparedness division. We will all become more knowledgeable about the risks posed by this particular pipeline.

Our future requests for resources – whether for guest speakers, or exhibits, or for invitations to local or county-wide Red Cross and/or FEMA trainings – are much more likely to be welcomed by these official First Responder organizations.

Finally, are we serving as a role model for other neighborhoods?  YES!  That is the real bottom line.

Our local neighborhood is adding a distinct layer of safety and security to our wider community. It is gratifying and encouraging that this effort be acknowledged and appreciated.

Virginia
Your Emergency Plan Guide Team

P.S. What press coverage has your group received? Any suggestions for the rest of us?


Terrorism and Situational Awareness

Share

Spotting Suspicious Activities is Your Best Protection

(Part three of a three-part series)

Awareness of surroundings
How aware are you of your surroundings?

As we conclude this series of commentaries, it’s important to clarify the definition of terrorism: violent acts that create terror in victims and non-victims.

The tendency is to think of terrorism as something that exists on the political level. But, while incidents like the Colorado movie theater, Tucson and Sandy Hook shootings, more recent racially-motivated shootings as well as the many workplace incidents may not qualify for a formal definition of terrorism, the dangers are real. We suggest you include these incidents in your self-defense thinking.

There are five identifiable levels of awareness commonly used by most authorities . . .

1. Tuned Out

How often have you walked or driven down a street and not been aware of your surroundings because your mind was elsewhere? This distraction from your present situation makes you vulnerable. Blaring radios, cell phones, over-tiredness and other distractions put you at risk of terrorist activities — and from all sorts of otherwise benign occurrences.

2. Relaxed Awareness

Comparable to defensive driving, this level of awareness allows you to switch from relaxed to cautionary mode as you observe things that are out of the ordinary, but not necessarily threatening. This is the least taxing level of awareness that you can practice for long periods of time without inducing fatigue. And, you can readily “ratchet up” to level three or four as appropriate.

 3. Focused Awareness

A lot like driving in a heavy rainstorm or other hazardous road condition, focused awareness requires a heightened level of attention. Because it requires greater energy, this level of awareness is also accompanied by added fatigue over extended periods of time.

4. High Alert

Here is where you experience that adrenaline rush that accompanies the threat that puts your survival at risk. On the edge of panic, this is a scary place to be, but you are still able to function, albeit for a limited period. Coming down off of this level of alert can be distracting as you readjust to your “normal” level of awareness.

5. Comatose

This is one level of awareness that you don’t want to experience in an emergency. It’s what happens when a situation is so threatening that you freeze. You may even pass out to avoid the reality you are confronted with. This level of awareness is comparable to being asleep with your eyes wide open.

Practice awareness!

Staying aware of your surroundings is more of a mindset than a skill . . . you may want to practice relaxed awareness on a regular basis. Not that terrorist threats are all around you. They aren’t. That’s why they will stand out.

But if you don’t practice situational awareness, you may not be conscious of what is ordinary and the out-of-the-ordinary activities that might be an actual threat.

(A side benefit of regularly flexing your mind muscle by practicing situational awareness activity might just be your hedge against Alzheimer’s Disease. :))

Joe Krueger
Your Emergency Plan Guide team

Don’t miss any of our articles. Subscribe below.

Gas Line Leak!

Share

High pressure lines are closely monitored by a number of agencies.  Your local utility or city will be the most familiar with the state of high pressure lines in your area, and with the monitoring guidelines and records.

Gas fire in street.

Gas fire erupting through LA street after Northridge earthquake. (photo by M. Rymer)

No matter how carefully lines are monitored, however, leaks and breaks can happen.  Most often, they happen when construction equipment accidentally punctures a line.  They can result from a natural event like a storm, earthquake, tornado, or ice storm.  Sometimes an over-loaded, aged infrastructure is to blame.

Leaks could happen at any time.

How do your local gas lines stack up?

An online search using the National Pipeline Mapping system is a good place to start. Dig deep on that site to find the names of the various operators of the different lines in your area. Contact them to get more details about the age and condition of their lines, their monitoring and safety policies and plans, etc.

If you think you have an emergency…

If you see or hear any of these near a pipeline right-of-way, it could signal a leak:

  • A hissing, roaring sound
  • Dirt or dust blowing
  • Water bubbling or spraying
  • Dead or brown vegetation
  • Flames coming from the ground
  • “Rotten egg” smell

(Typically the “rotten egg” smell is added only to smaller distribution lines. It won’t appear in major transmission lines.)

What’s the right response to a potential gas leak?

Get out! But do it intelligently.

  • Turn off any machinery or motors.
  • Don’t turn on or use any electrical equipment that could create a spark. This includes turning lights on or off, making a cell phone call, closing a garage door, or using a battery-operated radio!
  • Do not allow any open flames, including matches, cigarette lighters, welding equipment, etc.
  • Evacuate the immediate area. If exiting a building, leave the doors open.
  • Keep bystanders away.
  • Do not try to find the source of the leak.
  • Do not operate any valves or other shut-offs.
  • Do not attempt any repairs.
  • Do not attempt to put out any fires.
  • From a safe distance, call 911.

Emergency Preparedness Training

Action Items: Train your Emergency Response Team to recognize this hazard and to respond accordingly. Invite an expert as guest speaker to one of your neighborhood meetings. Prepare a flyer (taken from this Advisory?) and include it in your “Welcome Wagon” handouts for new neighbors.

We consider gas line leaks and the potential for fire resulting from them as the number one threat to our neighborhood! Where do they fit in your list of top threats?


Can You Spot a Terrorist Before Something Goes Down?

Share

(First of a three-part series on terrorism.)

Before we jump into this subject we need to clarify what we mean by “terrorism.”  When most people think about terrorism, they’re really envisioning attacks by jihadists or other non-state actors like those who perpetrated the 9/11 attack.  In reality, we need to broaden our definition to include domestic terrorism and terrorist acts perpetrated by individuals or groups that are motivated by political or domestic “causes” . . . and persons who are mentally unstable.

Pre-Incident Indicators

From the standpoint of frequency of events, the domestic terrorism poses a greater threat than that perpetrated by international groups.  With that in mind, let’s explore some of the “signs” – or, Pre-Incident Indicators (PIIs) of a possible, impending act of terrorism at a target location . . .

Reconnaissance

Possible surveillance?

Serious terrorists – even would-be ones – are most likely to visit the target area in advance, conducting surveillance and even taking photographs to aid them in their planning.  It is often difficult to differentiate between terrorists and tourists since both are interested in the features of the location, but with just a bit more attention, you can notice these traits:

  • Tourists are likely to take photographs at random of the more interesting features.
  • Tourists often take photos with themselves or their friends in front of the interesting features.
  • Terrorists will likely be more systematic, taking multiple or series of photographs of areas of ingress and egress.
  • Terrorists will be making notes about security coverage, monitoring activities, drawing floor maps, drawing diagrams of the location, using a recording device, etc.

Elicitation (attempts to get information)

Everybody has questions and asking questions in unfamiliar surroundings is normal.  Would-be terrorists, on the other hand, will be interested in more than the casual answers.  While their conversation at first appears ordinary, they will attempt to gain  more detailed information to determine security procedures, vulnerabilities, etc.  Elicitation attempts are not always made in person.  They can be made by telephone, mail or email inquiry or research at a library, etc.

Examples of unusal questions might be, “When does the next shift (of security guards) come on?” or “Where are the electrical shut-offs?”  Surely a question like one of these should capture your attention!

Please watch for the next post in this series. Part two will cover the logistics of terrorism and the third part will delve into the tests of security, dry runs, etc.

Logistics of Terrorism

Share
Terrorist taking photo

Spotting Activities That Could Be Acts of Preparing For a Terrorist Attack

(Part two of a three-part series) 

While random acts of violence are difficult (if not impossible) to foresee, planning and preparation for a “terrorist’s attack” has certain characteristics that, when combined, can be used to identify a pending event.

Financing

Funding any significant act of terrorism will often require activities that are out of the ordinary or out of character for someone.  Typically, large amounts of cash involving unusual deposit or withdrawal activity are required.  Solicitations for money or collections for donations or even fraud and transactions involving counterfeit currency or goods can provide the funding for terrorists.

Acquiring Unusual Supplies

Unusual supplies?

Unusual or particularly large purchases of chemicals or supplies, weapons or ammunition by unfamiliar or non-regular customers are worth noting.  Attempting to acquire official uniforms, vehicles or other items that would give them access to restricted areas is another sign to look for.

A case in point was Timothy McVeigh’s and Terry Nichols’s purchase of a large amount of fertilizer that would be used to perpetrate the largest scale incident of domestic terrorism in modern US history.  A close look at McVeigh’s reading and entertainment interests – as well as his radical political views – would also provide worrisome behavioral characteristics . . . but, then hindsight is, as they say, 20/20!

Deploying Assets

Getting people, supplies and vehicles into position to commit a terrorist act is often overt and observable by people familiar with the area.  It’s also the most immediate indicator with the least amount of time to alert authorities of the possible danger.  A good example of this was the SUV full of inflammable materials that was parked in Times Square, downtown Manhattan and brought to the attention of authorities by a street vendor familiar with the area.

Situational Awareness: Being Alert to Your Surroundings

Your best defense against terrorism is staying alert to your surroundings without becoming overly paranoid.  (For more about “situational awareness” here.)

You also want to avoid “profiling” individuals.  There is no “typical” terrorist appearance (Again, think of McVeigh and Nichols.)  School shootings should make it clear that the perpetrators look just like your next door neighbors or that kid in the next classroom.  The appropriate way to protect yourself is not to profile appearance, but to profile behaviors. 

This series continues with part three, focused on a terrorist’s practices or dry-runs.

Gas Pipelines in Your Area

Share

One of the possible risks you face, whether at home or at work, is from a pipeline leak. A good emergency preparedness plan reminds you to find out where pipelines are located, what they carry, and how to respond if there is an emergency.

Step One: Look for nearby pipelines.

Warning sign for petroleum pipeline

Have you seen this sign?

Find local pipelines by watching for pipeline signs as you go about your daily business! They are typically posted at major intersections, railroad and water crossings, and at property boundaries. The sign shown here is only a sample; a real sign would give more information about the kind of material being carried by the pipeline – for example, “petroleum,” “high pressure gas,” “natural gas,” “oil,” “jet fuel” — and include the operator’s emergency phone number.

Action Item: Get all members of your team, or workplace colleagues, to watch for signs as they come and go from home and work. They can bring in photos and locations. Build your own map of where they are located, and of your vulnerabilities.

Step Two: Find a detailed gas pipeline map.

The National Pipeline Mapping System provides an online service where you can search for pipelines by state and county. The maps are layered, showing transmission lines, liquid natural gas plants and breakout tanks. Smaller lines (distribution and gathering systems) are not included in NPMS. You can print the maps, but you are not able to download the underlying data.

You don’t need a password to get into the site, but it does take a while to get through all the different layers. You will be able to see a map by county and then, by entering a specific address, you’ll see major carrier lines, the pipeline operators for the area, what is carried and whether it is “hazardous,” whether the line is in service or abandoned. You can also use a tool to measure how far you are from the pipeline.

Access the National Pipeline Mapping System here.

Action Item: As part of your Risk Assessment process, research your local geographic area using the National Pipeline Mapping System.

Step Three: Know how to respond to a pipeline leak or break.

Watch for the continuation of this article in an upcoming Advisory here at Emergency Plan Guide. Sign up below to be sure you get ALL the Advisories about Gas Line Leaks.

Virginia
Your Emergency Plan Guide Team


Emergency Supply Kit — Portable Radio

Share

A wide-spread emergency can result in a power outage that lasts for days or even weeks. Over that entire time, if you’re on your own, you’ll need an emergency radio — or perhaps more than one — to know what is happening outside your immediate area.

What’s the best radio for emergency purposes?

The photo below shows five radios that we have purchased and tested; find our comparison of these five emergency radios here. (Guess which one of the radios is a dud!)

What follows are the basics for any radio you decide to put in your emergency supply kit.

A portable AM radio will be your lifeline.

Five emergency radios

Which radio should you choose?

Local emergency services and radio stations will be broadcasting news that you will want. Be sure you know what channel they’ll be using!  (Put a label on each radio.)

 — Evacuation plans: schedules, staging areas, different routes, location and status of available shelters

 — Weather reports: temperatures, anticipated rain and/or winds

 — Location of areas to avoid: “hotspots,” traffic jams, roadblocks

—  Announcements from Police, Fire or other emergency services

Generally, all the above notifications will be broadcast over the AM band. FM and television signals are “line of sight,” so they can get blocked by tall buildings, mountains, etc., and usually dissipate after about 50-75 miles. AM signals, on the other hand, can bounce off the ionosphere and travel much further (even all the way around the earth!). So, in an emergency situation, you want a strong AM radio so you can tune in to local emergency transmissions.

Your radio needs to work for days or even weeks.

In a power outage, your radio won’t work by being plugged into the wall. It will need an additional source of power – typically batteries. When they wear out, how will they be re-charged?

  1. Replace the batteries with new ones from your supplies. Obviously, you have to have plenty of the right size: AAA, AA, D, C, etc.
  2. Recharge “rechargeable” batteries using a hand crank and generator, built into the radio.
  3. Recharge the batteries using solar power, either built into the radio or attached as a separate panel.

What combination of features will work best for you?

Check out our Emergency Radio Review. It has a series of questions that will help you select exactly what you need.  It also identifies the one radio in the group above that you should NOT buy!

Virginia
Your Emergency Plan Guide Team


Improving Building Safety – Chimneys

Share

Building Structures, continued . . .

Disclaimer: The following basic info comes from a number of sources deemed to be reputable.  BUT, be sure to get more information before you start making any changes to your home!

Partially collapsed brick chimney
Partial collapse damages roof

Chimneys are dangerous.

If you don’t have a chimney, you can skip this post – but only if your neighbor doesn’t have a chimney, either!

Chimneys are dangerous because they are usually constructed of unreinforced masonry or brick. In an earthquake, they can fall onto the roof of your house or to the ground.  In many cases, the entire chimney falls away from the wall, collapsing in a pile of bricks on the ground.

What’s the condition of your chimney/s?

Take these basic steps to understand the risk in your own home.

Action Item:  Check the condition of your chimney. Is the mortar crumbly? If yes, that’s a danger sign.  Check the attic. Is the chimney tied to the house with metal braces? If not, that’s a danger sign.

Consider these steps to make your chimney safer. 

  1. Check around the base of the chimney OUTSIDE to be sure there are no parking areas or play areas that would be threatened if the chimney came down.  Take a look at your nearby neighbor’s chimneys to see that they don’t threaten your yard or house, too.
  2. Consult with a professional to see if the chimney can be attached to the house.
  3. Consult with a professional to see if your roof or walls can be strengthened — typically with plywood sheets —  to protect against falling brick.
  4. Remove the bricks in the top section of the chimney and replace with a metal flue.

Again, any construction you undertake should be with the advice of a qualified professional.  But don’t procrastinate.  If your chimney is dangerous, it’s only getting worse with age.

Virginia
Your Emergency Plan Guide Team

If you are just coming across this Advisory, don’t miss the other Advisories that deal with improving your home’s safety:

Share these Advisories with neighbors, too.  Their home is likely to be as vulnerable as yours is.