Don’t Miss the Eclipse

Share

Solar eclipse

Are you preparing for eclipse-related disasters?

Do you live in the path of the eclipse scheduled for Monday, August 21?

If so, you’d better be ready. There are some eclipse-related disasters that could happen and are likely to happen!

First, you could miss it altogether . . .

if you’re not paying attention!

What’s happening is that as the moon orbits the earth, its path will cause it to pass in front of the sun. This will create a shadow that will move across the earth — and across the face of the entire U.S., from Oregon to South Carolina. This is such a rare occurrence that it has been given a name: the Great American Eclipse — first time since 1918 that this has happened!

If you’re in the exact place where the sun, moon and earth line up, the moon/sun will look like the image above and the world around you will turn totally dark — if only for a couple of minutes.

Here’s how scientist Tyler Nordgren describes what to expect:

“The shadow of the moon moves over you, day turns to night for half an hour, the stars become visible in the middle of the day, the sun turns black and the most incredible thing – the sun’s corona: that million degree atmosphere that is invisible at all other times – suddenly you see the enormous crown, its rays of pale white spreading outward from the sun,” The Guardian

So, you don’t want to miss this one!

Action item: Here’s a super website that will tell you the time of the eclipse in your town, and show what it might look like.  Just replace “city” with your city (or a nearby one) at the end of the link:

https://www.timeanddate.com/eclipse/in/usa/city

Second, looking at the eclipse could damage your eyes!

By now you should know that you should never look directly at the sun, even with dark glasses. In fact, I just today read that counterfeit solar glasses have surfaced. (Amazon is actually giving refunds for fraudulent merchandise!)

How to know whether glasses you’ve bought will do what they say? Check to be sure the glasses are from a vendor approved by the American Astronomical Society, AND make sure they have the label ISO.

pinhole projector
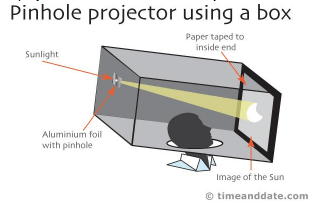
If it were me, I’d avoid glasses altogether and watch the eclipse “indirectly” using a pin-hole projector. Easy enough to make as a family project!

You’ll need these supplies – and you probably have everything at home already:

A cardboard box – the longer the better

Scissors and box cutter

Tape

A sheet of white paper

A square piece of aluminum foil

A pin or tack

Basic instructions:

  • Cut a square hole in one end of the box, tape a slightly-larger square of tinfoil over the hole, and puncture the foil in the center with pin or tack. Make a SMALL neat round hole.
  • Tape the white paper on the INSIDE of the box, at the end opposite the pin hole. This becomes the screen.
  • When the eclipse starts, point the foil/pinhole end of the box at the sun. Put your head inside the box and look away from the sun at the white paper screen. There you’ll see the (reversed) projection of the sun and the shadow of the moon!

Need more? Here’s a great video demo of how to build the projector, perfect for kids. Our thanks to station WAPT in Jackson, MS:  http://www.wapt.com/article/diy-make-a-box-pinhole-projector-to-view-eclipse/12014830

Third, you could find yourself trapped on the highway.

Areas that expect to be in the path of the “totality” (entire sun obscured by the moon) have been planning for months for a massive influx of visitors.  I’ve been reading reports from various emergency services across the country (in particular, Idaho and Kentucky) about the steps they are taking to manage the hundreds of thousands of people they expect to try to get to “just the right spot” to view the eclipse.

Estimates of the number of people traveling to get into the path of the eclipse range from 1.85 to 7.4 million!

Police and emergency services are planning for traffic conditions replicating evacuations – that means, stop and go and maybe huge traffic jams. Even if you don’t intend to try to get to a good viewing place yourself, you may experience significant traffic congestion just trying to get to the local store.

In any case, be sure your car is full of gas and well supplied with water, emergency food and blankets, just in case you get unexpectedly caught.

As always, the more you know, the better you can anticipate potential problems and work around them.

Enjoy the eclipse!

Virginia
Your Emergency Plan Guide Team

P.S. We won’t seem much of the eclipse here in Southern California. Let us know what YOU see!


Safety Checklist for New Employees

Share

Safety Is Your Responsibility

Where's the nearest fire extinguisher?
Will a new employee be able to answer this question?

Are you a business owner? in charge of emergency response at your work? an employee of any sort?

If you’ve been there a while, you should be able to check off every item on the Safety Checklist below. There are only 12 items.

A new employee, however, will have to make an effort to figure out all the answers. And if an emergency hits before he or she has done so, your business may be in jeopardy!

12-point safety checklist

Download the full-sized safety checklist here.

Share it with new employees and, for that matter, with ALL employees.

More In-Depth Info on Employee Safety

Some Advisories with more details for workplace preparedness:

If you want a more thorough discussion of how to build a Simple Business Contingency Plan – get a copy of our book, Emergency Preparedness for Small Business.

Suggested Next Steps for the Company

You can put this checklist to work in just about any workplace – office, factory, hotel, retail operation – wherever your business is located. Of course, you may prefer to use it as a sample and make your own, more customized version.

Either way, here are 3 suggestions for how to proceed:

  1. Share this article and the safety checklist with management. See what items they can check off; are there any items no one has thought of, or knows the answer to? Be sure you understand which items might have some liability connected to them.
  2. Decide on a plan for sharing the checklist (or a customized version) with all current employees. Turn it into a team effort, or a competition — whatever works to engage people and get them more aware of safety and their surroundings!
  3. Add the safety checklist to your on-boarding process for new employees. Obviously, they will need a helpful partner to be able to get through the list. I think they’ll find it to be a comforting exercise and one that will impress upon them the company’s commitment to preparedness and to safety.

Disclaimer from EmergencyPlanGuide.org

This handy checklist is not meant to be a full assessment of employee or workplace preparedness. Rather, it is meant as a simple, easy tool to create more awareness among people who are working together.

If the checklist starts a conversation about what’s missing, consider it a bonus. And then, put together a plan to fill those gaps!

We are committed to a continuing conversation about being ready for emergencies. As always, the more the people around us know, the better off we ALL will be!

Virginia
Your Emergency Plan Guide Team

Cash Is King in an Emergency

Share

Gold coins

Best emergency currency?

Surviving after a serious, wide-spread disaster

We’re not talking “emergency cash fund” here, the 6 months’ worth of savings we’re all supposed to have to carry us through losing our job.

Here, we’re talking about getting up after the storm has hit, shaking ourselves off, and taking stock of how we’re going to get through the next few days or weeks.

In most emergency situations like this, you’ll be at home – or you’ll get there after some effort.

Will I need cash if I’m sheltering in place at home?

If your stock of emergency supplies is complete, you won’t need much cash!

  • You’ll have food and water, even if there’s no easy way to heat it.
  • You’ll have lights, and blankets, and activities to keep you busy if not exactly entertained.
  • Your battery-operated radio will keep you up with the news.

On the other hand, if you’re like half the population, your food and water supplies will be GONE within just a day or so. You’ll join the hordes of people who realize they have already run low or run completely out of . . .

  • Batteries
  • Bread
  • Butter
  • Coffee
  • Milk
  • Eggs
  • Pet food
  • Toilet paper
  • Tampons
  • Diapers
  • Baby Formula
  • ! ! !

Even more upsetting will be running out of prescription pills – the kind with the label: “Don’t stop taking this medicine.”

If you find yourself in this situation, you’re going to try to find a store to replenish your supplies. And to do that, you’ll need cash.

Think about it.  When the electricity is out your credit cards are going to be pretty much useless.  Stores – including your pharmacy or doctor’s office — may not even be open if they don’t have lights, air conditioning, etc. If they are open, they’ll only be able to deal in cash. (Maybe if you’re a particularly good customer they’ll accept your IOU.)

Moreover, to GET to a store that does have supplies, you’ll need gas. In an emergency gas pumps won’t work, so stations will be shut down until they can bring in a generator. Even then, their credit card systems won’t be operating.

Once again, cash will be the likely medium of exchange . . . and you may encounter inflated prices as business owners assess the realities of the situation.

If you’re stuck at home for a while, you may also want to pay people to help you repair damages, clear roads, etc. For sure, these neighbors or contractors won’t be accepting credit cards.

(In a big emergency, people may resort to bartering for supplies and services. The best items for bartering seem to be alcohol, commodities such as flour, rice, coffee, etc., and ammunition.)

What if I have to evacuate?

Escaping impending disaster or a disaster that’s already hit means . . . getting on the road in your car.

This puts us back to the need for gasoline.

If you’re aware of what’s happening, and you’re prepared for immediate action, you may get out ahead of the other people hitting the road.  That might put you first in line at a gas station that still has power and gasoline, and where your credit card will still work.

In the crush, however, you may find yourself competing for gas, for a motel room, even for a place to camp or park – for a week or longer! Again, you’re back to paying for these necessities, and maybe with potential bribes to get you a preferred place in line.

So how much cash do I need?

Obviously, the better prepared you are at home, the less money you need if you’re staying home. And the types of emergencies you might expect (power outage, ice storm, earthquake) will have an impact on the preparations you will have made.

On the other hand, you may live in an area where the likelihood of evacuation is high. (For example, if you live along the coasts where hurricanes threaten, where a tsunami might hit, or where flooding is common.) If so, your evacuation preparations need to be more extensive.

And, of course, ANY of us could be asked to evacuate due to a fire, explosion or other unexpected emergency.

So, the better prepared you are to evacuate QUICKLY (with supplies, maps to help you find alternative routes, etc.), the less money you need, too.

In every case, it seems as though enough to keep you fed and sheltered for a week or so would be a good idea. This could mean at least $500 and probably twice that.

What denominations should I have, and how should I carry them?

When things get frantic, people accepting money are not likely to want to make change. So, having smaller denomination bills is probably best — $5, $10, $20.

You can also assume some people will be ready to take advantage of the situation by demanding your money – or taking it. So, don’t keep it all in one place. Put some in a wallet, some in a pocket, some in the dirty clothes bag. If someone tries to rob you, they may be satisfied when they see that your wallet/pocket is empty and it looks as though you have given them all you have.

If you’re sheltering in place, follow the same suggestions. Stash your money in a variety of places in the house. Avoid the bedroom, night stands or jewelry boxes – places where thieves look first. Take some time to create effective hiding places – just don’t forget where they are!

Hiding money or valuables in plain sight

The best way to hide money in your home is in ordinary places that a casual observer wouldn’t even notice but that aren’t hard for you to get into. Some examples:

If you’re a handy-person,

  • Convert a section of your wall (between the studs) into a storage cabinet. If you have paneling, a removable section won’t show.
  • Set a fake vent into the floor or the wall. Use the space behind for storage. (The space below cabinets is particularly useful.)

If you’re not handy, or are in a hurry,

  • Put a hollowed out book right there on your shelf with the rest of the books. Some “secret storage books” are really a simple metal safe, with keys (probably not fireproof). If you intend to put a weapon in the book, be sure to get a book that is big enough. The image shows an example that would fit nicely in our library. It costs around $12. Click the image for details from Amazon:

  • Buy a camouflaged container, like a fake Clorox bottle or a can of vegetables whose bottom comes off. Here’s a picture of a fake WD-40 can! (around $17). I have several cans of WD-40 around the house so this would be totally unremarkable!)  Again, click the image for more details.


Children and money

Obviously, giving children money to carry can be dangerous. Be sure they understand how much they have and how to protect it. Small children who normally manage their own allowance may become vulnerable targets in a widespread emergency.

What about precious metals?

We’ve all heard the investment world talk about the value of precious metals in times of uncertainly.

As an investment, gold and silver can make sense as part of a portfolio. However, as emergency currency, they may not be so effective. Consider:

Who would accept an ounce of gold in return for supplies? Would they be able to make change? How would they (or you!) even establish its value? (Quick quiz. What’s an ounce of gold worth today?  See below for the answer!)

What about a gold coin with the stated value of $1, like in the image at the top of this article? Here, the answer is probably a lot more positive. In fact, some people might prefer the metal to paper. (These coins might also be able to be used in a dispensing machine . . . if you come across one!)

Again, your preparations depend on your own circumstances. But, as always, you want to put the thought into the preparations well before the disaster hits!

Until next time,

Virginia
Your Emergency Plan Guide Team

P.S. The value of an ounce of gold today, July 14, 2017, is $2,012.  Care to make change for that?


Tags:


Catastrophic Events and Disasters Can Ruin Your Day — Updated 2017

Share

Ostrich Assessing the Situation

Assessing the Situation

Classic Categories of Disasters

When we started writing our Advisories, back in 2012 (!), this was the list of “Catastrophic Events” and “Disasters” we learned about and wrote about:

  1. Widespread Natural Disasters – Several of these HIT somewhere in the world every year. Examples: Earthquakes, tsunamis, major storms, major wildfires. (Melting of ice caps and drought can be added to this list, though they usually don’t HIT. Rather, they creep up on regions.)
  2. Annual Threats – These events can be EXPECTED regularly every year including in the U.S. Examples: flooding, power outages, tornados, hurricanes.
  3. Man-made Accidents – These are unexpected, far less frequent, and often can’t really be anticipated. Examples: train wrecks, plane crashes, explosions and fires, nuclear plant meltdowns. Some people would add an economic meltdown to this list.

Since 2012, though, there has been one change to our list. Along about 2014 we had to add . . .

  1. A new category: Man-made On Purpose

You can guess which disaster falls into this category: Terrorist attacks.

Facts and statistics about natural disasters change slowly. They get worse as more people crowd to urban and/or coastal areas where storms are most common. And weather patterns are changing because of global warming.

But the facts of these changes are pretty well established, and the changes themselves are relatively slow.

Terrorist attacks are something else. News about terrorist attacks is dramatic, and gets splashed on the front pages. These attacks take place suddenly and in totally different and unrelated places.

Moreover, facts and statistics about terrorism aren’t necessarily well known. Here are some statistics from the 2016 Global Terrorism Index.

  • In 2015, nearly 30,000 people were killed from terrorist attacks worldwide.
  • More than half the deaths were attributable to two organizations: ISIS and Boko Haram.
  • Although many countries experience terrorism, over 80 per cent of all deaths in 2015 occurred in 8 countries: Iraq, Afghanistan, Nigeria, Syria, Yemen, Pakistan, Egypt and Somalia.
  • Over 90 per cent of all terrorism attacks occurred in countries experiencing violent internal conflicts.
  • In developed countries (Europe, the U.S.), the “man-made” factors correlating with terrorism: youth unemployment, levels of criminality, access to weapons and distrust in the electoral process.

OK, enough on terrorist attacks.

Let’s get back to our full list. When we look at all the possibilities, we realize immediately that trying to prepare for every catastrophe is impossible.

So why do we even make an effort at preparedness?

Because we know some of these disasters will happen, some day, to us, to our friends and neighbors, and to our community!

A better question: How to respond to this reality?

Here are the three most common approaches we’ve observed:

  1. Denial. Some people feel overwhelmed and bury their heads in the sand (figuratively, of course), pretending nothing will happen to them. If you have people like this in your family or at your workplace, you feel the same frustration we do. We have found over the years that it’s not worth the effort to try to change these folks’ mind.
  2. Passionate Anticipation. Some people are convinced disasters of the worst kind will happen and they spend time, money and psychic energy getting training, stockpiling supplies, buying gear and developing the mindset to get them through when the SHTF. We have met many of these people over the years, and sometimes are envious of everything they’ve put in place.
  3. Common-Sense Acceptance. Far more people approach emergency planning as simply one of the steps that responsible citizens take. Just as we buy insurance for our cars – in case we have an accident – and insurance for our homes – in case there’s a fire – making a commitment to preparedness – in case one of these disasters hits – just seems sensible.

Here at Emergency Plan Guide, we tend to support attitude #3. And we try to encourage people to take easy steps for sensible preparedness.  We remind them that it doesn’t all have to be done immediately. BUT, it can’t be done after the emergency hits!

For newer and long-time readers . . .

Here’s how we approach the process of preparedness.

  1. Count on having the bare necessities. Start with the most likely and immediate emergencies. For example, running out of food and water – whether it’s because of a simple power outage or a severe storm – is easily predictable! And the solution to this problem is one we all already know. It just takes adding a few items to our shopping list each week for the next few months. Nothing difficult, nothing high-tech. Hardest part is deciding where to store these supplies!
  2. Add Life-saving skills. You already teach your kids how to call 911. You teach them to swim. Add a few more skills to your own stock, like how to send a text, how to handle basic first aid or administer CPR. These aren’t particularly hard-core survival skills – they are really every day necessities.
  3. Think stopgap instead of permanent. It’s possible that we will experience a true apocalypse. It a lot more likely, though, that we’ll be trapped in the car overnight, or have to leave the house for a few days because of a water main break or the threat of a hurricane. Have enough packed so you can get along for 3 days at a hotel or in your brother’s extra bedroom. You aren’t likely to be camping in a forest somewhere trying to shoot squirrels for food.
  4. Build a support group. We already mentioned your brother, but what about neighbors? As a team, you could expect to have all the necessities and skills needed to get through the emergency – if you have built a relationship so you trust one another! Here at EmergencyPlanGuide.org we recommend taking a CERT course and using that to kick-off an effort to build a neighborhood or workplace group. Everybody has something to offer, and together we’re a lot more resilient and powerful than we are standing alone.
  5. Keep this stuff in perspective. Yes, emergencies will happen, but your local First Responders will be able to deal with them in 99% of the cases. And yes, a terrorist attack could happen. But whereas in 2015 some 30,000 people across the world were killed by terrorist attacks, 30,000 people are killed by gun violence every year in the U.S. alone! For that matter, around 30,000 people are killed in car accidents every year, too. Keep it in perspective!

When uncommon threats become predictable

Occasionally a threat develops that used to be in the “rare” column but now approaches “likely.” For example, here in Southern California there is one looming threat that tends to disrupt the stable, calm-cool-and-collected scenario described above — and that is a major earthquake.

Major earthquakes are unique in their potential for widespread damage. And the chances of a major quake here are getting better and better. (I think you could add a developing hurricane to this category, too.)

If these major events happen, days or even weeks may go by before outside help can arrive.

Our own First Responders tell us that planning for a 3-day emergency is not adequate. They ask us to prepare to take care of ourselves for at least 10 days.

If your own list of catastrophic events contains a threat that is usually rare but whose chances of happening go up for whatever reasons, then you need to take immediate and more focused action.

Having the basics already in place will make that extra effort a lot easier and give you a lot more confidence in your ability to survive.

So, let this Advisory  be a prompt for reflection about your own situation – and an impetus for action.

As always, you can’t prepare or train AFTER THE FACT.

 Virginia 
Your Emergency Plan Guide team

P.S. Our section BUILDING YOUR SURVIVAL SKILLS can get you started quickly! (It’s in the right-hand sidebar of this page.) Clicking the links will take you to targeted Advisories. If you know exactly what you’re looking for, use the SEARCH box at the top of the sidebar to get to that information even faster.

P.P.S.  As I write this, we’re approaching PRIME DAY at Amazon (July 11, 2017). If you’ve got a shopping list going — for emergency supplies or gifts or whatever — now might be the time to consider becoming a PRIME member.  We find Amazon to be a good source for nearly all supplies, and sometimes there are really great deals to be had. Try it out for free right now:


Reliable Sources for Disaster Preparedness

Share

Car in flood

Keeping up with the latest — whether political news, phone technology, business trends or emergency preparedness — takes some effort.

It’s made easier when I find reliable sources that I can return to again and again. It’s made even easier when people take the time to send me the good stuff!

So today I’m sharing some preparedness and disaster recovery tips that I have recently received from favorite sources. Thanks to you all! (Please follow the links in each paragraph to get more on that topic.)

1-For Business Owners from Business Owners

Focus on Crisis Communications

I attended another  online webinar this morning, hosted by Agility Recovery: www.agilityrecovery.com  Today’s webinar was on Building a Crisis Communications Plan for business. I’ll be drafting a full Advisory based on my notes, but if you know you need this part of your plan, go grab this earlier version of their worksheet right now – https://www.agilityrecovery.com/assets/SBA/crisiscomms.pdf– and watch for my upcoming, updated  Advisory on this topic!

In the meanwhile, get to know this business preparedness and recovery service. I’ve found everything they do to be first rate. Over the past several years I’ve shared a number of things from their resource library. At their website, you’ll find:

  • Tips: Their “52-week Disaster Recovery” series.
  • Checklists: One of the best: Checklist for Power Outages and Back-up Generators. (Read the whole Advisory before you request the checklist. The questions in the Advisory are critical! https://emergencyplanguide.org/power-outage-in-the-workplace/.
  • Case studies. There’s likely to be a story about a business similar to yours since Agility has responded to thousands of emergencies. I was particularly captured by the story of Western Financial Group’s 2015 flooding and recovery.

I really can recommend Agility Recovery as a “reliable resource.”

2-For Homeowners from a Homeowner

Focus on Flooding – Wells and Septic Tank Systems

I live in one of the most well-planned communities in the country. (Some neighbors complain that it’s overly planned. That’s another story for another day.) In any case, all utilities here are underground; I had to look up images of “telephone poles” for my recent Advisory about power lines because I couldn’t just look out the window and see one!

As a kid, though, we lived a lot further out in the country, and we managed our own well and septic tank. We even strung our own phone and electric lines (probably without a permit).

So when I got an email this month from one of our readers, I was interested!  Jim McKinley –  www.moneywithjim.org   — offers smart money management advice.

The resource he sent for us is about preparing your family and home for a flood – in particular, preparing to protect your water supply and sewage treatment system. And the link takes you to a pdf published by the Canadian Province of Saskatchewan. The general info is likely to be review for most Emergency Plan Guide readers, but I found these aspects of the article to be particularly valuable:

  • Protecting your wellhead
  • Decommissioning well pits
  • Coping with groundwater flooding (lots of info on setting up drains)
  • Pumping out a septic tank or holding tank BEFORE flooding
  • Managing the soil of your private wastewater system AFTER a flood

You may not live in Saskatchewan, of course. And the property where I grew up, and maybe where you live, has long since been “connected to the city system.”

But it’s likely that someone you know lives further “off the grid” than you do. Or maybe you know someone whose vacation home has wells and/or a private wastewater system. Share this link!

https://www.wsask.ca/Global/Lakes%20and%20Rivers/Flood%20Watch/Preparing-for-a-flood.pdf

3-Finally, for anyone whose car has been caught in a flood.

From time to time over the years I’ve watched with concern and even horror as water crept up through the floorboards. But my cars have never been fully flooded.  How about you?

Once in North Carolina I rented a car for the day. We noted right away that something was amiss, and as the day warmed up – and we got farther and farther away from the rental shop – it became clear that the car had a real problem! It had been flooded!

Peeeee-yewwww! The smell was awful! Talk about car body odor!

If a car has been flooded, it’s usually considered a total loss by the insurance company. And it will be completely replaced. But, if you don’t have the right insurance, or the car wasn’t totaled, then you may find yourself trying to save it.

Once again, our friend Jim has directed us to an excellent online resource:

https://www.yourmechanic.com/article/how-to-reduce-the-damage-to-a-flooded-car-by-jason-unrau

And I’ll add to this article, part of which deals with eliminating odors. Yes, have and use plenty of baking soda. But in addition, consider this under-$10 specialty product:

This “sponge” doesn’t attempt to overpower the odor with another smell; it absorbs all odor.

If only we had had one of these in that rental car!

OK, that’s three tips for today. Maybe only one applies directly to you. But perhaps you have been inspired to think about other tips that you might share here. We welcome your suggestions!

 Virginia
Your Emergency Plan Guide team

P.S. Got an idea for a tip or for a full Advisory?  For a family, for a group, for a business? Just let me know and we’ll figure out how to get it published!  You can write to me directly at Virginia@EmergencyPlanGuide.org.


Fire Danger in High-rise Buildings

Share

High rise fire
Intro: At Emergency Plan Guide, we try to write about subjects we know something about from personal experience. (It helps to be “a mature adult!”)  But until we become paid reality-show stars, some things we have to write about as observers.

The news is often an inspiration. Last week I wrote about hurricanes — though I have never lived through one. This week, it’s a fire in a high-rise.

The closest I’ve been to that is living through a fire on a ferry boat — not exactly the same thing, but certainly some similarities.

The point of all this? My own experience may be limited, and the risks that I face may be limited. But we all will  face a variety of emergencies FOR THE FIRST TIME. I’m convinced that simply being open to ever more more knowledge gives us a better chance of surviving. That’s what keeps me learning and writing.

With that, here’s this week’s offering. 

_________________________________________

The high-rise apartment building fire in London was horrifying. And deadly. When I started this Advisory – 3 days after the fire – the number of people missing and presumed dead had risen to 58. As of today, 2 days later, it is now at 79 missing and presumed dead.

High-rise fires are alarming but infrequent.

High-rise fires are always particularly horrifying. We all picture flames shooting up the sides of buildings, far above the street, and we can imagine the terror of the people trapped inside.

Still, with the exception of terrorist acts, the threat posed by fires in high-rise buildings isn’t as great as that in low buildings.

According to the National Fire Protection Association, in all the structure fires in a year, around 2,600 people die – but only 40 of them are in high-rise building fires.

Moreover, the NFPA says the danger of fire in high-rises is going down.

Why? It’s a function of old buildings being replaced by newer ones.

Modern high-rise buildings have fire-suppression protections that work.

If you’ve read the details about the London fire, you will discover that the 24-story Grenfell Tower did NOT have such protections. According to news reports:

  • Only one stairwell was available for residents.
  • There was no sprinkler system.
  • Recent “upgrades” to the building included a plastic-filled cladding material that was not fire-resistant.

What do you know about the building you are about to enter???

Safety depends on the building codes in effect.

In the United States, national and state codes regulate new construction and, to a certain extent, upgrades or retrofits. Generally, these codes apply to different aspects of the building – some of which we, as consumers, may be aware of, and other that are hidden from sight but just as important.

Outside the U.S., codes and standards may be different. For example, in the case of the London fire, the new cladding would not have been allowed in the U.S. (A visitor to the building wouldn’t have known that. Even the residents of Grenfell Tower, who had requested fire-resistant upgrades, may not have realized that their new cladding did not meet that standard.)

So, whether living, working or traveling, here are some questions to get answered before you stay in a high-rise building.

It’s good practice to answer these every time you enter a high-rise building!

1-Is there a fire alarm or smoke alarm system?

Easy enough to find out. If you don’t see installed alarm buttons, just ask!

2-Is there a fire sprinkler system?

An alarm doesn’t fight a fire!

So, look up and see if you can identify sprinklers. These are the key safety feature – in fact, they have been determined to be 97% effective in suppressing fire. (The other 3% didn’t work because they water supply wasn’t hooked up right, or the system wasn’t properly maintained.)

Don’t see any sprinkler heads? Are they blocked by furniture or decorations? Ask property management if a system has been installed.

This is the very most important feature for high-rise fire safety! No sprinkler? Don’t stay!

(An older building can be retrofitted with a fire sprinkler system. Unfortunately, it costs many times more to put in after the fact that if it had been incorporated into the original building. So, building owners may resist adding systems if the law doesn’t require it.)

3-Where are the fire exits?

Look for signs. Identify more than one exit. Check diagrams of the building so you would know which way to go if you couldn’t see because of darkness or smoke.

4-Where are the stairwells?

Again, note the PLURAL word. Every high-rise building needs more than one set of stairs. Note where stairs are located so if you need to evacuate, and one set of stairs is blocked, you can go down the other. (Remember, in a fire, one stairwell may be reserved for use by fire fighters.)

5-Are there fire doors in the hallways?

Modern buildings include fire doors that close in the case of a fire, keeping it from spreading. Usually, these doors are held open electromagnetically, and if a fire alarm goes off the circuit is broken and the door closes by itself.

Bad sign: Fire doors are blocked so they cannot close.

Again, under normal circumstances you may never notice these doors because they are “hidden” by the décor. However, it is good to know that in an emergency you may come upon a door that you didn’t expect.

6-How would people with a disability be assisted in case of a fire?

While you may see special signs for emergency procedures for people in a wheelchair, etc., it is up to you to figure out how you will handle an emergency.

Other fire safety features to look for, in any building.

1-What is the maximum occupancy?

Overfilled rooms, theaters, restaurants, stadiums, etc. may be more dangerous if there is panic. Be aware of where exits are located, and in an emergency do not automatically head for the door where you came in. Is there a better exit option?

(In my experience it’s fun and valuable to train children on a regular basis to look for multiple exits. As you settle down in movie theater seats, ask, “How many exits do you see? Or, how many ways to do you see that we could get out of here?”)

2-Where are fire extinguishers?

In a commercial building in the U.S., there’s sure to be one not far away!

Usually, local fire codes require that fire extinguishers be installed based on square footage, and they also require that you be able to find one no more than 75 feet away. (“75 feet” is only an example. Specifics may change slightly in a different state and in a different type of building.)

In any case, when you enter a building or room, it’s a good idea to look around to see if you can locate the nearest hand-held extinguisher.

This assumes you know HOW TO USE an extinguisher, of course.

What to do if there is a fire in a high-rise?

Fire experts still say “shelter in place” is the best advice IF THE BUILDING HAS PROPER FIRE SUPPRESSION PROTECTION.

(Stuff towels under the door to block smoke from entering, stay alert for instructions.)

Sprinkler systems have been in use for over 100 years. They provide 24/7 protection, turning on automatically when sprinkler heads reach a certain heat level. Fires can be caught and put out without people even realizing it until later.

Once again, if you plan to visit or stay in a high-rise building without a sprinkler system, think twice. Think three times!  You may want to find another option.

Virginia
Your Emergency Plan Guide Team

Want more information about fires and how to avoid a disaster? Check out these Advisories:

Hurricane Headscratchers – A Quiz for Preppers

Share

Hurricane forming

Over the years, we preppers gather a lot of info about the various threats we face. We prepare our car, pets, and pantry for “the first 72 hours,” for long-term shelter-in-place, and for bugging out.

We assemble and test survival gear, food and first aid items – including snake bite kits, liquid skin and anti-radiation pills.

We do a lot of preparing!

And then along comes a hurricane, and we realize we DON’T know everything, after all!

Hurricane season starts this month. Here are a dozen questions about hurricanes pulled from a variety of “reliable sources.” Test yourself and see how well YOU do!

Let’s start our quiz with the easiest questions.

1-The circular, clear space at the center of the hurricane is called the ___? (Just beginning to form in the image above, from NASA.)

2-At the center of a hurricane, does air rise or fall to create the eye?

3-The cloudy outer edge of the eye is called the ______.

4-T or F —  Winds are highest at the eyewall.

5-Precipitation from a hurricane is greatest

  • At the eyewall
  • At the outer edges of the hurricane
  • When the eyewall hits land

6-T or F Once the eyewall starts to weaken, the storm is dying.

7-Match the storm name with the likely location:

  • Hurricane
  • Typhoon
  • Cyclone
  • ——————
  • NE Pacific Ocean
  • South Pacific and Indian Ocean
  • NW Pacific Ocean

8-All these storms are considered “tropical cyclones.” Tropical because they are formed ______ and cyclones because they _________,

9-In the northern hemisphere, the winds of a cyclone blow in which direction?

10-In the southern hemisphere, in which direction do they blow?

11-For us preppers, the greatest threat from a hurricane comes from:

  • Wind
  • Tornado
  • Storm surge
  • Flash flooding

12-The word “hurricane” comes originally from the _____ language.

How well did you do?  Sure you got everything right? Read on if you aren’t sure about some of your answers!

And the answer is . . .

1-The eye of a hurricane (that we’ve all flown through in movies) can be anywhere from 2 miles in diameter to over 200 miles! It is typically clear and calm – although the water below may be violent.

2-In a mature tropical cyclone, sinking air is what creates the eye.

3-The outer edge of the eye is called, not surprisingly, the eyewall. It’s not exactly a vertical wall. Rather, it expands outward with height – called the “stadium effect.”

4 and 5- The eyewall is where everything is happening – the greatest wind speeds, heaviest rain, and air rising most rapidly. (In 2015, winds from Hurricane Patricia reached 215 mph! A category 5 hurricane has winds of 157 mph or greater.)

6-In a large storm, there are a series of rain band rings that move slowly inward. The eyewall can weaken, but then can be replaced by the next band, giving the storm a new eyewall and new strength.

7-Hurricanes occur in the Atlantic and northeastern Pacific. A Typhoon occurs in the northwestern Pacific. And a Cyclone occurs in the south Pacific or Indian Ocean.

8-Tropical storms are “born” in “the tropics,” over warm bodies of water. Their “cyclonic” or rotating winds are a function of the earth’s rotation.

9-Cyclonic winds blow counterclockwise in the Northern Hemisphere.

10-They blow clockwise in the Southern Hemisphere.

11-The greatest threat to life comes from the storm surge – water that is pushed ashore by the storm’s winds. Storm surges can reach 25 feet and be hundreds of miles wide. In November 1970 the storm surge from the “Bhola Cyclone” in Bangladesh was estimated to be 20-30 feet high. Between 300,000-500,000 people in the low-lying regions were killed.

13-The Mayan god of wind “Hurakan” became our word Hurricane. One of the first record of hurricanes is found in Mayan hieroglyphics.

Are you a teacher or leader of any sort, and do you . . .

Want more on hurricanes?

The best short, all-purpose article I found is here:  https://pmm.nasa.gov/education/articles/how-do-hurricanes-form  It has several excellent diagrams showing the parts of the hurricane (eye, eyewall, the rain bands, etc.), how the air sinks and rises, etc. It also lists the different storm categories (rated by wind speed).

If you want the full explanation of the storm categories – the Saffir-Simpson Hurricane Wind Scale — check here: http://www.nhc.noaa.gov/aboutsshws.php

Enough here for cocktail party or dinner table conversation, eh?

Virginia
Your Emergency Plan Guide Team

P.S. Hurricane season reaches its height in September. By the time September comes around, if you are in hurricane/cyclone territory, you need to know more than just these tidbits. . .! In particular, be sure you and your group distinguish between hurricane warnings and watches.


Summer Vacation Threats — Wild Animals

Share

WildlifeTravel to a place you haven’t been before often tops the list of vacation destinations.

And a glimpse of a wild animal you’ve never seen outside a zoo might make that vacation truly memorable.

Still, an “up close and personal” experience with a bear (mountain lion, coyote, wolf, bison, snake, alligator, etc.) may turn out to be more than you bargained for.

Five general guidelines for protecting yourself from dangerous wild animal attacks.


First rule – “Maintain situational awareness!”

We’ve talked before about the dangers of wandering city streets with your attention focused on your cell phone. Paying attention to your surroundings is just as important in the woods or on safari or surfing. Your “vacation paradise” may be the hunting grounds for wild animals — and you could become the prey.

So, know before you arrive what you might expect, and be on the lookout with every step.

Second rule – Avoidance is the best defense.

Unless you are a professional hunter, or perhaps a professional photographer, the safest vacation will be one where you never even see a dangerous animal up close.

Most wild animals will avoid you if given the chance.

Some ways to improve your chances of keeping wild animals at a safe distance:

• Avoid areas where dangerous wild animals have been seen or attacks have happened. This includes keeping hands or feet out of water where alligators may swim, and keeping entirely out of water where sharks have been seen. Check local reports – you may decide to change camping plans at the last minute.
• Make some noise as you hike or travel. Consider wearing bells or other noisemakers to let animals know you’re coming. (More on that. Keep reading.)
• Vacation with a group. Jog or bike with partners; don’t leave children or pets alone in a campground or let them wander off by themselves.

Third rule – Animal babies are NOT cute.

We pretty much know this by now, but any mother will viciously defend her baby. Many deaths from bear attacks have been because people got between cubs and their mother. Make sure your children understand this rule!

Fourth rule – Hunger drives behavior.

More and more homes are being built in areas that used to belong to wild animals. Climate changes are driving animals closer to human habitation, too.

This means that the traditional sources of food for predators – namely, other smaller wild animals – may have disappeared. Where else can they turn?  To humans.

Bears, coyotes, mountain lions or cougars and alligators can be attracted by garbage. Make sure trash containers are animal-proof, sealed and sturdy. If you’re camping, keep food out of easy reach of wild animals (hang it away from your sleeping area). And for heaven’s sake, don’t take food into a tent with you!

Pet food? Same idea. Small animals may be attracted to the pet food – and in turn may attract larger animals like bears or mountain lions.

If you come across a dead animal, or other stash of food, it may be planned lunch for a larger animal – and that animal may be just out of sight. Don’t let the “owner” think you’re about to steal that meal!

If hungry enough, wild animals may consider people as potential food, too. While attacks are very infrequent, they happen and with grisly results.

Once again, remember the basic rules. Be aware. Hike or bike in groups. Make enough noise that animals won’t be surprised to see you appear around the corner. If you accidentally come across a wild animal, stay calm and back slowly away. Don’t run! Give the animal an escape route. Keep it in sight as you move away, but avoid eye contact, as that is considered a sign of aggression.

Fifth rule – If you are attacked, fight for your life.

The only animals you might be able to outrun are moose. (They don’t see you as food so they give up once they’ve chased you away.)

You might be able to climb a tree to escape a coyote or wolf, but bears and cougars can come right up after you.

If you are being stalked or are confronted . . .
• A coyote can be scared away by noise or aggression. Hold your arms out, open your coat, put a child on your shoulders. Be noisy, look BIG!
• A pack of coyotes may NOT be frightened by your actions. Call for help and get your back against a wall and be prepared to defend yourself from quick attacks aimed at your feet and legs. Use whatever weapons you have. Aim for the animals’ eyes.
Wolf attacks are the rarest of all large predator attacks. Wolves are wary of humans and not aggressive toward them by nature, and if one attacks it’s probably because it has been fed by humans, or is sick. As with a single coyote, be noisy and look BIG, and – unusual for dealing with wild animals – maintain eye contact.
Cougar or mountain lion attacks are also very rare. If looking BIG and threatening doesn’t frighten the cougar away, and it attacks, you must fight back using whatever you have: a stick, backpack, water bottle, shovel or bare hands.
Bears really don’t like people, and they are likely to detect you and leave the area a lot sooner than you will detect them. Should you suddenly surprise a black bear, though, remain calm and do not run. Tell the bear to get away (thus letting it know you are a human). It may make a “fake charge” and then stop. If the bear attacks, fight back immediately and forcefully.
Grizzly bears, like other predators, will defend their territory, their young or their food. If you threaten any of these, they may attack, but if you remove yourself as a threat, they will likely calm down. One way to “remove the threat” is by playing dead – if you have the discipline. If a grizzly sees you as prey, however, it may keep coming. (Note – “Playing dead” seems to work with grizzlys, but not with other bears.)

Weapons for self-defense against wild animals.

Avoiding encounters with wild animals is the best defense. However, if you are trespassing on their territory, it’s best to be prepared with weapons for self-defense.

These weapons can range from firearms to a big knife to a club or walking stick or to pepper spray or bear spray. In every case, you need to have practiced with your weapons so you can reach them quickly and surely. Again, keep reading for a recommendation about bear spray.

Good items to add to your vacation planning list.

If you’re planning a wilderness vacation trip, consider adding these items to your list. They are relatively inexpensive and could actually save your life.

  • Smart camping items

Keep food and food garbage from attracting animals by storing it in odor-barrier bags and/or in bear-resistant containers. Here are examples available at Amazon. (Obviously, you want to dispose of the bags in animal-resistant trash containers.) The bags cost less than $15 for assorted sizes. The plastic, shatter-proof container comes in 4-day or 7-day sizes (weighs around 2 pounds) and costs between $70 and $80 as I write this. Click on the links or images for full details.

BaseCamp Odor-Barrier Bag, Assorted

Bear Vault BV500 Bear Resistant Food Canister

  • Smart hiking items

Let animals know you are coming by wearing bells. This one comes in a variety of finishes (black, chrome, red) and because it costs around $5 is considered an “add on” at Amazon. (The magnetic silencer feature allows you to “turn it off” when you’re not out on the trail.)

Bear Bell w/ Silencer


If you find yourself in a tough spot, you may want to make more noise with a whistle. Again, these are inexpensive additions to your day pack and will give you peace of mind.

ZITRADES 3pcs Emergency Hiking Camping Survival Aluminum Whistle Key Chain With Red/Green/Blue Color

Now for the bear spray. If you’ve read our Advisories for a while, you will have come across a couple of articles about pepper spray for personal safety. THIS IS NOT YOUR MOTHER’S PEPPER SPRAY. It is not meant for that mugger standing 4 feet from you. Bear Spray has extra powerful pepper. The container lays down a cloud of spray well before the bear gets to you — at 25-30 feet.  Start shooting in time, and aim low to get it into the bear’s eyes and nose. (Get a large can of spray to be sure you don’t run out before the bear runs away.)

You must have INSTANT ACCESS to spray to make it useful. Wear it in a holster at your chest or waist, and practice drawing and shooting BEFORE you need it. (Recycle a partially used can responsibly.)

Frontiersman Bear Spray with Chest or Belt Holster- Easy Access, Max Strength – 9.2 oz -Industry Max 35-Foot Range

Don’t think this is everything you need to know!

Different parts of the country experience different wild animal problems. Before you make final plans for your vacation, take the time to check in with experts from the area.

For example,

  • The U.S. Forest Service issues warnings regarding bear encounters.  Google the area where you are heading with the words “bear attacks.”
  • Parks may have special websites all about their wildlife, including ways to interact safely. At http://www.yellowstonepark.com/bear-spray-matters/  you can get info about local conditions and how to purchase or even rent bear spray.
  • Specialty websites are a great source of information about particular animal behavior. A generic resource site can be found at http://westernwildlife.org

As with all threats, the more you know, and the better prepared you are, the better you’ll be able to avoid a disaster.

Enjoy your summer vacation!

Virginia
Your Emergency Plan Guide Team

May 31 is Dam Safety Awareness Day

Share

Who ever heard of this holiday?

Dam Safety Awareness Day
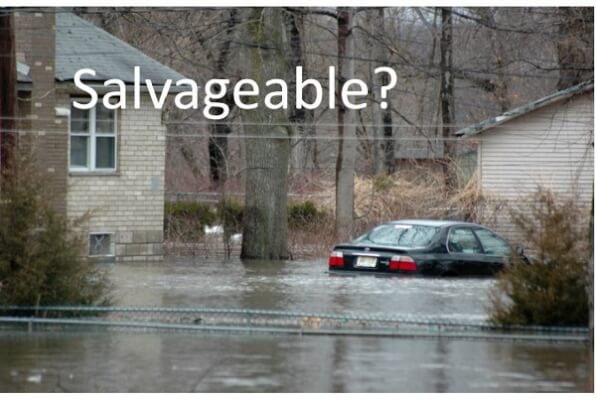
Maybe the people who live near the 90,000 or so dams in the United States! (BTW, Texas has more dams than any other state, followed by Kansas . . .)

Most likely to have heard about Dam Safety Awareness Day, however,  are the people who live near the 17% of all dams that are considered by the American Society of Civil Engineers as having high-hazard potential!

Apparently the Oroville Dam in northern California, that came so close to collapsing this spring, was not even on that list . . .!

(Personal note. My dad, who among other things was a road-grader operator – “Best damn blade-man west of the Mississippi” – worked on the construction of the Oroville Dam in the 60s.)

The Oroville Dam didn’t collapse, thanks to quick action by its operators. But in the aftermath, it was discovered that its Emergency Action Plan had never been tested in the 50-year-life of the dam. And during that time, population in the area below the dam had doubled and evacuation options had changed. Officials admitted that had the dam actually broken, citizens would not have received a warning quickly enough to be able to get to safety.

What makes a high-hazard dam?

The ASCE defines it this way: “A dam in which failure or mis-operation is expected to result in loss of life and may also cause significant economic losses, including damages to downstream property or critical infrastructure, environmental damage, or disruption of lifeline facilities.”

And, the ASCE gives a grade of D to our dam infrastructure.

What risks do dams face?

Most dams become at risk simply because of age and lack of maintenance. This image from FEMA shows the kinds of weaknesses that appear as an embankment dam ages:

Embankment dam weaknesses

At the Oroville site, the problem wasn’t in the main embankment, but rather a break in the emergency spillway. When water was released to relieve pressure on the main dam, the spillway began to give way, which could have led to the whole thing collapsing.

Too much water behind the Oroville Dam was caused by unexpectedly heavy rain storms. But dam failures are not always caused by storm. Most are caused by settlement and damage from earthquakes, mechanical failures (like gates not working) and poor design (allowing for overtopping and blocking by debris).

So who is keeping track of whether dams are safe?

States regulate the vast majority of dams in the U.S. (about 80%). The Federal government regulates the remaining number.

Regulation is one thing. Actually doing the required maintenance is another. Most states’ safety programs are woefully underfunded and do not have any authority to require maintenance.

Keeping the dams safe is up to dam owners.  And nearly 70% of dams are privately owned.

For example, a homeowners’ association that wants its homes built around a lake will own and operate a dam. A utility may own a lake used for water storage or for electricity production. And, of course, large commercial entities (agricultural, mining, etc.) may build waste holding ponds behind dams.

As more dams are built, as downstream development continues, and as ALL dams age, the number of high-risk dams increases.

Where are these dangerous dams?

I tried to find a map showing dams and danger areas – called Dam Break Inundation Areas. It wasn’t easy!

What I finally discovered is the National Inventory of Dams, maintained by the Army Corps of Engineers. As a “non-government user” I could get into the database but even after I filtered for my own state, the data wasn’t easy to read. And I never found a map!

I encourage you to check it out yourself: https://nid.usace.army.mil If you have the name of a specific dam, you’ll get info faster.

Another course would be to inquire of your own insurance agent. You may have to shop for a specialist in flood insurance to get specifics for your own location.

Obviously, even if you personally are not in the path of water from a breech, you could be impacted in other ways by the failure of a dam.

Homes and businesses of people you know might be flooded; those people might be displaced. Your personal water supply might be shut off. Water for irrigation, fighting fires, etc. – all might be reduced.  Utilities that depend on hydro power could be affected. Transportation systems could be disrupted.

If we are near a dam, what should we be doing in the way of emergency planning?

1- People: Somebody manages that dam! Find out who, and ask these questions:

  • Who owns the dam? Has it been inspected?
  • Is there an Emergency Action Plan for the dam?
  • When was it last updated?
  • What kinds of warning systems are in place to warn us of danger or potential danger? (Sirens, reverse 911 calls, door-to-door notification?)
  • Are evacuation routes laid out?
  • What about people with disabilities?

2-Political: If you encounter barriers or obfuscation (love that word when it comes to things political!), consider these actions:

  • Urge your state to require a disclosure of whether property for sale is in an inundation zone.
  • Likewise, urge policymakers to require disclosure of dam-related issues to potential owners of dams and property around them.
  • Urge legislators to fund dam safety programs and to provide funding for those programs.

3-Personal: And everyone can add to their own personal emergency plan:

  • An evacuation route to higher ground.
  • How to evacuate family members who need assistance.
  • Practice evacuation route and point out a family meeting place.

Having an evacuation kit packed and ready to go is a given.

Want more info for your family or your group?

FEMA has produced a useful fact sheet (8 pages), available here:

https://www.fema.gov/media-library-data/1486735320675-8b0597aca8b23c7e2df293310e248bee/NDSPFlashFactSheet2015.pdf

Hope this has added to your knowledge about the (often invisible) world around us!

Virginia
Your Emergency Plan Guide Team

P.S. And the story behind the Dam Safety Awareness Day being on the 31st . . .

One of the worst disasters in U.S. History was the Johnstown flood of 1889, which happened on May 31.

At that time, Johnstown was a thriving community in western Pennsylvania. Nearby, a group of wealthy citizens had restored an old dam and created a private lake for fishing, sailing and ice boating.

In May the area experienced several days of extraordinary rain, and it was feared the dam would collapse. Nothing could be done, however, in part because debris had built up in the spillway, making it impossible to lower the level in the dam. Warnings were issued, but false alarms had been given before, so residents ignored them.

At 4 p.m. on the 31st, the dam was overtopped, and collapsed, sweeping a 20-ft. high wall of trees, railcars and entire houses down the valley toward Johnstown. There, the mass was stopped by a bridge, which became a second barrier, causing the water to back up and cover the whole town. Then, everything burned.

More than 2,200 people died in the Johnstown flood. The entire town was destroyed, and surrounding communities dealt with typhus, smoke, contaminated water supplies and outbreaks of violence.

The private club members and dam owners were able to claim the dam break was “an act of God” and escaped being held liable.

Are you sabotaging yourself?

Share

Hiuding in the woodsDo you ever roam the internet, checking out different survival forums and blogs?

Well, naturally, I do – to better understand “the communities,” learn about new products and practices, and stay up to date with some of the latest science regarding emergency response.

When I find interesting or exciting new ideas, I try to share them on our Advisories.

One theme I don’t share very often – the paranoia I see out there.

Here’s sort of how it goes:

“When the SHTF, expect bad guys, marauding gangs, vigilantes, even government troops, to start roaming the streets coming for you and for your supplies so you’d better be ready with weapons and lots of ammunition and be able to turn your home into a fortress or better yet, escape to a hidden, hardened survival shelter where you can wait it all out.”

I’m not saying some bad stuff couldn’t happen, or that having an escape plan doesn’t make sense. What I do question, though, are the implicit recommendations in this scenario. I see three of them:

  1. “Treat all others as potential aggressors.”
  2. “Arm yourself with serious weapons.”
  3. “Pull yourself into your shell and close the doors after you.”

As I see it,

The reality of the most likely emergencies is going to be very different.

For example, last week we talked about an emergency that shuts down your work completely, like a fire or flooding. In a situation like this, you may suffer a personal disaster because you don’t have money in the bank to meet your bills while you are out of work. Others you work with may suffer, too. But roving gangs as a threat? Probably not.

We’ve often talked about the most frequent emergency at work – a power outage. Statistics suggest that as many as 70% of businesses can expect to experience an outage during the next year, whether weather-related or from equipment breakdown. Once again, your company, its customers and maybe even shareholders will suffer – but all of you being well armed won’t make a bit of difference.

In fact, in the U.S., disasters have seldom left people on their own and scrambling for supplies, for more than a few days – the exceptions being Hurricanes Katrina and Sandy.

So, our recommendations at Emergency Plan Guide are built on a different set of assumptions.

Neighbors. I know them, their kids and their dogs. I may not consider them “best friends,” but they’ve never hesitated to lend a helping hand. They’ll be the first to show up in an emergency. Why wouldn’t I look to them for help?

Self-defense. Yes, as I wrote in my bio, I grew up with guns and I’m comfortable with them. But I think the emphasis on guns (handguns, shotguns, automatic weapons) — and also tomahawks, and machetes — encourages people to arm themselves who have no business having weapons. They will make an emergency situation even worse.

(As embarrassing as it is to admit, when Joe went through specialized weapons training with the military, he learned how to shoot all sorts of weapons. Unfortunately he couldn’t qualify as a marksman with any of them! So weapons may be more dangerous for us than for intruders . . .!)

Self-reliance. Yes, be sure you have a sensible stash of food, medicines, etc. But to count on one family to have everything it needs? How much easier to share the cooking, child or elder care, and medical knowledge and skills. How much more effective to share tools and work together on repairs. Share the fear — and share confidence and hope when you can. Self-sufficiency is positive; isolation is lonely and negative.

And as for the government . . .

Again, some survivalist blogs and forums have members who are passionate about hating the government, the police, and, in fact, any “authority.”

Here at Emergency Plan Guide we have been fortunate to build good relationships with all kinds of “authorities” in our community. I write often about the fire fighters and police and the CERT team members with whom we work closely.

One of the advantages to these relationships is that we have a pretty good idea of what to expect from the authorities in an emergency. In an emergency, we won’t be guessing – or second-guessing – what they are likely to do.

For example:

  • We know how our police department has been trained to respond to active shooters – and how their procedures have changed in the past year or so. (We’ve even been invited to participate in a drill as civilians caught in an active shooter situation.)
  • We know what emergency facilities our local first responders have. Heck, we’ve been inside most of them, and seen the equipment in action!
  • We’re tuned in to local emergency services that deal with homelessness, missing people and drug overdoses. We know who to call and what to say to get an appropriate response.
  • We’ve checked and are clear on how our local police force is handling coordinating with ICE on immigrants in our community.
  • We receive regular bulletins on how local schools plan for emergencies.

This isn’t everything we’d like to know, but it’s a pretty good start!

What does it take to get up to speed about local policies and procedures?

Here’s some of what our local group members do on a regular basis.

  • We follow what our city is doing by going online to the city website.
  • We take tours when there’s an open house at a fire station or the police department.
  • We sign up for official emergency alerts (AMBER alerts, etc.).
  • We track the police department via its Facebook page.
  • We’re on the list to get invitations to CERT follow-up trainings. (The most recent one was on terrorism.)
  • We invite “the authorities” to come to our local emergency response team meetings as guest speakers – and then ply them with questions. (Yes, we have put them on the spot from time to time!)
  • We subscribe to various online industry news feeds.

If you’ve been reading our Advisories, then you know we also share what we learn from these various field trips and events – so our immediate neighbors and several hundred Emergency Plan Guide subscribers from across the country know what we know.

In our estimation, by choosing NOT to know details like those above, and NOT being open to working with a group,  you are sabotaging yourself and your chances of coming through a disaster.

No, I don’t expect the authorities to “save us” in an emergency. In fact, they have made their limitations clear. Frankly, I’m glad to know that they WON’T necessarily show up immediately . . . because it gives me an incentive to do a better job of my own preparedness.

But our philosophy has been, and continues to be, to include family, friends and co-workers in our planning, because . . .

The more we all know, the safer we all will be.

Thanks for reading.

Virginia
Your Emergency Plan Guide Team

Words or action?

Share

Words for preppersWhich do you prefer, words or action?

When you’re nosing around on the Emergency Plan Guide website, you’ll find pretty equal doses of what I’ll label “narrative” – things like personal stories and descriptions of new survival gear – and “calls to action” — the suggestions for putting that info and that gear to work.

That’s because I believe that after learning something, unless we take action – we’ve wasted our time!

That being said, this week’s Advisory leans heavily toward the “words” side of the equation.

In fact, this is the fifth Advisory we’ve done on . . .

Common words associated with prepping, survival and preparedness!

Disclaimer. You don’t have to actually SAY any of these words. Or write them. But at least you won’t feel like a dummy if you hear someone else using them!

The essentials: “Prepper” vs. “Survivalist”

These two terms used to be distinct, but seem to be overlapping more each day. At least after today you’ll know the difference.

Prepper – Clearly, this word comes from the verb “to prepare.” It refers to a person who thinks an emergency or disaster –  man-made or natural — is likely to occur in the future and who makes active preparations for it. Typically, preparing includes stockpiling food, tools and other supplies (which could include firearms and ammunition).

If you are reading this Advisory, you are probably a prepper.

(I must admit I am not particularly fond of this word, however, given its linkage to both “Doomsday Prepper”  — which has become totally trite – and also to words where “-er” is added to an otherwise innocent noun to create something problematic, like “Truther” or “Birther.”)

Survivalist – So now the question. If you are a prepper, are you also a survivalist?

This word has been around a lot longer than prepper, and while it has much the same meaning, the survivalist’s preparations run to learning and practicing outdoor survival skills, typically for use in a forest or wilderness setting.

The survivalist stores supplies, too, but also anticipates “living off the land” by hunting, fishing or trapping (not to mention picking and eating berries, plants, etc.) Survivalists are hardcore. Not many of us are survivalists. (Heck, some of us haven’t even been camping for years!)

Good to distinguish between these two!

Want more than the usual article in Popular Mechanics? Here’s a book from Amazon that will keep you busy for a few weeks! The author, Dave Canterbury, also has a book just on trapping, gathering and cooking! Either one makes a great gift. Just click on this link or on the image to get to Amazon so you can order. (That last sentence is a classic example of a call to action.)

OK, now on to a few more expressions that crop up in nearly every online forum or survival blog.

How about these common prepper vocabulary terms?

EDC – One of my favorite resources is a blog that regularly features a photograph of a pile of small items (always very neatly laid out) that the author carries in her purse or pocket. Usually, there are keys, a wallet, an expensive pocket knife, an LED flashlight, maybe a small very clever multi-tool. These are some of what are called “Every Day Carry” items — stuff to have with you all the time.

Try dumping out your own pockets, or your briefcase. Any useful prepper items there?

BOB – What you have in your pockets won’t be enough to keep you alive for the 72 hours that a Bug Out Bag is designed for. Sometimes called a GoBag, or a Get Out of Dodge Bag, or a simple Survival Kit, this is meant to provide the basics — food, warmth, water, communications — for those first three critical days. In real life the “basics”  usually translates to a whole collection of stuff including blankets, paracord, a multi-tool, dried food, first aid kit, emergency radio, extra underwear, etc.

The thing about the BOB is that you have to be able to CARRY it, so you’ll continually have to pare down what you think you need.

Variations on the bug-out theme include the BOV, or Bug Out Vehicle, which is designed to get you to the BOL, or Bug Out Location. (Remember, roads may be impassible.)

MOLLE – A month or so ago I came across a new word when I was researching BOBs! It referred to a particularly small and efficient backpack with a web arrangement that makes it easy to add additional equipment or pouches. (Here’s a link to that Advisory on BOBs.) Molle, pronounced “Molly,” stands for:  Modular Lightweight Load-carrying Equipment. (Anything Molle is also likely to carry the word “tactical.” Both expressions are related to the military.)

Of course, when we mention “military” we must add to our vocabulary list (and probably to our BOB) these classics:

MRE stands for Meals Ready to Eat. You probably already know that these are packaged meals designed for the military. They come in a durable pouch, and you eat right out of it. For those of us who would get tired of eating cold MREs, there are also MRE s that come with a water-activated chemical heater!

While eating out of pouch would probably get pretty tiresome after the first day or two, it would be better than having nothing to eat. MREs belong in a BOB, but probably shouldn’t be major part of the long-term food supply for Bugging In, or sheltering-in-place.

While you can buy individual packets, it’s more sensible to buy MREs by the dozen. After all, you need at least two meals a day to give you enough calories. (Two meals X three days = 6 meals in your BOB, alone.)  Here’s the link to Amazon, where you’ll find this two-box package.

P.S. to this section: Veterans seem to have their favorite flavors/menus. Check with a veteran if you have to make a decision. (The box in the image comes with 12 – all different! – so you can’t go wrong!)

P.P.S. to this section: MREs are packed securely to repel insects, withstand rough handling, etc. That means you aren’t going to be able to open them with bare fingers. Your BOB has a knife or multi-tool, I’m assuming.

Before we leave the BOB, there’s another set of guidelines that will help you as you pack up your kit.

The Rule of Three describes how humans can live only 3 minutes without air, 3 days without water, and 3 weeks without food. Lately, the Rule of Three has been expanded to add another “rule” – and that is, in extreme weather conditions humans can live only 3 hours without shelter.

We mentioned Mylar space blankets, right? As shown in the clickable image, they typically come in packs of 4 or more.

Now for some random prepper acronyms.

OTG — Off the Grid – or OTGE – Off the Grid Event. A lot of preparedness deals with functioning when “the grid” goes down. The grid refers to the electrical system for the country. The grid provides us not only with electricity, but also drives communications, water, food distribution systems, etc.

Some self-sufficient people have already chosen to live off the electrical grid. But in a situation where ALL systems are down – electrical, social, legal, etc. it may take a long time for civilization to recover.

The concept of a total societal breakdown brings us to the last two acronyms for today:

WROL– without Rule of Law, a situation where law enforcement is ineffective or non-existent.  In WROL, this acronym may apply:

YOYO You’re on your own!

Feel like you know more now?  What are your plans for putting some of this new-found knowledge into action?!

Virginia
Your Emergency Plan Guide Team

If you’re tempted to use some of these acronyms in a game of Scrabble,  they won’t be allowed unless they are considered common usage or if they are found in the official dictionary you have chosen to accompany your game. Pick your team and your dictionary well!


Surveillance Technology

Share

Hidden cameraWe regularly look at what I’ll call “common security devices” – outdoor lights, motion-activated lights, including the very popular Ring doorbell camera.

All these are designed to prevent an unwelcome surprise or potential criminal activity.

Security devices help you keep an eye on what’s going on around your home or place of business.

Let’s stop for a moment and take a look at things from the other side.

What about surveillance devices?

Surveillance devices — sometimes called spy gear or spyware — may be letting others watch you!

If you’re a fan of spy movies or novels, a lot of what follows will sound familiar. The thing is, what used to be fantasy is now everyday reality.

Before we start, keep in mind that some of what we’re about to discuss may have legal restrictions. *

Still, people are using “spy gear” every day, and as someone interested in safety and security, you ought to have a basic awareness of what’s out there and how it works.

Examples of everyday spy gear.

We’ve all seen the movie where the detective goes directly to the phone in the room, takes off the base, and silently points to the recording device installed there.

These days, with communications taking place via cell phone, that sort of technology may be outdated!

1-Track a cell phone.

You surely know about the “Find my phone” capability in your smart phone. You can use the app or sign into iCloud and you’ll see a map showing your phone. (By the same token, if someone knows your login in and password, they can pretend they are you, log in and find your phone — and you — the very same way.)

The GPS technology built into the phone allows someone to track a lot more than just where you (and your phone) are. Stealth programs can locate the phone on a map, trace the route the phone has taken and alert the program owner if the phone has gone outside a preset boundary. More comprehensive programs can track all phone activity including instant messaging and social media activity.

More advanced phone tracking software typically requires a monthly subscription.

2-Secretly record a cell phone call.

If you want to record calls you make on your own phone, it’s usually a question of downloading the right app and learning how to activate it before you call, and then turning it off again when the call is over.

But what about secretly recording calls someone else is making? Again, it’s a question of software. You download a program onto your computer, then get your hands on the other person’s phone long enough to get it set up. Then, when they make a call to a specific number, or at a specific time, the call is recorded. You can download it and listen at your convenience. You may even be able to see pictures that are being sent via instant messaging, etc.

This sort of surveillance ware typically requires a monthly subscription because the data is sent to a hosting account maintained by the product manufacturer. You log in to your account to view what’s been recorded.

There are a lot of options associated with the programs that track cell phone usage. Here’s a site that reviews this sort of spyware:   http://www.top10spysoftware.com/

3-Take a video with a hidden camera.

We’re certainly accostomed to security cameras looking down at us in public places – and they have been instrumental in helping law enforcement catch criminals. (Remember the Boston Marathon bombers on video?)

We’re not so used to videos being taken in private settings, however.

In fact, many ordinary items — like the teddy bear in the photo above! — can house a hidden camera and most people would never suspect them. Just a quick jaunt through Amazon shows these examples.  Prices start at around $20, and some are even cheaper. (See my Personal Disclaimer at the end of this Advisory.) Click on the images or on the links for details and prices.

Note: when choosing a hidden camera you have to decide if the unit is standalone, or whether it can be connected to the wireless Internet network in your home or office. To use a standalone unit, you’ll have to remove the SD storage card and plug it into a computer to view what’s been recorded.  If you can connect to the network, you may be able to watch what’s going on remotely.

A pen that is actually a camera? Standalone unit, perfect for any business setting. Be sure it writes, of course. (This one actually comes with pen refills.)

32GB HD Spy Pen Camera 100 Min Video Recorder, FREE 32GB Memory Card, 5 Extra Ink Refills – Professional Secret Mini Digital Security Pencil With Tiny Undetectable Hidden Covert Cam

Look around the room you are in. See a wall clock? See a desk clock? Either one could have a hidden camera, taking photos of you right now!  The average person would never even notice this one, for example:

OUMEIOU 1080P 16GB Spy Hidden Camera Alarm Clock Infrared Night Vision Simplified Version

One of my favorites for a bedroom is a smoke alarm. Easy to mount! (But don’t put up a second alarm if there’s a real one already installed. Someone would notice that!)  (Click on image for more details.)

And again, for the office, hotel room, whatever . . . a spy camera that is housed in a phone charger or AC adapter. Comes in black or white to match your own device.

The list goes on. There are , . .

  • light bulbs with hidden cameras
  • electrical outlet plates
  • picture frames
  • key fobs
  • a tablet or iphone case
  • a bottle of water
  • (what looks like) a pack of chewing gum!

And still another idea. This fake plant with its camera actually plugs in for “years and years of use!”

And a last idea. Take a picture BACK through a door peephole using this clever reverse peephole spy cam!

4-Listen to a private conversation.

While there were plenty of spy cameras to look at, I didn’t see anywhere near as many audio listening or recording devices. Probably because of legal limitations — see the Legal Disclaimer. However, you can find good quality up-close recording devices built into wrist watches.

Spy cameras with recording devices can also be hidden in pens, similar to the one above, or in flash drives. Or you can buy a tiny recorder, no bigger than a button, and stick it anywhere.

Again, click on any of the images to go to Amazon, where you’ll be able to get an idea of features and costs. Shop around — there are plenty of choices!

5-Track someone’s whereabouts. 

GPS trackers have saved hikers lost in the woods. (We include a review of an excellent GPS radio here.) They also track commercial vehicles and the cars of family members, including pets. An obvious GPS tracker can be put in a pocket, stuck in the car door, or fastened to a pet collar. Hidden GPS trackers are fastened so that they are hidden, of course!

A “simple” tracker is motion activated. It records and saves info about where it went, to what address, how fast it traveled, etc. To get the info, you must retrieve the tracker and plug it into a computer.

An “advanced” tracker can provide real time tracking. It’s powered via battery, or is hardwired to the electrical system, and it sends messages to a cellphone or computer. Advanced trackers can send data in near real time. They require a subscription.

Here’s an “advanced” tracker that reports in every 5 seconds. You can  set up “boundaries” for the item being tracked and be notified via email when the boundaries are crossed. Attach to a vehicle with its magnetic case.

Spy Tec STI_GL300 Mini Portable Real Time GPS Tracker.

6-Track what someone is doing online.

It’s easy to download and install “tracker” software on any computer. It records all activity and, in fact, can record every keystroke. It can send alerts when certain words appear in an email or on a website. And it can block access to certain sites or emails.

If your boss or family member installs this on YOUR computer, they can monitor everything you are doing from their own phone, tablet or computer. The installation is difficult if not impossible to detect. (It’s also legal for your employer to track everything you do with company-owned property, in case you were wondering.  Check your Employee Policies Manual for your own company’s rules.)

Again, this kind of web-based program requires a monthly subscription.  Looking for more information about monitoring software? Again, here’s a review site: http://www.toptenreviews.com/software/privacy/best-monitoring-software/scription.

Counter Surveillance Technology

If you think you might be the target of some of these surveillance gadgets or techniques, you may have to spend some money to find out.

When it comes to computer spyware, you may not be able to detect it yourself. Good anti-virus or anti-spyware may help. Here a link to one of the best: Norton Security Premium – 10 Devices [Download Code]

When it comes to company-owned computers, you may be out of luck. Best solution? Change your behavior so you don’t have to worry.

As for finding listening devices or hidden cameras, “sweeping” a room may require something like this, designed to sweep a room to find hidden listening devices and cameras:  Spy-Hawk Security Products Pro-10G is the 1 GPS Tracker Finder and Law-Grade Counter Surveillance Bug Sweep – Newest Professional Handheld Detection of All Active GPS Trackers, Mobile Phones

Finally, you could try protecting your own cell phone from being tracked by carrying it in a “signal blocking bag.” Inexpensive peace of mind:
SYB Phone Pouch, Cell Phone EMF Protection Holster Sleeve for Phones up to 3.25″ Wide, Black with Belt Hoop

*Now for the Legal Disclaimers

All these items come with a caution to USE LAWFULLY. I am not a lawyer and am not giving any legal advice, but here are the basics that appear at every website or in every product description. Keep them in mind and do more research if you plan to use any of the devices we’ve talked about here.

  • Federal laws are one thing, and state laws another. Be sure you know how your state defines “lawful” when it comes to secretly recording or filming.
  • Generally, taping or filming someone who has an “expectation of privacy” can get you into trouble, and your recordings probably can’t be used as evidence. You may be able to use them to help you make private decisions, of course.
  • Audio recording is more problematic than video recording.
  • If you own the property, or have permission, you can put up a video camera with no audio. (This is the “nanny cam” standard.)
  • When it comes to audio, at least one person must give permission for the recording to be legal. (In some states, both parties must be notified and give permission.)

And my personal disclaimer:

I’m not at all an expert on these devices, and unlike most of the things we write about, I have not owned any spyware. (Joe is more paranoid than I am, and has a lot more experience. He made important additions to this article.) And, of course, technological breakthroughs have a way of changing everything overnight!

Still, what I discovered in researching these devices is:

  • Prices vary widely on nearly all items. (The exception is monitoring software from well-known brands.) Even some of the small items (like a flash drive/camera) can cost anywhere from $15 to $50, so you definitely need to shop carefully. (Generally, I have tried to select mid-range items as my examples.)
  • Some of the inexpensive items seem to be unreliable. You are probably wasting your money on them.
  • Many of these items are available only directly through specialty spyware stores. And not all of them have return policies or guarantees, so again – shop carefully. (That’s why the examples from this article are all from Amazon, where I have had some good experiences in customer service and in returning merchandise that didn’t work as advertised.) Rather than order online, you may want to visit a brick-and-mortar store to talk to a knowledgeable salesperson.

And a few more buyer’s notes:

Many of these devices are powered by batteries. Some are hardwired to electrical sources. Most are either “motion activated” or “heat activated,” which go a long way to extending battery life. What’s being recorded goes onto a SIM card and you avoid having to scroll through hours of dead time.

As with all emergency devices, be sure you understand how they are powered and how often you’ll have to replenish the power source.

And as with all electronic devices, make sure you realize just how much data your spy device can actually store before it runs out of memory and shuts down. As you can imagine, the more memory, and the higher the fidelity of the sound or image, the more you pay.

This Advisory is in no way comprehensive. It is meant to give you an overview of the kinds of spyware readily available today, and that you have probably come into contact with, without even knowing it!

If privacy is a big concern for you — and certainly, it’s becoming more of a concern these days for everybody — you’ll want to find out more about these devices.

Virginia
Your Emergency Plan Guide Team


One size does NOT fit all

Share

Take a look at your collection of Emergency Kits

Survival kits

Which bag still works?

We regularly (although not often enough) pull out our various emergency kits to see what’s in them, whether they need re-stocking, or maybe even replacing.

Some change is always required!

So over the weekend we took a look at what’s in the various closets and trunks of our cars. The photo shows five of the current collection.

It should raise some questions for you, like it did for us!

1-How many survival kits do we need, anyway?

Joe and I are a two-person household. We’ve written often about the different items that you’d find in our kits:

  • The Commuter Bag, stays in the car, designed to get us safely home if something happens when we’re on the road. One 2-person kit per car.
  • The 72-hour Survival Kit, the true “Grab and Go Bag” for immediate use in an emergency. We each have one.
  • The 14-day Survival Stash – food and other supplies that will carry us through in the case of massive storm, big earthquake, etc. The Stash is spread around the house, and doesn’t leave it.

When it comes to Survival Kits, we have published a whole workbook. Below is one of the charts from it. You’ll see that the chart adds a Workplace Kit and a School Kit to the other two.  Now, we work from home, and don’t have kids at school, so they aren’t on our own list. Nor do we have pets. But what about your family?  (Get the details of the workbook here. If you haven’t really begun assembling your preparedness items, this may be just the kick-start you’re looking for.)

Family Survival Kit Chart

2-So are the kits different?

I think EACH kit needs to be unique!  Not entirely, of course. We’ve written before about the top 10 items to consider for each short-term kit. (Here’s the Top Ten list of Emergency Kit Starter Items, with discussion.) Some of these, for example knives or other tools, might be inappropriate for small children or older people.

But as soon as you stop to think about it, you will want other stuff in YOUR kit that no one else might think of. And there are things others in your family might need that you have no interest in packing for yourself. For example:

  • Personal items — toothbrush, floss, tampons, diapers, eye shades, sunscreen, glasses/contacts, dark glasses, chewing gum, etc.
  • Medical items – pills, allergy cream, bee sting kit
  • Comfort items – candy, toys, a book

Most of these extras don’t take up much room, but without yours you’d be miserable!

3-What’s the best container for a kit?

So again, it depends. How much needs to go into the kit? Who is going to be carrying it and how far? If you look again at the photo, you’ll see some kits which have turned out to be pretty good for us, and others that really don’t make the grade. Here’s some of what to consider.

SIZE – We got the Big Yellow/Black Banana Pak Kit (center of the photo) early on. It was designed and sold by a thorough professional – everything you’d need, of the very best quality including the bag itself. Unfortunately, the minute it arrived we realized it was TOO BIG AND TOO HEAVY. I’ve kept it in the back of the closet because I really like some of the specialty items (whistles, binoculars, knives) but it is now relegated to the long-term, permanently stored Survival Stash. I can hardly carry the darn thing. Fortunately it has wheels.

Other kits in the photo are at the other end of the scale. For example, the small black kit with green base was one that we actually sold on Amazon as part of a “starter kit.” It works fine as a Commuter Bag – room for snacks, water bottle, flashlights, radio, a jacket. But with only two compartments, it’s not very flexible.

My latest acquisition is the black “Tactical Bag” at the left in the photo above, and here in a closer look.

I just received it (That’s why it’s empty!) and it seems to have a number of attractive features:
Tactical Bag Survival Kit

  • All the straps are adjustable, and the body of the bag is expandable. (I adjusted the shoulder straps. Took a while, what with all the buckles and loops.)
  • It’s made for carrying long distances – with a front chest strap and a belly strap, padded shoulder straps, etc. Everything cinches down tight for comfort and control.
  • The bag has 9 different pockets of varying size. The larger pockets zip all around for easy opening.
  • Multiple straps and loops make it possible to easily attach more gear: a jacket, bottles, blanket, lights, boots, weapons, whatever.
  • Bag is waterproof. (I always pack a couple of large trash bags so I can cover the whole pack in one fell swoop!)

A quick detour for vocabulary:

I described this bag as a “tactical” bag. This definition of tactical comes from The Free Dictionary:

Tactical — characterized by skillful tactics or adroit maneuvering or procedures especially in military or naval operations.

Molle — And in reviewing backpacks I also discovered the word “Molle” which stands for Modular Lightweight Load-carrying Equipment. It refers to the ability of a  backpack like this one to attach other modular gear components: vests, pouches, etc.

QUALITY – As I already mentioned, the big yellow pack is made of the highest quality materials. It rolls like luggage, has shoulder straps, and can be carried by a top handle or a side handle like a duffle bag. Its zippers are industrial strength, as is the canvas bag itself. Real leather zipper pulls. Special separate pockets for different items: glasses, water, etc. Top quality, top price, heaviest by far!

The green/black “starter kit” is medium grade nylon material, with ordinary zipper and fabric zipper pulls. Medium quality, inexpensive, very lightweight.

The other bags in the photo lie somewhere in between.

If you are going to store a kit in the car and only grab it in an emergency, a medium quality bag will work fine. (Keep it out of the sunlight, of course!)

On the other hand, if you plan to carry your bag on arduous hikes or use it camping, or even as a daily carry full of books, invest in the best quality you can afford. Nothing worse than a broken zipper when you need reliability!

So go back to your chart. You are likely to need multiple kits – for different needs, for different people. (You may want to start with some used backpacks you already own, just to get a better idea of how much each pack needs to hold and thus how big it needs to be.)

Start building your kits. Soon, you will have a collection just like ours!

4-Consider a “Tactical Bag” for your collection.

There are plenty of backpacks out there labeled “tactical.” Some are absolutely huge! For your first survival kit purchase, you might consider something smaller, like this one, available from Amazon at what appears to be an excellent price. And this one gets some of the best Amazon reviews I’ve seen. (I always read all of them.)

Click on the link for details and the current price. (Remember, we’re Amazon associates and may get a small commission for sending you there to buy.)

Military Tactical Assault Pack Backpack Army Molle Bug Out Bag Backpacks Small Rucksack for Outdoor Hiking Camping Trekking Hunting Black.

Over the years we’ve worn out a number of bags and backpacks, so we’re always on the lookout for new ones for our stuff. And our “stuff” has changed, too, as we’ve moved around the country.

No matter where or when, however, we try to have a survival kit handy. When the emergency hits, it’s too late to start searching for what you need!

Virginia
Your Emergency Plan Guide Team


When to Activate Your Emergency Team

Share

Quick! Call the Fire Department!

Emergency call

EMERGENCY ALERT!

Just before Christmas we had a fire here in our neighborhood. One of our neighbors heard a “ZAP” as he turned on the overhead light, and noticed smoke curling from the fixture. He ran outside to grab a garden hose, but as he scrabbled around to find it and then opened a sliding porch door to get back into the house, the fire exploded and knocked him right back down the stairs.

Ultimately, the home burned  down. Our neighbor was pulled safely away from the steps by an on-the-ball visitor. And fire engines arrived to protect the houses on either side.

What was our Neighborhood Emergency Response team doing during all this?

One member of our team was the first to call 911. Other members arrived on foot and helped keep the streets clear for emergency vehicles. (When the police arrived, the police took over, of course.)

Somewhere along the way, a few phone calls alerted other members of our team, including our group “Commander” (me), whose home is far enough away that this all went on without my even realizing it!

Later, we discussed how things went.

Decide: Big Emergency or Small Emergency?

Our group has been set up to help people prepare for “widespread emergencies when First Responders are overwhelmed and unable to respond.” Usually, that means preparing for “the big one (earthquake).” In that case, it will likely be hours if not days before our community gets assistance. We’ll need to deal with possible structural damages, roadway blockages, injuries, need for food, etc.

Our group educates and trains for big emergencies. It does not activate for localized, small emergencies, such as a fire or some sort of medical emergency. Those belong to the professionals.

We confirmed that this fire did not officially fall within our charter.

Choose: Active Bystander or Emergency Response Team member?

At the same time, when any of us hear a loud crash, or hear sirens and see an emergency vehicle pull up down the street, we’re curious and want to help if we can.

Individual members of our group have helped out in situations like this in the past:

  • At an accident in town, one member, first on the scene, parked her car across a lane to keep the victim from being run over.
  • One member alerted a hotel employee to grab his fire extinguisher when she saw flames coming from underneath a bus unloading passengers at the entrance.
  • One member used his “gas sniffer” to reassure a neighbor about a strange smell – and discovered a leak in his own BBQ! (That same gas sniffer operator has identified the smell of marijuana, too. Those are stories for another times . . .!)

The point is, many team members are ready and willing to step up without waiting for a formal group activation command.

When you recognize and safely intervene in potentially dangerous situations, you fit the definition of active bystander. (There is also the “passive bystander,” someone who recognizes a bad situation but takes no action to stop or solve it. That’s not likely to fit anyone reading this Advisory.) In those cases, you’re acting as an individual and not as a CERT or neighborhood group member.

Communicate better for better results.

Part of CERT training is being ready to take charge. In the incidents described above, our individual CERT members made decisions and got other people to follow orders. We’ve often discussed the importance of projecting authority with the help of:

  • Loud, simple verbal commands (“Come to me.”)
  • Appropriate hand signals (“Stop.”)
  • A uniform (vest and/or helmet)

And when appropriate, you’ll want to activate your team.

Verbal commands and an authoritative posture work here, too. And for the group to function best, you need appropriate tools and protocols. After the recent fire, we reviewed our own communication protocols.

Communication steps.

Here’s what we agree on:

  1. Use a phone to CALL 911. (Don’t text to 911.)
  2. Use cell phone, landline, email and/or text messaging to alert other members of the team. (Have their numbers programmed into your phone’s memory.)
  3. Switch to hand-held radios (walkie-talkies) for efficient, immediate group-wide communications – or if regular phone service is out.
  4. Set up command center to manage a larger network. (Our command center is an officially-recognized HAM radio station with direct contact to the city’s emergency communications system.)

As we’ve described, our local group practices using our hand-held radios with a regularly-schedule monthly drill. Our HAM radio station operators belong to a city-wide group; they practice weekly.

Essential tools and equipment.

This Advisory points to the equipment that every group member needs to have and be familiar with. In particular:

Simple team uniform – a vest.

CERT graduates have their own vests; all our group members who aren’t CERT grads are issued inexpensive vests like this one. (They’re not likely to be worn often, so they don’t need to be top quality.) We encourage our members to carry their vests in the car, assuming their car will be where they are in an emergency.

Ergodyne GloWear 8020HL Non-Certified Reflective High Visibility Vest, One Size, Lime

Personal cell phone.

Everyone has his own phone, with his own provider. However, for emergency team members that phone needs to be able to store numbers. The owner should sign up for local automated alert programs (iAlert).

And the owner needs to know how to send a text! (Some of your members not too sure? Check out this Advisory.)

Hand-held radios (walkie-talkies) for team members.

We have reviewed walkie-talkies several times. As with all electronic devices, you can expect changes in what’s available. In any case, you should be able to get a short-range pair of hand-held radios appropriate for your local group for $30-40. Read our review page – it has questions to help you decide just what capabilities you need, and shows several popular models. We particularly like this Uniden model because the buttons clearly show how to change channels and raise and lower volume. Some of the smallest walkie-talkies combine functions on just one button, making it harder to figure out.

Uniden GMR1635-2 22-Channel 16-Mile Range FRS/GMRS Battery Operated Two-Way Radios – Set of 2 – Black

If you’re a candidate for a ham radio (and the licensing that goes along with them), here’s an article about these radios, too, with some info about how they differ from simple hand-held walkie-talkies. Prices vary from $50 to $450, so know what you need before you buy!


BaoFeng BF-F8HP (UV-5R 3rd Gen) 8-Watt Dual Band Two-Way Radio (136-174MHz VHF & 400-520MHz UHF) Includes Full Kit with Large Battery

Emergencies happen frequently. Some we can help with, others are handled by First Responders and we have no role. Still, when a real emergency DOES happen, and you are there as witness, being ready to take positive action is something to feel confident about, and proud of.

That’s why we train, isn’t it?!

Virginia
Your Emergency Plan Guide Team

The examples in this Advisory are all drawn from our own neighborhood group. They could just as well apply to a workplace group. If you are responsible for emergency preparedness at work, go back and see if your leaders and team members have the essential tools and equipment they need.


Survey Tool for Your Group or Community

Share

Preparedness SurveyThis week I came across a Department of Homeland Security (DHS) survey through one of my Google Alerts. (Alerts are a great resource; find out about them here.) The survey is currently being put out to residents in several counties in Washington State.

It turns out that DHS has been conducting similar surveys in different communities since 2001, trying to track trends in preparedness.

And yes, some trends have emerged. For example, the surveys have found that full time employees have the highest level of personal readiness compared with other types of employees. People with children in school also report higher preparedness levels. And, as you might expect, different parts of the country have different levels of preparedness.

Overall, though, American preparedness has not improved markedly since 2001!

We here at Emergency Plan Guide are trying to change that trend!

Can we take advantage of this survey to improve the preparedness in our local groups?

I’m not suggesting that we use it like DHS does. I see some other uses appropriate for your local CERT meeting.

A look at the original survey.

Before I add my comments, here’s (nearly) the whole survey. (I edited it slightly.) Take a look to see what YOU think about it. (It is LONG. Scroll through quickly to get an idea of the scope and format.)

Citizen Expectation Survey (from Homeland Security)

 1. My home is located in the following area

  • ________________

2. My household includes: (Check all that apply)

  • Child (Birth – 5 years)
  • Senior Citizen(s) (65 and over)
  • Disabled Family Member(s)
  • Non-English Speaking Member(s)
  • Household Pet(s)
  • Tribal Member(s) (and Affiliation)

3. What’s your main source of local, state, and national news and information?

  • Television
  • AM/FM Radio
  • Newspaper/Magazine
  • Internet
  • Social Media

4. How do you primarily receive your local weather forecast information?

  • Television
  • AM/FM Radio
  • Newspaper/Magazine
  • Internet
  • Social Media

5. What is the best way of delivering severe weather or disaster news and updates to you?

  • All Hazards Weather Radio
  • AM/FM Radio
  • Television
  • E-mail
  • Phone Call
  • Text message
  • Twitter
  • Facebook
  • Other Social Media

6. Does your family have a Family Emergency Plan?

  • Yes
  • No

7. Does your Family Emergency Plan include: (Check all that apply)

  • I do not have a Family Emergency Plan
  • My plan includes how to contact each other in the event we were separated during a disaster (phone, text, e-mail addresses)
  • My plan includes an out-of-state family contact person for when all local communications are down
  • My plan includes a specific meeting place in the event my family is separated
  • My plan includes how and where to evacuate to in the event we must abandon our home during a disaster
  • Other

8. Does your or your child’s school have an Emergency Plan for disaster?

  • I have no children
  • I have no children who attend school
  • Yes
  • No
  • Unsure

9. Does your workplace have an Emergency Plan for disaster?

  • I am not currently employed
  • Yes
  • No
  • Unsure

10. Do you and all other members of your family, including your pets have a GO KIT, Get Away Bag or similar item? (Check all that apply)

  • Myself
  • Each family member
  • My pet
  • We have none
  • I do not know what a GO KIT or Get Away Bag is

11. I am aware of the risk and hazard to all local disasters, such as, earthquake, tsunami, severe weather, flooding, tornado and wildfire.

  • Yes
  • No
  • Unsure
  • I have no risk or hazard to any of these disaster events

12. I expect an Earthquake to affect my community in the next:

  • year
  • 3 years
  • 5 years
  • 10 years
  • longer than 10 years
  • never

13. I expect a Tsunami to affect my community in the next:

  • year
  • 3 years
  • 5 years
  • 10 years
  • longer than 10 years
  • never

14. I expect Flooding to affect my community in the next:

  • year
  • 3 years
  • 5 years
  • 10 years
  • longer than 10 years
  • never

15. If a disaster is threatening, my expectation is, I will receive warning and instructions from the following: (Check all that apply)

  • Local City Government
  • Local County Government
  • Tribal Government
  • State Government
  • Federal Government
  • ALL Hazard Alert Weather Radio
  • National Weather Service
  • Local Emergency Management
  • Local Law Enforcement
  • Local Fire Department
  • Television
  • AM/FM Radio
  • All Hazard Alert Broadcast Siren (AHAB Warning Siren)
  • FEMA

16. If a disaster situation was imminent, would you evacuate your home if warned to do so by official authorities?

  • Yes
  • No
  • Unsure

17. If you had a 10 hour advance warning of the need to evacuate your home, how long would you expect it to take, to prepare and leave your home, once you receive the initial evacuation warning?

  • I would not evacuate
  • Under an hour
  • 1-2 hours
  • 2-4 hours
  • 4-6 hours
  • Longer

18. If you were to evacuate following a warning given by local authorities, would you bring your pet(s) with you?

  • Yes
  • No
  • Unsure
  • I have no pets – I would evacuate
  • I have no pets – I would not evacuate

19. If you were to evacuate following an order given by local authorities, where would you most likely go?

  • I would not leave my home
  • I would stay with family/friends in my County
  • I would stay with family/friends in an area other than my County
  • I would stay in a hotel/motel in my County
  • I would stay in a hotel/motel in an area other than my County
  • If none of the above, explain where you would go.

20. What modes of transportation are available to you in the event you have to evacuate from your home? (Check all that apply)

  • I have no available transportation
  • Private automobile
  • Public transportation
  • Bicycle
  • I would rely on friends or family
  • Other (please specify)

21. I expect emergency response agencies to assist me if I must evacuate my home.

  • Yes
  • No
  • Unsure

22. If my County were impacted by a significant disaster event lasting multiple days, I expect Federal and State Response Agencies, including FEMA and the Red Cross, to respond within:

  • 12 hours
  • 24 hours
  • 2 days
  • 3 days
  • 4 days
  • Longer than 4 days

23. If my County were impacted by a significant disaster event lasting multiple days, I expect Local, City and County Response Agencies to respond within:

  • 12 hours
  • 24 hours
  • 2 days
  • 3 days
  • 4 days
  • Longer than 4 days

24. In a significant disaster event lasting multiple days, who would you seek out to obtain food or shelter assistance?

  • School
  • City Hall
  • Local Fire Department
  • Local Police Department
  • Church
  • Hospital
  • Unsure
  • Other
  • If other, please specify here

25. Have you signed up for the Emergency Alert and Notification System in your county?

  • Yes
  • No
  • I do not know if we have an Alert and Notification System in my county.

26. Do you have a NOAA All Hazards “Alert” Weather Radio?

  • Yes
  • No

27. Which news headline would likely interest you enough to read the associated article?

  • A Huge Winter Storm is Approaching With Winds Exceeding 150 mph and a Large Storm Surge.
  • We’re Awaiting One of the Most Extraordinary, Mind Boggling, Meteorologic Marvels, Never Before Witnessed by any Earthbound Creature.
  • Neither Headline Would Interest Me Enough to Continue Reading the Article.

28. Please indicate if you would like more information on any of the following:

  • Evacuation
  • Disabled/Functional Needs Disaster Preparedness
  • Livestock Preparedness/Evacuation
  • Pet Preparedness/Evacuation
  • Family Preparedness
  • Business Preparedness
  • School Disaster Preparedness
  • My Local County Emergency Management
  • Disaster Mitigation
  • Disaster Response
  • Disaster Recovery
  • FEMA/Flood Programs
  • Evacuation Routes/Shelters
  • Communications
  • Earthquake
  • Tsunami
  • Severe Weather
  • Disaster Volunteer Organizations
  • My Local County Emergency Notification System

29. Do you have suggestions, comments, questions or constructive criticism? Please write your comments or concerns here. (If you desire a reply, please leave your name, email, and phone number).

How to use the survey as training material. 

I’m usually an enthusiastic survey taker (or interview giver), but this survey is so long that even I felt like abandoning it halfway through.

Therefore, my first idea would be to divide the survey up into several sections or themes and use each one as part of, or the main focus of, a group meeting. For example:

  • Ask group members to complete a section of the survey themselves, and then use that section for discussion.
  • Assign sections of the survey to sub-groups and have them prepare background material or collect samples to share with the others.
  • Create still another version of the survey for neighbors who aren’t yet part of the group. You wouldn’t collect the surveys, but would design them as “eye-openers” for your neighbors!

Family Needs – Questions 1 – 5

Every family is different. Poll the group to detect commonalities. Share resources, such as the best TV channels for weather news, etc. What particular challenges would you have associated with children, older people, people not speaking English, etc.? What actions can your group take to help meet some of these challenges?

Individual Family Plans – Questions 6 – 9

If your group is not likely to have plans, whether family or work related, perhaps you can focus on providing step-by-step instructions on what should be included. At Emergency Plan Guide, we devote about half our Advisories to one facet or another of planning! Here’s a recent article on building a Family Plan and a one-pager for increasing workplace preparedness.

Building a Go Bag – Question 10

Provide people with a list; call a meeting that focuses on “show and tell” using one of the leaders’ bags. At work, make copies of “What to take with you” and distribute them. Check out our new custom survival kit workbook for families, too — it works for all families and can be an excellent benefit for employees.

Likely Threats – Questions 11 – 14.

We’ve had good luck getting experts to train us on different natural and man-made threats. YouTube has great resources, too. Stick with the threats that are most likely; no need to overwhelm everyone with EVERY possible threat! People will have their own amazing stories to share!

Warnings and Evacuation – Questions 15 – 26

Traditionally, about half the people, when asked, say they will NOT evacuate! Be sure people understand how and when to evacuate, and the fact that once they’re out, they can’t come back. Don’t forget to discuss how people with disabilities will be assisted to evacuate, and how to handle pets and large animals. In particular, note how long it might take for “authorities” to show up with help. (Check with your local Red Cross.) “Evacuation Realities” would be a popular topic to attract all kinds of visitors to a group meeting.

As for the “warnings,” you can help people know what to expect locally, show them how to sign up for local alert apps, and see if you can arrange for the purchase of NOAA Weather Radios.

Not sure I’d include – Questions 27 – 29

Caution: You may find some of these questions ask for information that you consider “too personal” to share openly. Feel free to remove or adjust those questions. In any case, be sure to discuss with your group the importance of privacy and how to maintain it.

Training is an ongoing challenge. (That’s why I pulled together my book on CERT Meeting Ideas.)

Finding already-developed materials like this survey is a boon to CERT group leaders. While this particular survey wasn’t designed for groups, it can certainly work as a refresher, as a discussion starter, or even as an agenda for several separate meetings.

Let us know if and how you find it useful!

Virginia
Your Emergency Plan Guide Team


How many terrorists are there, anyway?

Share

Earlier this week we attended a special

CERT update presentation on Terrorism.

Terrorist with pistolThe meeting was sponsored by our police department and given by an expert with military and law enforcement experience.

As always, it was good to see some of our CERT colleagues and to renew that feeling of being a part of a committed and capable group. (We have over 2,000 grads in our community!)

As it turned out, much of what was presented is information we have already reported on here at Emergency Plan Guide. Check out the list of Advisories at the end of this article — remembering that some of them were written as early as 2013 and thus are dated.

Anyway, after our training at the City, and prompted by news headlines about terrorists that we’ve seen on pretty much a weekly basis, I decided to dig a deeper into the issue.

My first question was,

How many terrorist attacks have we experienced here in the U.S.?

After several hours of research, my answer is:

There’s no good answer to that question!

Statistics on terrorism were difficult to find and even harder to interpret. Let me go through the challenges that I faced in trying to answer what I though was a pretty simple question.

Challenge #1. “What’s your definition of terrorist?”

As you might expect (!), different people define terrorist differently.

Dictionary definitions of terrorism seem to include three elements: “using force, particularly against civilians, to achieve a political goal.” (Typically, “state-sponsored terrorism” is not included in the basic definition.)

OK, but other terrorist terms popped up, too.

For example, in the U.S., the FBI has the job of combating terrorism. On their website I found that they track or otherwise deal with two different categories of terrorists. “Known terrorists” have been convicted or are known to belong to a terrorist organization. “Suspected terrorists” are people likely to engage in terrorist activities.

(“Terrorist organizations” is yet another aspect of this study. The list of Foreign Terrorist Organizations is maintained, interestingly enough, not by the FBI but by the Department of State. https://www.state.gov/j/ct/rls/other/des/123085.htm.

And I could find NO formal list of Domestic Terrorist Organizations, but Wikipedia has a good start: https://en.wikipedia.org/wiki/Domestic_terrorism_in_the_United_States)

And we have all heard of the FBI’s “watchlist” that they use to track terrorists.

But I did NOT know that people cannot be put on that list solely because of their race, ethnicity, national origin, religious affiliation or because they are exercising First Amendment-protected rights – freedom of speech, freedom of the press, etc. There has to be a link to actual or potential terrorist activity – that is, back to the concept of “violence or force.”

You can find out more about the FBI and its watchlist here: https://www.fbi.gov/about/leadership-and-structure/national-security-branch/tsc.

Whew. More work than I really expected to have to do. But while we’re on words, I have to include “extremist” and “radical,” too. Both these words show up, right along with “terrorist.”

Further research suggests that extremists and radicals share and support ideas that are “far from what most people think is correct or reasonable.” It’s only when we add the concept of violent and forceful action that these believers shift over to becoming terrorists.

So what’s the point of all this word play?

Terrorist, extremist, radical, domestic, foreign . . .

It’s this: Having extreme beliefs doesn’t make you a terrorist or a criminal. Forcefully and violently ACTING on those beliefs can.

So, before I could even attempt to answer my initial question, I found I had to first define my terms!

Challenge # 2. What are the parameters of the source you are using?

There are more than a dozen lists online of recent and not-so-recent terrorist activity. Every single one is different. Why? It has to do with the parameters of the study.

And nowhere did I find those parameter clearly stated!

For example, I had to look for . . .

  • Period covered. Online lists of terrorist activity cover very different periods of time – leading to different conclusions. For example, one oft-quoted and very long-term study (starting in the 1970s and ending in 2008) shows a preponderance of terrorist activity perpetrated by Jewish Underground organizations – groups which by today have become essentially inactive. Recent studies, covering the U.S. only since 2000, omit important acts like the Oklahoma City Bombing and Columbine. Timing matters.
  • Current activities. Most studies online are not up to date. The most up-to-date list I found is here: https://en.wikipedia.org/wiki/Category:Lists_of_terrorist_incidents_by_year
    As of February 15, 2017, the Wiki list shows 63 attacks for this month alone – none in the U.S.
  • Obvious bias. Again, as you can imagine, different authors are attempting to make a particular point. To pick up bias, first it helps to check the author of the study (Individual? Organization, Agency?) What about the use of particular jargon or “code” that reveals a particular point of view? (Religious bias seems to come through pretty strongly.)

With all this in mind, then ask yourself:

Challenge #3. What are YOU trying to prove?

If your goal, for example, is to focus on terrorist activities perpetrated by refugees (a popular topic these days), then be sure you set out your own clear parameters.

For example, if you were looking for statistics about terrorist activities perpetrated by refugees, you might look for refugees who . . .

  • Came from a particular part of the world
  • Arrived during a certain time period
  • Adhere to a particular religion
  • Attacked a certain target
  • Used a particular weapon
  • Etc.

As it turns out, for the purposes of this Advisory I found NO statistics on “refugee terrorists!”

I plan to continue with this topic, because at our meeting we learned some more about how police respond to terrorist activities, and what YOU can do to evade or avoid getting caught. But, that’s for another day.

Meanwhile, if I find myself hearing “statistics” about ANY of these subjects — terrorists, radicals, extremists, refugees — I know I’ll be a whole lot more cautious in trusting them.

Oh, and my research also came up with some terrific quotes about statistics, and I leave you with this one from William T. Watt (Professor of English, Lafayette College in Pennsylvania)

“Do not put your faith in what statistics say until you have carefully considered what they do not say.”

Virginia
Your Emergency Plan Guide Team

Some earlier Advisories with good background info:

Again, some of these were written as early as 2013, so keep that in mind as you read the stats!


We can dream, can’t we?

Share

Ah, for a wilderness retreat.

You may have guessed by now that Joe and I live in a community surrounded by other communities running up and down the coast of Southern California. Over 22 million people whose view of mountains is often just a brownish-gray haze over the top of multiple freeways. As for forests and rivers – well, you’ve heard of the California drought, too, right?

What this means is that OUR normal notion of “survival” really doesn’t include camping, hunting or fishing. For most of us, even the notion of back-yard farming is out of the question. (There’s that drought I mentioned.)

Living vicariously

So, I live vicariously through other survival blogs and my monthly Popular Mechanics, which seems to feature survival in 3 out of every 4 issues! Oh, how those photos of lush greenery make me envious! And the “how-to” survival ideas remind me of earlier days, when I tagged after my brothers as they earned Boy Scout merit badges. (Starting a fire with a bow was one of the biggest challenges, I recall.)

Anyway, a recent issue carried this title story: “How to Survive On Your Own – Make your own power, grow your own food, and other secrets to the new self-sufficiency – Page 55.”

So I thought I’d highlight a few things, in case you missed it . . .! (You won’t find all these items at Amazon, but if there’s a link, click to get the current pricing.)

Some slick survival equipment

The multi-page feature article started with wonderful tips about cast-iron equipment for the off-grid cookitems I’ll probably never use but that I’d like to try! (There’s such a satisfying feeling to the finish and heft of just about anything made of cast iron.)

  • A cast-iron grain mill ($1,100) for making flour and grinding seeds.
  • An 8-quart fruit press ($200) will handle berries, too.
  • The 11.75 in. Le Creuset enameled cast-iron skillet ($285) is something I MIGHT use. I admire Le Creuset pots but they’re heavy. The one in the magazine article has two handles so you can pick it up more easily. I’d still probably opt for a smaller size, maybe this one – cherry red, of course. Le Creuset Signature Iron Handle Skillet, 10-1/4-Inch, Cerise (Cherry Red)

But then I got to some other survival items that I would definitely try:

A manual washing machine – a 5 lb, hand-cranked machine great for delicates or small loads in an apartment and, of course, for camping. As long as you can hang things up to dry, it sounds like a terrific – and resource saving – idea, don’t you agree? The Laundry Alternative Wonderwash Non-electric Portable Compact Mini Washing Machine

A heavy-weight shovel that turns out to be a multi-tool – adjust the angle for chopping, digging or sawing, and it even has a fire starter embedded in the handle. I need a shovel for my car kit – I am particularly attracted by the case for this one from FiveJoy. The image shows the whole package.  (Note – this is the RS and not the C1): FiveJoy Military Folding Shovel Multitool (RS) – Tactical Entrenching Tool w/ Case for Camping Backpacking Hiking Car Snow – Heavy Duty, Multifunctional, Portable, Compact Emergency Kit Survival GearA pre-made, off-grid house! No tent for me – how about a self-contained pod that makes its own electricity, collects rainwater, deals with waste, etc.? The article described three different models (only one had a waste processor) costing from $87,600 (ecocapsure.sk) to “$400,000-$500,000.” (acredesigns.com). Sorry, no direct link to Amazon on these!

And then, there was the section called “Entertainment.”

It focused on making sure you have plenty of power for games and movies on your various devices. (After all, we’re talking survival here!) I already own solar panels, and recommend Goal Zero for even the most inexperienced survivalist.

Solar panels plugged into a power pack can charge your phone or tablet to give you the power you need for entertainment or connecting to civilization. There are many permutations of (1) panel/s + (2) powerpack/battery + maybe (3) inverter + device, but Goal Zero seems to have done a good job of making sturdy, convenient and handy combinations. We own a number of the components.

Here’s a Goal Zero kit that you could consider as a starter, for hiking or camping. Charge from the sun, by plugging into the wall, or into your car. The image shows the foldable solar panel with the battery and attached inverter. Many people add an extra 20W panel to give it more capability. Goal Zero 42011 Sherpa 100 Solar Recharging Kit

One family’s story

Still deep in the magazine, turn the page and you come to a personal story about confidence, creativity and survival in Smith Henderson’s article about his childhood and his family living in Montana. The story includes an intriguing mixture of danger (forest fire), hard work (filling the woodshed, canning and pickling and jamming to fill the cellar) and the best of modern survival gear. Again, for example:

Henderson’s father’s hunting bow with “complex sighting system, soloCam and arrows that flange outward.” As a kid I had a bow (and slingshot, and crossbow) so for fun, I took a look at several articles about real hunting bows, and learned a lot about draw-weight, draw-length, speed, weight, noise and vibration. Here’s a medium-priced single cam bow at Amazon that got a solid recommendation. PSE Archery Prophcy Skllwks CamoLH70.  (Nothing like what you remember from your childhood, eh?)

Can’t finish my Advisory without a nod to Smith Henderson himself, who published a first novel in 2014 — set where else but in Montana? — and which won all sorts of awards. Check it out:  Fourth of July Creek: A Novel

And a philosophical touch

I found the best piece in this whole feature buried in the section called “You need books.” It was a quote from Henry David Thoreau’s Walden, and it can pretty much apply to all our Advisories at Emergency Plan Guide.

As we dream, and make plans for acquiring wonderful new survival gear, we need equally to make plans for acquiring new knowledge, being open to new attitudes and learning new skills.

For as Thoreau says,

“Beware of all enterprises that require new clothes, and not rather a new wearer of clothes.”

Thanks to Popular Mechanics for its continued emphasis on do-it-yourself self-sufficiency.

What about you? What’s a favorite resource of yours? Let us know in the comments!

Virginia
Your Emergency Plan Guide Team


Confident About the Security of Your Passwords?

Share
Lock requiring password
So what’s the combination?

There is no such thing as complete security. All precautions and security devices are nothing more than time delays. You are not immune from hackers or malicious software bugs, identity thieves or unscrupulous “ransom ware” extortionists.

You can, however make yourself and your business a harder target and significantly reduce the likelihood that you will be a victim.

The first line of defense is usually the password.

At last count, I have close to 100 passwords I have to retain and use periodically, some more frequently than others and some more complex than others. Virginia has an equal portfolio with a few overlapping with mine. That’s too many unique and nonsensical combinations of numbers and characters to rely on memory alone.

We understand all too well how unlikely it is that you will approach your computer and on-line security with enthusiasm.

It’s just human nature to look for shortcuts.

I accept this and, in fact, I have some institutional experience that I’ll share with you that may help motivate you to reexamine how you approach this important subject. It’s not a long story, but it’s one I think you’ll find both entertaining and enlightening.

A true and embarrassing story of security shortcuts.

Some years ago, I was serving our country with the US Army as a Special Agent for Counterintelligence. I assure you that, while there were exciting times and even dangerous assignments, there were many more tasks that some (me included) would consider mundane and tedious. Among the latter was the responsibility of conducting periodic inspections of Army units in their handling, storing and protecting of classified information.

(And, yes, this required that we put on our expressionless “face” and make sure we came across as serious “spooks.”)

One thing we did that relieved the tediousness of these inspections was to ask early in the process to see how documents were stored. We also wanted to know who was in charge to “make sure” they had the proper level of clearance.

Storage in those days was typically in a bank of four-door file cabinets with a rod inserted through the handles, secured with an impressive Sargent-Greenleaf combination padlock at the top.

As part of our inspection, and always with the handful of personnel (including the Unit Commander, officers and non-coms in the “audience”) we would begin attempting to open the padlocks by turning the dials without anyone providing us with the actual combination/s.

Imagine, if you can, the looks of surprise and embarrassment on the faces of the soldiers as, one-by-one, we deftly opened most – and sometimes all – of the locks on the file cabinets.

“How in the hell did you do that?!?” was the typical reaction.

Actually, it was quite simple. Before the actual inspection, we examined the personnel records of the people in charge. We jotted down birthdays, wedding dates, serial numbers, etc. With few exceptions, we would find that at least half of the locks could be opened by treating these dates as combinations because they were an easy way for the people to remember the sequence of numbers.

In some of the more dramatic encounters where we opened ALL of the locks, it was usually where the same sequence of numbers was used on all the locks.

The point of this story is to illustrate that the convenient ways you create passwords is typical. Most “crackers,” if not “hackers,” will have search scripts that can readily break these normal code patterns.

Avoid normal code patterns as passwords!

There are a number of ways to pick passwords that will foil eager agents, friendly or not so friendly.  Here are three:

  1. Use a password generator. Typically, these programs will create totally random combinations of capital and lower case letters, numerals and symbols, often as long as 16 digits.
  2. Save these passwords so you can retrieve them, since you won’t be able to remember them. Password manager programs include Keeper, RoboForm and LastPass.
  3. Not happy with having all your passwords stored on your desktop? You can write them down on paper and store or seal it well away from prying eyes.

If these ideas seem too few, or too paltry, we recommend you click on Consumer Reports: 66 Ways to Protect your Privacy Right Now. In 14 pages it discusses passwords but also covers email, devices, privacy, software updates, two-factor authentication, PINs, travel, encryption, settings, wifi, phishing, and ransomware!

Joe Krueger
Your Emergency Plan Guide Team

P.S. We continually update information like this, though we can’t beat the story about the padlocks! If you’re interested in security, check out this recent Advisory about Cyber Security Threats.


New Year’s Resolutions and Emotional Intelligence

Share

Do you fall into that 45% of Americans (or 32% of Britons) who routinely make New Year’s Resolutions? And how about your success rate? Is it around the average 8%?

“Getting prepared for emergencies” — not typically one of the top 10 resolutions.

But ask anyone if they have done some preparing for emergencies and you’ll invariably get this answer:

“No, I haven’t got around to that, but I really should!”

This year, as we approach Resolution Time, I’m trying to come up with ways to help people get started on what they clearly think is important! And I decided to see if I could use the concepts of Emotional Intelligence to help.

You’ve heard about EI. It was “discovered” in the 90s and continues to be an important business topic three decades later. From what I can tell, EI boils down to “Know thyself, ” and in so doing, you’ll be able to understand others better, too.

Four Emotional Intelligence questions.

Ask yourself these questions, and then ask others.

1-What’s your motivation for putting together a cache of supplies?

We have asked many, many people this first question. There are four or five common answers:

  1. My wife keeps nagging me
  2. I know it just makes sense
  3. Some sort of emergency is inevitable
  4. Better safe than sorry

What’s your motivation? What’s the motivation of the people you’re trying to convince?

2-How do you respond if you get criticism, resistance, or ridicule?

EVEN WHEN THEY’VE ALREADY AGREED THAT PREPARING MAKES SENSE, most people quit as soon as they get criticism or resistance. It stops ‘em in their tracks!

They then come out with excuses like these:

  1. If it is my time, then it is meant to be.
  2. Nothing has happened so far. Why think it could happen in the future?
  3. There are too many eventualities to prepare for.
  4. We can’t afford the cost associated with preparing.
  5. The government will take care of us.

If you’ve spent time on this at all, you know that these “excuses” are just that. But here’s where EI comes in to play.

3-Can you understand the emotions behind the criticism?

Many friends and even family members may discourage you because of their OWN emotions: Do any of them fit you, too?

  1. They’re guilty they haven’t done any preparing themselves.
  2. They are embarrassed to admit they wouldn’t know what to do in an emergency.
  3. They are afraid to think about destruction, pain or death.

If you can identify these emotions, then you will find answers to these emotional barriers. So, the last question.

4-Do you have the skills to manage the situation and inspire support?

Sometimes answering fears and emotions is as simple as first, listening to the person. Then, depending on the situation and the person, you communicate the value of a change in behavior (i.e., taking steps toward emergency preparedness).

Here are some EO inspired approaches about emergency preparedness that may work for you.

  • (Show confidence.) You have already made it through some tough situations because you already have basic good sense and resilience. There’s nothing magic about emergency preparedness.
  • (Acknowledge conflict) Emergencies happen – but they don’t have to become disasters. You’re likely to live through an emergency. It will be a lot safer and more comfortable is you have some basic supplies and tools.
  • (Articulate a simple vision) Maybe you can’t prepare for every single emergency that could arise, but “general preparedness” will help in every situation. Start with a survival kit; you probably already have a number of the items that belong in it.
  • (Lead by action) Preparing doesn’t mean making one huge investment in stores of dried food. I started with water and a few food staples – things I already knew and liked – and then added a piece every month or so. Flashlights, glow sticks, rain gear, an emergency radio – they fit my budget and began to fill my kit!
  • (Collaboration and team building) As for the government coming to help . . .Katrina, Sandi and more recent floods and storms have shown that in an emergency we can expect to be on our own for at least several days. Neighbors will be our First Responders – and we’ll be theirs. So the better prepared we all are, the safer we all will be.

So to get back to the New Year’s Resolution that started this article,

People who “know themselves” best get the best results with ANY resolution.

Share this article with friends and neighbors. Add to the list of “excuses,”“fears” and “criticisms.” Think what emotions they really represent. ‘With every step, you’ll be understanding yourself better, and be strengthening your Emotional Intelligence.

And you may find that the “Resolution to Get Prepared” will become a reality in 2017!

Virginia
Your Emergency Plan Guide Team


How to Light a Flare

Share

Accident in Darkness

Winter darkness makes accidents on the road hard to see and even more dangerous.

Having a good accident kit in the car can help protect YOU, and might help protect others if you come across an accident scene.

An accident kit is different from a car survival kit. The survival kit has stuff for YOU – warm clothing, flashlight, food, water, etc.  The accident kit has stuff for the CAR, like jumper cables, emergency reflector triangles, flat tire inflator, and flares.

Does your car accident kit have road flares?

When it’s dark, there’s nothing better than flares to warn oncoming vehicles of an accident, a stranded car or even an injured person. Flares are easy to get, easy and safe to store, and they last a long time. The problem that people have with ‘em is . . .

How to light a standard industrial flare?

Our CERT group had the opportunity to practice one evening with the police department. We hung around in our official vests, enjoying the cool evening and the chance to see each other again. When it came time to light the flares, however, some of us looked pretty dumb.

It’s not as simple as you might think!

Here are some guidelines that I took away from that evening.

1Have more than one flare so you can warn oncoming vehicles and direct them around the accident.

2-Pick where you want each flare to go BEFORE you attempt to light it. Once the flare is burning, you will not want to carry it around to be positioned! It’s BURNING and shooting off white-hot bits!  Some things to keep in mind:

  • If there’s spilled gas, don’t use a flare nearby at all.
  • Keep flares on the road so they don’t roll into a ditch or catch vegetation on fire.
  • Go to where you’ll place the flare, and then light it.

3-Remove the cap on the flare to expose the rough striking surface.

A flare has a plastic cap. Part of the cap contains a rough “striking surface.” Under the cap is the “igniter” end of the flare. You want to hold the striking surface in one hand and the flare in the other.

4-Light the flare by scratching it across the striking surface.

Extend both arms and scratch the flare across the striker in a movement going away from your body.

It’s rather like striking a very large match. Too soft a strike, nothing happens. Too hard, and you can break the “head” off the match.

In our group, most people had trouble getting the right amount of pressure and speed to get the flare to light. One person actually broke the head off the flare because he “scratched” too hard.

5-Place the ignited flare where you had planned to place it.

Put the cap back on the non-burning end of the flare. If you’re carrying it, keep the flame pointed down so you don’t get any drips on your hand.

Don’t drop the flare – you could break or extinguish it. Don’t place the flare in a puddle – it could go out.

If it’s raining, place the flare so any running water goes around the base of the flare and not directly against the flame end. You can prop it up to keep it dry.

6-The flare will burn for 10-30 minutes.

When you’re ready to extinguish it, break off the burning end and let it burn out. You cannot easily smother this flame.

(In our group, we picked up the burning flares and carefully tossed them a little ways down the road. When they landed the burning end broke off.)

After practicing, we all felt more competent.

It’s like so much else. Until you’ve practiced, you really can’t count on being able to make it work! So here’s a suggestion:

Buy a supply of flares and set up a practice. Even if everyone doesn’t attempt to light a flare, everyone in the group will clearly see how it’s done – and what NOT to do! A great CERT group exercise, and a great family exercise, too.

Hi-tech No-Flame Alternative  — LED, Battery-driven Flares

Obviously, First Responders use “real” flares because they work! Everyone recognizes just what they mean, and starts paying attention as soon as they become visible.

But not everyone is ready to handle industrial flares as described above!

If you find this just too challenging, consider a good alternative: plastic strobe light flares that are safe and comfortable to use.

These flashing, reusable flares come in two styles – stand-up flares with a tripod base, and round, disc-style flares that lie on the ground or attach magnetically to a car.

I personally prefer flares that are really bright and can be seen from all sides – so the disc style would not be my first choice.

In fact, here are flares that we own. (We also own reflective triangles made by the same company). I particularly like that they come in their own case; otherwise, the flares (and their bases) can get lost in the trunk of the car.

Click on the link or the image to get full details. (As you know, we’re affiliates at Amazon so this link will take you there.)

Magnatek LED Flashing Roadside Emergency Beacon Flares-Two RED Flares with Solid Storage Case

A couple of hints if you’re considering flares like these.

  • Each flare has 3 different settings, one of which converts it to a flashlight. Handy.
  • The flares use AAA batteries. If you leave the batteries installed in the trunk of your car for weeks and months, ultimately they will corrode. So, store the batteries in a baggie UN-INSTALLED but in the package with the flares. Of course, it makes sense to PRACTICE installing them as soon as you get the flares so you’ll be able to do it in the dark and when you’re nerves are frazzled because of an accident.
  • These flares also have magnetic bases so you could place one on TOP of your stranded vehicle for more visibility.

(This image – for one order — shows the front and back of the case. It’s misleading. Each individual case comes with two flares. If you want more than two, then you’ll have to order more cases.)

Another good idea for a stocking stuffer!  (A very large stocking, perhaps!)

Virginia
Your Emergency Plan Guide team

P.S. Again, a reminder to check the status of the batteries in your emergency lights, flashlights, etc. They ultimately do go bad if not recharged or replaced. Now’s a good time to do that.

Holiday Security Mistakes

Share

Tempting Christmas window All ready for the holidays?

Here are 3 security mistakes people tend to make at this time of year. Take 2 minutes to check them out. It would be wonderful if you and your family could avoid them all.

  1. Packages are SOOOO tempting!

Sure, you know better than to allow packages to be delivered to an empty house.

Just a week ago I was stopped on the street by a patrolman who showed me a picture of a kid taking a package from a front porch. (The picture had been taken by a home security camera. More on those later.)

And when you’re shopping, take the time to put gift purchases into the trunk of your car. If they won’t FIT in the trunk, at least cover the back seat pile with a dark and preferably dingy looking blanket. Better yet, make an extra trip rather than let packages sit unattended in a parking lot in full view.

And at home, don’t position your tree and all the lovely presents right in front of a window as in the picture above. Someone could break the window, grab the presents and run.

Packages are so tempting — to thieves!

  1. “We’re so proud of our emergency preparations.”

The holiday season often means more visitors to your house. The guy to string the lights on the roof. UPS and Amazon delivery people. All the invitees to your Christmas party!

Every person who comes onto your premises has the chance to take a good look at what you have – and that includes some of your emergency preparedness items.

Your gardener sees the locks, the security cameras and lights you’ve installed. The delivery guy walking past your open garage door sees your tools and the cupboards and shelves packed with food and water. The computer guy you bring in to troubleshoot your new network sees your ham radio set-up, not to mention your laptop and printers.

It’s natural for a visitor to tuck this sort of information away. And in a big emergency, your house might become a target for one of those visitors, now turned desperate.

What can you do to cover or camouflage emergency supplies? Yes, be proud of the sensible steps you’ve taken. But with a bit of creativity you’ll get more of them out of sight. You can be just as satisfied and maybe a whole lot safer.

  1. Take out the trash!

We’ve all read the novels where the criminal is identified because of stuff he puts in the trash. (Harrison Ford left orange peels and fake ID photos in the wastebasket in The Fugitive, remember?)

If you’re making a lot of purchases and getting a lot of gifts, you are going to have more trash than usual. And it may attract the wrong kind of attention.

Save and/or shred receipts or statements that have account numbers. Some receipts for online purchases may show up in your email. Protect them from casual view. Don’t stuff empty cardboard boxes (with pictures of TVs and electronic games and security cameras and drones!) into the trash; break them down and recycle anonymously at the recycling place.

And if you’re traveling during the holidays, make sure newspapers, leaves or other trash doesn’t build up outside while you are gone. That trash, plus a dark and empty house, is a real invitation to trouble. (Ask a neighbor for help, and invest in some timers for lights and/or radios.)

Oh, and for heaven’s sake, don’t you or your kids announce via social media or on a phone message that “We’re away skiing for a week!” Ouch!

We wish you the pleasure of giving, and the excitement of receiving. But we sure hope it’s not spoiled because you overlooked taking these sensible precautions.

Virginia
Your Emergency Plan Guide Team

P.S. We’re writing an Advisory about “Hiding valuables in plain sight.” Sign up for all our Advisories to be sure you get it.


Battery Failure Ruins Flashlight

Share

We Test More Batteries

If you’ve been following our blog entries you know that over two years ago we ran some tests on our Emergency Response Team’s battery purchases and the batteries’ life expectancy.

Battery failure

Recent failure of one battery ruined the entire flashlight

What we found was that performance between Duracell and EverReady batteries was pretty much equal, and both outperformed their private label versions sold through the big box stores (Costco & Sam’s Club).

The one dramatic difference was a higher failure rate (i.e. leakage and corrosive damage to our radios, flashlights and other tools that we relied on) for the Duracell batteries than for the EverReady batteries.

It’s important to note here that our Neighborhood Emergency Response Team typically has close to sixty active volunteers. We issue each team member a radio (FRS/GMRS) and a flashlight. We run active monthly drills with the radios and recommend that members check their batteries regularly and change them twice annually. The result is that we spend almost $1,400.00 annually on AA, AAA, C & D batteries and replacement radios, flashlights and other devices.

Batteries Die and Fail

While most batteries simply die and are unable to produce sufficient voltage or current to power the devices, we experience a 15% (+) failure due leakage and corrosion. We are able to “repair” about half of the radios using baking soda & water paste applied with Q-tips to dissolve the corrosion confined to the battery compartments. Flashlights are usually a total loss.

You can easily see an example of corrosion on the black flashlight in the photo. It takes a sharper eye to spot the point of failure of the Premium AAA Duracell battery. The arrow points to the cavity where the casing failed at the bottom (negative pole), under the silver strip.

We Switch to Premium Batteries

Lately we have been using only the premium Duracells (red/gold, 10-yr guaranteed shelf life) since the EverReady batteries are no longer available through Sam’s Club (where we used to find the best price). Our hope was that by purchasing the higher-priced premium Duracells, we would experience a longer life and a reduced failure rate. So far we have no evidence that this will indeed be the case and, to date, the failure rate seems to be about the same as the regular Duracells.

As of this week we are stocking up on additional EverReady, Amazon, Ikea and Orchard Supply Hardware batteries to measure longevity. We will share our methodology and results in a future post.

And, while the comparison on battery failure rate will take longer to measure, the results will be more anecdotal since the sample size of our tests will be smaller and subject to individual team members’ actual usage and care patterns. We will share our experience in this regard as well with the caveat that it’s not possible to completely separate individual user habits from the failure rate experience.

Joe Krueger
Your Emergency Plan Guide Team

P.S. If you’re asking yourself why we don’t use rechargeable batteries, that’s a good question. But we think the answer makes sense. It’s this: We’ll only be using these radios and flashlights in a real emergency – most likely, after a major earthquake. We expect all power to be out for an extended period, days if not weeks. As soon as our rechargeables are dead (and they don’t last as long as disposables, anyway), we’ll be stuck. We don’t want that to happen! (Yes, we DO have some solar chargers. That’s a topic for another Advisory!)

P.P.S. If you are interested in the results of our planned test, be sure to sign up below to get our weekly Advisories.

Better Home and Office Security

Share

“Who’s that at the door?”

Who is at the front door

If you hear someone knocking, can you tell who it is without opening the door?

As the days get shorter, more and more of us — business people, parents of busy children, everybody, in fact — find ourselves out and about in the dark. And while crimes can happen at any time, being in the dark certainly gives us less chance to see trouble coming.

I am all for simple and effective security solutions. Here are a couple of improvements we can all consider.

Better Perimeter Security at the Office

If you are alone in the lighted front office, and it’s dark outside, you may wish you had an extra layer of security around yourself.

(Now we’ve written before to business owners about the importance of securing entrances to the business. Upgrading your entire perimeter with mechanical or electronic security devices – fencing, gates, lighting, etc. – would be costly and time-consuming. Of course, it may be worth it to strengthen your insurance coverage and to avoid legal threats. If you’re interested, here’s a link to that earlier Advisory : https://emergencyplanguide.org/security-at-the-front-door/.)

But getting back to the convenience and safety of the person alone in the office . . . here is one easy upgrade worth considering.

Add a perimeter alert system.

What is it? It’s a wireless motion detector that sends an alert when, for example,

  • a delivery truck arrives at the freight entrance
  • a car comes through the front gate
  • a person appears at the back door.

The model below looks perfectly adequate and is not too expensive. A brief description is below the image — click on it, or on the link, to get all the details at Amazon. CAUTION: As always, compare prices carefully at Amazon! Prices vary considerably, since vendors set the price they think they can get. And sometimes, they’re looking for a quick sale, and you can benefit!

Wireless Driveway or Entry Announcer

This model has two parts. The motion detector — about the size of a baseball — attaches to a building or wall, where its sensitivity and visual field can be adjusted in a variety of ways to suit the location and your needs. It can send a signal for up to 2,000 ft. to the receiver, generating different tones to distinguish between the different alerts.

The receiver plugs into the wall; the detector operates off a 9 volt battery.

Naturally, you’d have to buy one sensor for each entrance you want to protect.

Would something like this make sense to the person alone at the front desk or in a back office at your workplace?

Better Perimeter Security at Home

Lately we’ve seen more and more internet-driven devices that offer home comfort, and now more home security.

Various companies offer “home security programs” that consist of multiple door and window locks, cameras and a console that connects to a remote monitoring office. You can set the alarm system to work while you’re away, or set it at a lesser level so it’s on at night when you’re asleep. In an alarm is tripped, the monitoring company or the police are called. Typically, these systems require professional installation and have a monthly charge (and a contract).

Again, for this Advisory I was looking for something simpler and less expensive.

Something focused on the front door at your house. 

  • If someone knocks at your front door, do your children automatically run to open it?
  • Do you have to peer through the curtain or a window to see if you can recognize who is there before you open the door?
  • What happens if someone knocks in the middle of the night?

Do these questions make you wince?

If so, you may want to consider installing a video door bell.

You’ve seen the ads. The scary-looking guy comes to the door with a questionable story. Without having to open the door, the mother see who he is, tells him she’s not interested and sends him away.

I took the time to look into these devices. Here’s some of what I learned.

First, there are at least a half dozen on the market. All have the same basic characteristics:

  1. A video camera films your entrance.
  2. The camera is triggered by a motion sensor or a person pressing the doorbell.
  3. The camera connects to your home wi-fi system.
  4. A downloadable app allows you to view the video and also to speak with the visitor via your smartphone or tablet.
  5. You can save and store the video for later viewing.

As you can imagine, different products have variations on these features. So, when you’re shopping, compare with the help of these questions.

  1. Consider the video quality you want or need. And how big is the image? What’s the resolution? The best video camera tends to be the most expensive, of course.
  2. What triggers the camera? Someone actually pressing the doorbell? Or simply approaching the door? From how far away?
  3. How much flexibility do you have in setting up the motion sensor? Range, multiple ranges, sensitivity, etc.
  4. What about its source of power? Is it hardwired through your regular doorbell, or battery operated? Do you have a choice?
  5. How well does the system operate at night or in other low light conditions?
  6. How is the video footage stored? How long? What do you have to pay for storage?

And a couple other things to consider to protect your system from being hacked.

  1. Can you set your own password?
  2. How will the security updates be provided by the manufacturer?
  3. Can you disable remote viewing (and just use your system while at home)?

With all this information in mind, and after reviewing the top doorbell video products, here’s the one that seems to be the best seller. I’d start by looking at it.

Ring Video Doorbell Pro

This model is at the upper end of the price range. It has to be hardwired. Since it looks like a regular doorbell, it doesn’t announce itself as would a mounted security camera. Oh, and it comes in four different colors.

Once again, look carefully at all the models, and at all the prices before you buy. Maybe it could be an early Christmas present?!

Virginia
Your Emergency Plan Guide Team

P.S. I’ve written before about outdoor lighting as a security device. When the light outside my bedroom window foes on at 4 am, I am pleased to know it’s working, and to know I can look out and see just what triggered it. That peace of mind is worth a lot — and that’s what I’m trying to achieve with the security recommendations in this Advisory!

Communication Challenges in an Emergency

Share

Once again, Emergency Plan Guide offers some tips for business or neighborhood CERT teams.  Today’s subject: communicating with people in a disaster situation.

 Last month we talked about the importance of succinct and clear radio communications. Today, succinct and clear are just as important, but this is a situation where you are dealing with a non-professional. It’s a situation that may be uncertain and unfamiliar to you both. Communication is going to be a challenge, no matter what.

Action Item: Use this Advisory to start a discussion in your group on potential problems. You are likely to be able to add more specifics based on your environment.

Person with disabilities

“Not getting through?!” 

In a big emergency, whether you are a concerned citizen, an Emergency Response Team member, or a First Responder dealing with victims or potential victims, you may find your words just not getting through!

You are asking urgent questions or giving urgent commands.

But the people you’re dealing with just aren’t responding!

Before you overreact and start yelling, run through this list in your mind. If you can identify one of these problems, and its solutions, you’ll have a better idea of what to do next for better communications.

Don’t forget to start by introducing yourself!

In any emergency situation, start by introducing yourself and why you are there.

For example: “My name is Joe, I’m a member of CERT, and I am here because there’s been an explosion and we need to move you to a safer location.”

Tell the person where they are going and what they need to take with them. If you know, tell them how long this move is likely to last. Repeat that it’s urgent that they get started . . . and that you are there to help.

If you know the person’s name, use it to start your sentences.

If the person has a care-giving companion, address your remarks to the person, not the companion!

What to do if the person doesn’t respond to your commands.

There are a number of things that could be preventing your audience from understanding your words and/or what they should do. Here are a few problems, with tips for how to address them.

The person doesn’t understand what you are saying.

1- Whether the person doesn’t hear well, doesn’t speak English well, or has mental health issues, here are some ideas for improving communication:

  • Make sure they know you are there to help. Get their attention by calling out and flicking the lights.
  • Get face to face with the person and at their level; don’t yell down at them or across the room.
  • Speak simply, clearly and slowly. Use hand gestures in speaking.
  • Repeat your commands or requests as necessary. If still no understanding, use DIFFERENT words to explain; don’t just repeat the same thing over and over.
  • Write your message on a paper, and let the person write back.

2- You are dealing with an elderly person who is resisting or confused.

  • Tell the person you are there to help.
  • If the person needs to leave the home, reassure them that this will only be temporary.
  • Gather medicines (or at least a list) and any portable medical equipment.
  • Let them know how and when they will be able to contact family.


What if the person isn’t able to follow your commands?

1- Person has a service animal and you aren’t sure how to proceed.

  • The animal must be kept with its owner. A service animal is like an extension of the person – it is not a pet.
  • The service animal must be on a leash or in a harness but does not need a muzzle.
  • Don’t try to give the animal instructions or use its harness to direct it. The animal will respond only to its owner.
  • Do not feed or pet the animal.

2- Person has mobility problems (walker or wheelchair in room).

  • Ask to be sure you understand the person’s capabilities. For example:
    • “Can you stand or walk without your walker?”
    • “Can you get down the stairs without my help?”
  • Assume the person knows how you can help. Let her tell you the best way to do it.
  • Assume the person knows how her equipment works. Let her give instructions about how to attach or detach parts, move the chair up or down stairs, etc.

3- Person declares or you think he is visually impaired.

  • Announce your presence.
  • Visually impaired does not mean hard of hearing. Speak in a normal tone of voice.
  • State the nature of the emergency, tell him what needs to happen, and offer assistance.
  • Do not reach out and grab the person to move him. Let him take your arm or rest his hand on your shoulder and then lead him.
  • Warn of stairs, doorways, ramps, etc. before you reach them.
  • To help a person sit down, place his hand on the back of the chair.


Communicating in a disaster takes extra thought.

By and large, we understand and are able to automatically put many of these tips into use. In an emergency, though, we may allow our own excitement to make the situation more challenging than it needs to be.

Take a deep breath, think it through.

It will be so much easier dealing with someone who (finally) understands than trying to force them, confused and frightened, into action.

Virginia
Your Emergency Plan Guide Team

P.S. The best resource I’ve found on the topic of communication with people with disabilities is called Tips for First Responders, from the Center for Development and Disability at the University of New Mexico. You can get copies of the booklet here: http://cdd.unm.edu/dhpd/tips/tipsenglish.html

P.P.S. Resources for dealing with people with disabilities all echo this point: these are PEOPLE FIRST.  Start with the assumption that they have many abilities. For an interesting perspective about the concept of “People First” – written by a person with disabilities — check out this article from the Huffington Post.  http://www.huffingtonpost.com/2013/07/15/disability-etiquette_n_3600181.html


Gift That Will Save a Life

Share

Vial or File of Life – a Great Gift Idea for Family or Employees

We are constantly looking for ways to engage our communities in “preparedness thinking.” It’s not always easy. For some reason, many people prefer to fall back on “It won’t happen to US!” as the reason they don’t do any planning.

However, everyone has seen an ambulance pull up to a home or business, lights blazing. Everyone stops for at least a moment to wonder what is happening inside.

We can use this fact to raise awareness in our neighborhoods or workplaces. Here’s a GIFT that you can arrange for that people will value – and that could make a difference between life and death.

The Gift: The Vial of Life

At a recent meeting with the Fire Department we were reminded that when First Responders are called to an emergency in a home, they automatically look for the victim’s VIAL OF LIFE.

Vial of Life
What is the Vial of Life?

The Vial is really simply a container that holds essential medical information for the people in the house – information that First Responders will want to know if they have to give emergency treatment.

Originally, the info was put into an actual vial (like a medicine prescription bottle) but these days, the preferred container is a simple zip lock Baggie. You can see the plastic baggie in the image (blue stripe).

What goes into the Vial of Life Baggie?

The Baggie holds a filled-out Medical Information Form. It’s the form in the picture, with places for info such as:

  • Name of person in trouble
  • Name of Doctor
  • Medical conditions
  • Current medicines/prescriptions
  • Allergies
  • Contact information for family

Where do I put the Vial of Life Baggie?

Identify the Baggie by placing a decal with a red cross on the outside. Fold the Medical Information Form and place it inside.

Then fasten the baggie to the refrigerator door with tape or a magnet.

(Naturally, you’ll want to keep the Medical Information Form updated – that’s why it’s best to use a zip lock style baggie so you can take papers out and replace them.)

How does the Fire Department know I have this information on my refrigerator?

Depending on the layout of your home, place the second decal with a red cross on the front window or door to your house. This will let the Fire Department know you have a Vial of Life Baggie on the refrigerator.

Even without the second sticker, they will likely automatically look there for medical information.

Anything else I need to know?

Depending on your circumstances, you may want to put other information into the Baggie. For example . . .

  • If you have appointed someone else to make medical decisions for you in an emergency (common for senior citizens), you may want to include that info along with directions to where the full document can be found.
  • Your Advance Health Care Directive, which tells what emergency life-sustaining treatment you want, can also be included. (That form is available online and must be witnessed by your doctor.)
  • Finally, if you have specific end of life wishes, such as the desire to donate your body, you may want to include that info, too.

These documents are important.

Without the Vial of Life information, emergency personnel will follow their STANDARD PROCEDURE – which may NOT be what you want or can even survive.

How to Use the Gift with Your Group

If you want people to participate, you have to make it easy for them.

The “easiest” is to create Vial of Life kits, already assembled, and pass them out to all the members of your group. Each member of the family needs one!

You can go to http://www.vialoflife.com to get the masters for everything you need.

Assemble into individual kits:

  • Instruction sheet
  • Baggie
  • 2 Decals (print your own using color printer onto white labels), one for the Baggie and one for the door
  • Medical Information Form

If you prefer, turn this into a group activity. Provide sheets of decals, piles of forms and instructions and the baggies and have group members set up an assembly line to separate and assemble the kits.  Next step is to distribute kits to neighbors, family members, etc. (You could add a pen as an extra incentive to get the form filled out!)

We distributed Vial of Life kits to our community about three years ago. Many of our neighbors, who don’t participate in any of our neighborhood emergency response team activities, still have their Baggies and point proudly to them.

The Vial of Life has been a successful and inexpensive awareness builder for our team. Add it to your own group’s agenda!

Virginia
Your Emergency Plan Guide Team

If you are looking for other emergency response team ideas for group activities, please don’t overlook the book of CERT Meeting Ideas I put together earlier this year. You can get details here.