Over the years Joe and I have been involved in both CERT and NERT training. CERT is Community Emergency Response Team training, a course and refreshers offered by our city. NERT is our informal Neighborhood Emergency Response Team, with its own unofficial and customized training.
At both CERT and NERT get-togethers we end up sharing ideas for useful supplies and gear, and, of course, ideas for how to stay on track. We’ve documented many of these conversations and trainings in the over 200 Advisories here at Emergency Plan Guide.
Since I have been getting requests for one list or another, I thought I’d just bundle a few of them together in one place for easy reference. So . . .
Here are 7 popular lists for individual and family survival kits.
If you are looking for ideas for a meeting agenda, just grab one of the Advisories above and use it to stage a “show and tell.” You can bring your own kit and get group members to bring theirs. Always a success!
And don’t forget, we’ve gathered up a collection of something like 50 meeting agenda ideas pulled from all the meetings we’ve held over the years. Here’s the link to the page where you can download them immediately. (And yes, we do charge a little for the books. It helps us continue to buy and share emergency items with our team!)
Three more lists, specifically for Neighborhood Teams’ “Block Captains.”
No matter how your neighborhood group is set up, at the very ground level you’ll have a number of people who have agreed to get to know their “block” of neighbors (a block could be a building, a floor, a department, or actually a block), to check in with them in an emergency, and report on their condition to the designated leader.
We find that Block Captains are the heart of our neighborhood group, so we encourage their active participation by making sure they get their own specialized resources.
1-Block Captain Supplies for CERT graduates
Have you taken the formal CERT training? If so, then you already have received a first set of supplies. For example, our local CERT graduates come away with:
A vest with reflective stripes
Duffle bag
Helmet
Flashlight
Safety goggles
Dust mask
Gloves
(Other CERT programs supply their members with different items. The list above is from our local program, only. Amazon.com actually offers a variety of CERT kits starting at around $50 and going up from there. Take a look at all the gear included in these kits to see what you might want to include in yours.)
By the time the class is over, most of our CERT members have added to their bags – first aid items, a few tools, duct and making tape, pens and tablets to write on, headlamps, etc. The duffle bag can get very heavy very quickly; most people keep them in their cars.
2-Block Captain Under-the-Bed Kit
As far as local Block Captain duties are concerned, we have been able to outfit our captains – whether or not they are CERT graduates – with just a few essential items:
A reflective vest
Walkie-talkie and extra batteries
Clipboard, tablet and pen for taking notes
Flashlight
Whistle
A reminder checklist of what to do in an emergency
You can get a Block Captain outfitted with the above items for less than $30. (Most expensive item is the Walkie-talkie/hand-held radio at around $15.) Buying items in bulk can reduce that cost.
And we truly call this the “under the bed” kit. (As I’ve mentioned before, we recommend that all our Block Captains also store shoes under the bed. If something happens, we want to be able to jump into action – safely!)
3-Block Captain Step-by-Step Checklist
Our NERT volunteers carry a quick reminder checklist of their primary duty when the community is hit by an emergency. It’s a card similar to the one to the left.
As you can see, this card assumes that the community has already been organized into Divisions; everyone has a walkie-talkie and understands the way channels have been assigned. Your own checklist needs to reflect the vocabulary and set-up of your organization.
In any case, the list needs to be SIMPLE and HANDY. You might consider laminating it to give it a bit more heft.
When we bring a new member aboard, we present him/her with some items at the orientation, and then present the rest when the new Block Captain is introduced to the group. People like to be recognized – and this is an important role they are going to be playing!
And we find that getting free “gear” encourages other people to join in.
What lists or checklists have you found to be helpful as you manage your own preparedness? And do you have suggestions for helping a group get formed and stay interested? Pass ’em along!
If you’re close enough to hear a siren or get a text like the one above, you are in potential danger.
It doesn’t matter whether the danger is coming from a nuclear plant leak, a terrorist explosion or an incoming missile.
Take action immediately. You may have just a few minutes.
Get to shelter. Get deeper into a building or deeper underground to put as much solid material – bricks, concrete, dirt – between you and the radioactive fallout. Obviously, if your shelter is hit directly by a bomb, it won’t protect you.
Stay in your shelter. Radioactivity is worst at the time of the blast, but dissipates pretty quickly. According to the Department of Homeland Security, radiation will have declined to a little as 1% after 2 weeks.
Don’t come out until it’s safe. This may mean 24 hours or it may mean 2 weeks or even longer! You’ll only know it’s safe if you have a way to get emergency communications from official sources.
Basic preparations to take now
Most preparations for a nuclear disaster are pretty simple, and follow the guidelines that we’ve laid out many times. Here’s a quick reminder list.
Have a survival kit that you can grab at a moment’s notice. Take it with you to your shelter. You may want to have a battery-operated walkie-talkie in each family member’s kit so you can stay together in the dark.
Stock your shelter with food and other supplies so you can shelter in place for days if need be. Obviously, if you are traveling or not at home, it will be difficult if not impossible to have enough supplies for a lengthy emergency stay.
Be sure you have an emergency FM radio so you can monitor official transmissions.
Advanced preparations if you are in a target location
Some areas are more likely to be targets than others. For example, right now the emphasis seems to be on Guam and Hawaii, which could be reached by missiles from North Korea.
However, every nuclear reactor in the country – there are about 100 of them – could also be subject to an emergency or terrorist attack, as could different manufacturing, government or military centers.
If you live near one of these “prime targets,” you may want to make more preparations. These could include:
Find out what your local government’s “emergency plan” is for a nuclear disaster. It probably involves evacuation.
Be ready to seal yourself into your house. Bring in pets. Close all windows and doors, shut off fireplace, heater and A/C.
Have a supply of potassium iodide (KI). It’s nonprescription and FDA approved. You’ll need enough for every family member for several days. Pills cost lessz than a dollar each. Be sure to check on expiry date.
Consider having a way to measure the levels of radioactivity yourself. Geiger counters start at around $150. There are also Smartphone apps to measure radiation.
P.S. If you get caught in an active radiation blast, you’ll need to protect yourself as best you can and then get the radiation — carried through the air like dust — off you. Steps for decontamination are pretty much removing your clothes and then washing off your body and hair. Here’s an article from NPR that describes the process and the imprecise nature of that process: Decontamination
Is it up to date? Do you know what stuff is in there, and how to use it?
I added “Update your First Aid kit” as No. 4 on my Preparedness Checklist for 2018. That was partly because OSHA has new requirements.
But there’s more to this Advisory.
There have been so many violent incidents in the past 12 months. Hurricanes, floods, the shooting in Las Vegas. And yet,
People’s lives have been saved by quick bystander action.
In particular, bystanders have jumped into action, stopping bleeding until victims could get medical help.
I want to be one of those bystanders who is able to help – and I realized I don’t know enough about stopping bleeding.
Thus, this Advisory.
Some of this Advisory may be review. But some of it may be new. For sure, some of the items below are being introduced for the first time to Emergency Plan Guide families.
Let’s start with a new item for your first aid or survival kit: a tourniquet.
From the Department of Homeland Security: “A person who is bleeding can die from blood loss within five minutes.”
Five minutes!
If someone is bleeding heavily from a wound, with blood spurting, soaking clothing or pooling on the ground, you can’t wait for the professionals to arrive.
Certainly, some of the people in the Las Vegas shooting and the Boston Marathon bombing were saved by bystanders like you and me, operating on instinct and some basic understanding. That’s what I was looking for as I began this Advisory.
Disclaimer: I am not a trained medical professional, so I read many articles and watched a number of videos about the use of tourniquets. I recommend you do the same before you think you know what to do and when to do it. BUT, having studied at least this much, it appears to me that as a possible bystander to a mass shooting or big wreck some basic knowledge is better than none!
Professionals don’t all agree about exactly how to handle severe injuries. But they seem to agree on . . .
Steps for stopping severe bleeding.
1-Be sure you and the victim are safe. If this is a terrorist or accident scene, you may have to move the victim to a protected place.
2-Figure out where the blood is coming from. Open a shirt or slit a pants leg to find the wound. Then,
3-If blood is coming from the head or torso, apply pressure to the wound to keep that blood in the body!
Having a first aid kit with large-sized pressure bandages to place on the wound would be best. (See below.) But you can use a towel, clothing or even your hands. Yes, you may be introducing germs into the wound. Better to introduce a few germs that can likely be dealt with later than to lose the patient to shock from immediate blood loss.
4-Press hard with both hands and don’t quit. Use the weight of your body on your locked arms or even your knee.
Pressure on a wound will hurt. Be strong and confident and tell your patient that help is coming and that you need to do this to save his life.
5-If blood is coming from an arm or leg, first try pressure. If pressure doesn’t work, consider a tourniquet.
We used to be taught that a tourniquet could somehow damage the limb. There still could be damage, but now we know that saving a life is better than losing a limb. A tourniquet – a simple cord or strap wrapped around the limb tightly enough to stop blood flow – can work if you know what you are doing. And to repeat, for the purposes of this article, we’re talking about a mass situation where victims outnumber medical personnel but professional medical help will soon arrive.
Again, having a professional tourniquet in your pocket or pack would be optimal. But you can make a tourniquet from a scarf, a belt, a shoelace, the strap of a purse, a bra, whatever. Simply wrap the tourniquet a couple of times around the arm or leg at least 2-3 inches above the wound (between the wound and the heart), not over a joint. Tighten the strap, then tie a partial knot, place some sort of bar onto the wrap and tie a second knot over it. Twist the bar until you feel no more pulse below the wound. Tie the bar or tape it down so the tourniquet doesn’t loosen. Don’t open to check!
If you can, use a marker to flag the fact of the tourniquet (write a “T” on the patient’s forehead), and write the time when you started its use. Give professional medical personnel a heads up to know what they are dealing with!
The Department of Homeland Security has an infographic that covers the above steps with simple diagrams. Click the picture to get the full-sized image.
Where to get a tourniquet.
See below for examples of tourniquets that are readily available as additions to your first aid kits. The two most common are called CAT — Combat Application Tourniquet and SOF® Tactical Tourniquet. The SOF TT Wide version (1.5″) seems to be preferable to the narrow (1″) version.
It is particularly important that when you get your tourniquet to open the package, unwrap everything and “prep” your tourniquet so it will be ready to use at a moment’s notice. You will not be able to get the package open if you have only one hand and/or everything is slippery with blood.
Training videos to view before you buy.
I found these two videos to be very helpful for the non-professional. Each makes it clear that you have to practice with a tourniquet to be able to apply it correctly and quickly. Professionals aim to get it on in less than 30 seconds!
https://youtu.be/pDP5Cy0nguU — Video – 17 minutes. Goes through the “prepping” process and makes clear the difference between the two different tourniquet models.
https://youtu.be/TqUI1xeMKRU — Thorough and detailed presentation by 20-year veteran. At 25 minutes the video starts coverage of a third type of tourniquet. My research suggests the first two would be better for non-professionals.
Examples of two popular types of tourniquet.
This CAT tourniquet (image below) comes in a variety of colors. As the long description says, this is for “pre-hospital hemorrhage control,” which is what we’ve been talking about. This model costs less than $20. (A number of tourniquets LOOK similar. One thing to watch for — a metal windlass instead of plastic.) The picture doesn’t tell the whole story! Be sure to watch the videos to see what the tourniquet really looks like.
I’ve shown two SOF tourniquets (below), one in orange and one in black. You’ll notice that the tourniquets are unpacked, giving you a better idea of how big and how complicated they are. I like orange because it’s a lot more visible in a backpack or kit. The SOF technology is different from that of the CAT, and this tourniquet costs about twice as much as the CAT above. Click the links for more details and exact prices.
You’ll notice we are using the plural form: kits. We’re assuming you have several kits to be sure one is immediately available no matter where you are – in the house, in the garden, at the office, in the car, on a hike or backpacking.
Commercially available kits are usually more like “starter kits.” You’ll want to add your own specific medicines and/or supplies, like sunburn cream, bug spray, and antibiotic cream.
Also, consider the items below as additions to your kits.
Pressure bandage — Israeli bandage. Get the 6” size. These bandages have multiple layers, a sterile pad that goes onto the wound, and then wrapping that acts as compression and secures itself.
Good multi-purpose knife – like the classic Swiss Army knife – that has tweezers and scissors as well as the usual knife blades, bottle openers and punch. Get several so you have one for each kit.
Flashlight or even better, headlamp. Emergencies don’t happen in the daytime; they happen in the rain or at night, too. Being able to see, and to have both hands free to cope, just makes sense. Same advice about multiples.
Survival lighter can be used to provide light, start a fire for heat and/or comfort, and to sterilize equipment. (Even the Tesla electric lighter could sterilize whatever tool you could fit between the points, like a needle or knife tip.)
Self-adherent bandages. Tape is important to have, but these bandages stretch to fit then stick to themselves, making them convenient and quick for holding dressings. Most kits won’t come with any of these – add them yourself.
And finally, as for your “regular” first aid kit items . . .
First aid kits have some sort of shelf life, like maybe 3-5 years. During that time, every tube of ointment, every packaged wipe, and every band aid is likely to degrade.
It’s easy enough to check the components of your kits, toss those that are out of date, and replace them with new. Toss items that have been opened, used and then re-closed. If you have powdered gloves in your kit, you may want to toss and replace them, too. (The FDA has banned them as of January, 2017.)
You may even want to invest in a new kit altogether, one that has room for some of your new items. But don’t delay on any of these decisions. When you need that kit, you NEED it!
Smart devices make your home more comfortable . . .
A look back to January 2018 in The Costco Connection shows “some of the smart tech you may want to invest in over the coming months.” The image above suggests 10 different smart technologies – lighting, windows, temperature, door locks, etc.
Note that I said “Costco.” This wasn’t Wired or Popular Science, which you might expect to have articles about the very latest in high-tech gadgetry. No, we’re talking mainstream — in 2018!
Moving forward to 2019, a search for the list of the top smart devices you’d want to have “right here at home” included these members of the IoT (the Internet of Things). How many of them do you have?
Smart Speaker
Security Camera
Light Bulb
Smart Thermostat
Smart Smoke/Carbon Monoxide Detector
Smart Home Hub
While their powerful features open the door to cyber threats.
Consider if all the personal information described in the next few sentences were available to casual hackers, the government, or criminals?
Smart phones – Shoot 4k video so you can play it back on your TV; recognize your fingerprint as password; track your blood alcohol level; track where you’ve driven and find your car; diagnose why it’s not starting. (Is your phone synced to your home computer so all this info is transferring?)
Smart watches – Receive text, email and tweets from friends; capture your fitness info; give you directions or track your run via GPS; lock, unlock, and start your car.
Smart homes – Respond to voice or touch commands to adjust air and water temperature, lights, locks and cameras; “learn” family habits and schedules; report on current traffic conditions along your route to work; read and adjust solar panels; start the laundry. (Are all the devices interconnected?)
Smart TVs – Connect to social media platforms; follow voice and gesture commands; display photos and videos from your phone.
Even if you don’t understand exactly where the threats lie, or will lie, you can recognize the threat.
How do these vulnerabilities come about?
A recent Advisory reviewed home and business security systems – all of which were internet connected — and in doing that research I read many, many advertisements and reviews. Not one had anything to say about security. But when I dug into broader background on the Internet of Things, I got a whole load of warnings.
Like every other product, IoT products are hurried to market to beat the competition. (Think Apple.) They don’t have time to spend on developing sophisticated layers of security that interact with every other device’s layers of security.
Device manufacturers may be as interested in selling information about you and how you use the product as in selling the product in the first place. So, the price their device ridiculously low. And they conveniently overlook certain aspects of security. (Remember the TVs that were capturing info about their viewers’ choices? And the “Talking Barbies” that stored and transmitted what the children said to their dolls? And very recently, the scandal of Amazon’s Alexa picking up on conversations in one home and sending them to another?)
Many IoT products are complex, combining software, hardware and services often provided by more than one supplier. Not infrequently, one or more of the suppliers sells out or even goes out of business somewhere along the line. A broken link in the chain is a hacker’s opportunity.
And IoT users – that is, us consumers – are not following smart security practices!
So what can we do to protect ourselves from these cyber threats?
Seven recommendations for your personal IoT devices as of May 2019.
1-Enable security features on all smart devices. Not sure if there ARE security features? If the device connects to your home network, there had better be usernames and passwords that you can change from the default! In fact, the instructions should remind you to make those changes. Remember that default usernames and password combinations are published online and thus easily available to hackers. (The book mentioned at the end of this article has a suggestion for memorable passwords that won’t be hackable!)
2-Use strong passwords. Are your children using the devices? Don’t give them an easy password so they can operate the thing. A simple password makes it easier for every hacker to break into the device!
3-Check for and reconnect or remove dead devices. Some IoT devices are treated by the family or employees as toys, and after a while they lose interest in them. These neglected devices are precisely the ones that may provide an opening for a hacker. Take a regular inventory and clean up your IoT.
4-Schedule battery replacement. Many of these devices operate using battery power. Batteries die – and when they do, you could cause a security risk. (Door lock won’t open? Fire alarm won’t go off?) Check all devices regularly until you know just how long their batteries will last, and then build a schedule for ongoing maintenance – with dates and numbers and types of batteries required.
5-Update firmware (operating systems) and apps. If you find the updates on your phone or computer to be a nuisance, imagine having an entire collection of devices with apps that need updating! But it’s through updates that holes are stopped up and vulnerabilities are fixed. Watch for updates and apply them. (Not sure exactly how you’ll be notified of updates? Find out, so you don’t miss out.)
6-Be sure updates and/or network communications are encrypted. You don’t want strangers listening in on your baby monitor, measuring your blood pressure or noting the hours when the house is empty! If your smart device sends unencrypted info across your home network and the internet, you are vulnerable.
7-Are any ports left open? Some devices – particularly hubs or routers – need open ports to allow connections to the internet. The more ports that are open, the more vulnerable you may be to hackers. By and large, your firewall software will allow or block connections based on the profile you’ve set up. If you haven’t set up firewall software, do it. (If you aren’t sure how to find out about the status of your ports, you can get additional software to check on them.)
A next step for non-tekkies.
If you’re interested in getting a lot more familiar with IoT and IoT Security, plan on either spending a lot more time online or spending some money on one or more of the books available via Amazon or other book stores. Most of these books seem to be directed to IT professionals and have professional prices.
But here’s a fantastic book written by an expert, for ordinary internet users, in a clever and captivating way. In fact, I just finished reading it myself and HAD to put it up here!
As a writer myself, I appreciate a story — hard to manage, sometimes, when the topic is technology. Author Alan Pearce puts you right in Sherlock Holmes’ living room in telling this story of”cyber threats right here at home” to his friend Dr. Watson.
Sherlock Holmes goes into the IoT and then takes Watson on a journey into the dark web. If you read this book you won’t become an instant cyber-security expert, but you will be a lot more savvy – and a lot more wary!
Virginia Your Emergency Plan Guide Team
P.S. This is the kind of information that everyone should be aware of. Please forward this Advisory to friends and family and share with your neighborhood group. If just a few people take a few actions they will be safer than they were before.
Have you seen the ads showing a package thief caught in the act? Or the ad that shows the “escaping teenager” on the roof, caught because she set off an alarm when she opened her window? All these ads are designed to make you realize you need a security system! But while the ads are compelling, they really don’t tell the whole story behind the available technology.
In fact, they don’t make it at all clear where a simple self-contained security camera leaves off and where a comprehensive monitored security system begins.
If you’re a new business owner, or someone newly concerned about security and safety, take a look at the questions and answers below. They’ll help you come up with a shopping list customized for your personal needs.
Disclaimer: security equipment and commercial security “packages” change regularly, so as you shop, be sure you are comparing current offers. This year, many of these items are being featured as special deals, so watch for them!
Questions to ask about security
The first version of this article appeared in Emergency Plan Guide nearly four years ago. In the time since, some things have changed dramatically! The “classic” security camera set up shown in the image below – camera connected to DVR connected to monitor — still exists, of course. But in many cases, wires have been replaced by wireless connections. And now you can get the images sent right to your cell phone or tablet in addition to your computer monitor.
That’s not all that has changed. As you review the following questions, consider what you really need for your location and your circumstances. As you might expect, the more features you want, the more expensive the system.
“Do I want wired or wireless?”
Wires are reliable as long as they aren’t damaged or cut. In fact, they may be more reliable than wireless, which can suffer in extreme weather or because of electronic interference.
And of course, wireless systems can be hacked! (None of the most popular wireless systems has been shown to have flaws, but all can be hacked by a determined pro. Most likely, people wanting to break into your home aren’t hackers — they are thieves! They’ll look for the easiest targets. Make sure you follow all best cyber practices — changing defaults, using unique passwords, updating everything whenever there’s an update. Your system will be too hard to break for that average thief.)
So, whether you choose a wired system or a wireless may depend, then, on your location or your security level requirements. Think it through. Oh, and if components are wireless, they still need to be powered, so you’ll have to consider when and how to replace batteries or install back-up batteries.
“Should I manage the system myself, or have it professionally monitored?”
Basic systems are set up to alert you by phone of activity or of a breach. Activity could be as simple as someone approaching the front door. You could, of course, miss the alert if your phone isn’t operating or isn’t nearby.
A monitored system reacts to a broader set of activities, and when it detects a breach, it reaches out to alert the monitoring company, which then alerts you and/or others, including perhaps police or fire.
Whereas a basic system is pretty much one purchase and a DIY install, a monitored system could involve service personnel to guide you through the installation. Once the threat of COVID is gone, they may actually do the installation for you. This may include installing a number of connectors, monitors and cameras and tying the system in to your home for business computer network. Naturally, you might have to pay for that personal installation service.
You will have to pay for monthly monitoring, as well. Some services wrap the cost of the equipment into the cost of monitoring. Others charge for the equipment up front, so their monitoring fees are much lower.
Costs vary widely. Equipment costs for a home system start as low as $100 for a single camera but are more likely to be twice or three times that much. (Even a simple business location will likely be more expensive in part because there are more rooms and more spaces to monitor.) Monthly monitoring costs may add as little as $10/month but most monitoring companies fees seem to be in the $39 –$59/month range for home services. Some companies even offer “advanced” monitoring that connects directly to police and first responders, saves your video, etc. (Watch for “sign-up specials” you can take advantage of!) Some companies require a contract; others don’t.
“Do I need indoor or outdoor security?”
Outdoor “barrel” or “bullet” security cameras (as shown in the illustration above) have a hood that protects them from the weather. “Dome” style cameras, with a curved face, are most popular indoors, and can also be weatherproof for outdoor use. (They have an advantage in that you can’t tell which direction the camera is pointing. You’ll often see them in casinos or in other public places.)
The latest models of doorbell security cameras are smaller, best described as a simple box with a small camera lens – not too dissimilar to the camera in your smart phone.
A complete system may have a variety of camera types. The main thing to remember: while an outdoor camera can be used indoors, the reverse is not necessarily true.
“Do I want an alarm only, or do I want to see video?”
The simplest video systems run continuously, without interruption. If something happens, it is caught on the tape. (You’ve surely seen videos showing convenience store robberies, or scenes from street cameras.) When the tape is filled up, it is stored for a given period of time and then written over.
A continuous video creates hours’ worth of images that are difficult to search through if you need footage for insurance or crime purposes.
So, you probably want a motion-activated system for your home or business, something that you can set to complement known traffic patterns. Movement or a change in condition (window being opened, for example) sets off an alarm that can go to your smart phone or computer, or, as already described, to a monitoring service. Movement can also start a camera that takes still photos or video that you can view on a computer screen in your office or send to your smart phone.
“What quality picture can I expect?”
The question really is, how much detail do you actually need? Do you need to be able to recognize faces on a 6 x 12 foot front porch? Or read license plates 30 yards away in the company parking lot? Think about how far away the object will be and the horizontal distance you want to cover.
The more detail you want, the higher the price of the equipment you’ll need. In many cases, however, you do NOT necessarily need the highest quality.
Having cameras with varifocal lenses will allow you to set the same camera for different uses. Some versions are P/T/Z – can be panned, tilted and zoomed remotely, for utmost flexibility.
“What about nighttime views?”
Most cameras have the infrared night vision built in, and automatically switch from day to night mode. Some cameras are paired with separate, motion-activated spotlights to provide the amount of light necessary for filming.
“Do I hear and can I speak to the person being filmed?”
The porch camera ads on TV show the homeowner telling the intruder to get lost. (Or you hear a friendly dad’s voice acknowledging the arrival of the kids.) Being able to hear and speak to the person who has activated the alarm are again additional features. They will cost more and require more bandwidth in the system.
LEGAL CAUTION: The above paragraph describes SPEAKING to another person via your security system. RECORDING a person without his or her knowledge is a whole different thing! In fact, Federal Wiretap Laws specifically prohibit recording unless at least one person in the conversation knows recording is taking place. (In California where we live, both parties must be aware of the taping.) So before you invest in a camera with audio recording capabilities, make sure you know the law in your state. You probably don’t want this capability!
OK, so much for the basic choices. Now . . .
“What additional features might I want?”
Some monitored home security systems offer more than just the surveillance and intrusion features we’ve discussed so far. Options could include:
Panic buttons – Press to call for help if you are threatened in your home. Silent alert goes to monitoring service and to police.
Life support systems – Press to call for medical help. This is the so-called “life alert.”
Fire and CO alarms — These can be added to the system to alert residents and also the monitoring company in an emergency of this type.
And the final important question . . .
“What kind of customer support will I get – and what will it cost?”
Are you buying from a third-party distributor or the manufacturer? The amount or quality of support will vary dramatically. Before you buy, make sure you will have access to full documentation, at least, and check on the terms of the guarantee.
If you decide on a monitored service, you’ll want to know even more details before you sign on the dotted line. For example . . .
Will the company set an appointment and come to my home/office to do the installation, or am I responsible for installing the equipment?
Do I pay extra if they do the installation and set up?
Must I buy all the equipment from the monitoring company? What if I already have some cameras I want to use?
How do I get repairs if the equipment stops working?
What sort of contract is required? (How many months?)
Is there a fee to discontinue the service?
So now, if you’re ready to shop . . .!
Three examples of basic security camera systems
I picked these three best-selling models because they had consistently good reviews while demonstrating the variety of features discussed above. As you can see, prices vary. Click on the images or links for full details and to get exact prices at Amazon.
Reolink, A straightforward yet complete wired set-up with extra high-quality camera and continuous video. Note that when you get to Amazon to shop, you will find a number of “packages” containing this basic component.
Simplisafe – popular wireless home security system that “understands” Alexa and Google Assistant. No contract required (although professional monitoring is available). (I have to admit that I can’t resist the Simplisafe ad where Robbert says “Entrez vous!” to the pizza delivery guy.) Again, many individual components and different packages.
Ring Doorbell Pro uses existing doorbell wiring. Ring continues to get a lot of chatter on our local neighborhood Nextdoor website. People seem very pleased with their improved security. And prices have come down since we last looked. Remember that this is truly a doorbell, and not a whole house system.
Here’s the basic Pro version to get you started on your shopping.
Lists work. They’re easy to figure out, satisfying to check off. Here’s one to get us all going toward some new levels of preparedness for 2018.
Review or reminder?
For a few people, this will be review. But for most of us, at least one of these items will cause a grimace or even a slap of the forehead because we know we should already have dealt with it!
There are more ideas and resources below the chart. But take a quick first look.
Which item should be first on your list?
More resources for items on the list.
Homeowners’ insurance may not cover water damage to the stuff in your basement. Neither may flood insurance! If you rent, what about the items stored in your “cage” in the parking garage? You will never really know what’s covered until you pull out your policy and go over it with your insurance agent. Here’s an Advisory that will give you more questions to ask about any insurance: Flood Damage Not Covered By Insurance
What was a good place to head for last year may have changed. Update your plans, particularly if you have children. Pick an assembly place nearby – like the big oak tree at the back of the lot – and another place further down the block or even across town. Can your family members FIND these places without the maps in their phones? Get Out Now — Family Evacuation Plan
Every homemaker knows this, and knows how to do it. In a survival kit, just pull and replace everything! (You may discover that more and more canned items now are self-opening. Yay!) On the kitchen shelves, load at the back, eat from the front. Basta.
I finally got far enough ahead on my blood pressure pills to have 10 days’ worth stored in my survival kit. But they’ve been there a while . . . And as we all know, over time pills lose their effectiveness, band aids lose their stick, bottles dry out, tubes ooze. Your first aid kit could actually do you harm if it’s not up to speed. First Aid Kit Failure
Seems as though it would be easy to run outside in a fire, doesn’t it? But people are trapped and burned every day. Practice with your family! Make sure you know two exits from every room, how to get down from the second floor. What’s your agreed-upon signal for a home invasion threat? Every individual needs to know how to respond. If all your children know is to come screaming for you, you have NOT trained them properly. Escape from Burning House
People around you could turn into rescuers – and even into friends. It can’t hurt to be open to meeting more of them. Besides, it’s just a neighborly thing to do. And if you have a neighborhood emergency response team, invite them to come and find out more. Build a neighborhood team
Memorize important phone numbers. Assume phones won’t be available in a car wreck, a storm, or an earthquake. Memorizing is healthy brain activity, too!
Computer companies compete to be your back-up service. But where do they PUT your files, and how to you access them if your computer has been destroyed? Have at least 3 back-up methods: onto your own computer, onto a separate physical hard drive stored off-site, and into the cloud. Test whatever procedure you have put into place. Just having a COPY of something doesn’t mean you can necessarily start right back up to work.
Did you know that if one roommate applies for relief from FEMA, the other roommate may not be eligible? Do you know who would have to sign off for you to get an insurance payout on your house? We all tend to let legal questions linger . . . 2018 is the year to clean legal issues up for a number of reasons, not least of all to get them off your mind. Legal problems surface after flood
Emergency preparedness isn’t supposed to be all long faces and determined expressions. It’s supposed to be positive! What would be fun for you and your family? Learning to tie knots? Identify edible plants? Start a fire without matches? Operate a HAM radio? Take a course in basic self-defense? Do the CERT training? Every one of these skills will improve your knowledge, improve your confidence, and make you better prepared for any emergency! Tie the right knot! Ham radio operators play key role Self-defense for the rest of us
OK, I think that should do it! Post this list somewhere handy, so you won’t overlook these items. What else should we add to the list? Just let us know in the comments!
Virginia
Your Emergency Plan GuideTeam
P.S. While we’re still on the positive aspects of preparedness, don’t miss my most recent Top Ten list! It’s a collection of comfy camping items that would make ANY trip so much more pleasant — and fun! Here’s the direct link: https://emergencyplanguide.org/top-ten/
What 2018 is looking like for Emergency Plan Guide
The Emergency Plan Guide website has been up since 2011. Its main objective has stayed the same since those first days: to help people understand disaster realities and be better prepared to face them.
Three realities continue to sustain the site.
(If you’ve been with us for a while, this will be mighty familiar!)
Emergency Preparedness isn’t top of mind for anybody. When asked, people say they want to be ready – they just don’t think about it on any regular basis. That’s why we came up with the idea of weekly Advisories, filled with tips and reminders. Since 2011 we’ve written hundreds, covering dozens of different topics. (Right now I count 297 in the list of Archives. A number of older Advisories have been retired, and several are being reworked.) People keep subscribing, so the Advisories will keep on coming!
Family preparedness is one thing, workplace preparedness is another. You’ll see that we address both on a regular basis. We also address a third aspect of preparedness that very few other websites even mention – the importance of community and the value of working together as a group to prevent or make it through a disaster. Much of this planning is based on CERT (Community Emergency Response Team) training.
Authorities do their best, but . . . Police and fire departments, local and federal government and non-profit agencies may not arrive for hours, days or even weeks after a disaster hits. We hear about new instances of delay, and we use them to keep reminding our readers that no one is coming to save them – it’s up to us.
OK, that’s three of the core beliefs that drive us. What drives YOU to work on being prepared? What threats are keeping you up at night? Keep reading, please.
Seven trends will be guiding our plans for 2018.
Some of these trends have been around for a while, but have pushed themselves to the top of the heap, demanding more attention.
Technology changes faster and faster. Five years ago we might have written about how to use a compass and a map; today we write about personal locator devices (GPS) that will direct rescuers right to you! Smart phones have become THE primary tool in every survival situation; in the past several months solar rechargers have supplanted batteries as the best way to keep devices functioning. At the same time, more technology also means more security risks. Watch for an upcoming series on hacking threats to your home from the internet.
There’s a new normal for natural disasters. In Texas, three 500-year floods occurred in the last three years! In California, three years of historic drought have been followed by the “most destructive wildfire season ever.” Some areas in the world – like Florida – are “hot spots” where sea level rise is 6 times faster than average. Add “normal” emergencies to these locations and it becomes a nightmare. Shelter in place doesn’t work well for these disasters, so watch for more info on how to prepare for evacuation.
Deliberate cutbacks threaten (FEMA). Proposed budgets, not yet passed, aim at cutting federal emergency funding by nearly $1 billion! Local budgets are cutting police and fire department funding. This leaves citizens on their own more than ever before. We have three books on the drawing boards to strengthen citizen response; the first one should be coming out before the end of this year.
Terrorist threats and hate crimes continue. ISIS may have lost its caliphate, but U.S. home-grown terrorists are alive and well. And hate crimes have risen in the U.S. for the second straight year. I guess we can’t change people’s minds about religion or ethnicity – but we can talk about how to spot a potential crime and what to do when you do. And we will keep talking about steps communities can take to increase safety. (Did you know that after the shooting at Sandy Hook, Connecticut passed new requirements and made money available to improve school safety, but barely 25% of schools are reporting that they have even held fire drills, much less hardened facilities or practiced lockdown drills!?)
Risk of nuclear war reemerges after 3 decades. Almost impossible to contemplate. As older Americans, we remember the drills of the 50s. Watch for more as we struggle to consider the realities of this threat.
Most people cannot retreat to the wilds and live off the land. The last census in 2010 showed 80% of the U.S. population living in “urban areas.” Here in California, that percentage was 95%! Today those urban percentages are only higher. What this means is rural lifestyle, which fosters self-sufficiency and encourages learning and practicing wilderness survival skills, is simply not available to most of us. Yes, we can enjoy learning more of these skills, but a plan to “bug out” to the wilderness is unrealistic. We will address more urban survival skills.
We all face more distractions. Driving, devices, politics, health, family — it’s hard to be clear about objectives, much less to follow through. People are also reading less and less — the average American spends only 19 minutes a day reading! These facts have led us to turn more Advisories into quick read worksheets and skimmable checklists – and almost always, a Call to Action! (Nothing like having a background in direct marketing and advertising.)
Now, when it comes to emergency preparedness, what’s on YOUR mind?
When you sign up to receive our weekly Advisories, I get the chance to see the town your message is coming from. But that’s all I know about you!
Occasionally, people write in with a comment or question, and then we are able to begin a real conversation. (I like that a lot!)
After all, I’m researching and sharing information that I trust will be useful. If it’s not – well, it’s a waste of your time and mine.
So . . .here’s that Call to Action.
Can you please take a moment and send me a quick message with some trends or some topics YOU would like to discuss? I can promise I’ll respond! (I’ll keep your name private, of course.)
I just heard the local newscaster say, “ . . . as many as 260,000 will be without power.”
That should give you the clue as to where we are. There are 7 wildfires burning here in California, with all but one at 0% containment. And that one is only 5% contained.
I hope by the time you read this, those numbers will have changed.
Last week we talked about severe winter weather and the dangers the cold it can bring. This week, it’s heat.
Whether from heat or snow, winds or flooding, overburdened electric cables, transformers, and other electrical equipment can fail.
This year will explode the power outage statistics, given the hurricanes in Texas, Florida, Puerto Rico and the US Virgin Islands that left hundreds of thousands without power.
Will you be next?
Up until this year, the average American could have expected at least one power outage a year, and it would have averaged 200 minutes. Unfortunately, given the way things are going, you may need to expect a whole lot more minutes of outage. And maybe even days.
The good news? We assume you have a sensible approach to outages and are preparing for them.
Ready.gov offers these basic suggestions for coping with power outage.
Have flashlight, batteries, cash and first aid supplies. No candles.
Have alternative charging methods for your phone or any device that requires power.
Know how to open your garage door when power is off.
Keep your car full of gas. Gas pumps require electricity.
This should all sound familiar, but . . .
Let’s take a closer look at a couple of these.
It goes without saying that you should have flashlights in every kit and in every room!
Emergency temporary lighting options
About 6 weeks ago, just after Hurricane Harvey hit, we revisited the topic of emergency lights and lanterns. If you haven’t seen that Advisory, or can’t remember the details, it goes into some detail about different types of flashlights, batteries, what a difference lumens make, the value of adjustable focus, etc.
You may want to take another quick look at that lantern Advisory and see if you need to replenish or add to your emergency supplies. While you’re at it, add Inflatable solar powered lamps to the options.
Shown at left, these are affordable at about $10 each, and are water and snow resistant, small, lightweight, perfect for emergencies or for any evening activity or party. Click on the image to get current pricing.
Alternative charging methods for devices
The technology that allows you to charge or recharge your various devices just keeps changing!
Not long ago we spent time examining the so-called “power banks” that store enough power to recharge your devices several times. They range from what are termed “lipstick size” (1-2 charges) to considerably larger. Here’s that original Advisory that covers batteries and chargers.
As you might expect, the more charging capacity you ask for, the larger the banks are and the more they cost. The one shown here, for example, is about the size of a wallet, has two USB ports for charging devices, and actually will charge your phone as many as 6 times. Click on the image for full details on this power bank.
Charging methods for bigger stuff
If you’ve ever been faced with a car that won’t start, you’ll be interested in this!
I seem to attract cars whose batteries just can’t keep up . . . so we have added one more piece of emergency equipment to what’s stored in the trunk.
12 V Car Jump Starter
After years of backing a second car up to mine, fighting with jumper cables, etc., I was happy to get a portable battery charger. You can see it in the photo, labeled “old.”
This week, though, I was even more thrilled to get my hands on the portable power pack labeled “new.”
It pops right into the trunk (or into the glove compartment) since it’s not much bigger than Joe’s cell phone (shown) and can provide enough power for 20 jump starts!
The charger also powers phones, tablets, etc, and has a built-in S.O.S. LED light.
Lots of safety features, too, to prevent over-charging, over-heating, etc. And a row of blue lights indicates just how much charge you have left.
Below is a similar model, same size, same price, better picture!, from Amazon. It comes complete with clamps, plugs and cords plus carrying case.
The model shown here has 600 Amps, suitable for jump starting cars or smaller diesel engines, ATVs, boats, etc. If you have bigger engines, look for a more robust device. The more energy you need, the bigger the item and, of course, the more expensive.
Still, for somewhere around $60 you can get a LOT OF SECURITY for yourself or family members! (Small enough to stuff in a stocking, too.) Click on the image for exact pricing.
Energy to keep equipment running
We’ve heard over and over again the challenges Puerto Rico has in keeping hospitals running for weeks using generators designed for short-term usage. Their maintenance people must be very skilled!
For most of us, a generator is purely a back-up device to carry us through a temporary power outage.
Precisely because it’s not used regularly, a generator requires extra attention as to placement and usage. Some quick safety reminders:
Generators can produce carbon monoxide, so they need to be placed OUTSIDE where there is plenty of air circulation.
Keep your generator dry.
Store the right fuel for your generator in a safe, secure place where it doesn’t become a fire hazard.
A portable generator typically can run one or two pieces of equipment. Plug them directly into the generator. Do NOT plug the generator into the home electrical system!
Size your generator to meet high start-up electrical requirements as well as requirements for running the equipment. (“Starting watts” vs “running watts”)
I’ve written before about the generators we bought for our neighborhood emergency response group. You may find those stories informational. Here’s a link to one of them.
A generator like the one shown below is a typical, mid-range household emergency generator. This type of generator is rated at between 500 and 15,000 watts. This one (at 7,500 watts, about $1,000) is shown with wheels, but be aware that it is not exactly portable because it weighs over 200 pounds!
This generator has an electric starter and runs on gas or propane. In the yellow triangular space on the front you can see that it has several outlets, both 120 and 240 volts, all protected from power surges. The manufacturer also offers a number of guarantees.
Click the image for full details and to use this model as a start for shopping. (You’ll see that a lot of people buy a cover and extra heavy-duty cords along with the generator itself.)
Whole-house standby generators
Did you notice the sentence hidden above that says a is designed to power “just one or two pieces of equipment.”?
If that’s not enough for you (!), you’ll want to consider a standby generator. This is a different level of equipment, permanently installed and sized to turn on automatically when the power fails. Standby generators generate anywhere from 5,000 to 150,000 watts. To find the right sized generator, you’ll need to examine exactly what you want to power in the way of essential equipment (A/C, heater, sump pump, etc.), appliances (stove, microwave, dishwasher, dryer, etc.) and extras (computers, hot tub, security, etc.).
Prices on standby generators start as low as $2,000, but realistic prices probably start around $5,000.
Get help from a qualified electrician to establish the size you need and to be sure it gets properly installed.
Whew. That’s a fair amount of info about emergency lighting and power. But I can assure you, when an extended outage hits, you’ll be pleased to have some back-up capability.
You can be SURE that after the power outage hits, none of these items will be available in stores — either they’ll be sold out, or the stores too will be closed because they have no power!
How To Protect Your Home–And Your Family–In An Emergency
Intro to this week’s Advisory – From time to time, readers contact me to offer a suggestion, a correction or, happily, a Guest Advisory! This week is an example. It was written by Oliver Lambert, co-creator of DisasterSafety. As its name suggests, his site focuses on safety resources including but not limited to hurricane, flooding, wildfire, blizzard, earthquake, and tornado. His mission is to provide the most updated and accurate info on how to stay safe before, during and after these disasters. For those of us who like to-do lists, this article has what you need for several of them! And if you want even more info, follow the links included. Thanks, Oliver!
Winter can be a fun time for many families, especially on snow days; sledding, building snowmen, and drinking hot chocolate are some of the best parts of cold weather.
However, winter storms can cause hundreds or even thousands of dollars’ worth of damage and can leave your home–and your family–exposed to the elements. Even if there’s no damage, there may still be power outages and other issues that can lead to emergency situations.
Fortunately, there are some simple ways to prepare for a major winter storm, and it’s important to do so as soon as the weather turns cold. In many parts of the country, fall and winter are unpredictable seasons, meaning the snow could fly at any time.
Being prepared means having the right tools to deal with Mother Nature plus a plan for your family’s safety.
Read on for some of the best ways to get started.
Winter Prep your home
It’s a good idea to walk from room to room inside your home and look for ways you can prep them for winter weather. This means reversing the direction your ceiling fans turn in so they’ll push down the warm air that collects near the ceiling; having your fireplace and chimney checked and cleaned; laying aside enough firewood to get you through the season; checking and replacing furnace filters and making sure the unit is in good working order; installing a carbon monoxide detector or replacing the batteries in the one you have; and protecting your pipes from freezing. For some tips from professional property managers on how to help your pipes stay warm even in freezing weather, read on here.
Think emergency
It’s important to think about how you’ll handle an emergency. If the power goes out, or if you get stuck inside your home due to heavy snowfall, what will you need to get through several days?
Backup generators, kerosene heaters or wood burning stoves (CO warning!), flashlights, extra batteries, a small radio, blankets, a reserve of food along with any cooking tools you’ll need, medication, and anything your pets may need is a good start.
Make a list and ensure you have everything you need to get yourself and your family through an emergency.
For tips on how to handle heating when the power is out, check out this article from the Red Cross.
Stock up on tools
Bad weather in winter means you’ll likely have to do some shoveling, so stock up on salt and make sure you have the right tools, including sturdy gloves that will protect your fingers from the cold and a shovel that’s in good shape. (The Red Cross article mentioned above reminds you not to overexert yourself in cold weather, too!)
Remember to have a camera handy for when the storm is over so you can photograph any damage for the insurance company. This includes damage to your roof, windows, deck, and gutters. If possible, take “before” photos of these areas in the fall, before the first snow. For more tips on how to handle any storm damage, check out this article from the real estate professionals at Redfin.com.
Get your car ready
Winterizing your car will take some collaboration between you and a mechanic, who can check fluids, tires, and windshield wipers and make sure everything is ready for the cold.
What you can do is stock the car with a jug of water, blankets (foil emergency blankets are compact and inexpensive), flares, a spare tire and set of tools, a flashlight, and a bag filled with snacks such as granola bars in case you get stranded for a little while.
Look outside
The exterior of your home is just as important as the interior when it comes to a winter storm. Branches that are dead or hang close to your house should be trimmed so they don’t become weighed down with ice, and the gutters should be cleaned so icicles don’t form and clog them up. Clear walkways and make sure you have plenty of salt or brine on hand to keep them from becoming slippery hazards.
Remember that each family member should be aware of your plans for winter weather; talk about what you’ll do in case of an emergency and where everyone should meet in case you get split up. Keeping communication open will ensure that everyone stays safe.
Thanks for reading, for making your own check-lists, and being ready for winter. Here in Southern California we continue to have historic high temperatures — 91 degrees on Thanksgiving Day! — and NOAA (National Oceanic and Atmospheric Administration) says that two-thirds of the continental US will likely experience warmer-than-normal conditions this winter season. So, things may not be quite as bad as they could be!
But no matter the long-range outlook, a cold snap or two will surely happen. Be ready.
Real preparedness extends beyond the walls of our homes.
We spend a lot of time at Emergency Plan Guide examining the best supplies to lay in, and how to select the right emergency tools. Last week we reviewed in detail individual or family survival kits, and everything that needs to go into the best ones.
Yes, focusing closely on our immediate needs is a good idea.
But from time to time we need take a wider look around. Joe and I often do this at our monthly team meetings.
This week’s Advisory could become a great topic for YOUR next meeting. At the very least, it will broaden your personal horizons!
Here are 7 news headlines to inspire NEUE IDEEN! (That’s German for “New Ideas!”)
For each headline, I’ve added a brief comment and then posed questions for you or your group to follow up with.
You know our favorite saying: “The more we all know, the safer we all will be.” Well, I hope these questions inspire a new level of knowledge – and safety!
1-“Fayetteville NC works on downtown evacuation plan in case of emergency on train tracks.”
It turns out Fayetteville has train tracks running right through the town. And the city doesn’t know exactly what those trains may be carrying. Since they have experienced more than one terrible train wreck, it seems to make sense to prepare for the next.
Questions: Do you have nearby train tracks? Do you know what’s being carried on them, and at what time of day? Perhaps more pertinent, do your city’s First Responders know this information? Find out! (Hint. It may be impossible . . . but whatever you can do will move the ball forward for your community.)
2-“Everett WA Graduates First Ever All Spanish Speaking Only CERT Class In Washington”
When the disaster hits, everyone will be pretty much in the same boat. Think of how much safer you’ll feel – and how much safer you’ll BE – when neighbors pitch in as a coordinated team!
Questions: Does your city put on CERT classes in another language? If not, what language/s should they consider? How could you or your group make that happen? (Think about reaching out to work sites, churches, private schools.)
3-“Florida’s 3,200 assisted living facilities and 640 nursing homes were ordered, by this week, to submit emergency plans that include enough generator power to run air conditioning . . .”
You surely heard about the 14 people who died in Florida during the aftermath of Irma. You may not have heard that nearly 2,000 facilities in FL haven’t yet complied with the order.
Questions: Do you have elderly relatives? Any in nursing facilities? What is that facility’s requirement for an emergency plan? What are your city’s requirements when it comes to emergency and/or evacuation plans for facilities of this sort? Can you bring pressure to bear if it appears to be necessary?
4-“The Hawai’i Emergency Management Agency will begin testing its Attack Warning Signal or ‘Wailing Tone’ next month as they continue preparedness for attack from North Korea..”
Whether you live on the West Coast, the East Coast or in the middle of the country, a nuclear disaster is a frightening thought. It doesn’t have to be the result of war; it could just as well be the result of a natural disaster or even an accident at an aged facility.
Questions: Are there nuclear power plants anywhere near you? How old are they and what kind of maintenance do they receive and/or report on? What sort of warning signals do they have? (Have you ever heard one?) What’s the evacuation procedure for your home, your town? (Important: Sometimes the evacuation zones of plants overlap, which could make one or both of the individual plans inadequate.)
5-“Amid wildfire risk in Bay Area, UC Berkeley’s emergency management office to lose 50 percent of its staff… “
This isn’t the only headline I’ve come across on the topic of staffing. Communities and their budgets change, often without much warning. If emergency management funds are cut, the quality of response to emergencies will decline.
Questions: Does your city have an Office of Emergency Management? An Emergency Operations Plan? Who heads up the department right now? What are the leader’s qualifications? What does the future for the department look like? What role can your local neighborhood group play in community preparedness? (Maybe you can get that department leader to be a guest speaker at one of your local meetings?)
Ask these same questions about the place where you work!
6-“JOHNSON COUNTY, ARKANSAS — The owners of C&H Hog Farms and the international corporation that supplies the operation’s swine are planning to apply for a permit to operate another farm, this one in a flood-prone area just south of Hartman.”
We heard just a couple of months ago about how unrestricted development added to the flooding tragedy in Houston. We all remember from 2014 the massive landslide that swept away an entire town in Washington – a town built below a hillside with a well-known history of slides.
Questions: What’s the status of your home and your community with regard to flood plains and/or past flooding? Has it been the victim of wildfires? What about hurricanes and/or tornados?
A developer, real estate agent and/or insurance agent may not be eager to share the history of the locale. In fact, they may not know it!
As a homeowner, you need to know this information. As a member of the wider community, you want everyone to know and be prepared to the extent possible. What plans does the city have for growth and new development? You CAN find out . . . and maybe keep ill-advised development from taking place.
7-PROVIDENCE, R.I. (AP) — State health officials are encouraging people with special health care needs to enroll in an emergency registry.
In a widespread emergency, people with special needs will be most vulnerable. But they’ll not get the help they need if people don’t know they need it! Some sort of registry, like the one mentioned above, may help direct resources.
Questions: Does your state or local community have a registry for people with special health needs? How do you sign up? How is the registry maintained? How is it updated? Note: People with special needs could be a target for unscrupulous or even criminal behavior, so privacy and security for any registry are paramount.
How to use these headlines.
OK, so while you’re digesting this spread of preparedness morsels, I hope you will have taken note of several questions that you want to answer for your personal benefit.
You can expect that getting those answers will take some time.
But as we have discussed many times, being prepared is a continual state of mind built on awareness, knowledge, and confidence.
I think pursuing news headlines like these can help on all fronts!
Virginia
Your Emergency Plan GuideTeam
P.S. Use these headlines at your next group meeting, or ask people to bring in their own news item on emergency preparedness. Pick a few to discuss. Come up with questions like those above and, if appropriate, turn getting answers into a group project. (In our neighborhood team, we almost always have one small group or another pursuing one idea or another!)
No matter where you live, you could experience a WATER EMERGENCY any day of the week. Why, in just the last couple of weeks, for example . . .
Boil water alerts have happened in Richmond, KY, in Detroit, MI and in Cocoa, FL. Where I live in Southern California, water main breaks took place in Reseda, Gardena and right on Wilshire Blvd in Los Angeles.
These are not your extraordinary natural disasters.
We have all been sensitized to the need for clean water in a wide-spread emergency. We watched as the people of Beaumont, TX struggled without their water system for 10 days after it was flooded. And we are still watching the people in Puerto Rico for whom water of any quality is nearly impossible to get.
We understand what happened in these places, devastated by historic floods and storms.
Today we are taking a look at local problems.
Rather than a huge catastrophe, it’s more likely that we’ll need to be ready for a localized water problem.
Most of these local problems stem from two things:
A water main break, a repair, or regular maintenance that shuts the system down
An electrical power outage to a water plant or facility
Whenever the water pressure in the system drops, no matter from whatever cause, the water can be contaminated – mostly with dirt and/or bacteria.
What are the signs of danger?
You don’t need to wait for an official news announcement. Sometimes, accidents happen and you will know before the authorities do.
= Your water pressure drops suddenly.
If you notice an unannounced and dramatic drop in water pressure, we recommend you instantly turn off your water to protect the water already in your home’s system. You can always turn it on again later.
= Your water turns murky.
You may see unusual foreign matter in your water. That murkiness is called “turbidity.” Don’t drink this water – and start thinking about a way to filter it to remove the junk. (More below . . .)
= Your water contains bacteria, parasites, etc.
Unfortunately, your water could contain all kinds of dangerous microorganisms and still look clear and clean. (My son came down with giardia when he got water in his mouth from a high mountain stream. He wasn’t even drinking it – but the resulting diarrhea put him into the hospital for 6 days!)
When water comes through a properly-operating system, these contaminants are removed. If the system fails, so does any guarantee of cleanliness.
That’s when you could get a Boil Water Alert.
If there’s a possibility that your water system has failed or your supply is contaminated, you could get a Boil Water Alert. Officially announced or not, you have several options.
Option One. Switch immediately to bottled/stored water that you know is clean. Use it for drinking, cooking, and washing. This is an emergency; that’s why you have emergency supplies! (If you haven’t put together supplies in advance, and you have to head to the store to buy them, you may be shocked to discover high prices, or worse, empty shelves.)
Option Two. Boil your drinking wateruntil you know your water is safe. Bring water to a rolling boil, boil for one minute, then let cool down. Use this boiled water for drinking, brushing your teeth, preparing food, etc. Do NOT use your dishwasher, ice that was recently made, etc.
Option Three. Disinfect your water if you can’t boil it. One alternative is to add 1/8 teaspoon of regular, unscented household chlorine bleach to a gallon of water. Mix and let stand for 30 minutes before you use it. If you need to, strain cloudy water through a cloth or filter paper before you disinfect it.
You can also disinfect water with water purification tablets. Easy to carry and manage, they are designed to be used in bottles and canteens; just make sure they dissolve completely! (Keep reading for more on water purification.)
How long will you need to boil, disinfect, etc.?
The methods listed above will work well for a day-long water outage, or a week-end camping trip. However, depending on them for days or even weeks at a time will be trying, at best.
If you receive a Boil Water Alert, you can assume it will last for at least 3 days. It takes 48 hours for water quality test results to come back!
If the emergency is much bigger or more serious, you need to have plans for the long term. As you know, it’s recommended that you plan for a gallon of water a day for each person in your family. A family of four, for 3 days, needs 12 gallons. If the emergency lasts 10 days (which is what I think you should plan for), you’ll need 40 gallons. That is a lot!
Now, first off, I would assess my water supplies. Some of your water supplies may be of better quality than others. I’d plan to use “pure” water for drinking and cooking, but would consider using a lesser quality water – like from the rain barrel — for washing my feet. (Obviously, water that you know is contaminated with toxins or dangerous chemicals should not be used at all.)
Maybe your family of 4 doesn’t really need 40 gallons of pure drinkable water. But it still needs that much total water.
How to manage your need for gallons and gallons of water?
Here are a number of suggestions for sources of emergency water. I hope these are all familiar to you! But the question is, have you taken action to be sure they are available for your family right now????
Purchase and store bottled water.
You will be tempted to rinse plastic bottles that you’ve emptied of juice, milk, or whatever, and use them to store water.
Don’t.
You will find it nearly impossible to get these containers clean – and thus, the water you store in them will be suspect. Other options may cost more, but you won’t have to worry about ADDING to the emergency with tainted water!
One-time use plastic bottles of water are cheap, readily available, and easy to move, stash around the house, etc. You can keep regular cheap bottles for 6 months; after that, replace with new ones. (Reusing a plastic water bottle isn’t recommended. The cap collects bacteria from your mouth . . .) Square plastic bottles may be a bit sturdier, and are a lot easier to pack/stack.
A 24-bottle case of bottled water is about 3.2 gallons and weighs about 30 pounds. In my neighborhood I can find them on sale for less than $5. A dozen cases would just about meet your 4-person family needs.
Don’t stack these plastic-wrapped cases too high, because they will collapse and break.
Note: Half gallons of water a lot more convenient and efficient, if you can get them.
P.S. If you click on THIS image, you’ll go nowhere. I think you’ll do better to shop locally and bring home cases of water yourself!
Stack water using interlocking water bricks.
Having had thin plastic bottles break in my storage shed, I strongly recommend water bricks! (That’s why I’ve included a BIG picture here!) Yes, they are an investment, but are so much more reliable and far more efficient for storage! They are of heavy plastic and designed to interlock and stack like Legos. (The manufacturer suggests stacking them no more than 4 ft. high.) Each regular brick holds 3.5 gallons, and weighs just over 30 pounds when filled. You can fill with clean water from the tap, seal, and store for several years. Or, add water preserver for more peace of mind.
You can even add a spigot to your order of bricks to make them easier to use.
I’m referring here to barrels that are made specifically for this purpose. (Our neighborhood emergency team was able to make a great group purchase one year. Haven’t found anything like it since!)
You’ll need a spigot and a pump to get the water out of the barrel. And naturally, you won’t be able to move this water supply, since a full barrel weighs over 400 lbs. Find a good spot, place the barrel on a wood platform — a couple of level boards will do — so it doesn’t touch the cement floor, fill it carefully so as not to introduce any dirt, seal closed, and put a cover over it to keep it clean. Refresh your water once a year for best results.
One barrel could serve the needs of a 4-person family for 10 days. The barrel shown here comes as a kit, complete with a bung wrench (to turn the plugs), a hand-pump, and water preservative. Get more info here.
Fill the bathtub if you have time!
Now, I wouldn’t necessarily suggest that you DRINK the water you’ve run into your bathtub. After all, just how clean would it be if an emergency were called suddenly? Still, consider buying a bathtub liner designed for this purpose. Open it into the tub, fill from the faucet. Some models have a top to keep the water as clean as possible. Check out the link below to a full kit.
The water in your pool MIGHT be drinkable if you put some in a glass jar for several hours and let the sun evaporate the chlorine. Still, the chemicals in the water, not to mention ordinary dirt from leaves and dust AND whatever your humans leave behind . . . make this a bad choice for drinking and cooking.
If the electricity is out, then the cleanliness of the pool will deteriorate even more quickly because the pool pump and filters will stop working. Again, filter and clean it as best you can, and then use for purposes other than cooking and drinking.
Turn to collected rainwater, streams and other open sources of water.
Now we’re back to the problem of contamination. The only way you can safely drink even from a clear mountain stream is using a filter. The single-person LifeStraw is the standard – it will filter 1,000 gallons of water before needing to be replaced. You can get the LifeStraw many places for around $20. Naturally, get one for each person.
Not every family member will want to or even be able to use the LifeStraw, and it won’t put water into a pot for cooking. In this case, you’ll need a gravity-fed filtration system like the Katadyn or the LifeStraw family-size version. These hanging bags can filter several gallons of water in an hour. The image shows the LIfeStraw model, which filters 9-12 liters/hour. Click on the image to find out more.
With a filter system like this you’ll easily reclaim the 4 gallons a day you need to keep your family going for an extended period.
Purification tablets are a convenient back-up.
Water-borne diseases are the dangerous aftermath of many natural disasters, when people bathe, drink or eat food that has been exposed to infected water. Children are particularly susceptible to the bacteria and protozoa in unclean and unsafe water.
Fortunately, it is easy to add water purification tablets or liquid to your emergency supplies list. Potable Aqua, shown, is a well-respected brand.
At home after the boil-water notice has been lifted?
It will take some flushing to be sure your home systems are clean and ready to go back to work. Some recommendations:
• Flush hot water faucets for 15 minutes, and cold water for 5. • Change your refrigerator water filter and any other water filters. • Empty ice cubes, run through a cycle and discard those cubes, too. • Run your dishwasher empty for a cycle. Then rewash everything that came into contact with water just before the boil-water notice. • Discard and clean containers, then refill any water used in humidifiers, CPAP machines, electric toothbrushes, etc.
Be ready for a short-term or a long-term outage, and you’ll sail through. If you’re NOT prepared, or your neighbors aren’t prepared, something simple could turn into a real emergency, or even a disaster.
Take action today to store emergency water. It’s easy when everything is operating as it should. When the system is broken, it may be too late.
Virginia Your Emergency Plan GuideTeam
P.S. I didn’t account for the water that pets may need. Be sure to build that into your plan!
It’s “Spring Forward, Fall Back” time here again this weekend. Along with re-setting the clocks, this time of year now has expanded to include reminders for emergency preparedness.
Of course, you know about checking the batteries in your smoke alarm. But that’s just the start! So read on, for some simple actions that if overlooked could put you in BIG trouble.
To the extent that your safety and security depend in part on your neighbors’ preparedness, be sure you share this list with them, too!
1-Change the batteries in your smoke alarm.
You should know this statistic from the National Fire Protection Association by heart: Three of every five home fire deaths resulted from fires in homes with no smoke alarms or no working smoke alarms. Nuff said?
And here’s a real life story to go with the statistic.
A couple of years ago on a Saturday, the local fire department, police department cadets, some EMTs, and the Red Cross, supported by our Neighborhood Emergency Response Team, installed 461 new smoke alarms in our neighborhood! (Funded by a grant, in case you’re wondering.)
The alarm packaging said, “10-year guarantee” so naturally we were all annoyed when people began reporting that their smoke alarms were “chirping.”
Here’s what we discovered about alarms chirping:
Nearly all people who heard the chirping incorrectly identified where it was coming from! In nearly every case, it was from an already installed OLD alarm, and not the new one.
The 10-year guarantee works for the mechanism. When it comes to the battery, the guarantee applies only to alarms that have sealed lithium batteries. If your smoke alarm has a replaceable battery, check it and replace it or it will surely start chirping, like ours did, in the middle of the night!
Every battery has an indicated life. Just remember, you may buy new batteries today but you don’t know how much of that “life” has already expired while the battery was on a shelf somewhere.
Upshot? Simply replace your alarm batteries twice a year when the time changes. A few dollars invested can save your life.
2-Change the batteries in your walkie-talkies.
Same concept: when the emergency hits, if you don’t have fresh batteries, you may have lost an important tool.
Walkie-talkies take AA or AAA batteries. Over the years we have tested different brands and over the years the “winner” in the test has been different every time!
Get the right size, get the longest life available, and TEST them regularly. Every month we catch a couple of dead Walkie-Talkies during our monthly drill. (Of course, if people forget to turn the Walkie-talkies off after the drill, the chances of the batteries going bad are about 100%.) (And corroded batteries can destroy the walkie-talkie, too.)
Don’t have Walkie-talkies for your group or family? Here’s our walkie-talkie reviews to get you started on adding some.
3-Check your fire extinguishers and replace if they have lost pressure.
Fire extinguishers can last many years, but – Do you really remember when you bought yours?
A good extinguisher has a pressure gauge to help you track its functionality. Check the gauge when the time changes, if not more frequently. Not sure if the extinguisher is any good? Get a new one.
Looking to re-charge your extinguisher? We’ve looked, and haven’t found a reasonably-priced service. Maybe you can find one, but chances don’t seem to be very good.
Still, you’ll want to start with a basic kit, and add your own enhancements.
At the left is a starter kit, available at Amazon, that looks even better than ones we’ve recommended before. Click on the image to get full details, but note to start with that this kit has soft sides with pockets labeled so you can see everything at a glance. (Most of the inexpensive kits that I see are simply a zippered container with contents thrown in.)
Any first aid kit needs customization, and that’s where a regular check-up is important. At the time change, pull together all your kits (from your cars, your Go-Bags, etc.) and look in particular for . . .
Small medicine bottles whose contents have dried up completely.
Tubes of medicine that have been accidentally crimped or punctured and are oozing gook.
Band aids that have torn packaging and thus have lost sterility and stick.
Pills that have expired.
Scissors or other tools that have mysteriously developed spots of rust.
Repeal and replace as appropriate!
5-Clean out coils and filters to prevent fire.
We’re talking refrigerator, heater, and clothes dryer. All these collect dust and lint in hard-to-see and harder-to-get-to places, and can overheat or even (in the case of the dryer) burst into flames.
Enlist help to move or open any pieces of equipment or access doors, and attack with the wand and the crevice tool of your vacuum cleaner.
When you’ve finished vacuuming, empty its dust container and replace the filter in the vacuum, too.
While we’re on vacuum cleaners, a couple more safety notes:
Don’t leave a vacuum cleaner running while you go to another room. It can overheat and start a fire! (Just go onto YouTube to see a number of dramatic examples. . .!)
Check the cord and plug of your vacuum to be sure they aren’t damaged or frayed. These cords get hot! (Even the cord of my quite new Navigator gets really warm, just from being in normal use.)
That’s it.
You may have discovered that your 60 minute time change job has turned into a multi-hour project!
However, once you’ve gone through the steps once, it’ll be easier next time. Also, you may be able to turn the whole thing into a family bonding exercise by delegating different jobs to different family members, and presenting it as a contest!
However you get through the 5-point list, you’ll have the satisfaction of knowing your home is good to go for another six months. And you won’t be caught by an emergency just waiting to happen — as represented by the eager dinosaur in the picture!
Here in California wildfires are threatening thousands. Last Tuesday the evacuation area got within 5 miles . . . but fortunately for us, the fire turned and headed in another direction.
That fire is still burning, but for the time being we are safe.
The whole situation developed quickly. People just 15 minutes north of us were forced to leave their homes with only minutes’ warning.
Moreover, even though their houses haven’t been damaged, these people still haven’t been able to get home again!
The close call right here at home has made me reconsider our own state of preparedness.
I am embarrassed to tell our story of being “ready for evacuation.”
I have written many times about go-bags.
Our go-bags were ready.
We have them in the house and smaller ones in the car. They include a change of clothing, some water, first aid kit, personal items. At the top of each bag: shoes and a flashlight. So, all I had to do was put in some prescription pills.
I added a couple of personal items to my house bag, and some energy bars, and stashed it near the back door. So far, so good.
How about the car?
Our car was 7/8 full of gas, thanks to Joe’s unfailing attention.
Plus there’s a warm blanket and even a pillow in there, our CERT duffel bag, and a couple of walkie-talkies.
But what else would we put into the car?
Here’s where the challenge became clear.
What about our “original official documents” that we’ve collected over a lifetime – birth certificates, death certificates, marriage and divorce certificates. Military records. Transcripts. Credentials. At least they are all mostly in one filing cabinet drawer! One big swoop and they all landed in a cardboard file box.
What about proof of ownership of the house, the car, past houses, past cars, property taxes on all? What about insurance on all these? OK, another drawer and a second box was filled.
All the business records – we’ll take the computers themselves, a laptop plus a desktop with keyboard, screen, mouse. The back-up drives. Oh, and that binder with all the account passwords in it . . .Ugh. This would take time to disassemble and haul outside. We leave all this for later.
Photo albums! Another THREE boxes full, and we’re leaving the framed pictures behind on the wall.
All the cards — credit cards, health cards, insurance cards, passports. Plus some cash. Surprising how much room these take up when you never seem to have enough of them!
Phones, power bank, plugs and cords. Ham radio and batteries. This stuff is scattered throughout the house.
And more . . .
It quickly became clear that we have far more to save than is possible to stuff in the car.
But what was even more painful was the realization that for all our writing and speaking and encouraging and nagging, we had never taken the time to prepare fully for evacuation.
We have procrastinated about scanning our official papers!
The answer to important papers
The data from more than half the items listed above would fit easily on a couple of flash drives!
So, that’s why you see that photo of me at the top of the page, scanning what is actually my mother’s birth certificate! I’m using our all-in-one printer. Even a modest multi-function printer can do a reasonable job as a scanner.
Of course, it will take hours to scan EVERYTHING using this printer/scanner.
So, I’m actually going to take it step by step. (I’ll be leaving the filled file boxes stacked in the hall, just in case another emergency arises!)
First I need to come up with the labeling system I want to use to be able to find things later. (Not too hard. I’ll use the same file names I have in my computer.)
I’ll start with documents that would be difficult or impossible to recreate, like that birth certificate, or photos.
Documents that exist in some government or commercial file somewhere (like property tax records) will be a lower priority.
Of course, I could also scan documents using a smart phone. Depending on what version of phone you have, you can get an app that will allow you to scan documents into your phone, send to your computer or store in the cloud (DropBox, OneDrive, Evernote). Some of these apps are free; some cost a few dollars. Depending on what you need, you can adjust for size and clarity, combine multiple pages into one document, convert text into editable files, etc. This would work really well for scanning on the go, of course.
If scanning each document one at a time gets too onerous, I’ll likely invest in a higher-speed document scanner. (In the past we used a desktop scanner for business receipts. It scanned well but became outdated and as our business needs changed it wasn’t worth it for us to upgrade.) A full-featured desk-top scanner that can handle multiple pages at a time, with documents of different sizes and shapes, may cost $200-$400; the “mobile” models (about the size of a short box of tinfoil – the documents feed through one at a time) cost less than $100. Before you buy, make sure to find out if you are required to purchase amonthly subscription for the software and/or the digital storage as part of the deal.
Of course, you can also consider using a professional document scanning service. Many options are available. Some services scan, store, or shred. Some certify. Some can convert scanned documents to searchable pdfs for ease of retrieval. Photo retouching may also be available. It all depends on the number and condition of your documents, and your concerns for privacy.
In my case, images of my documents will end up in my computer, copied on a flash drive, backed up on our back-up drives, and . . .
I’ll also file these digital documents somewhere in the cloud!
We’ve prepared before for evacuation from potential flooding, but we had plenty of time to do it. This last week, once the order came down, we would have had only minutes to get things organized and out the door.
Yes, that go-bag is the first step. But taking care of other “loose ends” is also part of preparing for an evacuation.
Still in the hall . . .
This has been a valuable lesson for us. I hope it’s useful for you, too. I’ll let you know how the scanning goes.
Virginia Your Emergency Plan Guide Team
P.S. These are the boxes I mentioned. As you can see, they’ve been used before. We always have a few empty ones on hand!
Ever been accused of being overly protective of your children?
Maybe it’s true. And it’s doing them a disservice, because . . .
When it comes to an emergency situation – you MAY NOT BE THERE to protect your child!
The good news?
Children are trainable! They are resilient! Give them tools to work with, and they can surprise you.
(Heck, this goes on throughout your life as a parent!)
Start where you are.
Here are some questions you can ask your kids to see just how well they would manage BY THEMSELVES in an emergency.
Of course, the first reaction for most small children would be to run crying for you. But what if you are not there? These questions are designed to help your child think past that initial reaction and move through to the next step.
How well the question-answer conversation goes will depend for the most part on your own ability to guide it in a meaningful way – i.e., with the right amount of information for each child. (It’s easy to go overboard . . .!)
But if you can help your child realize that there is a course of action he or she can take that will be smart and that will help . . . then you’ve made a huge difference in how well things will turn out.
So, some sample questions. Pick one to start with.
If there’s a fire in the house, what would you do first?
If you are at the park playing, and you feel an earthquake, what would you do?
If you’re home alone, and you hear our smoke alarm go off, what would you do?
If a policeman is knocking at the door, what would you do?
What if you try to call 911 and no one answers?
These are pretty tough questions. Your child probably won’t be happy even thinking about something happening when he’s alone.
Still, given a bit of encouragement, your children can probably come up with some good ideas.
The purpose of the conversation is to remind your child that emergencies DO happen, to figure out what your child knows already about dealing with them, and then identify more good ideas and turn them into action steps.
Build simple action steps with your child.
What follows are some examples of action steps that might be appropriate. You will build your own list, depending on where you live, the makeup of your household and the skill level of your child.
Be sure you can tell a Firefighter or a Police Officer your whole name (first Name, last name) and where you live (your street address). (I’ve met 6 year old children who are unable to talk to adults.)
Memorize your home telephone number or a parent’s cell phone number. (This applies to older children, too!)
Know at least two ways you can get out of the house. How can you get out of the second floor of the house if you can’t go down the stairs? (Only kids who like the idea of “escaping” have really considered this!)
If the lights go out, find a flashlight. (Where?)
Fix a meal while you’re waiting for things to get back to normal.
When you feel an earthquake, the first thing to do is: ____, ____ and ____. (Children in California schools know this one.) What if the earthquake happens at night when you’re in bed? (Cover your head with the pillow. Don’t jump up and run barefoot through the dark house! Flashlight? Shoes?)
Call 911 in an emergency. (Having a landline will allow even small children to call for help. If teens and adults all just have cell phones, a small child may have no options.)
If there’s no answer at 911, what does that mean?
Don’t automatically open the door because someone says so. (What else could you do?)
When you can’t stay in the house, or can’t reach it, go to our “safe place.”
If you have to leave in an emergency, grab your go-bag.
In an emergency, wear shoes.
And more . . .
Now, it’s on to the most important, third piece of this plan.
Practice the action steps.
When a disaster disrupts your child’s regular routine, a back-up plan THAT’S BEEN PRACTICED will fall into place. Without that practice, the child will likely be unable to make any good decisions.
Every one of the steps you’ve come up with in your conversations can be practiced.
Here are examples that you can use as starters.
Go room-by-room through your house and identify 2 exits from each room. (Windows work if they’re not blocked by bushes or bars.) You may want to draw a floorplan of the house and show those exits.
Climb to the second floor to see how to get out without going down the stairs. If you have a fire escape or an emergency escape ladder, assemble it and climb down. If you or your child can’t make it down, you can’t count on the ladder to save anyone!
Practice reciting address and telephone numbers. The number of your out-of-state contact should be on your list of memorized numbers, too. IF YOUR PHONE IS OUT OR GONE YOU WON”T BE ABLE TO PULL UP NUMBERS FOR AUTOMATIC DIALING.
Pick a place for flashlights or emergency lights and make it a game to find every one. Try to keep the lights in their assigned places so you could find them in the dark.
Make sure your child can prepare a simple (uncooked) meal while she’s waiting, or get to an emergency snack. This simple job will be reassuringly normal.
Practice making phone calls using a variety of phones.
Build family go-bags together. Right on top: SHOES (and then a flashlight). Stash the bags in an appropriate place.
Grab your go-bag and take a walk to your “safe place” (assembly point) outside the house or further away in the neighborhood. Have the child lead the way. Take the walk again, in the dark.
Practice communicating using walkie talkies.
Add more skills as your child gets older.
Schools train children on some of the basics. Boy Scouts and Girl Scouts have emergency preparedness and first aid training, too. FEMA and CERT offer programs especially for high-school-aged children.
If you take your kids camping, that’s a perfect time to practice a whole other group of survival skills: building a fire, understanding how to build a shelter, knowing when it’s safe to drink water, “capturing” water using a plastic bag over a branch, tying knots, using tools, administering basic first aid, reading a compass, etc.
If you are looking for more info on preparing children, consider these resources:
This page lists a whole collection of resources aimed at different age levels and different audiences (for example, educators, social services, etc.). Some of the programs are co-sponsored by Ready.gov, the Red Cross, Dept. of Education, etc.
This easily accessible site has good descriptions of what to expect in a particular type of emergency (hurricane, tornado, etc.) and helpful suggestions for building a go-bag. (Don’t forget our Emergency Plan Guide booklet on how to build customized bags.)
The KIDS section at Ready.gov offers a series of simple comic books with accompanying tips for parents and educators.
http://www.savethechildren.org Resources at this site include some downloadable checklists for parents and for child care professionals. The checklists might be appropriate for members of your emergency response group, too.
In summary . . .
Grab some of the resources listed here, and build disaster preparedness and response reminders and actions into your daily family routines. Add new “content” as your children get older.
Disasters will happen.
Unless you have prepared your children to take action without you being there to tell them what to do . . . they are more likely to be hurt, trapped or at the very least, traumatized.
Protecting your children from disasters isn’t as good as preparing them to get through successfully.
Hard to imagine: “Puerto Rico residents still without communications, now into third week . . .”
But it was hard to imagine that the U.S. would be hit by back-to-back-to-back hurricanes and flooding, too.
Emergencies happen. Overnight they can turn into disasters. And if you’re caught in the middle, you want to know what’s happening and be able to reach out to let others know what’s happening.
It’s time to take another look at personal emergency communications.
What you’ll grab first – your cell phone!
Since most people have their phone within reach 24/7, it’s likely to be your first choice in an emergency. Phones can connect with family, receive electronic alerts, and come up with what to do in case of disease, traffic jams, etc.
Cell phone tip: Pre-program your cellphonewith important emergency numbers (police, fire, utilities) and create a “group” with family members so you can reach them all quickly.
Your cell phone is an important tool, as long as it’s working.
Three reasons why your cell phone may not work in an emergency:
Cell phone towers are pretty sturdy, but can be damaged and even knocked down by big winds or a big earthquake. Result: no service at all.
Service can be overwhelmed by too many people trying to use it at once – ex., the Boston Marathon. Result: busy signal.
Your phone may, and eventually will, run out of battery unless you have made provisions to keep it charged.
Three ways to have a better chance of getting through.
Text or tweet instead of calling. These messages need far less bandwidth and can be “stored” in the system until they’re deliverable.
Send your message or call your out-of-town family contact instead of local friends or family members. Naturally, this arrangement has to be set up in advance.
Carry a battery back-up for your phone – one of the power banks or a solar charger – to give yourself a better chance of eventually getting through. Some emergency radios can charge a phone, too. (Want more on batteries, power banks or solar chargers? Here’s an Advisory covering these devices.)
No cell phone? Don’t forget to try a land-line.
When a power outage has crippled communications, a simple phone attached to a landline may still have a dial tone. Of course, you have to know whatever number it is you want to call! (That’s why you have memorized a few numbers, right?)
And as we’ve said many times, the operator answering your cell phone 911 call only knows approximately where you are, particularly if you are in a high-rise building. A landline pinpoints your location.
Facing a longer term outage?
Puerto Rico has been cut off for weeks. But not EVERYONE there is cut off!
Three kinds of emergency communications are being used there by people who were prepared in advance of the storm.
Short-reach walkie-talkies. Depending on the quality of the instrument, the weather and the terrain, battery-operated walkie-talkies can connect people across the street or across town.We recommend that all families and neighborhood emergency response groups consider getting their members walkie-talkies (with extra batteries). Even small children can master their use easily. See a couple of examples below, and take another look at our updated Walkie-Talkies Reviews to see if you are considering adding walkie-talkies to your emergency supplies: https://emergencyplanguide.org/reviews/Best Walkie-Talkies/
Wider-reach HAM radios. This is the one option mentioned more than any other by the professionals in my LinkedIn group. Over 3,000 ham radio operators have been active in Puerto Rico since the hurricane hit. They have been assisting the American Red Cross to gather records about survivors, transmit personal messages to families, and help dispatch power authority crews. (Article: Amateur Radio Volunteers Aiding Storm-Ravaged Puerto Rico, US Virgin Islands)You can get started with a HAM radio for less than $100, but realistically you’ll probably want a better device and additional equipment (power supply, antenna, etc.) so budget for more. Joe is a licensed HAM operator and wrote more about the radios and training, here: https://emergencyplanguide.org/getting-serious-about-emergency-radio-operations/
Satellite phones for world-wide connection. As the name suggests, these phones use satellites to carry their calls. When cell towers are down or you are so far from civilization that there are no towers (mid-ocean? Antarctica?), this might be your best bet for staying in communication.As you might imagine, it costs a lot more to own and use these phones. Prices for most devices themselves (some rather like a clunky cell phone, others more complex, like a computer with handset) range from $500 to $1500 or more. Prices for actually using the phones start at around $40/month at the low end, or you can buy by the minute. More details here. https://emergencyplanguide.org/ultimate-emergency-communications-device/
Examples of hand-held emergency radios
Most emergency radios are compact, though they are heavier than a regular cell phone. And, they will require practice before you can tune them successfully. Don’t think they are terribly expensive. Most of them cost less than the latest Apple iPhone. Some examples are below. Click on the image to go directly to Amazon for full details and current pricing. (We are Amazon affiliates. I’m happy to refer you there because items are almost always available and prices are often better than anywhere else.)
Baofeng -- Basic 2-way dual band HAM radio; VHF and UHF; costs around $70-80.
Yaesu -- Mid-range quad band HAM radio. Submersible. Yaesu makes several; this one costs around $500.
Irridium Satellite Radio. Click on image and go to Amazon where you should read the reviews, particularly the one about Alaska. Cost around $1,000.
And here are a couple of examples of walkie-talkies. We own and have used both models; the Uniden is what the members of our Neighborhood Emergency Response Team use and practice with every month. Click on the image to get details at Amazon.
Good basic walkie-talkies. Great for local group, family or workplace. Easiest-to-manage buttons. Cost around $40 a pair.
I like these because they're yellow and not so hard to locate in an emergency! Alkaline or rechargeable batteries; NOAA weather channels. Cost around $70 a pair.
If a radio and/or battery charging device sounds as though it makes sense to you, get started on your purchase now. It’d be hard to find someone selling one during a disaster.
Virginia
Your Emergency Plan Guide Team
P.S. An upcoming Advisory will be on serious solar panels designed to drive all these communications devices. If you haven’t signed up to get ALL the Advisories, do so now! (Fill out the form below!)


 Over the years Joe and I have been involved in both CERT and NERT training. CERT is Community Emergency Response Team training, a course and refreshers offered by our city. NERT is our informal Neighborhood Emergency Response Team, with its own unofficial and customized training.
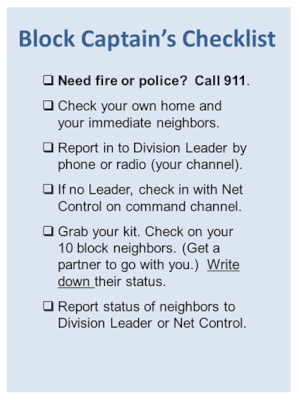 Our NERT volunteers carry a quick reminder checklist of their primary duty when the community is hit by an emergency. It’s a card similar to the one to the left.
 Where is the nearest first aid kit?
 Professionals don’t all agree about exactly how to handle severe injuries. But they seem to agree on . . .
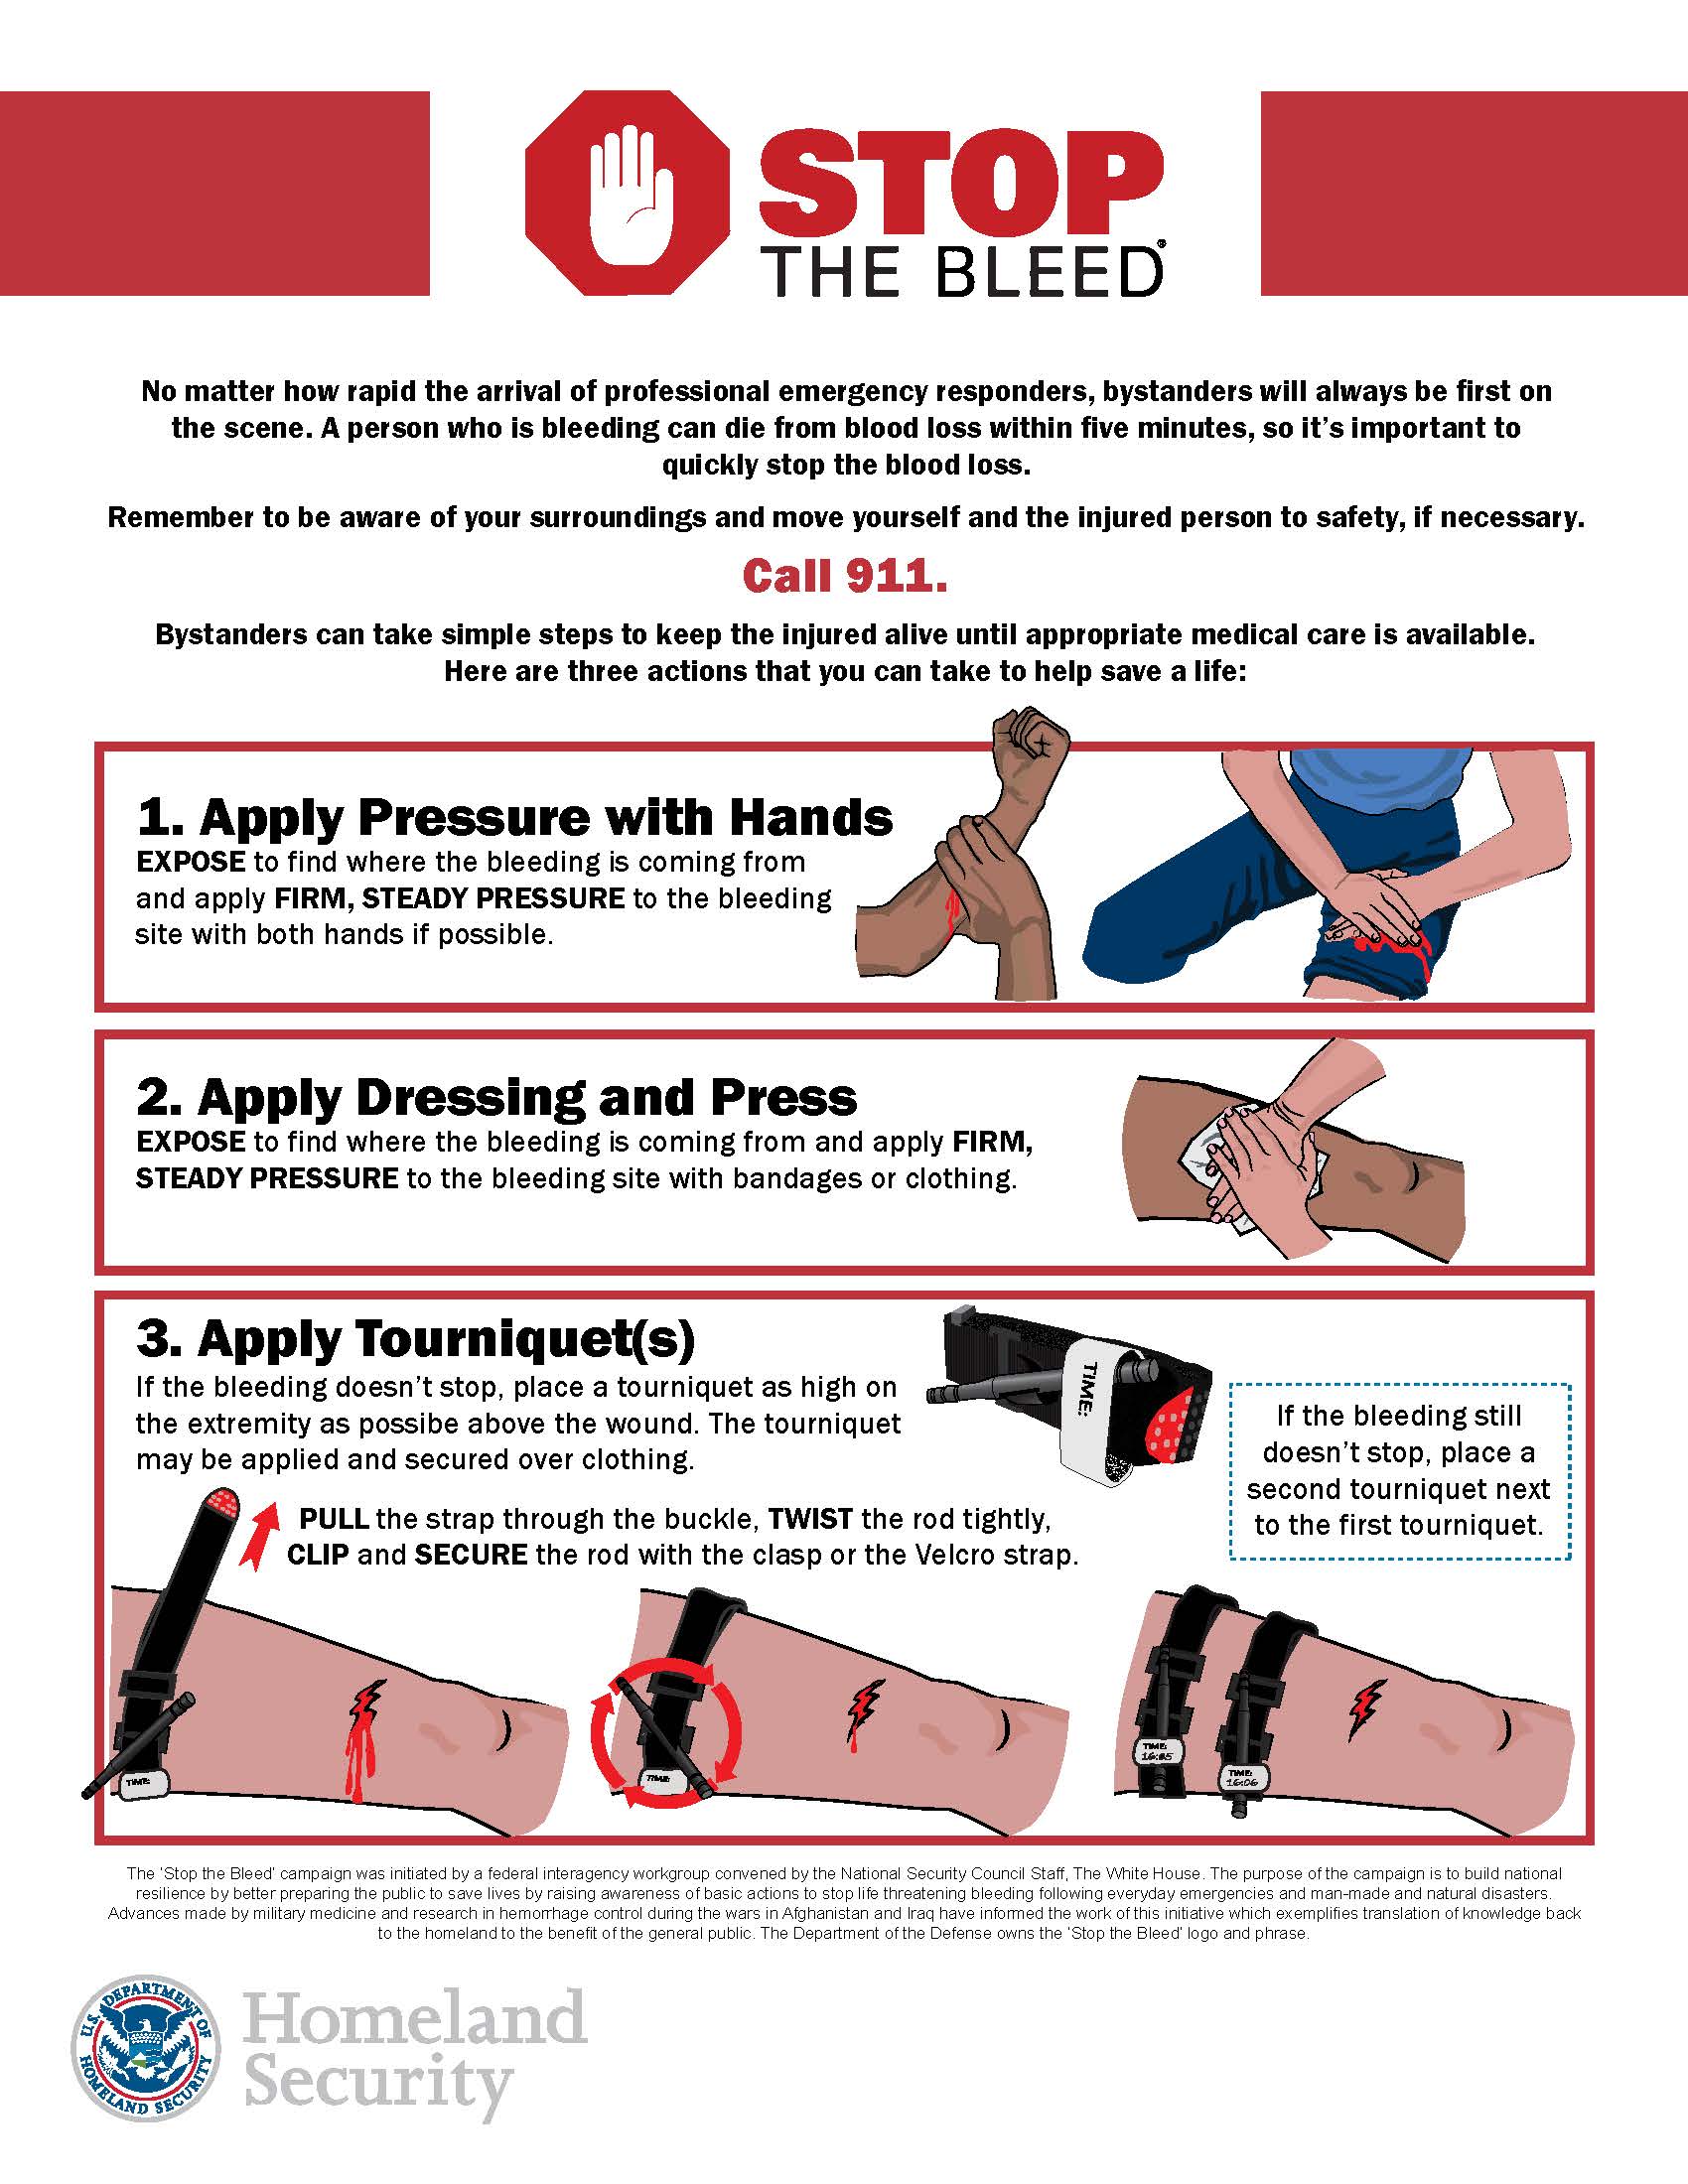


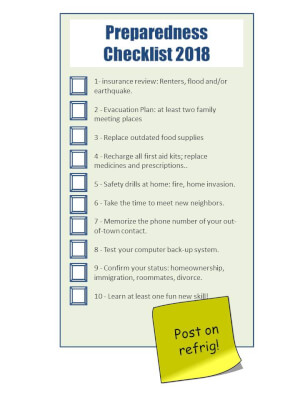 More resources for items on the list.
 The Emergency Plan Guide website has been up since 2011. Its main objective has stayed the same since those first days: to help people understand disaster realities and be better prepared to face them.
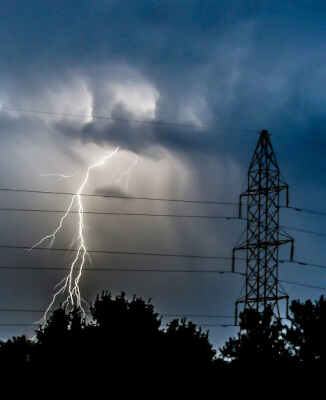 Hundreds of thousands in the dark – again?

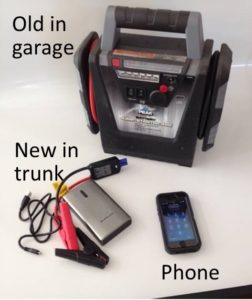 After years of backing a second car up to mine, fighting with jumper cables, etc., I was happy to get a portable battery charger. You can see it in the photo, labeled “old.”

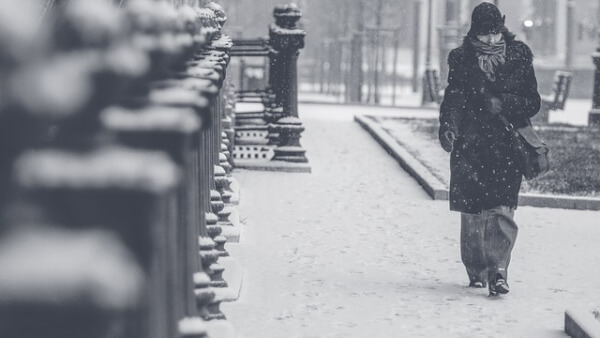


 Just waiting for you to make a mistake!