Category: Action Items

Abandoned in a disaster?

Share

Helping people with disabilities.

This is my 5th year of writing weekly Advisories, and my 15th year of participating in my local neighborhood emergency response team. During that time I’ve attempted to address the challenges of helping people with disabilities during a disaster.

Not suitable for wheelchair usersThe first time the subject came up was after Katrina, when we heard the horrific stories of people left behind in their nursing home to drown. Then, after Hurricane Sandy, stories came out about people trapped in their high-rise apartments when the power – and thus the elevators – were out for days and days.

Most recently, I received an email from a reader asking if I had any advice for her newly-formed Emergency Team, particularly on how to plan to help neighbors suffering from dementia.

So for the past couple of months I’ve been reaching out again for resources.

Let me warn you – I have not found much!

But let me share what I have found, and invite you to comment or to incorporate some of this into your own local planning. I’m posing these as questions you can ask in your own community.

1 – Should we maintain a Registry of people with special needs?

Several online articles mentioned efforts to build lists of people who might need special help in an emergency. I found references to what looks to be a robust registry in Santa Clarita, California, and the Calgary Police (Canada) started a new such registry in 2015. However, other registries that I attempted to research have gone out of business!

I even posed a question online in a special LinkedIn group, and over two dozen people were kind enough to respond. The consensus: many people with disabilities do not want to be on any list – mostly because they don’t trust that their information will be kept private.

Check your local community for what’s available and confirm that it is secure.

2 – Does our city have special plans for First Responders when dealing with people with disabilities?

We have a great relationship with our City’s Office of Emergency Management, so we invited the head to speak to our group. One of the questions we posed was this one. His answer, “We do not have special plans because we don’t know exactly what will be needed.”

Since this answer wasn’t exactly satisfactory, I have dug deeper into training that is available for First Responders. In fact, there are resources available online, for free, that would be useful for First Responders and for ALL of us. We will be building them into our regular trainings starting in September.

Some simple and sensible guidelines:

  • Don’t make assumptions about people’s abilities or disabilities in an emergency situation. Ask.
  • Everybody will be disoriented in an emergency, so expect a range of emotional response.
  • Treat people with respect. Somebody who can’t see isn’t necessarily deaf or stupid. Be patient.

Tips for First RespondersTwo resources I found most useful:

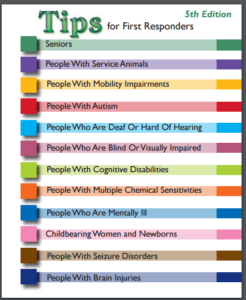
Tips for First Responders from the University of New Mexico. You can get a pdf that lists tips for dealing with 12 different situations: seniors, people with service animals, people with autism, etc.  The online link: http://cdd.unm.edu/dhpd/tips/tipsenglish.html

A set of training videos for First Responders comes from the Nisonger Center at Ohio State University. I found them thorough but long. This is the YouTube link:  https://youtu.be/VRa3oU09XIE?list=PLjdWYCi9CWHblC5668uTXiMoTHNEdyUaw

3 – What should people with disabilities do when it comes to emergency planning?

There is really only one good answer. If you have special needs, you are in the best position to plan for your own safety.

It’s up to you to build your own personal support network. Members of your network can be relatives, neighbors, friends and co-workers. You need more than just one person; you need people you can trust to check on you and people who know your capabilities and needs.

As part of my research I received many great referrals, but one document that appealed to me particularly comes from FEMA and the American Red Cross. Preparing for Disaster for People with Disabilities and other Special Needs is a brochure with a lot of basic information, but in my estimation, it’s the “Complete a Personal Assessment” section that is most valuable We will be using this assessment list with ALL our members..

Action Item: Get this Assessment; it starts on page 3 of the booklet: https://www.fema.gov/media-library/assets/documents/897

I have no doubt that we will be revisiting this topic many times. If you have a recommendation for EmergencyPlanGuide.org readers, please share it in the comments below.

Here’s to a better chance of survival for your entire community!

Virginia
Your Emergency Plan Guide team

I’ll be publishing excerpts from the materials mentioned in this Advisory. Don’t miss them. Sign up to get all our Advisories below.


Assessing Threats to Your Business

Share

“What could possibly go wrong?”

Storm with lighteningWhen asked that question about their business . . .

Most people think first about natural disasters.

Here in California, everyone is concerned about earthquakes or (some years) El Niño. Along the coasts, popular threats are hurricanes and, occasionally, tsunamis. That leaves tornados and storms for the rest of the country.

Would you believe that initially, most people overlook the most common natural disaster?!

According to the experts, the most common natural disaster – accounting for about 30% of all disasters in the U.S. — is flood!

But let’s take a broader look at threats.

What about threats that are man-made?

This list will be a lot longer. Here are some more threats to business (or to any community), in no particular order:

  • Unplanned IT and communications outages
  • Cyber attack
  • Data breach or loss (accidental or deliberate from disgruntled employee; loss of mobile device)
  • Power outage
  • Water main break
  • Fire
  • Security breach (including theft)
  • Health emergency (chemical leak or spill)
  • Safety problem (accident, train wreck, explosion)
  • Terrorist act
  • Regulatory change
  • Lawsuit: personal injury, employment practice
  • Loss of key personnel
  • Civil unrest (might depend on your neighbors and/or neighborhood)
  • Supply chain interruption
  • and the list goes on!


STEP ONE. What threats does YOUR business face?

One of the first steps in preparing for emergencies in your business or community is to take a look at the threats you are facing. The easiest way is to gather together key people and simply brainstorm, writing down everything you can think of.

For example, your list could start by looking like this:

List of threats

STEP TWO. What’s the likelihood of the threat actually happening?

The next step in your analysis is to rate all the threats you’ve come up with as to their probability of taking place. An easy way to do that is simply give each threat a score from 1-5.

  1. = rare
  2. = unlikely
  3. = possible
  4. = probable
  5. = almost certain

Here’s our sample list with the threats rated.

Probablethreats


STEP THREE. What would be the impact of the threat?

There’s a second side to every threat, too. That’s the impact that it would have on your business. For example, some common threats (for example, a break in a water line) might be serious but would probably not threaten the health of the whole organization.

Other threats, like a direct hit from a tornado, might completely destroy the business.

So your threat analysis needs to consider impact.  Again, one way to help direct your preparedness efforts is to add a second score to your list of threats.

The impact score could also be 1 – 5, from lowest to highest impact. For example . . .

Threat probability

STEP FOUR. So which threats do we need to look at first?

By completing the list, you can get an idea of the priorities for your preparedness efforts. Here’s our sample, completed:

Create the total score by adding probability and impact.

Business threat

The higher the total score, the more attention you probably want to place on preparing for that event.

Caution: Danger of Threat Analysis Paralysis

Analyzing your threats can become complicated. In fact, in the wrong hands it can get WAY too complicated!

You don’t have to do it the way this report suggests.

But it IS important to get past that first quick assumption about natural disasters, and take a look at the other threats facing your business. The risks associated with the threats might be reduced by better procedures, better insurance coverage, or simply more awareness.

Completing even a simplified risk analysis will give you a more realistic picture of what could happen and how to protect and prepare for it.

Joe and Virginia
Your Emergency Plan Guide Team

P.S. If you are serious about analyzing the risks to your business, consider purchasing this book. It has a significant security focus, but defines all types of threats and lays out a process to help you make decisions regarding mitigation.  Threat Assessment and Risk Analysis: An Applied Approach. The book is available in hardcover or soft at Amazon, where we’re affiliates, as you know.


Stay Safe in Hotels

Share

Summer may find you traveling to new places, and staying in new hotels.

Hotels have their own risks

. . . worth noting and being aware of.

Smoke in hotelFire:

High-rise hotels (or any high-rise building, for that matter) are vulnerable to fire. The causes? malfunctions in electrical equipment, carelessness, smoking (in bedrooms), temporary decorations for festivities, use of combustible cleaning materials, and, of course, arson and sabotage.

In a hotel, fire danger is increased because guests, people attending conferences, patrons at restaurants and bars, etc. probably don’t know the layout of the property and have no idea about security or emergency policies.

Terrorism:

Particularly in developing countries, hotels have become the popular target for terrorists. There are a number of reasons why.

  • Over the past couple of decades, embassies and military buildings have been “hardened” against attack.
  • Hotels remain areas where many people come and go, where entrance to the building is seldom restricted, and where politicians and other high-profile individuals are likely to be found.
  • Even when security is improved, by definition a hotel is a “soft target.”

If you are traveling and can make a choice about which hotel to stay in and where in the hotel to sleep or conduct your business, you may wish to consider these recommendations, culled from a variety of sources including the Stratfor Weekly, National Fire Protection Association, and Siemens Switzerland Ltd.

What to do to reduce the risks

Before you arrive

  1. Find out about hotel security. Is parking secured? Is the desk manned 24 hrs. a day?
  2. Ask about smoke/fire alarms and sprinkler systems. There is no guarantee that they will work, but if they are absent altogether, you may wish to look for another hotel.
  3. Choose a room between the 3rd and 5th floor, where terrorists can’t easily reach you from the street and fire department ladders can reach if you need to evacuate.
  4. Choose a room away from the street to avoid an explosion or violence at the entrance, which is where most terrorist activity occurs.
  5. On your floor, confirm the location of fire extinguishers. Have they been certified?
  6. Check on emergency stairs, exits and signage. Confirm that there are no items stored in stairwells.
  7. Keep emergency items next to your bed: shoes, a flashlight, and a smoke hood if you carry one. See below for more details.

If there is a fire in the hotel

  1. Grab your smoke hood and be ready to put it on if you smell smoke.
  2. Escape from your room if you can safely.
  3. Stay low and use walls as a guide.
  4. Use stairs; do NOT use elevators.
  5. Do not enter a staircase or hallway if it is filled with smoke. Try to find another path.
  6. If you must, stay in your room. Protect against smoke by sealing the door with duct tape and/or wet towels; stay low to the floor.

If you suspect terrorist activity

  1. Escape from the hotel if you can.
  2. If you are trapped in your room, protect yourself. Lock the door. Use a door wedge. If you can do it quietly, move furniture in front of the door for further protection. Turn off the lights. Turn off the TV and silence your cell phone. Close the drapes to protect from explosions that might create broken glass, and stay away from the windows. YOUR GOAL IS TO MAKE THE ROOM APPEAR EMPTY so terrorists will go on to an easier target.
  3. If terrorists are evident, and you cannot escape and cannot hide, you must fight. Improvise weapons with whatever is at hand – a lamp, a piece of furniture, a hot iron, a full water bottle, a battery charger at the end of a cord or in a sock, etc. In this case, your SURVIVAL MINDSET IS MORE IMPORTANT THAN WEAPONS. Fight, and don’t stop.

Emergency items for travelers

In this article we’ve mentioned just a few items that are recommended for travel safety. We haven’t used all of them ourselves, but it they make sense to you, check them out.

Door wedge

You may have a couple of these in the house already! Simple, small, easy to pack. Very effective at keeping any door closed — and you can get a couple of them for less than $10. Here’s an example from Amazon:

Shepherd Hardware 9132 Rubber Door Wedges, Brown, 2-Pack

If you’re traveling by car, you can also consider carrying a sliding glass door security bar. We always have one for peace of mind when we stay in hotels with balconies. Cost is right around $20. Here’s a link to a good one (no photo – I figured you know what a bar looks like!):

Master Lock 265DCCSEN Dual-Function Security Bar


Smoke hood

Rather like a gas mask, a smoke hood goes over your head and seals tightly to protect you from inhaling smoke. A filter allows you to breathe. Smoke hoods cost anywhere from $25 to $150 or even twice that, so you’ll want to shop carefully.

The filters in smoke hoods screen out particulate matter, fumes and gases. Unfortunately, the most deadly gas, carbon monoxide, can’t be filtered out. But carbon monoxide can be converted to carbon dioxide. Look for this feature in the smoke hoods you’re considering.

Other features to consider: How big is the hood — will it go over eyeglasses? Will it fit a small child? How good is visibility? Can others see you in the smoke? How long will protection last?

Here are three different models from Amazon, for comparison. Look at the photos (provided by the sellers) to answer some of the questions above. Click on the links to go directly to the detailed product page.

1 – FIREMASK

FIREMASK Emergency Escape Hood Oxygen Mask Smoke Mask Gas Mask Respirator for Industrial and Urban Survival – Protects for 60 Min Against Fire, Gas, & Smoke Inhalation . Great for Home, Office, Truck, High Rise Buildings. Get Peace of Mind 

Firemask

Firemask claims 60 minutes effectiveness. Of course, it is one-time use, replaced if you need to use it. Its Polycarbonate visor looks to provide good visibility.

Easy to put on, fits children as young as 3. Amazon low cost (as of today), $28.95.


2 – SAFESCAPE

Safescape ASE60A Fire Escape Smoke Hood Respirator Hard Case with Glow in the Dark Side Straps and Labels

safescape

From the photos and reviews, it looks as though the hood on the Safescape is bigger and perhaps more heat resistant than other hoods. The hard case can be mounted in a strategic place, and the glow in the dark strips would make it easy to find.  Any hard case might make packing a smoke hood more difficult.

60 Minutes of breathable filtered air. Easy to put on without special instruction.

Five year shelf life – Free Replacement if used in documented emergency.

Amazon price today: $69.95. Note that there is also a less expensive Safescape 30-minute hood.


3 – iEVAC

iEvac® the only American Certified Smoke/Fire Hood

ievac

This is most expensive and heaviest of the three hoods here. Notice the reflective tape top and sides, which will stand out in smoke and darkness.

This hood is the only “certified” hood. It gets top reviews and carries some strong endorsements:

  • Designated as an Anti-terrorism technology by the US Department of Homeland Security Safety Act
  • Tested by the US Army Research, Development and Engineering Command, Edgewood Chemical Biological Center
  • Currently being used by numerous Federal, State and local Government Agencies including every branch of the Military

The iEvac costs $149.95 at Amazon (and more in other places).


Of course, you can’t avoid every potential danger when you’re traveling. But some simple, common sense preparations may make your trip a lot more comfortable and safer.

Virginia 
Your Emergency Plan Guide Team

If you actually live full-time in a highrise building, you may want to take a much closer look at what would happen if a fire broke out. Here’s an Emergency Plan Guide Advisory with more ideas.


Lies Your Employer Is Telling You

Share

Just a month ago we exposed some “lies” about FEMA coming to the rescue in an emergency.

Today it’s the turn of employers, and the lies they tell you and themselves.

The biggest lie?

“In an emergency, we’ll just work from home.”

Work From Home(Ha, ha! When you hear that, do you laugh along with me?)

It’s not that working from home is impossible. Many of us do it, some on a regular basis.

The ridiculous part is thinking that in a disaster you can save the business by working at home without having designed an emergency plan to do it.

Granted, every company is unique. But when it comes to operating by working at home, your company needs to have thought through and come up with answers to some essential questions.

Here are 7 of the issues you’ll want to consider beforehand.

1 – Who makes the decision? Who will decide that there is a disaster and that employees should stay home?

Not every disaster is as dramatic as a hurricane or earthquake. Something as simple as a construction bridge collapse or partial power outage might not make the emergency airwaves, but still could mean your business is shut down. Who makes the call? (And how does the word get out to every employee?)

2 – Who assigns roles? How will employees be notified about the disaster, who should be working from home that day, and who should be planning to take the day off?

And will it be with or without pay?

Not every employee may need or be able to work from home. But to counter concerns about what’s fair, employees need to know in advance what emergency policies are, how they will be activated – and how that will impact their particular job.

3 – What functions need to continue? A company that’s prepared may be able to limp along for some time before it experiences serious damage. Which functions are vital for that interim period?

You’ll only know the answer to this question if you plan ahead. That planning will identify jobs that can be performed by employees working at home and will determine what resources they need to perform them.

Your planning will also identify which jobs need to be able to be performed by more than just one person – i.e., where cross-training is called for.

4 – What resources do we need? Doing research, drafting a report or even responding to business emails or calls may be easy for an employee on the road or working at home.

Other jobs, however – such as customer service, accounting, project management, etc.— may be difficult if not impossible for an employee who doesn’t have full access to company files, the right software and hardware, appropriate communications lines and phones, and a stable internet connection with plenty of bandwidth.

Which employees would need these resources to be able to keep YOUR company afloat? Who will pay to have these resources in place, or put in place?

5 – What security will be required?

It’s relatively easy to control security within your organization. This can include restricting entrance to certain areas of the plant, restricting access to different areas within the company network, restricting what people can download and/or take home with them.

In an emergency, information may need to be accessed or manipulated at many different locations, all of them away from the office. Electronic files may need to be shared; paper files may end up being transported in private vehicles; laptops and tablets may be put to use in coffee shops or who knows where.

What level of security do you need to consider to safeguard your operations (and, perhaps, to meet legal requirements)?

6 – Will employees be accountable? During the regular workday, it’s pretty clear who is working and who is goofing off.

Employees working at home may need to track their own hours and progress, actively check in, and make the decision when to call for assistance or approvals. Understanding employees’ level of self-reliance will determine, in part, whether or not they belong on the “work-at-home emergency response team.”

7 – What about Plan C? While working from home may seem to be a reasonable Plan B, back-up to an anticipated power outage or short-lived storm, by definition a disaster causes “great damage or loss of life.” The “work from home” Plan B may not be adequate!

What if a number of your key employees have had to evacuate their entire families and are not at home at all? What if employees are at home, but power is out there just as it is at the downtown office? What if employees are safe at home but your entire office, and all the files the employees need to connect to, are still standing in 12 inches of floodwater?

Plan C can take different forms.

  • Your Plan C might start, for example, with your committing some key operations and/or data to “the cloud,” which would make them accessible from anywhere by those displaced key employees. I found this overview of how small businesses might use the cloud for disaster recovery, from Network World.
  • It might include a contractual arrangement with a disaster continuity company to replace or restore your flood-damaged equipment within 24 hours. Agility Recovery Solutions, a company we’ve followed and written about for several years, specializes in recovering four areas for small business: office space, power, communications, and computers. (Check out their videos.)
  • Or Plan C might even require a service that is prepared to set up – or continually maintain – an off-site back-up office that mirrors your daily operation (a so-called “hot site”), where key employees could simply walk in and sit right down to work. You can get a good description of hot, warm and cold sites here.

As you may have gathered by now, Plan C could become costly! But . . .

If your Plan C keeps the business going, when otherwise it would collapse . . .

— well, then, you really must consider it.


This article is not meant to be a complete program for business continuity planning.

It’s goal is simple — to dispel the “myth” that working from home is an adequate back-up plan.

For most businesses, working from home will be a partial solution at best. Even then, it will require some serious pre-planning.

So don’t let your employer – and if that’s you, don’t let yourself! – be fooled by thinking, “We’ll just work from home.”

Virginia Nicols
Your Emergency Plan Guide Team

As they say on TV, “Watch this space.”  We’ll be back with another “lie” very soon! (It you don’t want to miss it, sign up below to get all our Advisories!)


IEDs — Improvised Explosive Devices — In Your Neighborhood

Share

IED soda cansAs I pulled out into the street today, I noticed a cardboard box on the curb, with trash spilling out of it. It hadn’t been there yesterday.

Suddenly a thought flashed into my head – could this be a bomb?

I drove off and forgot about it until later, when two news reports practically jumped off my computer screen at me.

IEDs in the today’s news.

  • Fox News reported that two brothers in Pennsylvania were arrested for building and detonating multiple IEDs in their own community over winter break from college. (Nobody was injured.)
  • A completely different article mentioned that Eric Harris and Dylan Klebold, the two boys responsible for the Columbine High School attack in 1999, had built and placed 99 IEDs as part of their plan. (15 students were killed and more than 20 injured.)

Of course, we’re familiar with IEDs in wartime settings. For a few years that seemed to be the biggest part of the news coming from Afghanistan.

But that was elsewhere. This article is about IEDs here in the U.S. and about the importance of “situational awareness.”

If IEDs are so easy to build that kids can do it, we can only assume that more explosions will take place, just like the ones reported on today.

How can we protect ourselves?

We need to know more.

This advisory is meant only as the briefest introduction. We are not explosives experts and, unlike most of the equipment we write about here, we have not personally tested any of the items we may talk about.

The questions we asked today . . .

What is an IED?

The name says it all. An improvised explosive device is not a traditional military weapon. It can be made out of a combination of “found” and conventional materials. An IED has five components: a switch to set it off, an initiator (fuse or blasting cap), the charge or explosive, some sort of power source, typically a battery, and a container to hold it all.

The image at the top of this article includes a couple of regular coke cans and two IEDs – the soda can upper left whose bottom has been punctured and “resealed,”  and the yellow Fanta can with the battery power source and fuse stranding beside it, ready to be inserted (yellow can image thanks to Renful Premier Technologies).

The bomb can be set to go off using a timer, or when it is jostled, driven over or stepped on, remotely by radio frequency, or by a suicide bomber him or herself.

What does the IED do?

It explodes. Depending on the size of the bomb, its blast (with smoke, shrapnel and heat) can spread for 100’s of yards. A bomb aimed at bringing down people can be filled with nails, pellets, rocks, etc. to create more injuries.

Of course, an IED could as easily be filled with “dirty” radioactive material.

How can we recognize an IED?

Not easily. Of course, bomb detection technologies continue to be developed. They include machines – and dogs – that can detect traces of explosives in the air.

But everything I read, including several reports from Homeland Security, says that even security personnel can only look for:

  1. People exhibiting unusual or suspicious behavior (the guys in the airport each wearing just one glove!)
  2. Items where they don’t belong (an abandoned backpack – or that box of trash on the street by my house)

“Soft targets” of course will likely be the most attractive to bombers. These include landmarks, special events (like the Boston Marathon, or sporting events), infrastructure including transportation systems, and malls and parks.

All these are easy to get into, and often people are unfamiliar with the venue and thus will not notice things or people that are out of place.

What can we do?

In 2013 President Obama signed a special report: Countering Improvised Explosive Devices. The only paragraph in it that appeared useful to me was:

“[We must] Improve public awareness of IED threats and corresponding reporting of suspicious activity to local authorities through enhanced information sharing resources;”

So, the number one thing we can do is be alert to our surroundings, and report anything suspicious.

  • If we see something that feels or looks doubtful, has a weird smell, is leaking or dripping — report it immediately to authorities.
  • If we notice someone buying large quantities of what could be bomb-making supplies — chemicals, fertilizers, fuses, tape, peroxide — take note and report. (The Pennsylvania brothers purchased multiple cans of lighter fluid.)

Obviously, if you’re familiar with a given environment, you will be the best person to sense that something is out of the ordinary.

It’s the simple rule that our local police repeat often:

“See something? Say something!”

So, start paying more attention to your environment. Train your kids to get their noses out of their cell phones. This is a case where YOU have the biggest role to play for the safety of all.

Virginia
Your Emergency Plan Guide Team

P.S. I feel there is a lot more to this topic. If you are interested in more details, check out this recent article from Jan Glarum, counter-terrorism consultant and instructor:

http://www.abetteremergency.com/blog/2016/04/ieds-training-impact/

And the report from the Department of Homeland Security, quoted from above:

https://tripwire.dhs.gov/IED/resources/docs/Countering%20Improvised%20Explosive%20Devices.pdf


Emergency Radio Update

Share
Panasonic Emergency Radio

How old do you think this radio is?

Radios — The Most Popular Piece of Emergency Gear

More of our readers “invest” in emergency radios than in any other one piece of emergency equipment. (Makes sense, of course. Without a reliable emergency radio, when disaster hits you could be completely cut off. Without a good emergency radio, you may not even know that a disaster is COMING!)

Because of this interest, we continually comment on what to look for when you’re shopping for a radio. And we regularly update our Best Emergency Radios review page to be sure the radios listed there are still available.

So it’s time for yet another radio update.

Status of our long-time favorite emergency radio

The Ambient Weather Adventurer, original cost around $30, has been our favorite for a while. We own more than one, and many of our readers have them, too. It’s a great radio to tuck into your pack or simply have on the kitchen counter.

Bad news! This model seems to have been discontinued. Here and there online you can find one for sale, but their prices make no sense! I saw one yesterday at $281!

So we aren’t recommending this model anymore. (Maybe you want to try to sell yours for a profit???)

New favorite, the Eton FRX5

Eton makes several different radios, and the brand carries a number of labels including one from the American Red Cross.

The FRX3 costs about $10 more than the original Ambient Weather, and has most of the very same features.

The one we’re recommending today, though, is the Model FRX5.  It costs nearly twice as much, but for that you get double the power, more lighting options, the ability to charge a smart phone, capture localized emergency alerts, etc.

Here’s a link to the radio: Eton FRX5 Hand Crank Emergency Weather Radio with SAME Alerts

And here’s what it looks like:

This is a very compact radio, just over 7 inches tall and a couple of inches wide. It operates on battery, AC, solar and crank. In fact, this radio earned the best score in a recent test measuring how much listen time was created by 2 minutes of cranking. (In this case, something like 10-12 minutes.)

What I like is the SAME Alert feature — stands for Specific Area Message Encoding. You enter in your county and the radio will automatically send alerts for that area.  (Seems to me this would be essential in Tornado Alley of the U.S.!)

When you click the link above, you’ll go directly to Amazon. Scroll down to the bottom of the Amazon page for a full description of this radio, with several more photos.

First time radio purchaser? Get answers to 7 important questions.

If you haven’t yet added a radio to your survival supplies, check out the Eton model above. Just click on the blue link to get started.

If you have NEVER shopped for an emergency radio before, go first to our Best Emergency Radio Reviews page because you’ll find there the 7 questions you need to consider before adding a radio to your pack, or to the survival kit of any of your family members. And you’ll see a number of other radios that we have reviewed and recommend.

The radio we would upgrade to if we were flush

I’ve mentioned before that we have an old Panasonic shortwave radio. (Joe’s had it ever since we’ve been together, and that’s over 33 years now, so its age is something older than that!) That’s the radio in the picture at the top of this page. Joe was changing the batteries, which explains the red ribbons at the bottom.

We have hauled this radio from coast to coast and back again, and Joe loves it.

Yesterday Joe handed me a spec sheet for the radio he would LIKE to have. It’s also available at Amazon, and also made by Eton. As far as I am concerned, it certainly looks a lot like the old Panasonic (!), but . . .Joe assures me that it’s “the ultimate” in radio receivers. It gets AM, FM, Aircraft, Longwave and Shortwave bands, has a rotating antenna plus you can tune-in stations by keying them in or searching for them. You can actually store 1000 stations!

If you’re really serious about emergency radios, check this one out.

Alert – Prices for the SAME RADIO vary considerably. Shop carefully to get the best deal!

Eton Grundig Satellit 750 Ultimate AM/FM Stereo also Receives Shortwave, Longwave and Aircraft Bands – Black (NGSAT750B)

And doesn’t it look a LOT like the Panasonic collector item above?


You need at least one emergency radio, and probably several. The good thing about radios is you can select the features you need (for each use or each person) and not have to buy features you don’t want, and you’ll save by choosing carefully.

Do you already have an emergency radio? Would you recommend it?  Let us know in the comments!

Virginia
Your Emergency Plan Guide Team

Don’t miss any of our equipment updates. Sign up below to get our Advisories directly into your email each week.


Plastic Bags – Use or Reuse for Emergencies

Share

PlasticBagsToday I stuffed 20 or so plastic bags into one, so I can take them back to the store to be recycled. It’s amazing how many accumulate in just a couple of weeks – and we carry reusable shopping bags!

Be that as it may, I always keep some bags handy for emergency use! Here are 20 ways they can come in handy or even save the day!

And the best part? You can collect these bags and add them to your kit for free. (Or at least you MAY get them for free. A new law was just passed in California to ban free plastic bags . . .)

Keep out moisture

  1. Use a plastic bag to line your Bug Out Bag, to help keep it water proof.
  2. Use zip-lock bags for storing food, small items, cosmetics, etc. in your bag.
  3. Put a plastic bag OVER a backpack to keep out the rain.
  4. Turn a large plastic bag – like a trash can liner – into a rain poncho. Just make a slit along the seams for your head and arms.
  5. Use bags inside your boots to keep your feet dry.
  6. “Wear” underneath your clothes for extra insulation.

Protect from dirt

  1. Pull a plastic bag over your hand before picking up something dirty. Then just turn the bag inside out and dispose of it.
  2. Tie a bag over your face to keep out blowing dirt or sand. (Of course, don’t use thin plastic that clings for this!)
  3. A plastic bag can work as a diaper. (Why, I remember the earliest plastic diapers that I used on my daughter really weren’t much different!)
  4. Water out of order? Use plastic compactor bags in the toilet to capture waste. (These won’t likely be bags that are reused. But having a supply is essential for your emergency stash.)

Aid for First Aid

  1. Use zip-lock bags to store different first-aid supplies, keeping them clean and dry. You can pack full small bags into a larger bag for easier and more efficient access. (For example, pack gauze in one bag, band aids in another, tape and scissors in a third; put them all in one larger bag.)
  2. Fill a bag with ice and apply over an injury to keep swelling down.
  3. Turn a plastic bag into a sling.
  4. Tie a bag over a bandaged wound to help keep it dry.
  5. Somebody sick? Use a bag to catch vomit or diarrhea. Yukky, but better than having it spread all over the car or your living area.

Other smart uses

  1. A bag with no holes can be a temporary carrier for water, snow, berries, etc.
  2. Twist a bag or two together and use them as a belt or a carrying strap.
  3. Fasten a number of bags together end to end to use as rope. Braid several strands for more strength.
  4. Use a white bag as a signal or strips of bag to mark the trail.
  5. If an emergency keeps you trapped in the house, use trash bags – for trash! You can always dispose of it later.

As you’re packing your Survival Kit, use a few extra bags as padding, to cushion the sharp corners on tools, keep shoes separate, etc. That way you’ll always have some at the ready.

And one last note about the “secret ingredient”

Many of the ideas above would work a lot better if, in addition to the right sized bag, you have DUCT TAPE. (That’s an old roll in the image, above. Recognize it now?)

Use duct tape to close gaps, make sure the bags stay put, and even to seal them up when they’re full of waste.

These two essentials – plastic bags and duct tape — should be in every one of your kits. And the good news? They’re practically free!

Virginia
Your Emergency Plan Guide Team


Readers and friends send me ideas all the time. Don’t hesitate if you have one. And don’t miss ANY of them. Sign up below to get all our Advisories.


Has the Zika Virus reached your neighborhood?

Share

Like the Killer Bees, the Aedes mosquitoes carrying the Zika Virus have spread across the southern part of the U.S. and are steadily expanding northward.

But people travel much faster than mosquitoes, and so the disease has outpaced the mosquitoes. Zika Virus MapHere’s a Center for Disease Control map (from April, 2016) showing where cases of the disease occur. UPDATE from December, 2016. Every state in the U.S. now has reported infections — a total of 4,756 in all!

So far, most of these illnesses are travel-associated.

But it is only a matter of time before the mosquitoes get here. In fact, because symptoms of the disease are typically mild and like those of a lot of other diseases, the mosquitoes may already be here and we just don’t know it because infections haven’t been reported.

Symptoms: fever, rash, joint pain and red eyes (conjunctivitis). People don’t get sick enough to go to a hospital, and rarely die. The concern, as we know, is for pregnant women, whose unborn babies may be affected.

So how to avoid bites from disease-carrying mosquitoes?

No matter where you live, or how old you are, here are three important steps to take to protect yourself and your family.

1 – Get rid of standing water!

It’s simple. Mosquitoes lay eggs in water, the eggs hatch, and you have bugs. So take a tour around your home and office and clean up or get rid of any standing water. In particular, look for . . .

  • Water barrels and recycle bins
  • Flower pots, saucers, toys
  • Areas around drains
  • Old tires
  • Pet or animal water bowls
  • Bird bath


2 – Wear long-sleeved shirts and long pants.

Mosquitoes are particularly active for an hour before and after dawn and dusk. Cover up and, if necessary, go inside to avoid getting bit.

3 – Use insect repellents.

We’ve probably all experienced that slippery smelly stuff that we slathered on as kids. It worked, but wasn’t very comfortable.

From what I can tell, things have improved somewhat. Here are some of the decisions you’ll want to make before buying any insect repellent.

  • What insects do you want to repel? We’re talking here at Emergency Plan Guide about mosquitoes, but some repellents are good for ticks, chiggers, etc. as well. Read the labels.
  • Do you want to use DEET? DEET (N,N-Diethyl-meta-toluamide, or diethyltoluamide), developed in the 1940s for use by the army, is the (yellow) chemical ingredient that is the standard for repellents. Tests show that the higher the concentration, the longer the protection. (For example, 100% DEET was found to offer up to 12 hours of protection while several lower concentration DEET formulations (20%-34%) offered 3–6 hours of protection.) Most of what I read suggests that non-DEET repellents shouldn’t be relied on for prolonged protection where mosquito-borne diseases are a substantial threat.
  • How long do you need protection? Note the concentration and buy and re-apply accordingly. Labels are very clear as to the percentage concentration, and will give you an idea of how long to expect the repellent to last.
  • Three chemical alternatives to DEET are Picaridin, Permethrin and IR3535. They don’t seem to affect plastic or vinyl the way DEET does, and have similar protective capabilities. Again, check percentage concentrations.
  • Looking for a natural repellent? Consider Oil of Lemon Eucalyptus. It seems to provide good protection with a pleasant odor (!) but protection may not be as long lasting as the chemical repellents.

All these repellents come in lotion, cream or pump, and some as wipes.

Note for children: Some repellents come as the ingredient in a “repellent bracelet,” but reviews suggest these bracelets may not be as effective as advertised. In any case, if you have children, be sure to note age restrictions that appear on some of these products.

What do repellents cost?

With all that info behind us, let’s move on to the good news.

Repellents are easy to get and quite inexpensive — less than $10.

There is no reason not to have a bottle or two handy in the car and in the house as part of your personal program to prevent the spread of disease.

Some recommendations for repellents.

These can be readily found at drugstores; clicking the link will take you to Amazon, where you’ll find a lot of detail and reviews from users, which I find particularly useful.

A DEET product at 98.1% concentration: Repel 100 Insect Repellent, 4 oz. Pump Spray, Single Bottle

Up to 10 hours of protection. Comes in a pump bottle small enough to carry easily.

From the same company, a natural ingredient formula: Repel Lemon Eucalyptus Natural Insect Repellent, 4-Ounce Pump Spray

This product is advertised as having a “cool, refreshing scent”. Up to 6 hours of protection.

Another version of repellent designed to be sprayed on outdoor clothing: Sawyer Products Premium Permethrin Clothing Insect Repellent Trigger Spray, 12-Ounce

This is advertised as being “as effective as 100% DEET.” Spray it on clothing, it won’t stain or damage, and will last through multiple washings.

My recommendation — Don’t wait until you read that the virus has hit YOUR town. Clean up your yard, then get and start using insect repellent. Pretty simple precautions.

Virginia
Your Emergency Plan Guide Team


A note: We’ve talked about mosquitoes carrying the virus. Be aware that it can also be transmitted through sex. If someone is infected, abstinence is the best protection.

Here’s a Gift for You or a Friend

Share

On a daily basis we’re caught up in the excitement of whatever storm or heat wave is going on, or in the latest political maneuverings. Or maybe news from the sports world.

Here in California, though, there’s a background noise like the far-off rumble of a train. It is  . . .

The steady threat of an earthquake.

It’s tough to get people to think about and prepare for something they may never have experienced, no matter how dramatic you try to make it. Our neighborhood emergency planning group comes back to the subject of “the big one,” and earthquakes in general, again and again!

Here’s one of our best neighborhood emergency response group flyers.

How to protect yourself during an earthquake and afterwards

Share this flyer!

How to use the flyer.

  • Make copies and go over it at a neighborhood meeting. You will be surprised at the number of questions that will come up and the number of comments people will make about the supplies they have stored. Discuss the status of gas lines in your neighborhood and how to tell if there is a leak. Take a look around the room you are in and ask people what furniture they would get under if the earthquake happened right this minute! If your meeting takes place at night, find out how many people in the audience even have a flashlight with them! (Action item: Come prepared with a flashlight to give away as a door prize.)
  • Make a few changes to the text and and use the flyer at work.
  • Send to family members and out-of-town friends, too.

Emphasize the warning about NOT STARTING YOUR CAR if you suspect a gas leak. Cars backed up in traffic jams have started devastating fires in earlier quakes.

So you can make any changes, and fill in the box at the bottom of the flyer,

Click here to download the Microsoft Word document.

Let us know how your meeting goes. What questions came up that you weren’t expecting?

Virginia
Your Emergency Plan Guide Team


If you need more background for likely questions, here are some earlier Advisories that may be useful:

Smartest Emergency Purchase I’ve Made Lately

Share

When it comes right down to it, having a simple phone plugged into a traditional landline simply makes sense. And when it costs so little . . .!

Corded phone for emergency
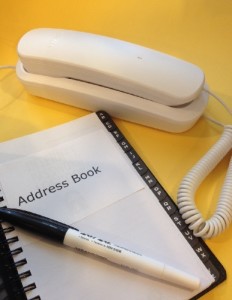
Five reasons to go out today and buy a corded phone.


1 – It works when other phones are knocked out or overwhelmed in an emergency.

How many times have we talked about what happens to regular phone communications in a widespread emergency? Power can disable cordless phones; cell phone towers can fall; systems can be overwhelmed. Ultimately, any device powered by a battery will stop working.

Landlines are the most reliable of all the options.

2 – Emergency Services will pinpoint where the call is coming from.

When you call 911 from a landline, emergency services know just where you are. When you call from a cell phone, they have to go through extra steps (using GPS) to find you. And if you’re on the tenth floor, and the only ID the emergency services get is the address of the building . . . When seconds count, a landline wins hands down.

3 – Your kids (visiting grandmother, babysitter) can operate a simple corded phone.

My granddaughters play with their parents’ cell phones all the time. That doesn’t mean they know how to actually turn a phone on, get past the password, find the phone app, and use the phone to make a call.

EVERY kid above the age of about 2 can be taught how to dial 911 from a simple phone.

Not every adult carries a phone, either. Consider elderly relatives. They, too, would easily be able to make an emergency call using a phone like the one in the photo.

4 – Yes, someone could tap the line – but not a random hacker.

Privacy is a concern whenever you’re using wireless communications. A landline is secure unless someone has actually installed wiretap equipment onto your line.

5 – You won’t misplace or lose it.

Your emergency phone is tethered to the wall. It will always be in that place so you will always be able to get to it immediately.

What will it cost?

A neighbor told me he’d bought a simple phone recently for “around $10.”

Frankly, I found that hard to believe. Still, when Joe went shopping for a phone yesterday, he came home from Walmart with the one in the photo. And it had cost him $5.95!

Naturally, you can get fancier ones, with a bigger price tag. (Check out our friends at Amazon. Use the search words: “corded phone.”) But we were looking for the simplest model possible.

Joe opened the box, pulled out the phone, and . . .

We plugged it into a wall jack — instant dial tone.

No registering, no passwords, no set-up, no waiting for a battery to charge, no software upgrades.

(What a relief after we had spent hours over the past week getting our over-the-air antenna to work with our TV and our Amazon Fire Stick. That’s another story, of course . . .)

Now, since the phone doesn’t store names or numbers, you’ll have to dig out an address book to go along with it. Or simply type up and print out a one-page sheet of emergency numbers as part of your family communications plan. (If you have children, you are likely to have this page already prepared for babysitters.)

Fasten this page to the phone itself, or tape it to the wall next to the phone, so it doesn’t get misplaced.

That’s it! It has taken me longer to write this Advisory than it did to get the phone set up.

Action Item: Do yourself a favor and get your own corded phone today.

You will definitely feel smarter and you and your family will definitely be safer!

Virginia
Your Emergency Plan Guide Team


Being prepared is more a state of mind than anything!  Keep your mind focused every week or so by subscribing to our Advisories. (Form below.) Free. Easy. Sensible.

Have friends who should be thinking about preparedness? Forward this email to them and suggest they subscribe, too!


Last-Minute El Niño Checklist

Share

28 Sensible Things To Do To In and Around Your House.

We’re expecting more balmy 80-degree days in Southern California.

A couple of years ago we braced for an El Nino event, and it didn’t happen. Since then, however, the forecast is back.  According to the NOAA’s Climate Prediction Center, a weak El Nino is likely to continue through the Northern Hemisphere summer 2019 (65% chance) and possibly fall (50-55%).  they have officially declared an Advisory.

El Nino Rainstorm

An El Nino will have a big impact – at the very least resulting in gutters rushing with water, small urban streams and canals overrunning their banks, and even larger scale flooding.

We normally make no “winter” preparations in Southern California.

But after the rains this past winter, we’re going to be on the lookout. Here’s a checklist for Southern California residents, assembled from a number of sources.

Before the rains and winds come, check out your home.

Outside and around the house:

  1. Clean out drains; keep ditches and other water ways clear of leaves and debris.
  2. Check your landscaping for areas where water may pool. Can you re-grade, or at least add mulch or other absorbent material?
  3. Turn off your automatic sprinklers if rain is threatened.
  4. Be sure your vegetables are planted above ground in raised planters.
  5. If you have fences, lights, fountains, etc., store or tie them down. Fasten outdoor furniture so it can’t blow away.
  6. Move potted plants to a secure spot.
  7. Check with your neighbors if you think water may drain from their property onto yours. They are responsible for making sure water from their property flows into the gutter or other drain.

The house itself:

  1. Check for leaks or weak spots in your roof. Make sure no debris is caught in flashing.
  2. Clean out gutters BEFORE it rains and be prepared to clean them again after the first downfall.
  3. Seal holes in the walls/roof made by cables or wires.
  4. Check around window glass and on trim; fill in any gaps with sealant or paint.
  5. Check porch and porch roof slope; make sure water flows away from the walls.
  6. If your property is low-lying or likely to be impacted by run-off, know where to find sandbags, how to fill them, and how to position them.
  7. Store plastic sheeting and heavy clips for emergency covering.

Put together emergency provisions to get you through short or extended power outages.

  1. Store water, non-perishable food and batteries to power flashlight or other lanterns. NO CANDLES; they cause fires.
  2. Have warm clothing and blankets for when the temperature falls and you have no heat.
  3. Be sure to have a back-up battery or other back-up for electrical medical equipment.
  4. Emergency items will disappear off store shelves before or immediately after the storm, and afterwards you may not even be able to travel due to downed trees, power lines, etc. Do your shopping early.

Communications may be interrupted.

  1. Your phones may not work if cables are cut, towers topple as the result of landslides, etc. An “old-fashioned” hard-wired phone is a good back-up.
  2. Prepare a list of emergency numbers. (Your computer or cell phone may be out of battery.)
  3. Know where to tune for emergency broadcasts and official information.
  4. Know the non-emergency number for your local police and/or fire. Use it, not 911, unless it is a matter of life and death.

Prepare your car, too.

  1. Do you need new tires? Bald tires are even more dangerous on wet roads.
  2. Check whether your tires are properly inflated; lessen the risk of hydroplaning.
  3. Do you need new wipers? Don’t wait until you’re caught in a downpour to realize you can’t see clearly.
  4. Need a new battery? Don’t get stranded because the car won’t start.
  5. Put together a survival kit for the car: water, food, flashlight, blanket, emergency radio.

Consider flood insurance.

As with all insurance coverages, the devil is in the details. However, here are some general observations that may help you to decide if you need flood coverage.

  • Flood insurance is not generally covered by regular homeowner policies.
  • A separate flood policy covers damage from flood waters to property and/or contents. (Check on the definition of “water.”)
  • Prices depend on the assessment of risk based on where you live. Premiums may range from $150 to over $1,500/year.
  • “Twenty percent of people who file claims come from non-high-risk areas,” says Mary Simms, spokeswoman for the Federal Emergency Management Agency’s Region IX, which includes California.
  • Federal policies have limits that would easily be overtaken in California, where property values are high. Separate “extra value” policies would be necessary to cover the full value of an expensive home.
  • A policy doesn’t cover living expenses if you have to leave your home while it is being renovated.
  • FEMA makes flood insurance available through a number of partners. The entire federal government flood insurance program is being revisited. Check out its website at floodsmart.gov.
  • It takes 30 days for any flood policy to become effective.

This is specialty insurance. Do your homework, starting with your regular agent. Then find and speak to someone who specializes in flood insurance, and finally get a third opinion.

One last thing to protect against the rain.

Oh, and don’t forget. Have a good umbrella handy! How could you go wrong with an umbrella with the name “RainStoppers?”?!

RainStoppers Auto Open Windbuster Sport Umbrella, Black, 48-Inch

There are bigger “Rainstoppers” too – 54, 50, 62, up to 68 inches! Just click the link or the image above to get to the right place to start your search!

Virginia
Your Emergency Plan Guide Team

Don’t miss a single one of our Advisories. Sign up below to get them every week.

Should you include a Geiger Counter in your Survival Kit?

Share

Three reasons for yes.

If you’ve been watching the news lately you no doubt know that our counterterrorism officials’ greatest fear is that terrorists will get their hands on enough nuclear materials to construct “dirty bombs” – bombs that could turn large areas of cities or communities into radioactive cesspools.

1. The dirty bomb threat

Admittedly, the odds are long on any one community becoming a target for this kind of attack. If you happen to live or work in or near a target area, however, having a reliable Geiger counter could be a real asset

2. Nuclear waste storage

While we don’t own one currently, we are considering purchasing a Geiger counter. For us, the decision is prompted by the fact that we are relatively close to a decommissioned nuclear power plant. It was closed a couple of years ago because of numerous equipment failures as well as design and construction flaws.

At first, its closure made us breathe a sigh of relief. Now however, our concern has risen again because levels of security and emergency planning for the decommissioned plant have been allowed to be reduced. And, finally, nuclear waste materials are being stored on the closed site – which is right on the Pacific Ocean and thus an obvious candidate for becoming the victim of storms and tsunamis.

(Why nuclear material is being allowed to be stored in this location is a question to be raised in another post. If you recognize this story as relating to San Onofre, in southern California, and it interests you, read more at: http://www.ocregister.com/articles/nuclear-658213-edison-waste.html)

3. Landfill threatened by fire

You may not have a nuclear power plant nearby, but consider this horror story that came out just last week.

According to St. Louis County (MO) officials, an underground fire at a landfill – a fire that has been burning for 5 years – is now within 1,000 feet of a nuclear waste dump.

Clouds of smoke have already polluted the region. Now it looks as though the fire will reach the decades-old dump filled with nuclear waste from government projects (like the Manhattan Project!) and weapons manufacturing — creating a radioactive smoke plume.

This entire situation became headline news in October when the school district sent out a letter to parents advising them that the school had “an evacuation plan for students” for when the fire reaches the landfill. Apparently, no plans for stopping the fire.

(Again, get more on this story at:  http://thefreethoughtproject.com/st-louis-preparing-nuclear-disaster-landfill-fire-nears-radioactive-waste-site/)

Could you use a Geiger Counter?

If you find yourself in any of these situations, or in similar ones, understanding your exposure to radioactive material may be prudent. If you travel to Japan, or if you are concerned about radiation levels in the food you eat, a Geiger counter could provide you with peace of mind.

In any case, here are two pieces of equipment to consider:

SOEKS 01M Plus Generation 2 Geiger Counter Radiation Detector Dosimeter (NEW Model replaces SOEKS 01M)

GCA-07W Professional Geiger Counter Nuclear Radiation Detection Monitor with Digital Meter and External Wand Probe – NRC Certification Ready- 0.001 mR/hr Resolution — 1000 mR/hr Range

There are less expensive options, including . . .

Smart Geiger Counter Nuclear Radiation Dosimeter “X-Ray” and “Gamma” Detector Smartphone Android iOS with App

The cost for the Smart Lab app (less than $35 when we wrote this) is a no-brainer for people who live and/or work in areas of moderate risk, or for people who just want a backup unit to carry on the road.

We are considering purchasing one of these for testing in our CERT program and, if they work as well as advertised we’ll probably purchase a half dozen for our Special Teams. As for the more expensive instruments, we recommend that you review all of the listed makes and make your decision based on your perceived level of risk and your own personal comfort zone.

UPDATE as of 10/25/2015: When we inquired regarding battery life, we received this email from John at Images Scientific Instruments, Inc., the distributor of the GCA-07W model shown above:

The 9V battery is not rechargeable. You can expect 10-12 hours of Geiger Counter usage per battery. Your battery lifetime time may vary. To extend battery life keep the LCD backlight off. 

The Geiger counter has an external wall transformer power supply for extended monitoring.

Final Note:  If you plan to volunteer as an Investigator with MUFON (Mutual UFO Network) to check out UFO sightings and test for radiation at reported landing sites, you will be required to provide your own Geiger counter. In this case, you will probably want the most sensitive unit  that fits your budget. (!)

Joe Krueger
Your Emergency Plan Guide Team

An earlier Advisory describes other safety concerns and radiation-related items for your survival kit.  Read it here.


Get out now! Your Home Evacuation Plan

Share

Sample family evacuation plansStop reading right now.

Look up. Look around.

What are TWO WAYS you could get out of the room?

  • Will that window open?
  • Can you really squeeze through?
  • Can you get down outside or do you need a ladder?

Did you have to pause and consider?

I hope not!  These are answers you should know before anything happens.

In fact, everyone in your family should know the answers to these questions BEFORE an emergency happens.

Are you leaving your children defenseless?

Unless you point these exits out, your children will never think of them. In an emergency, they will likely run to try to find YOU, even if evacuating would save them.

Here’s an exercise you can do on a Saturday that will answer questions and give you all a much better sense of security.

Design your Home Evacuation Plan together.

It’s a step by step process that everyone in the family takes part in. You’ll need a pad of paper and some colored pencils. And one BIG piece of paper to assemble everything on.

Step 1.  Sketch a plan of your home.

One sketch for each floor, or, if your young children are part of the exercise, let each child sketch a separate room. Approximate sizes are fine.

Be sure all doors and windows are marked on the plan.

Combine separate pieces into one master plan. (You can redraw or even cut and paste.)

Step 2. Mark at least two exits from each room on your plan.

Plan in hand, take a walk from room to room. Mark potential exits. You may want to use two colors, one for PRIMARY and the other for SECONDARY exits. You may be able to get out, but can all the children? What about grandmother?

If you need special equipment to escape (a ladder), note that on your plan and mark where it is stored.  (Obviously, if you don’t already have the equipment, start a shopping list on a separate piece of paper! More resources below . . .)

Step 3. Note the location of special safety shut-offs for your house.

Keep touring the house. Mark where utility shut-offs are located. Does everyone know when and how to shut off the water? The gas? Again, is a special tool required, like a wrench? Note where it is stored.

Where are the electrical shut-offs? There may be more than one panel. Talk about under what conditions you would shut off the electricity.

Step 4. Where are emergency supplies kept?

In particular, note on your plan the location of fire extinguishers, flashlights and lanterns, and first aid kits.  (You can use icons if your plan is getting crowded.)

Where are your evacuation/survival kits stored?

Step 5. Last step: mark on your plan the family’s emergency meeting place — OUTSIDE of the house.

On the sample plan below, the family has designated a particular tree as the meeting place. Be sure the meeting place is far enough away from the house to keep people safe in case there’s a fire. You may want to label a second meeting place if the first one isn’t reachable, even though the second place may be off the map.

evacuationplanwoodbuffalo(Thanks to the Regional Municipality of Wood Buffalo, Alberta, Canada for this drawing.)

A few more thoughts to help drive the point home:

  • Save and review your plan from time to time, particularly if you add new rooms, new equipment, etc.
  • Take a photo of the plan and share it with other family members (or maybe even with students at a show-and-tell session at school) to see if others will be inspired to follow suit.
  • If you will be shopping for emergency equipment, you may find more info in some of our special Advisories, listed below.

Can you get this done before the month is over?? Good luck!

Virginia
Your Emergency Plan Guide team

More Resources  from Emergency Plan Guide:

Escape ladders: Your healthy 12-year-old can get down any type of ladder, but what about others in the family?  We’ve looked at many of the escape ladders and think that the  Werner, 2-story version is a good place to start your shopping. It can carry more than one person at once. Here’s the link to Amazon: Werner ESC220 Fire Escape Ladder, Two Story (Be sure to look at the “product page” and scroll through the images to get a better idea of what the ladder is like.)

Fire extinguishers: We actually experienced a kitchen fire and used the extinguisher we’d just put in place!  Read the story and learn more about the different types of extinguishers. A good all-purpose extinguisher is this one, made by Kidde: Kidde 466227 ABC Pro Multi-Purpose Dry Chemical, Commerical and Industrial Fire Extinguisher, UL Rated 1-A, 10-B:C

First aid kits: Most kits you buy are woefully lacking. But you can start with a purchased one and add your own. We held a neighborhood meeting to discuss first aid kits — read about it here — and my search on Amazon for a good starter yielded this one by AAA: AAA 4180AAA 121-Piece Road Trip First Aid Kit


More Live Shooter or Terrorist Attacks?

Share

When statistics show an increase in just about anything, we always have to question whether the numbers are higher because they truly are, or because reporting has gotten better.

In the case of live shooter or terrorist attacks, it seems that both are at play. That is, there are more incidents. And the reporting, almost instantaneous, is now “enhanced” by graphic video taken by security cameras or by people at the scene and shown over and over again on television and other media.

Here at Emergency Plan Guide, we can’t ignore this trend. In fact, the U.S. Department of Justice’s 2013 study clearly shows it.

Active Shooter EventsAccording to this FBI study, in 2000-2013 there was one live shooter event every three weeks.

How many incidents need to be added to this chart for 2014 and so far in 2015??

Special Report: Live Shooter and Terrorist Attacks

Emergency Plan Guide Co-Author Joe Krueger has written a special report on this topic. Part One, published today, is entitled:

“What are the chances of you being involved?”

Part Two will be appearing in a week or so. It will focus on Workplace Violence. With over 2 million incidents a year, this is something that many more of us run the chance of being involved in.

But that’s next week. While we wait for Part Two, please take the time to read Part One of the Special Report.

It starts with some observations about the recent heroic actions taken by the Americans on the train headed to Paris.

They were certainly inspiring, but before you think that they could easily be replicated, read Joe’s perspective on the event. (You may not realize that he was trained in counter-terrorism, and although it hasn’t been his career, that’s not information or sensitivity that you lose.)

What can you do to protect yourself?

As always, Emergency Plan Guide is looking for sensible, do-able actions we can all take to improve our chances of surviving a disaster, whether natural or man-made.

We do not advocate arming more citizens; the thought of having untrained, aggressive or worse, terrified, gun-toters anywhere near us is repugnant.

But we do believe that taking time to mentally prepare before anything happens will give you a much better chance of making the right snap decision if it becomes necessary.

To that end, the report recommends two inexpensive books that we think make sense for our readers.

Head over to Joe’s report and read it. Here’s the link again: Special Report: Live Shooter and Terrorist Attacks

Thanks.

Virginia
Your Emergency Plan Guide Team


Home Base – The Hub of Your Family Communications Plan

Share

In a true emergency, you may have no easy way to communicate.

Home Base Hub of Family ommunica

In a widespread or severe emergency we know that phone communications may be spotty, at best.

An earthquake may cut cables and topple cell towers. A bad storm or hurricane may not cut underground cables, but it can damage all above-ground services including electricity.

For sure, in an extended power outage, even if distant towers and/or satellites are still functioning properly, cell phones and computers will eventually run out of battery. (Yes, yes, if you have solar panels, you may be able to recharge your devices.)

Being cut off from family members is terrifying.

Naturally, you and they imagine the worst. You will be desperate to get in touch.

When local phone service is out, what’s your best course of action?

Reach out to your family’s “Home Base.”

Trying to make a local phone call, whether via landline or cell, may be impossible. However, an outbound long-distance call or text may get through!

This is why we recommend that you talk things over with your family and come up with an out-of-state person who is willing to serve as your “Home Base” – the one place that every family member knows about and tries to contact as soon as possible.

Qualifications for your “Home Base” contact.

Naturally, this needs to be a person you trust. In addition, is your Home Base contact . . .

  • Willing to answer the phone day or night?
  • Able to take down and forward complete messages from people who may be nervous or even injured?
  • Able to receive TEXT messages (cell phone) and EMAIL messages (computer) as well as phone messages?

Remember, family members may be trying to send messages themselves, or they may be asking others (Red Cross, medical personnel, school employees, colleagues, First Responders) to communicate on their behalf. Those other people may have any one of a variety of communications devices.

Your job: Know your family’s Home Base phone number.

In a true emergency, you won’t be able to check your phone contacts on your cell phone or computer. You may not have your address book.

Your children will be in this same situation.

The only thing you can count on is an emergency listing that you carry in your wallet (assuming it hasn’t been lost or ruined) or a number that you have memorized.

Protect your family!

Take the time, as a family, to discuss who your Home Base contact should be, and get their agreement. Discuss safe places you could go if you can’t go home.

Talk about the importance of confidentiality for this information.

Most important of all, make sure all family members memorize the Home Base phone number!

Virginia
Your Emergency Plan Guide Team