Category: Family Survival

Urban Survival Tools

Share

Wilderness survival is still — and always — a hot topic. But according to the most recent census, only 14 percent of Americans live outside a metropolitan area — 86 percent of us look to a metro area for jobs, activities and amenities. So when it comes to disaster preparedness, we need urban survival skills!

storm damage

A safe room anywhere?

As far as I can tell, urban or suburban survival translates directly into being prepared to shelter in place.

Let’s take another look at some of the requirements for being able to effectively shelter in place.

First choice for a great place to shelter — a safe room

Even in an urban setting, you may be able to construct a traditional safe room inside your house. If you are in full construction or upgrade mode, you would build your room to code and include safety and comfort features.  You might even go to the effort to make the room unobtrusive or even invisible, with a hidden door.

If you live in an apartment, though, choices are different. For you, the best idea would probably be to turn an existing room or an interior walk-in closet (big enough for everyone)  into a strengthened room that could better withstand a storm or even an incursion by bad people.

In either case, designing and creating a special room would take money — probably anywhere from $1,000 (VERY low end) to as much as $10,000.Whatever your budget, and whatever the home you’re starting with, here are 5 major areas to focus on.

1. Door and walls: reinforced steel door frame, exterior-style reinforced door that opens INWARD, and heavy-duty deadbolt locks. Get the best you can afford that won’t totally overwhelm the space or stick out like a sore thumb. Whatever you do, be sure to secure hinges with 3-inch screws and use 3 inch screws on the strike plate of your lock, too. Here’s an example of a deadbolt lock highly rated by Consumer Reports. The lock is expensive — over $100 — but as Consumer Reports points out, it’s probably not more than your insurance deductible.


Paint the door and trim to match the rest of the house. You may even want to consider a hidden door; take a look at this model, built by the well-known Murphy bed company:

As for walls, they can be reinforced by pouring concrete into the spaces between the studs, or adding a layer of kevlar or steel sheeting and then covering it with drywall.

2. Windows are difficult to reinforce, so plan a safe room with NO windows.

3. Water and sanitation: It would be great if you had a bathroom built in. If not, store water and get a camping potty, realizing you’ll have to empty it at some point. I’m a big believer in 5-gallon buckets for a variety of uses. Here’s one that serves as a portable toilet. (If you already have a bucket, you can probably get an attachable toilet seat for about $10.)

4. Ventilation: If your room is too tight, you won’t be able to breathe. Figure out appropriate ventilation (not requiring fans — remember, the power will be off).

5. Food and other emergency supplies: Your room is a good place to store your emergency supplies — food, emergency radio, lights, first aid, warm clothing, tools, etc. Don’t forget your prescription medicines.

Interested in more about safe rooms? FEMA has produced some very detailed plans, suitable for a professional builder. (Start your search here.)  And Wikihow’s article about building a safe room, here, is a good overview.

In the aftermath of the storm

Assume the storm is over, you and your family are safe, but your home or building has been partly damaged. What might you need in order to make sure it’s habitable for a while, since you have no place else to go?

1, Basic hand tools and construction supplies

If the power is out, power tools are out, too. You’ll need battery operated tools to start — and you’ll soon be down to hand tools. You probably have some of the following tools at home now, or can get them locally. Just be sure to have them BEFORE the disaster threatens. Your local hardware stores will sell out immediately.

And as you shop, consider quality. Poor quality tools are dangerous and ineffective.

This is a simple starter list. The more skill or experience you have, the more you’ll want to add.

With a good hammer, saw and/or hacksaw, and pry bar you can remove debris. I have used tools like these many times, and as a non-professional I’ve found that the right weight and size is really important. Too heavy, you just can’t wield the tool for very long.  Too light, it won’t do the job. Below, you’ll see some examples along with my comments.

  • Hammer 16 oz one piece flat for ripping. We’ve all used hammers, but the standard home hammer has a rounded head (so it doesn’t damage the wood) and a rounded claw (for pulling out nails). If you build a lot, your home hammer probably has a wooden or a rubberized handle to lessen the vibration. If you’re not really into tools, you may have a short handled hammer or tack hammer that you use to hang pictures. But for emergency use you need something different — something  TOUGH and HEAVY enough to rip apart debris. This one looks great, and isn’t expensive. (Click on the image to get current prices.)

  • These days we don’t use hand saws much, since everybody has a power saw. However, in an emergency your power tools will be useless. You’ll need a traditional, all purpose saw. This Stanley version is only 18 inches long, not as long as a carpenter’s serious wood-cutting saw, but I think it would be just right for in-close work.


  • Use leverage instead of your own muscle power!  Again, the right length and weight of a prybar is important. We have several prybars in our shed, from 12 in. long up to 30 in. (and one giant one for rescue). I find that a 24 inch bar is carryable, packable, and still long enough so you can apply the pressure you need.
  • You will definitely want a tarp and tape to keep out the weather. This tarp is big enough but not too big, and it’s not too thick, either. (The heaviest quality might work fine for a semi-permanent install, but in our experience is just too difficult to work with in a temporary emergency situation.) As for duct tape, I just assume you already have some!  (Again, click on the image below to see full details and price for this tarp, and to compare to others.)

Store these materials where you’ll be able to get to them when the storm is over.

2. Specialty tools for dealing with debris

Work gloves – get the right size!  These gloves, for example, come in six different sizes; they have a wrist adjustment, leather palms for a good grip, etc. Actually, Joe and I  have two pairs of gloves each in our Survival Kits, to start with.

3. Dealing with metal

Not everything can be disassembled by force. In an urban setting you may need to open metal cabinets, remove fallen ceiling ductwork, get into utility closets, etc.. To do this, you’ll need to unscrew, unlock or cut wire or metal. (A pair of safety goggles is a good idea, here.)

A very good multi-tool can be easily stored and can serve a number of these construction purposes. (Avoid a multi-tool with hammer. It won’t be heavy enough to do the debris management we’re talking about.)

Some of the very best Swiss army type tools have the usual blades and saws, including metal saws, and also include different size screw drivers plus a ratchet with multiple bits.  There are different models, and prices vary from around $120 to over $200, so it’s a good idea to shop.

Start your shopping by looking at the Victorinox Spirit Plus model, shown below. This is one of the very few products on Amazon that gets awarded five full stars by users. I’d look carefully at this one. It’s pretty pricey (around $150 as I write this), but superior in every way. Click on the image to get current pricing.


As a comparison, the Leatherman Wingman Multi-tool is one we recommend for carrying in your 3-day survival kit.

It has basic blades and screwdriver, and costs $35 – $40. (Click image to get exact pricing at Amazon.) Both the Leatherman and the Victorinox weigh about the same amount – 5-7 oz. – so that’s not a deciding factor.

As always, pick tools appropriate for the person using them.

Good tools leverage the strength of the user, but only when they are properly used. Be sure children know how to use any tools before including them in a child’s survival kit or handing them over for a child to do a job. (As I am sure you  have found, some kids are really very capable — but they need training!)

OK, that’s it for now. In an upcoming Advisory we’ll be talking about staying warm in an urban setting. Stay tuned. . . and in the meanwhile, get those multi-tools!

Virginia
Your Emergency Plan Guide Team


Evacuation Fundamentals

Share

“What do we do?”  “Where do we go?”

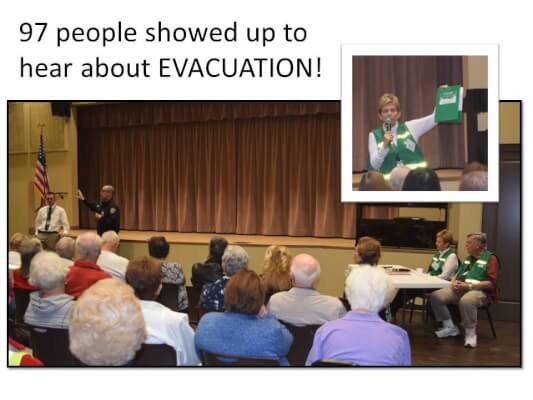
Evacuation MeetingAfter the wildfires last fall, we kept hearing these two questions from a number of our California neighbors.

The questions seem simple, but people were not satisfied with what they were hearing.

So, we invited the local fire department to address the topic at a special community meeting. Nearly 100 people showed up that evening to get answers to the questions we had sent in advance.

Here are some of the questions we sent, and some of the answers we got. I recommend you consider finding out what YOUR local First Responders would say if asked.

“How will we know if we are supposed to evacuate?”

An evacuation order can come from the governor, the mayor, or the fire department. In every case, once the decision is made, the order will be announced via television, radio, various social media (Facebook and Twitter), the app iAlert, reverse 911 services – and even loudspeakers on cars or trucks.

Your job is to be aware of the POSSIBILITY of an order, and be ready to act when it comes.  That means, at the very least, having your Evacuation Kit packed and your car full of gas. Having a battery-operated emergency AM radio will keep you up to date if power goes out.

“Where are we supposed to go?”

When an order is given, it is typically accompanied by a list of shelters that will be available. The addresses of the shelters will be given, and new shelters will be added as the incident evolves. (In our community, all high schools and community centers are prepared to serve as shelters.)

You can download the FREE Red Cross Shelter App for your Smart Phone and get a list of all open shelters in your area. (Look for Emergency App at the Red Cross site.)

Shelters are set up by the Red Cross and staffed by Red Cross and other volunteers, including CERT volunteers. Note that service animals are allowed in the shelters, but pets are NOT ALLOWED. You need to make arrangements for your pet beforehand!

“When is the best time to leave?”

Our speaker from the Fire Department emphasized that you do NOT need to wait for the order. You can leave any time you want – and sooner may be better than later. He told us that when the fire department arrived in one community where the order had just been given, everyone was already gone!

Of course, you don’t need to go to a shelter. You can stay with friends or relatives, stay in a hotel, etc. (If you have a pet, you may want to put together a list of pet-friendly hotels long before you might need one.)

Note: Once an order is given, and you have left your home, you will NOT BE ABLE TO RETURN until the official all-clear is given. Police need to be able to secure the neighborhood so fire fighters and other emergency personnel can move freely and safely.

“What about traffic?”

Cities usually plan for evacuation in phases, with specific traffic patterns laid out in advance. Streets can be converted to all-one-way. Unfortunately, in widespread evacuations as we saw in Florida last year, even freeways can become parking lots as everyone heads out in the same direction. (I don’t know why those Florida freeways weren’t converted to all-one-way!)

We saw during the Northern California fires, and later during the mudslides in Santa Barbara County that evacuation orders were delayed precisely because officials feared panic and traffic jams – and those officials have come under severe criticism. This is a tricky problem.

But it’s another reason for you to evacuate early if you can.

“How long can we stay in a shelter?”

Per the Red Cross, shelters stay open “as long as there is a need.” At the same time, while the shelter provides basic food and a place to sleep, the Red Cross recommends you bring your own supplies to make your stay more comfortable. On their suggested list:

  • Prescription and emergency medication · medical equipment such as a wheelchair/walker, oxygen, etc.
  • Extra clothing · pillows · blankets and sleeping bags
  • Hygiene supplies
  • Flashlight with extra batteries
  • Small board games · books for entertainment
  • Specialty snacks and juices for those with dietary restrictions
  • Baby food and formula · diapers
  • Beach chair or camp chair

You may NOT bring illegal drugs, alcoholic beverages or guns.

“What about people who can’t evacuate without help?”

Our Fire Department and the head of the Office of Emergency Management assured us that they know our community well enough to know where extra help would be needed – at hospitals, nursing homes, etc. Our speakers also agreed that having a current list of neighbors who would need extra help would be invaluable.

Unfortunately, putting together such a list is a challenge. In our senior community, our emergency response team attempts to collect information about neighbors. But some people are unwilling to provide the personal medical or financial information that would direct special assistance to them in an emergency. So, our list is always incomplete. Have you had success building a list?

“How should we prepare our homes before we leave?”

Fire. Here in California, where the danger is likely to be from fire, we are told by CalFire to take the following steps to protect our homes:

  • Build using fire-resistant materials.
  • Clear out underbrush and overhanging branches from around the home. (Create a “defensible space.”)
  • Block vents and under-eave spaces where embers can catch and smolder.
  • Remove curtains and move flammable furniture away from windows.
  • Remove flammable lawn furniture and other outdoors hazards.
  • Shut windows and doors and leave them unlocked.
  • Leave the lights on (to direct fire fighters if it’s smoky).
  • Do NOT leave water or sprinklers running (will lessen water pressure for professional fire fighters).

Flooding. In areas where flooding is the risk, suggestions include:

  • Make serious changes to the way your home is built: make sure electrical panels, appliances and heating systems are elevated, not in the basement.
  • Waterproof your basement.
  • Raise the whole house (stilts?).
  • Clean out gutters, downspouts and drains.
  • Move items you want to protect to a higher floor or to a safer place altogether.
  • Before you leave, turn off gas, water, and electricity if you know how and can do it without touching water or standing in it!
  • Put sandbags around your property.

Hurricane a risk? Again, some basic precautions before you leave:

  • Close storm shutters or board up windows with 5/8” plywood, cut to fit.
  • Install addition clips or straps to fasten roof to the frame.
  • Clean out rain gutters and downspouts.
  • Determine how and where to secure your boat.
  • Unplug radios, TVs, and small appliances (not refrigerator or freezer).
  • If you live in a mobile home or a high-rise apartment, evacuate for sure. These structures are more vulnerable to both wind and flooding.

Now, consider these last three steps everyone can take.

Start To Work Now On These Longer-Term Protections

Check Your Insurance.

By now, you should know if you are in a burn corridor, a flood plain, an inundation footprint (from a dam collapse) or in a coastal area where your home could be impacted by a hurricane or tsunami. The right insurance policy could help protect you in the aftermath of one of these disasters. It’s likely that your regular homeowner’s policy will not be sufficient. Check with your insurance carrier and do preliminary research yourself, online.

You can start here with our Advisory: Flood Insurance

Get Involved In Your Community.

With so many disasters happening lately, many people are taking political action to strengthen their communities.

First, they are forcing community leaders to reconsider zoning and building codes and their enforcement. (Think about the massive landslide in Washington State where homes were build below a hill that had been identified as unstable. Think about the new homes built flat on the flood plain in Houston.) People are demanding better emergency alerts and automated communications.

Second, they are building community emergency response groups, so knowledge and assets can be shared in case of a disaster. (You saw Joe and me at the table in the picture at the top of the article. Later — the inset — I jumped in to wave the information about upcoming CERT classes in our city!)

Neighbors are the true first responders — they are already there when the disaster hits. You want the most qualified neighbors possible!

Pack Your Evacuation Kits.

This entire article assumes you have a kit ready for each member of the family in case an evacuation is called. Our Fire Department speaker mentioned just three things: Food, Water and Medicines. For a more complete list, check out our complete list of Emergency Supplies — scroll down to the Evacuation Kit section.

This turns out to be quite a list. I hope it’s useful as a review or to stimulate some remedial action on your part.

Virginia and Joe
Your Emergency Plan Guide Team

P.S. This isn’t the entire list of questions we came up with for our guest speakers. If you are thinking of approaching YOUR fire department and police department, drop me a line and request “the full list of evacuation questions” and I’ll send it to you directly. Naturally, you’ll want to customize your list. But we have found over the years that by providing speakers with questions we get a much better presentation than if we just invite them to “come give us a talk about safety!”

Hazard Signs – Which do you recognize?

Share

We so often prepare for big weather events that it’s easy to overlook everyday situations that could turn into disasters in just a minute —  or even a second. This Advisory addresses some of those emergencies-waiting-to-happen.

Remember “the old days” when we used to look forward to seeing signs along the highway?

Burma-shave signs were the best. Of course you had to be able to read them backwards. If you don’t know what I’m talking about, check with a friend who roamed the roads in the fifties. And see the P.S. for an example!

These days roadside billboards are restricted in many places, but as we drive we still are likely to see directional signs, advertising signs, and dozens of hazard signs.

Ignoring or not recognizing hazard signs could be life-threatening.

But, which ones are which?

A while back, we presented a quiz with some common signs. Today we have six more – and these are a lot less obvious. (There’s one easy one in the collection below, to be sure everyone gets at least one right!)

Which ones do you recognize FOR SURE?
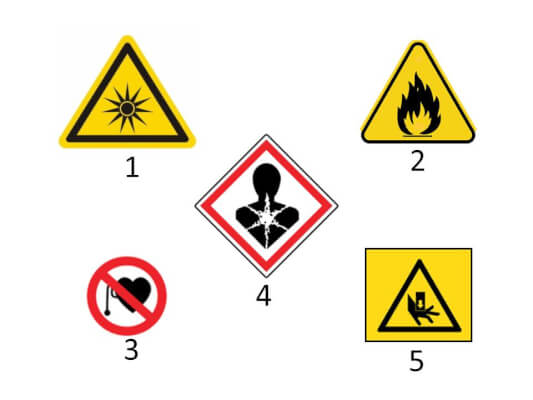
Hazard signsKnow what these signs mean!

  1. Danger of optical radiation – refers to light: ultraviolet, visible and infrared. Too much can damage the cornea or retina of the eye.
  2. Flammable or highly flammable – readily combustible. (Note: the words flammable and inflammable can be used interchangeably!)
  3. Radio frequency hazard — danger to heart/pacemaker.
  4. Carcinogen – capable of causing cancer, particular danger to reproductive or respiratory organs.
  5. Pinch hazard – A point in between moving and stationary parts of a machine where — in this case – your hand can get caught.

Now, here’s one more that you have seen hundreds of times but may never have really focused on.

The NPFA “Fire diamond” or “Safety square”

The National Fire Protection Agency started using these signs in the 1960s to help emergency crews know what is being stored inside a building, a tank, a truck, a pipeline, etc. Once you become aware of these signs, you’ll see them everywhere.

But exactly what do the colors and numbers mean?

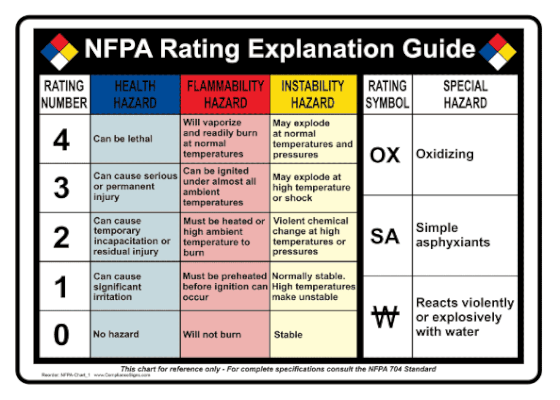
Briefly, red indicates flammability, blue indicates level of health hazard, yellow indicates chemical reactivity, and white contains codes for special hazards. The numbers range from 0 (no hazard) to 4 (severe risk).

So our example #6, above, would be read as follows:

  • Red, Flammability — 3. “Can be ignited under ambient conditions”
  • Blue, Health –- 1. “Could cause irritation or temporary incapacitation”
  • Yellow, Chemical — 0. “Normally stable”

Here’s the full chart – thanks to ComplianceSigns.com

(When you see the symbol at the bottom, right, you’ll see how important these are to fire fighters.)

NFPA GuideSetting off on a family trip? You can encourage “reading hazard signs” and “reading diamonds” as entertainment, as long as you can pry the kids away from their devices.

Virginia
Your Emergency Plan Guide team

P.S. More about Burma-Shave jingles. Burma-Shave was a brushless shaving cream that advertised its product on a series of signs along the road. Each line appeared on its own sign; you read them one at a time as you passed by. (If they were on the other side of the road, then you read them last-to-first, of course!) The signs often dealt with romance and grooming, but some were totally off the topic, like this one (Thanks to  https://fiftiesweb.com/pop/burma-shave-1/    )

Her chariot
Raced 80 per
They hauled away
What had
Ben Her
Burma-Shave

P.P.S. And don’t forget the Beginners Hazard Sign Quiz –  https://emergencyplanguide.org/nine-hazard-signs-a-quiz/.  Use these quizzes to start a conversation with your family and your neighborhood emergency response group. This is stuff we all should be familiar with.


Survive An Airplane Disaster

Share

Announcement from the cabin attendant, “In the unlikely event . . .”

My last airline flight was a short trip from L.A. to San Francisco. It was a Friday evening flight so before we even started taxiing people had removed their coats and shoes, turned off their overhead lights, and curled up to get in a quick hour’s nap after a long week’s work.

"you have 90 seconds to get 370 people through this doorway . . ."

“You have 90 seconds to get 370 people through this doorway . . .”

Alarm bells started going off in my head!

Why?  Because I had just finished reading a series of articles about airline safety and here are some of the details that stuck with me.

Three Airplane Safety Facts

It’s easy enough to learn and remember these. Make sure your family knows them, too.

Fact 1: Most airplane disasters happen between 3 minutes after taking off and 8 minutes before landing.

According to a 2017 Forbes.com article, nearly HALF (48%) of all fatal airline accidents happen during final approach and landing. Taking off and starting to climb accounts for only about 13% of fatalities. These statistics have changed over the years; take-offs have become safer as both engines and runways have been improved. Engines are stronger, making it easier for planes to off the ground. Runways have been extended, and in some cases with break-up-able concrete, so if a plane can’t take off it can at least stop safely.

In any case, during both take off and landing the planes are close to the ground, the crew is busy, and options are necessarily limited.

With all that in mind, I was horrified to see that at take-off most of my co-passengers were NOT thinking about emergencies, had NOT taken a look at the emergency brochure, had NOT checked their flotation device, had NOT noted the number of rows to the nearest exit.

Worst of all, many were barefoot.

If we had to evacuate, these people would be groggy, confused, and naturally hesitant to scramble out in the dark onto a strange, maybe hot or broken surface – or into the ocean!

We were set to fail the 90 second evacuation test.

Airplanes are designed to get everyone out within 90 seconds. To accomplish that, over the years airplane designers have widened the galley ways (to 30 inches), widened evacuation slides to handle 70 people a minute, etc. Planes need to be certified that they can be evacuated within the 90 seconds using only half the emergency exits.

The 90 seconds isn’t an arbitrary number.

It’s about how long you can keep moving to save yourself if you can’t take a good clean breath of air.

And that’s because, in the case of a crash, more people perish from smoke inhalation than from injury

Update: The evacuation rule is also set at 90 seconds because that’s about how long it takes for a fire to develop into a flashover — that is, when everything within the cabin bursts into flame.

Well, our flight didn’t have a problem (after all, I’m writing this) and when we landed, I witnessed an orderly exit. Still, it took a long, long time for everyone to dig out their hand luggage from under the seats and from the overhead racks. And this reminded me of the second thing I learned.

In an evacuation, people naturally want to bring the stuff they boarded with. The problem?

Fact 2: Evacuation slides on modern passenger aircraft are designed to rapidly remove human bodies from a plane that may be as tall as a two story building.

Key word is “rapidly.” A rapid evacuation works only if you JUMP onto the slide. It won’t work if you attempt to sit down to start your slide.

Jumping and falling that fast means you cannot control suitcases, computer bags, or rolling luggage carts. For sure, slowing your fall means you will be plowed into by the 350 lb. guy coming behind you with HIS rolling cart.

Even in evacuation drills, trained volunteers with nothing in their hands get injured sliding that fast and that far.

Luggage on the slide makes injury inevitable.

Fact 3: Once you’re on the ground, the next sensible thing to do is get away from the airplane. Fast!

We have all seen movies where the heroes run away from a burning car, house, or boat and it blows up behind them. (Great special effects.)

This image could just as well be an airplane loaded with aviation fuel.  Do our heroes stop to take a video of the flames behind them . . .?

While we’re on the subject, here are just . . .

A Few More Airline Travel Tips and Good Ideas

Take another look at that photo at the top of this Advisory, then keep reading . . .

Negotiating Emergency Doors and Exit Rows

Apparently getting to and then through an emergency door isn’t always as simple as it looks in that brochure. (“Pull down on handle, lift up door.”) In fact, some airline industry professionals suggest that you anticipate that half the emergency doors won’t be able to be opened at all – due to location of a fire, a damaged frame, whatever. That’s why you need to

  • Identify the two closest emergency exits as soon as you are seated. (Is one in a different section of the plane altogether?) Take a look at the emergency card to see just HOW those doors gets opened. (“Pull down on handle. Pull door inside. Turn door. Throw back outside???”)
  • Count the number of rows to the emergency exits so you can get there in the dark.
  • If you can choose your seat, get one within 5 rows of an exit.

(During my research I came across stories of people attempting to open the emergency doors during flight. Mostly, it’s because they (1) were drunk or (2) had never been on an airplane before. Unbelievable.)

Managing Yourself

In a crash, your goal is to get up and get out right now! Do not sit there checking to see if you are OK or waiting for your breathing to return to normal all while wondering what is going to happen next. Do not try to open the above-the-seat compartments to get luggage.

Remember that 90 second rule and get yourself and family members moving to the nearest exit!

Leave your luggage behind!

You are going to have to launch yourself off the side of the plane. Extra weight and/or encumbrances will slow your passage to the door and threaten your ability to slide safely and to negotiate your landing.

Of course, crew members will guide the evacuation. The more assertive they are, the better it will go, so don’t get huffy at being yelled at. Get off the plane!

Assuming all goes well, be more comfortable!

There are lots of good ideas for traveling comfortably, and they depend on your size, the length of the trip, etc. Here are a few “universal” tips! If you click on the images or links you’ll go right to Amazon, where you can check on details and current pricing, and take a look at other models, too. The items shown here have received consistently high ratings and have features I value.

Great Travel Pillow

I’ve traveled for years – why, I remember the days when a turbo-jet was the big thing!  Every time I’m on a long distance flight, I wish I could sleep better. I’ve just discovered a NEW TRAVEL PILLOW that might solve the problem!  It’s stiff enough to prop up your head and neck, and then is held in place by a soft scarf.  Folds up neatly so you can tuck it into your carry-on bag (unlike one of those fat pillows!). Check it out at Amazon – click the image or the link!


Trtl Pillow – Scientifically Proven Super Soft Neck Support Travel Pillow – Machine Washable Grey

Carry-on Bag

What you can carry on for a long flight is really important. Of course, if you have a big bag, it goes into the overhead rack, and you can’t easily get into it until you land. So I usually prefer two bags. A small one carries important papers, glasses, snack, medicines, etc. and tucks into the larger bag for moving within the airport. When I get to my seat, I take out the small bag and go ahead to put the big one up above.

Having just one bag to manage while traveling through the airport is a lot easier and safer, too. Toting several miscellaneous bags makes using the restroom a REAL nuisance, and also makes you a natural target for pickpockets.

Here are a couple of bags that seem to offer both the size and extra security features I look for. They are made by a company called PacSafe. Naturally, they come in different sizes and colors and configurations, but you can look for these:

  • Easy to reach outside, easily accessible pockets for tickets, etc. or for that “small bag” I mentioned above
  • Fabric and straps embedded with Slashguard, a flexible, stainless steel wire mesh that protects against slash-and-run theft
  • A security hook so you can attach the bag to a table or chair leg as you attempt a nap or eat a quick meal during your layover
  • Lockdown points for zippers to protect against pickpockets
  • RFID blocking pocket for passports, credit cards, etc.

Capacity is measured in liters; sizes start at 15L and run to 45L. The smaller versions are more like day packs; the larger versions more for real hikers, with chest and belly straps. If you plan to carry a computer, be sure to get the right size pack! (Check the height and width measurements, as well as the capacity.)

Here are a couple of examples – a 15L and a 25L. Both have the security features mentioned above.  Click on the images or the links to get exact colors, sizes and prices from Amazon. (There are probably a dozen different bags available from Pacsafe so take the time to be sure you get just what you want.)

Warning. Whereas in the US people manage to get aboard with bulging carry-on bags, in Europe the short-haul carriers are extremely strict. If your carry-on exceeds the allowed size limit, expect a charge! This is why I included the third example, below. The Eagle Creek Convertabrief is handy and practical and not stuffable and therefore not going to bulge! Plus you can open it at security to show your computer, without having to remove the computer. (Note: I checked prices today, and found that purchasing this item on Amazon would save you $50 over what it costs elsewhere. That’s one reason why we’re Associates!)

Pacsafe Metrosafe LS350 Anti-Theft 15L Backpack, Black


Pacsafe Venturesafe 25L GII, Navy Blue


Eagle Creek Convertabrief, Asphalt Black

Travel Document Holder

At different times you need to have a passport, tickets, credit cards and cash handy. Whoever was in charge made these all different sizes, so having them handy is not always easy.

Generally, I try to have the next needed item in an outside pocket, and I keep the other emergency stuff hidden deeper in luggage. Some things I prefer to actually wear — hence, a document holder. (Obviously, if you have a holder under your clothing you’re not going to be able to access it easily.)

I look for belt style document and money holders that have these features:

  • Soft shape and outer material. (Unfortunately, “sturdy” sometimes means stiff, and that is uncomfortable to wear for any length of time.)
  • Easily adjustable belt to go around you based on what you’re wearing under it. And that may depend on the weather! (I don’t like my belt against bare skin.)
  • Waterproof layer to protect against heat and dampness.
  • More than  one pocket so you can find things without having to paw through everything.
  • RFID protection to keep thieves from stealing your credit card numbers.

Here’s a document holder that seems just about perfect. It’s beige, so you can wear it pretty much invisibly under light-colored clothing. It even comes with a unique “insurance policy” against theft. As always, click on the image or link to get current prices at Amazon, where we are affiliates.

Travel Money Belt with built-in RFID Block – Includes Theft Protection and Global Recovery Tags

Compression Socks

I don’t want to overlook this travel item, which has made all the difference for me and members of my family!

These socks keep your feet and legs warm during long flights and help maintain circulation for feet that have any injuries, swollen veins, etc. I first bought them when I knew I’d be standing a lot for a new job; now I wear them regularly, almost as a “pick me up” for a day when my feet feel tired!  For sure, I wear them on long plane flights.

There are all lengths and styles of compression socks, in all price ranges. Most cost between $15 and $30 a pair. I’ve tried flimsy nylon ones. I’ve looked at short ones and tried on some that are so long they would have to be folded over at the top — not a good idea!

I’ve tried the lower tension ones (15-20 mmHg* ) and the more supportive ones (20-30 mmHg *). I own the ones in the picture below and I recommend them highly for travel.

  • Sizing is accurate.
  • Plenty of room in the toe; compression really starts at the ankle.
  • Socks are tall; the amount of compression keeps them up and in position even on my thin legs!
  • They are made with wool. (Some compression sock brands are 100% synthetic.)
  • I like this pattern!  (There are many other patterns; pattern choice does affect price.)


Sockwell Women’s Circulator Graduated Compression Socks-Ideal for-Travel-Sports-Nurses-Reduces Swelling, Medium/Large(8-11), Black Stripe

“In the unlikely event . . .”

Heading back to the subtitle for this Advisory — it’s important to realize that air travel is still statistically safer than other modes of travel.

Update: Aviation deaths have been steadily falling for the last two decades, and 2017 was the safest year in history for commercial airlines, according to industry research. Separate reports by Dutch consultancy T070 and The Aviation Safety Network found “. . .no passenger jets crashes anywhere in the world,” despite more flights being made than ever before. (“Crashes” doesn’t count airplanes downed deliberately by their pilots.)

When there is a crash, though, death statistics can be dramatic. Being aware and taking immediate action may keep you from becoming one of them. In the meanwhile, Bon voyage!

Virginia
Your Emergency Plan Guide Team

P.S. The Number 1 airline fact above – the 3 minute 8 minute rule – came from a book that we have read with great interest. It’s called Spy Secrets That Can Save Your Life: A Former CIA Officer Reveals Safety and Survival Techniques to Keep You and Your Family Protected. The travel safety tips are just a small part of what is fascinating reading about protecting your home and yourself from people out to get you.

P.P.S. * The amount of compression is measured in mmHg, defined this way by Wikipedia: “A millimeter of mercury is a manometric unit of pressure, formerly defined as the extra pressure generated by a column of mercury one millimetre high and now defined as precisely 133.322387415 pascals. It is denoted by the symbol mmHg or mm Hg.”

P.P.P. S. If you want to get regular tips and recommendations, be sure to sign up for our weekly Advisories below. There’s no cost, and you never know when one of our Advisories will give you a great idea or even be enough to save your life.


Active Shooter in the School

Share

Escape From Danger in the Classroom

Run from classroom

Get this video at the link below

Prologue:

If you don’t find time to read this entire Advisory, please take the time to note and to WATCH one or all of the three videos at this school site. Here’s the link

https://www.sausd.us/Page/34190

Each video is on how to respond to an active shooter event in school. One of the videos is for elementary school classes, one for intermediate, one for high school. Each video is about 11 minutes long.

As a teacher, parent, and even as a student, you will find these videos valuable. They were made by the Santa Ana Unified School District (CA). They will give you a basic understanding of what you can do that may save lives.

Strong emotional reaction to a disaster

We’ve found that it’s usually pretty easy to talk or write about preparing for a natural disaster. After all, while ice storms or floods may be dangerous, they aren’t usually associated with evil or diabolic intent.

Of course, when the storm hits, people may experience fear. But preparation can help them get past that fear and start taking actions they know make sense.

When it comes to human-caused violence, or terrorism, though, like what happened on Valentine’s Day in Florida, people react differently. When we think of a person “out to get us,” we may feel fear, but we may also respond with violent anger – at the terrorist, at the terrorist’s family or tribe, at the police or military who are supposed to protect us.

Any of these emotions may help us get past the denial, the shock and numbness that also may accompany the disaster – but what then?

My own emotions have made me address this issue today.

Rather than rage helplessly, I want to share some ways to channel emotions for my own health and perhaps to help others. It comes down to being prepared with a plan.

Having a PLAN can channel emotions and save your life

This week we’ve seen a terrifying example of a terrorist action – the mass shooting of high school students and teachers in Florida. Thanks to on-the-scene video coverage we’ve seen fear – and horror.

Those early student videos also showed how emergency planning and practice saved lives at that school.

Law enforcement’s plan for an Active Shooter

Over the past few years police tactics for handling active shooters have changed. A dozen years ago, police called to a shooter event waited for reinforcements and collected all the facts of the situation before coming up with their plan.

But, since most active shooter evens are over in less than 7 minutes, waiting “to make a plan” makes no sense.

So today, the role of the police is a lot simpler. The first officers to arrive find, engage and stop the shooter as quickly as possible.

The school’s plan for an Active Shooter

In Florida, we also saw that students and teachers knew how to react. And while some students were killed before the plan could be fully activated, many were able to take the actions they had practiced, and save their lives.

I wanted to know what the situation is here in my own town.

Results of my informal quiz

Over the past few days I’ve quizzed several neighborhood children about the drills they have in their schools.

  • The first graders were very vague. Yes, there were drills. With the exception of fire drills, the children were not sure what the drills were for.
  • Middle school children were more definitive. Yes, they said, they had drills. Some enumerated fire drills, earthquake drills, and “lockdown drills,” but some didn’t distinguish. None of the children recognized the expression “active shooter.” They didn’t recognize the expression “Code Red.”
  • High school students – who had actually been locked down three months ago in a potential crime situation at their school – were pretty knowledgeable. They knew about Florida and active shooter was certainly in their vocabulary.

“Closing up the room and keeping away from the windows” didn’t seem adequate to me, though, and that’s what took me to the internet for my research.

Results of my research – the Santa Ana Unified School District videos

I viewed a dozen videos and found the Santa Ana videos to be best.

They build on the traditional Run, Hide, Fight training that has been around since around 2012.

The videos are specific. They start by recommending that teachers do a thorough assessment of the classroom and school in order to:

Identify escape routes

  • Map out multiple escape routes, including breaking out windows and ways to get out of a second story.
  • Identify hiding places and ways to construct barricades.
  • Suggest how everyday classroom objects can be turned into weapons if fighting is the only alternative.

Most important, the videos SHOW kids and teachers in action in a realistic setting.

And my recommendations

If you have children in school, I have some recommendations.

  • WATCH the videos yourself so you can discuss with your kids. Here’s the link again: https://www.sausd.us/Page/34190
  • Quiz your children about the “drills” they have at school. If they are vague, dig deeper.
  • Find out from the school administration what drills are held, what training teachers receive, how often, etc.

Without getting into the politics of gun ownership, it is clear that with the MILLIONS of assault rifles in this country, not to mention handguns and other rifles, an active shooter event could happen at any time. There have been 35 mass shooting events so far this year alone! (defined as 4 or more people wounded or killed)

Your children deserve the best training you can give them.

Virginia
Your Emergency Plan Guide Team

P.S. Since we’re on the topic of emotions vs. logic, I have to say that if having more guns would make us safer, we would ALREADY be the safest country in the world since we have by far the most guns.


Get Ready for the Next Power Outage

Share

Power Outage Alert

“Open Immediately — Power Outage Alert”

This arrived in my mail box yesterday.

The letter, from our local utility, tells me that power will be out all day Thursday while they are “performing maintenance . . . to ensure our grid is modern, reliable and up-to-date.”

Probably a good idea – power was out for several hours a month ago, and again in the middle of the night just two weeks ago.

These outages have generated a few calls and some questions from our neighbors! (They think we have all the answers.)

So I updated my research and decided there was enough there to warrant another Advisory!

Check to see how well YOU will do at answering these questions!

What causes power outages?

(Quick, see if you can name at least 10 causes!)

Just watch the news any night and you’ll be supplied with some answers to this question! In the category of unexpected occurrences, cars hit power poles, animals crawl into electrical circuit boxes (most common problem-maker — squirrels), trees fall onto lines, and flooding takes out whole substations.

In the anticipated-so-not-entirely-unexpected category, on April 20 of 2017 a geomagnetic storm rolled in and disrupted power in places all across the country, from San Francisco and Los Angeles to New York. Want more on this topic? Check out this article and current readings of the Planetary K-Index from the National Oceanic and Atmospheric Administration.  http://www.swpc.noaa.gov/products/planetary-k-index

Of course, not one of these accidents is why OUR power is going off next week. Rather, our outage is for routine maintenance. I found out that our utility planned for 35,000 scheduled maintenance outages in 2017!

That’s understandable. When repairs are needed, components have to be replaced or upgrades are required – like integrating new solar or wind into the grid — the system has to be shut down for safety.

A major outage is one usually caused by a storm or other natural disaster, like the 2017 hurricanes and the massive 2017 California wildfires. Major outages are so disruptive that outage statistics are actually kept in two categories: with and without major events!

Utilities have come under some criticism for not being better prepared for major outages. In fact, in California, where power lines have sparked fires, utilities have been sued for negligence in not maintaining the lines and equipment properly.

Finally, here in California we’re familiar with a fourth type of outage, the rotating outage. In situations where the grid is unable to supply the amount of power demanded – usually during a heat wave – sections of the grid will be turned off, in turn, to keep the entire grid from failing. Fortunately, this doesn’t happen often.

How long do power outages normally last?

Reliable statistics are challenging for professionals to gather, and nearly impossible for consumers to find. Here is what I have gleaned:

  • A rotating outage generally lasts only a few hours.
  • Here in our part of the world, recent planned outages have been scheduled to last for most of a day or all night. They say our upcoming outage will last 8 hours.
  • Unexpected outages caused by accidents or a blown transformer are usually managed within just a couple of hours.
  • And major outages can last for days, weeks and even months.

In 2013 Lawrence Berkeley National Laboratory started coming up with nationwide statistics for outages: “The state average outage ranged from seven minutes in Vermont to 1,100 minutes (more than 18 hours) in South Dakota. The national average was around 200 minutes.”

Since that year other agencies have maintained statistics, with complete reports available at U.S. Energy Information Administration. The most recent report, for 2015, shows average outages (not counting major events) of around 110 minutes.  You can get the full report here, with state-by-state stats.  https://www.eia.gov/todayinenergy/detail.php?id=27892

Who do you call when the power is out?

Call your local utility to make a report and/or get a report. Now, if the power is out, your home phone and internet may be out, too, so it’s a good idea to have the phone number programmed in your cell phone or written down somewhere!

Should I turn off my home’s power if power is out in the neighborhood?

Always a good idea to switch off lights, TV, stereo, desktop computer, etc. so that the system won’t overload when everything comes back on all at once. No real need to turn off power to the whole house.

Leave one light on, though, so you’ll see when the power comes back!

If SOME things don’t come back on, a circuit breaker may have tripped. Basic instructions for resetting a breaker:

  • Know the location of your fuse box or circuit-breaker box.
  • Turn off or unplug equipment that connects to the tripped circuit.
  • Push the switch firmly to the off position.
  • Flip the switch back on again.

Circuit breakers are notoriously stubborn. You may have to repeat the off/on maneuver more than once.

Can I drink water from the tap when the power is out?

In most cities the water purification and delivery system runs with the help of electric pumps. If the power goes out unexpectedly and the system is compromised, you will likely be notified to boil water you want to drink, use for cooking, even use for bathing.

If you always have a supply of bottled water, you won’t have to worry. For a longer term emergency, you’ll need a lot more than just a few bottles, of course.

How do I flush the toilet when the power is out?

The sewage system operates on a combination of gravity and electricity, too, so your toilet may not flush if the power is out. You can pour a bucket of water into the toilet bowl to flush it down. The bowl won’t refill automatically, of course.

How long will food last when the power is out?

Food should last in the refrigerator for several hours as long as you don’t open the door! However, after 4 hours some could start to spoil. For example, meat, fish, eggs and leftovers that have been above 40 degrees for even two hours can make you sick. Food in the freezer can last as long as 48 hours but only if the freezer is full.

The test for everything edible: if it smells funny, looks strange or you just don’t know- throw it out.

How should I prepare for an unexpected outage?

Good emergency preparedness habits include having some things ready all the time.

  • Keep your freezer packed as fully as possible. Freeze plastic containers or even plastic bags filled with water and use to take up empty space. (Leave room in the containers for water to expand when it freezes.)
  • Store several days’ supply of ready-to-eat food that requires no cooking. Choose canned or packed items you know you will have no problem eating once you’ve emptied the refrigerator of edible stuff.
  • Have several days’ worth of bottled water. Don’t waste clean water on jobs that can be done using water that is old or slightly dusty, like water from the toilet tank or from the rain barrel.
  • Be ready with flashlights and lanterns. Our rule – a flashlight in every room! Consider emergency lighting for hallways and bedrooms – lights that will go on automatically when the power goes out.
  • Have an emergency battery-operated or hand-crank radio so you can get updates about the outage from authorities. Our most looked-at page is this review of emergency radios.
  • Be prepared and determined to remain calm. Treat the outage like an adventure instead of an emergency!

How should I prepare for a planned outage?

  • Fill extra containers with water to carry you through the outage. Use buckets, big pots, even the bathtub. Keep clean water available for drinking; use bathtub or bucket water to flush the toilet. Here are some more ideas for how to store water.
  • If there’s a chance that items in the freezer may defrost, put things like meat on a cookie sheet so their juices won’t contaminate the rest of the space.
  • You may want to buy block ice and fill a freezer chest with selected small items so you don’t have to open the refrigerator. (We pulled our chest out of the garage this morning in preparation . . .)
  • Distribute emergency lighting throughout the house and note where the flashlights and lanterns are located. Be sure you have extra batteries of the right size. See more information here: https://emergencyplanguide.org/emergency lanterns/
  • Charge your cellphone and have back-up chargers available. (They have become very popular and cheaper. Check out the model below in the P.S.)
  • Your heater may go off. Have extra blankets near your beds.
  • Make sure you have shoes or slippers so you aren’t moving through the dark house barefoot.
  • Clear floors of toys, small furniture, etc. to avoid tripping in the dark.
  • Don’t start laundry or the dishwasher if the outage is imminent.
  • Turn off and unplug sensitive electronics.
  • Make arrangements for back-up power for any necessary medical equipment. (Call the manufacturer for suggestions.)
  • Know how to open your electric garage door from inside.
  • Keep your car’s gas tank full.
  • If it’s too hot or too cold, consider going to the movies, to an air-conditioned mall or to a cooling shelter.

Maybe the best idea of all?  Consider going to stay with friends or relatives while the power is out.

This may all be familiar territory for you. But if it triggers an idea that you can implement to make your next outage just that much safer and more comfortable, that’s what we want!

Good luck!

Virginia
Your Emergency Plan Guide Team

P.S.  More on power banks:

Anker 10000 Power Bank for iphone, Samsung Galaxy, more.

Power banks really are useful. I used one just last night when I was away from home with a long call planned.  (We were testing a new emergency communications app.)  This bank is “Amazon’s Choice” for portable chargers. Click on the image to get current price and full details.

Emergency Preparedness Vocabulary to Add to Your Skill Set

Share

New Words

New words for 2017

Did you know that the big dictionaries (Merriam Webster, Oxford English, etc.) routinely add hundreds and sometimes even thousands of words every year?

In 2017 a lot of the new words were what I’ll call “social terms” – words like froyo, troll, mic drop, and dog-whistle. Don’t overlook the word conlang, referring to a “constructed language” like Elvish or Klingon.

I certainly don’t USE these words every day. But I try not to look dumb if someone uses them in my hearing!

But let’s move on for a light-hearted tour of  . . .

Words for emergency preparedness

New words emerge in the narrower world of emergency planning, too. Plus, of course, there are “old” words that resurface for one reason or another.

Here’s a list of words that have reappeared and that I’m likely to hear or even use at any time. How familiar are YOU with them?

Some commonly abbreviated expressions

. . . useful in emergency planning and also in everyday situations.

NSFW – I thought I’d start with this one because if you see it, you may be in trouble. It stands for Not Suitable For Work and refers to internet content (most likely nudity, profanity, etc.) not appropriate for the workplace. Compare to SFW (Safe For Work).

ICS – Emergency professionals throw this around, pronouncing just the letters. They stand for Incident Command System and refer to the standardized way official groups (First Responders, FEMA, etc.) respond to an emergency, or “the incident.”

IoT – OK, we’ve written about this a lot lately so it should be familiar as the Internet of Things, for example, the automated devices that you’re using to control your house — door locks, air conditioning, etc.

SOP – A favorite business expression that is used in emergency response, too. If people know the Standard Operating Procedure they will be able to work effectively together.

EOC – If you take your neighborhood emergency response group on a tour of your city’s Emergency Operations Center you may be disappointed. The EOC is only activated when there’s an emergency.

BIA – So just how much of an emergency would a power outage represent? What about a direct hit from a tornado? Your Business Impact Analysis should give you some perspective.

HVAC – Pronounced “H-Vac” or “HVAC”. I have to include this because some of my friends are Heating, Ventilation and Air Conditioning experts!

MTBF, MTTR, MTBU – Some of my favorites, these expressions always invoke a sense of urgency. (I don’t use them, but people in the world of manufacturing sure do!) Mean Time Between Failures, Mean Time To Repair, and Maximum Time to Belly Up.

Hint: If you use any of these words in a written document, it’s always a good idea to write them out fully “at first use.” It’s awfully distracting to read a report filled with abbreviations you don’t recognize.

Frequently-used but confusing industry jargon

. . . heard on the news and sometimes misunderstood or mispronounced by newscasters.

Cache – This French word refers to a collection of things (like emergency or military supplies) that are hidden away for later use. It’s pronounced “cash” but often is mispronounced by adding a syllable at the end so it sounds like “cashay.” (Cachet, pronounced “cashay,” is a totally different word that marks someone or something as having status or prestige.)

Failover – I have always been confused by this word but I’m trying to conquer that confusion! Failover refers to a process whereby (for example) a computer system, in the event of a failure, automatically switches to a backup or standby system. (Fail -> switch over)

Pandemic – We are all pretty familiar with the word epidemic, referring to the outbreak of a disease that spreads quickly in a community or region. Pandemic also refers to the spread of disease, but is used when the outbreak spreads across a whole continent or even the world.

OK, now we can tuck these words into our own vocabularies!

A brand new word for 2017

Here’s one I’ve never heard or said, but maybe you could use it in a Scrabble game because yes, it’s now in the dictionary.

Listicle – This is one for writers and bloggers. It refers to a published article that is made up of . . . you guessed it, a list! (Why, this Advisory, with some strategic editing, could become a listicle!)

Whew! That’s it for this week. Hope you have found these words as interesting or amusing or puzzling as I have. (Remember, learning new words is recommended for keeping your brain fresh . . .)

Send me your favorite words and I’ll include them next time!  In the meanwhile, if you want more on vocabulary, check out our earlier Advisories, listed below.

Virginia
Your Emergency Plan Guide Team


Walkie-Talkies – A Few of My Favorite Things

Share

walkie-talkies


As I’m typing this Advisory, there’s a Cobra MicroTalk lying on the shelf beside the computer. When I get into the car, I note the little Motorola tucked into the door pocket. In the garage, we have a couple Uniden models clipped to one of the shelves.

You’d think we like walkie-talkies, wouldn’t you?!

Yes, we do!

We use walkie-talkies all the time!

  • When we head to one of the big box stores, we grab a couple of walkie-talkies. There’s no way we can stay together while shopping.
  • One person being dropped off at the entrance while the other finds a parking place? Let’s find each other later using our walkie-talkies.
  • At the fair, when the kids head for the rides, one of the adults is looking for the nearest restroom. Everybody having a walkie-talkie makes it easy to stay in touch.

And our families use walkie- talkies, too!

  • The little granddaughters play hide and seek throughout the house, walkie talkies in hand.
  • The big grandkids take them with as they head up the mountain and split off for different ski-trails.

Of course, here at Emergency Plan Guide we’ve written often about how all members of our neighborhood emergency response group have walkie-talkies. In the event of a widespread power outage or emergency, when cell towers are down and landlines disrupted, we’ll be able to communicate with each other about the condition of the neighborhood and our neighbors.

If you haven’t seriously considered adding walkie-talkies to your supply of emergency gear, it’s worth taking the time to do it now. Here are some basics about the technology to get the process started.

What exactly IS a walkie-talkie, anyway?

The word itself pretty much describes the gadget. With it you can walk around and talk to someone at a distance. That “walkability” distinguished the early walkie-talkies from telephones, which allowed for communication but were tethered to a wire.

A more accurate description might be something like “hand-held, portable radio that can transmit and receive.”

Walkie-talkies came into widespread use during WWII and have been used ever since.

What makes them so popular?

They are simple, light weight and easy to use. No dialing, no ringing, no waiting for the call to “go through.”  Just push the button and talk. Works every time.

One handset connects directly to another via radio waves – or to several handsets, as long as they are set to the same frequency. They’re perfect for letting a group know all at once what to do or expect next.

How do they work?

The technology itself doesn’t seem to have changed much from the earliest models. Here are the basics for lower-priced models.

The handsets are powered by batteries. They each contain a transmitter/receiver and built-in antenna. There’s a loudspeaker that allows you to hear and that can convert into a microphone when you want to speak.

The whole listen-speak action is controlled by a button on the side of the set. When you “push to talk” (PTT) everyone else on your frequency can hear you. Only one person can talk at a time on the frequency; everyone on that frequency can hear what is being said.

How far do they reach?

Simple walkie-talkies have limited power and a range of at most a couple of miles in any direction. More power and more sophisticated circuitry can give a walkie-talkie a range of 25 to 30 miles. The distance the signal can reach depends greatly on whatever gets in the way – hills, buildings, trees, etc.

When you’re buying walkie-talkies you want to decide how far you need to send your signal. No use overpaying for capacity you don’t want or can’t take advantage of.

Are there any restrictions on using walkie-talkies?

Walkie-talkies are built to work on specific radio frequencies. Certain frequencies are assigned to First Responders, some are set aside for corporate use, and others are designated for public use. Within the public category, there are low-watt FRS (Family Radio Service) and higher-watt GMRS (General Mobile Radio Service) frequencies available.

These public walkie-talkies have from 8 to 25 or more frequencies so you can switch to a different frequency (or channel) if a channel is too busy or you want more privacy.

How much do they cost?

Walkie-talkies come in pairs. Prices range from less than $20/pair to over $100/pair, depending on the features you want.

What features should I look for?

Your shopping list will probably include a consideration for . . .

  • How much power (FRS is limited to 0.5 watt; GMRS goes up to 5 watts)
  • How many batteries and what size
  • How many channels
  • How sturdy
  • Water resistant or water proof?
  • Features to filter out interference
  • Privacy features
  • Add-on features: flashlight, ear buds, tone signals, etc.

As always, the more features you want, the more the price goes up. Again, consider who will be using the radios and for what purpose.

Where do I get walkie-talkies?

Sporting goods stores, electronics shops, and toy stores may carry a model or two. And of course they are available online. Our Emergency Plan Guide Review of Walkie-Talkies goes into all these features in more detail. If you’re seriously considering a purchase, head over to the Review NOW to see which models we’ve selected as good examples of what’s available.

If you’re still wondering . . .

. . .if having some walkie-talkies makes sense for you, consider a few more non-emergency situations where people use walkie-talkies effectively and happily.

  • Keeping track of other hikers in your group when you’re deep in the mountains and far from any cell service
  • Deciding when it’s time for the other tubes in your rafting party to pull over for lunch
  • Tracking the kids as they explore the cruise ship
  • Meeting up with a colleague at a convention
  • Letting your spouse know when to turn the water on again in the house after you think you’ve got that outside drain unplugged

We find a way to use these handy gadgets on a regular basis. Using them regularly makes sure they’ll be ready in a real emergency.

We recommend walkie-talkies for just about everybody.

Virginia
Your Emergency Plan Guide team

P.S. In the picture above, the little Motorola on the left didn’t work for some of our senior emergency team members; they had to remember too many button sequences to change channels, adjust volume, etc.. As you might expect, our grandchildren have no problems with this model. . .!


Lists for Active Preppers and Leaders

Share

The Good Stuff from CERT and NERT

Big FlashlightOver the years Joe and I have been involved in both CERT and NERT training. CERT is Community Emergency Response Team training, a course and refreshers offered by our city. NERT is our informal Neighborhood Emergency Response Team, with its own unofficial and customized training.

At both CERT and NERT get-togethers we end up sharing ideas for useful supplies and gear, and, of course, ideas for how to stay on track.  We’ve documented many of these conversations and trainings in the over 200 Advisories here at Emergency Plan Guide.

Since I have been getting requests for one list or another, I thought I’d just bundle a few of them together in one place for easy reference. So . . .

Here are 7 popular lists for individual and family survival kits.

They should all sound familiar to you!

(Follow the links to get to each Advisory.)

Lists of meeting agenda ideas for group leaders.

If you are looking for ideas for a meeting agenda, just grab one of the Advisories above and use it to stage a “show and tell.” You can bring your own kit and get group members to bring theirs. Always a success!

And don’t forget, we’ve gathered up a collection of something like 50 meeting agenda ideas pulled from all the meetings we’ve held over the years. Here’s the link to the page where you can download them immediately. (And yes, we do charge a little for the books. It helps us continue to buy and share emergency items with our team!)

Three more lists, specifically for Neighborhood Teams’ “Block Captains.”

No matter how your neighborhood group is set up, at the very ground level you’ll have a number of people who have agreed to get to know their “block” of neighbors (a block could be a building, a floor, a department, or actually a block), to check in with them in an emergency, and report on their condition to the designated leader.

We find that Block Captains are the heart of our neighborhood group, so we encourage their active participation by making sure they get their own specialized resources.

1-Block Captain Supplies for CERT graduates

Have you taken the formal CERT training? If so, then you already have received a first set of supplies. For example, our local CERT graduates come away with:

  • A vest with reflective stripes
  • Duffle bag
  • Helmet
  • Flashlight
  • Safety goggles
  • Dust mask
  • Gloves

(Other CERT programs supply their members with different items. The list above is from our local program, only. Amazon.com actually offers a variety of CERT kits starting at around $50 and going up from there. Take a look at all the gear included in these kits to see what you might want to include in yours.)

By the time the class is over, most of our CERT members have added to their bags – first aid items, a few tools, duct and making tape, pens and tablets to write on, headlamps, etc. The duffle bag can get very heavy very quickly; most people keep them in their cars.

2-Block Captain Under-the-Bed Kit

As far as local Block Captain duties are concerned, we have been able to outfit our captains – whether or not they are CERT graduates – with just a few essential items:

  • A reflective vest
  • Walkie-talkie and extra batteries
  • Clipboard, tablet and pen for taking notes
  • Flashlight
  • Whistle
  • A reminder checklist of what to do in an emergency

You can get a Block Captain outfitted with the above items for less than $30. (Most expensive item is the Walkie-talkie/hand-held radio at around $15.) Buying items in bulk can reduce that cost.

And we truly call this the “under the bed” kit. (As I’ve mentioned before, we recommend that all our Block Captains also store shoes under the bed. If something happens, we want to be able to jump into action – safely!)

3-Block Captain Step-by-Step Checklist

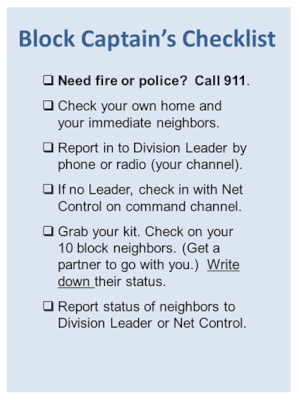
Block Captain ChecklistOur NERT volunteers carry a quick reminder checklist of their primary duty when the community is hit by an emergency. It’s a card similar to the one to the left.

As you can see, this card assumes that the community has already been organized into Divisions; everyone has a walkie-talkie and understands the way channels have been assigned. Your own checklist needs to reflect the vocabulary and set-up of your organization.

In any case, the list needs to be SIMPLE and HANDY. You might consider laminating it to give it a bit more heft.

When we bring a new member aboard, we present him/her with some items at the orientation, and then present the rest when the new Block Captain is introduced to the group. People like to be recognized – and this is an important role they are going to be playing!

And we find that getting free “gear” encourages other people to join in.

What lists or checklists have you found to be helpful as you manage your own preparedness? And do you have suggestions for helping a group get formed and stay interested?  Pass ’em along!

Virginia
Your Emergency Plan Guide team

Nuclear Bomb Threat – What to do

Share

Text - not a drill

If you’re close enough to hear a siren or get a text like the one above, you are in potential danger.

It doesn’t matter whether the danger is coming from a nuclear plant leak, a terrorist explosion or an incoming missile.

Take action immediately. You may have just a few minutes.

  1. Get to shelter. Get deeper into a building or deeper underground to put as much solid material – bricks, concrete, dirt – between you and the radioactive fallout. Obviously, if your shelter is hit directly by a bomb, it won’t protect you.
  2. Stay in your shelter. Radioactivity is worst at the time of the blast, but dissipates pretty quickly. According to the Department of Homeland Security, radiation will have declined to a little as 1% after 2 weeks.
  3. Don’t come out until it’s safe. This may mean 24 hours or it may mean 2 weeks or even longer! You’ll only know it’s safe if you have a way to get emergency communications from official sources.

Basic preparations to take now

Most preparations for a nuclear disaster are pretty simple, and follow the guidelines that we’ve laid out many times. Here’s a quick reminder list.

  1. Have a survival kit that you can grab at a moment’s notice. Take it with you to your shelter. You may want to have a battery-operated walkie-talkie in each family member’s kit so you can stay together in the dark.
  2. Stock your shelter with food and other supplies so you can shelter in place for days if need be. Obviously, if you are traveling or not at home, it will be difficult if not impossible to have enough supplies for a lengthy emergency stay.
  3. Be sure you have an emergency FM radio so you can monitor official transmissions.

Advanced preparations if you are in a target location

Some areas are more likely to be targets than others. For example, right now the emphasis seems to be on Guam and Hawaii, which could be reached by missiles from North Korea.

However, every nuclear reactor in the country – there are about 100 of them – could also be subject to an emergency or terrorist attack, as could different manufacturing, government or military centers.

If you live near one of these “prime targets,” you may want to make more preparations. These could include:

  1. Find out what your local government’s “emergency plan” is for a nuclear disaster. It probably involves evacuation.
  2. Be ready to seal yourself into your house. Bring in pets. Close all windows and doors, shut off fireplace, heater and A/C.
  3. Have a supply of potassium iodide (KI). It’s nonprescription and FDA approved. You’ll need enough for every family member for several days. Pills cost lessz than a dollar each. Be sure to check on expiry date.
  4. Consider having a way to measure the levels of radioactivity yourself. Geiger counters start at around $150. There are also Smartphone apps to measure radiation.

If you want more info and some specific recommendations for these products, please check out an earlier – now updated! — Advisory: https://emergencyplanguide.org/what-threat-do-you-face-from-a-nuclear-reactor-emergency/

Virginia
Your Emergency Plan Guide Team

P.S. If you get caught in an active radiation blast, you’ll need to protect yourself as best you can and then get the radiation — carried through the air like dust — off you. Steps for decontamination are pretty much removing your clothes and then washing off your body and hair.  Here’s an article from NPR that describes the process and the imprecise nature of that process: Decontamination


Add a Tourniquet to your Survival Kit

Share

Quick, before you have to think much . . .

Bloody faceWhere is the nearest first aid kit?

Is it up to date? Do you know what stuff is in there, and how to use it?

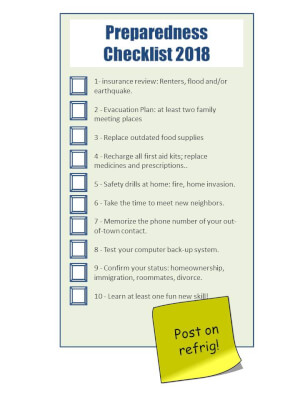
I added “Update your First Aid kit” as No. 4 on my Preparedness Checklist for 2018. That was partly because OSHA has new requirements.

But there’s more to this Advisory.

There have been so many violent incidents in the past 12 months. Hurricanes, floods, the shooting in Las Vegas. And yet,

People’s lives have been saved by quick bystander action.

In particular, bystanders have jumped into action, stopping bleeding until victims could get medical help.

I want to be one of those bystanders who is able to help – and I realized I don’t know enough about stopping bleeding.

Thus, this Advisory.

Some of this Advisory may be review. But some of it may be new. For sure, some of the items below are being introduced for the first time to Emergency Plan Guide families.

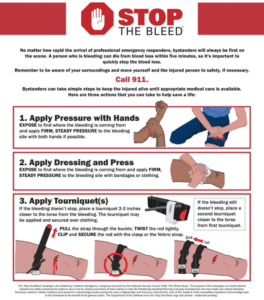
Let’s start with a new item for your first aid or survival kit: a tourniquet.

From the Department of Homeland Security: “A person who is bleeding can die from blood loss within five minutes.”

Five minutes!

If someone is bleeding heavily from a wound, with blood spurting, soaking clothing or pooling on the ground, you can’t wait for the professionals to arrive.

Certainly, some of the people in the Las Vegas shooting and the Boston Marathon bombing were saved by bystanders like you and me, operating on instinct and some basic understanding. That’s what I was looking for as I began this Advisory.

Disclaimer: I am not a trained medical professional, so I read many articles and watched a number of videos about the use of tourniquets. I recommend you do the same before you think you know what to do and when to do it. BUT, having studied at least this much, it appears to me that as a possible bystander to a mass shooting or big wreck some basic knowledge is better than none!

Bloodied girlProfessionals don’t all agree about exactly how to handle severe injuries. But they seem to agree on  . . .

Steps for stopping severe bleeding.  

1-Be sure you and the victim are safe. If this is a terrorist or accident scene, you may have to move the victim to a protected place.

2-Figure out where the blood is coming from. Open a shirt or slit a pants leg to find the wound. Then,

3-If blood is coming from the head or torso, apply pressure to the wound to keep that blood in the body!

Having a first aid kit with large-sized pressure bandages to place on the wound would be best. (See below.) But you can use a towel, clothing or even your hands. Yes, you may be introducing germs into the wound. Better to introduce a few germs that can likely be dealt with later than to lose the patient to shock from immediate blood loss.

4-Press hard with both hands and don’t quit. Use the weight of your body on your locked arms or even your knee.

Pressure on a wound will hurt. Be strong and confident and tell your patient that help is coming and that you need to do this to save his life.

5-If blood is coming from an arm or leg, first try pressure. If pressure doesn’t work, consider a tourniquet.

We used to be taught that a tourniquet could somehow damage the limb. There still could be damage, but now we know that saving a life is better than losing a limb. A tourniquet – a simple cord or strap wrapped around the limb tightly enough to stop blood flow – can work if you know what you are doing. And to repeat, for the purposes of this article, we’re talking about a mass situation where victims outnumber medical personnel but professional medical help will soon arrive.

Again, having a professional tourniquet in your pocket or pack would be optimal. But you can make a tourniquet from a scarf, a belt, a shoelace, the strap of a purse, a bra, whatever. Simply wrap the tourniquet a couple of times around the arm or leg at least 2-3 inches above the wound (between the wound and the heart), not over a joint. Tighten the strap, then tie a partial knot, place some sort of bar onto the wrap and tie a second knot over it. Twist the bar until you feel no more pulse below the wound. Tie the bar or tape it down so the tourniquet doesn’t loosen. Don’t open to check!

If you can, use a marker to flag the fact of the tourniquet (write a “T” on the patient’s forehead), and write the time when you started its use. Give professional medical personnel a heads up to know what they are dealing with!

Stop the bleedThe Department of Homeland Security has an infographic that covers the above steps with simple diagrams. Click the picture to get the full-sized image.

Where to get a tourniquet.

See below for examples of tourniquets that are readily available as additions to your first aid kits. The two most common are called CAT — Combat Application Tourniquet and SOF® Tactical Tourniquet. The SOF TT Wide version (1.5″) seems to be preferable to the narrow (1″) version.

It is particularly important that when you get your tourniquet to open the package, unwrap everything and “prep” your tourniquet so it will be ready to use at a moment’s notice. You will not be able to get the package open if you have only one hand and/or everything is slippery with blood.

Training videos to view before you buy.

I found these two videos to be very helpful for the non-professional. Each makes it clear that you have to practice with a tourniquet to be able to apply it correctly and quickly. Professionals aim to get it on in less than 30 seconds!

https://youtu.be/pDP5Cy0nguU  — Video – 17 minutes. Goes through the “prepping” process and makes clear the difference between the two different tourniquet models.

https://youtu.be/TqUI1xeMKRU — Thorough and detailed presentation by 20-year veteran. At 25 minutes the video starts coverage of a third type of tourniquet. My research suggests the first two would be better for non-professionals.

Examples of two popular types of tourniquet.

This CAT tourniquet (image below) comes in a variety of colors. As the long description says, this is for “pre-hospital hemorrhage control,” which is what we’ve been talking about. This model costs less than $20. (A number of tourniquets LOOK similar. One thing to watch for — a metal windlass instead of plastic.) The picture doesn’t tell the whole story! Be sure to watch the videos to see what the tourniquet really looks like.

Tourniquet -(ORANGE) Recon Medical Gen 3 Mil-Spec Kevlar Metal Windlass Aluminum First Aid Tactical Swat Medic Pre-Hospital Life Saving Hemorrhage Control Registration Card 1 Pack

I’ve shown two SOF tourniquets (below), one in orange and one in  black. You’ll notice that the tourniquets are unpacked, giving you a better idea of how big and how complicated they are. I like orange because it’s a lot more visible in a backpack or kit. The SOF technology is different from that of the CAT, and this tourniquet costs about twice as much as the CAT above. Click the links for more details and exact prices.

SOF Tactical Tourniquet – Wide

SOFTT-W Tourniquet 1.5 – Black

More items to add to your kits.

You’ll notice we are using the plural form: kits.  We’re assuming you have several kits to be sure one is immediately available no matter where you are – in the house, in the garden, at the office, in the car, on a hike or backpacking.

Commercially available kits are usually more like “starter kits.” You’ll want to add your own specific medicines and/or supplies, like sunburn cream, bug spray, and antibiotic cream.

Also, consider the items below as additions to your kits.

  • Pressure bandage — Israeli bandage. Get the 6” size. These bandages have multiple layers, a sterile pad that goes onto the wound, and then wrapping that acts as compression and secures itself.
  • Good multi-purpose knife – like the classic Swiss Army knife – that has  tweezers and scissors as well as the usual knife blades, bottle openers and punch. Get several so you have one for each kit.
  • Flashlight or even better, headlamp. Emergencies don’t happen in the daytime; they happen in the rain or at night, too. Being able to see, and to have both hands free to cope, just makes sense. Same advice about multiples.
  • Survival lighter can be used to provide light, start a fire for heat and/or comfort, and to sterilize equipment. (Even the Tesla electric lighter could sterilize whatever tool you could fit between the points, like a needle or knife tip.)
  • Self-adherent bandages. Tape is important to have, but these bandages stretch to fit then stick to themselves, making them convenient and quick for holding dressings. Most kits won’t come with any of these – add them yourself.

And finally, as for your “regular” first aid kit items . . .

First aid kits have some sort of shelf life, like maybe 3-5 years. During that time, every tube of ointment, every packaged wipe, and every band aid is likely to degrade.

It’s easy enough to check the components of your kits, toss those that are out of date, and replace them with new. Toss items that have been opened, used and then re-closed. If you have powdered gloves in your kit, you may want to toss and replace them, too. (The FDA has banned them as of January, 2017.)

You may even want to invest in a new kit altogether, one that has room for some of your new items. But don’t delay on any of these decisions. When you need that kit, you NEED it!

Virginia
Your Emergency Plan Guide team

Cyber Threats Right Here At Home

Share

Last updated 5-16-2019

Smart home

Smart devices make your home more comfortable . . .

A look back to January 2018 in The Costco Connection shows “some of the smart tech you may want to invest in over the coming months.” The image above suggests 10 different smart technologies – lighting, windows, temperature, door locks, etc.

Note that I said “Costco.” This wasn’t Wired or Popular Science, which you might expect to have articles about the very latest in high-tech gadgetry. No, we’re talking mainstream — in 2018!

Moving forward to 2019, a search for the list of the top smart devices you’d want to have “right here at home” included these members of the IoT (the Internet of Things). How many of them do you have?

  • Smart Speaker
  • Security Camera
  • Light Bulb
  • Smart Thermostat
  • Smart Smoke/Carbon Monoxide Detector
  • Smart Home Hub

While their powerful features open the door to cyber threats.

Consider if all the personal information described in the next few sentences were available to casual hackers, the government, or criminals?

  • Smart phones – Shoot 4k video so you can play it back on your TV; recognize your fingerprint as password; track your blood alcohol level; track where you’ve driven and find your car; diagnose why it’s not starting. (Is your phone synced to your home computer so all this info is transferring?)
  • Smart watches – Receive text, email and tweets from friends; capture your fitness info; give you directions or track your run via GPS; lock, unlock, and start your car.
  • Smart homes – Respond to voice or touch commands to adjust air and water temperature, lights, locks and cameras; “learn” family habits and schedules; report on current traffic conditions along your route to work; read and adjust solar panels; start the laundry. (Are all the devices interconnected?)
  • Smart TVs – Connect to social media platforms; follow voice and gesture commands; display photos and videos from your phone.

Even if you don’t understand exactly where the threats lie, or will lie, you can recognize the threat.

How do these vulnerabilities come about?

A recent Advisory reviewed home and business security systems – all of which were internet connected — and in doing that research I read many, many advertisements and reviews. Not one had anything to say about security. But when I dug into broader background on the Internet of Things, I got a whole load of warnings.

  • Like every other product, IoT products are hurried to market to beat the competition. (Think Apple.) They don’t have time to spend on developing sophisticated layers of security that interact with every other device’s layers of security.
  • Device manufacturers may be as interested in selling information about you and how you use the product as in selling the product in the first place. So, the price their device ridiculously low. And they conveniently overlook certain aspects of security. (Remember the TVs that were capturing info about their viewers’ choices? And the “Talking Barbies” that stored and transmitted what the children said to their dolls? And very recently, the scandal of Amazon’s Alexa picking up on conversations in one home and sending them to another?)
  • Many IoT products are complex, combining software, hardware and services often provided by more than one supplier. Not infrequently, one or more of the suppliers sells out or even goes out of business somewhere along the line. A broken link in the chain is a hacker’s opportunity.
  • And IoT users – that is, us consumers – are not following smart security practices!

So what can we do to protect ourselves from these cyber threats?

Seven recommendations for your personal IoT devices as of May 2019.

1-Enable security features on all smart devices.
Not sure if there ARE security features? If the device connects to your home network, there had better be usernames and passwords that you can change from the default! In fact, the instructions should remind you to make those changes. Remember that default usernames and password combinations are published online and thus easily available to hackers. (The book mentioned at the end of this article has a suggestion for memorable passwords that won’t be hackable!)

2-Use strong passwords.
Are your children using the devices? Don’t give them an easy password so they can operate the thing. A simple password makes it easier for every hacker to break into the device!

3-Check for and reconnect or remove dead devices.
Some IoT devices are treated by the family or employees as toys, and after a while they lose interest in them. These neglected devices are precisely the ones that may provide an opening for a hacker. Take a regular inventory and clean up your IoT.

4-Schedule battery replacement.
Many of these devices operate using battery power. Batteries die – and when they do, you could cause a security risk. (Door lock won’t open? Fire alarm won’t go off?) Check all devices regularly until you know just how long their batteries will last, and then build a schedule for ongoing maintenance – with dates and numbers and types of batteries required.

5-Update firmware (operating systems) and apps.
If you find the updates on your phone or computer to be a nuisance, imagine having an entire collection of devices with apps that need updating! But it’s through updates that holes are stopped up and vulnerabilities are fixed. Watch for updates and apply them. (Not sure exactly how you’ll be notified of updates? Find out, so you don’t miss out.)

6-Be sure updates and/or network communications are encrypted.
You don’t want strangers listening in on your baby monitor, measuring your blood pressure or noting the hours when the house is empty! If your smart device sends unencrypted info across your home network and the internet, you are vulnerable.

7-Are any ports left open?
Some devices – particularly hubs or routers – need open ports to allow connections to the internet. The more ports that are open, the more vulnerable you may be to hackers. By and large, your firewall software will allow or block connections based on the profile you’ve set up. If you haven’t set up firewall software, do it. (If you aren’t sure how to find out about the status of your ports, you can get additional software to check on them.)

A next step for non-tekkies.

If you’re interested in getting a lot more familiar with IoT and IoT Security, plan on either spending a lot more time online or spending some money on one or more of the books available via Amazon or other book stores. Most of these books seem to be directed to IT professionals and have professional prices.

But here’s a fantastic book written by an expert, for ordinary internet users, in a clever and captivating way. In fact, I just finished reading it myself and HAD to put it up here!

The Sherlock Holmes Handbook for the Digital Age: Elementary Cyber Security

As a writer myself, I appreciate a story — hard to manage, sometimes, when the topic is technology. Author Alan Pearce puts you right in Sherlock Holmes’ living room in telling this story of”cyber threats right here at home” to his friend Dr. Watson.

Sherlock Holmes goes into the IoT and then takes Watson on a journey into the dark web. If you read this book you won’t become an instant cyber-security expert, but you will be a lot more savvy – and a lot more wary!

Virginia
Your Emergency Plan Guide Team

P.S. This is the kind of information that everyone should be aware of. Please forward this Advisory to friends and family and share with your neighborhood group. If just a few people take a few actions they will be safer than they were before.

Intruder! Do we need a security system?

Share
Security Camera catching thief

Home and Business Security Options

Have you seen the ads showing a package thief caught in the act? Or the ad that shows the “escaping teenager” on the roof, caught because she set off an alarm when she opened her window? All these ads are designed to make you realize you need a security system! But while the ads are compelling, they really don’t tell the whole story behind the available technology.

In fact, they don’t make it at all clear where a simple self-contained security camera leaves off and where a comprehensive monitored security system begins.

If you’re a new business owner, or someone newly concerned about security and safety, take a look at the questions and answers below. They’ll help you come up with a shopping list customized for your personal needs.

Disclaimer: security equipment and commercial security “packages” change regularly, so as you shop, be sure you are comparing current offers. This year, many of these items are being featured as special deals, so watch for them!

Questions to ask about security

The first version of this article appeared in Emergency Plan Guide nearly four years ago. In the time since, some things have changed dramatically! The “classic” security camera set up shown in the image below – camera connected to DVR connected to monitor — still exists, of course. But in many cases, wires have been replaced by wireless connections. And now you can get the images sent right to your cell phone or tablet in addition to your computer monitor.

That’s not all that has changed. As you review the following questions, consider what you really need for your location and your circumstances. As you might expect, the more features you want, the more expensive the system.

Security Camera Buyer's Guide

“Do I want wired or wireless?”

Wires are reliable as long as they aren’t damaged or cut. In fact, they may be more reliable than wireless, which can  suffer in extreme weather or because of electronic interference.

And of course, wireless systems can be hacked! (None of the most popular wireless systems has been shown to have flaws, but all can be hacked by a determined pro. Most likely, people wanting to break into your home aren’t hackers — they are thieves! They’ll look for the easiest targets. Make sure you follow all best cyber practices — changing defaults, using unique passwords, updating everything whenever there’s an update. Your system will be too hard to break for that average thief.)

So, whether you choose a wired system or a wireless may depend, then, on your location or your security level requirements. Think it through. Oh, and if components are wireless, they still need to be powered, so you’ll have to consider when and how to replace batteries or install back-up batteries.

“Should I manage the system myself, or have it professionally monitored?”

Basic systems are set up to alert you by phone of activity or of a breach. Activity could be as simple as someone approaching the front door. You could, of course, miss the alert if your phone isn’t operating or isn’t nearby.

A monitored system reacts to a broader set of activities, and when it detects a breach, it reaches out to alert the monitoring company, which then alerts you and/or others, including perhaps police or fire.

Whereas a basic system is pretty much one purchase and a DIY install, a monitored system could involve service personnel to guide you through the installation. Once the threat of COVID is gone, they may actually do the installation for you. This may include installing a number of connectors, monitors and cameras and tying the system in to your home for business computer network. Naturally, you might have to pay for that personal installation service.

You will have to pay for monthly monitoring, as well. Some services wrap the cost of the equipment into the cost of monitoring. Others charge for the equipment up front, so their monitoring fees are much lower.

Costs vary widely. Equipment costs for a home system start as low as $100 for a single camera but are more likely to be twice or three times that much. (Even a simple business location will likely be more expensive in part because there are more rooms and more spaces to monitor.) Monthly monitoring costs may add as little as $10/month but most monitoring companies fees seem to be in the $39 –$59/month range for home services. Some companies even offer “advanced” monitoring that connects directly to police and first responders, saves your video, etc. (Watch for “sign-up specials” you can take advantage of!) Some companies require a contract; others don’t.

“Do I need indoor or outdoor security?” 

Outdoor “barrel” or “bullet” security cameras (as shown in the illustration above) have a hood that protects them from the weather. “Dome” style cameras, with a curved face, are most popular indoors, and can also be weatherproof for outdoor use. (They have an advantage in that you can’t tell which direction the camera is pointing. You’ll often see them in casinos or in other public places.)

The latest models of doorbell security cameras are smaller, best described as a simple box with a small camera lens – not too dissimilar to the camera in your smart phone.

A complete system may have a variety of camera types. The main thing to remember: while an outdoor camera can be used indoors, the reverse is not necessarily true.

“Do I want an alarm only, or do I want to see video?”

The simplest video systems run continuously, without interruption. If something happens, it is caught on the tape. (You’ve surely seen videos showing convenience store robberies, or scenes from street cameras.) When the tape is filled up, it is stored for a given period of time and then written over.

A continuous video creates hours’ worth of images that are difficult to search through if you need footage for insurance or crime purposes.

So, you probably want a motion-activated system for your home or business, something that you can set to complement known traffic patterns. Movement or a change in condition (window being opened, for example) sets off an alarm that can go to your smart phone or computer, or, as already described, to a monitoring service. Movement can also start a camera that takes still photos or video that you can view on a computer screen in your office or send to your smart phone.

 “What quality picture can I expect?”

The question really is, how much detail do you actually need? Do you need to be able to recognize faces on a 6 x 12 foot front porch? Or read license plates 30 yards away in the company parking lot? Think about how far away the object will be and the horizontal distance you want to cover.

The more detail you want, the higher the price of the equipment you’ll need. In many cases, however, you do NOT necessarily need the highest quality.

Having cameras with varifocal lenses will allow you to set the same camera for different uses. Some versions are P/T/Z – can be panned, tilted and zoomed remotely, for utmost flexibility.

“What about nighttime views?”

Most cameras have the infrared night vision built in, and automatically switch from day to night mode. Some cameras are paired with separate, motion-activated spotlights to provide the amount of light necessary for filming.

 “Do I hear and can I speak to the person being filmed?”

The porch camera ads on TV show the homeowner telling the intruder to get lost. (Or you hear a friendly dad’s voice acknowledging the arrival of the kids.) Being able to hear and speak to the person who has activated the alarm are again additional features. They will cost more and require more bandwidth in the system.

LEGAL CAUTION: The above paragraph describes SPEAKING to another person via your security system. RECORDING a person without his or her knowledge is a whole different thing!  In fact, Federal Wiretap Laws specifically prohibit recording unless at least one person in the conversation knows recording is taking place. (In California where we live, both parties must be aware of the taping.) So before you invest in a camera with audio recording capabilities, make sure you know the law in your state. You probably don’t want this capability!

OK, so much for the basic choices. Now . . .

“What additional features might I want?”

Some monitored home security systems offer more than just the surveillance and intrusion features we’ve discussed so far.  Options could include:

  • Panic buttons – Press to call for help if you are threatened in your home. Silent alert goes to monitoring service and to police.
  • Life support systems – Press to call for medical help. This is the so-called “life alert.”
  • Fire and CO alarms — These can be added to the system to alert residents and also the monitoring company in an emergency of this type.

And the final important question . . .

“What kind of customer support will I get – and what will it cost?”

Are you buying from a third-party distributor or the manufacturer? The amount or quality of support will vary dramatically. Before you buy, make sure you will have access to full documentation, at least, and check on the terms of the guarantee.

If you decide on a monitored service, you’ll want to know even more details before you sign on the dotted line. For example . . .

  • Will the company set an appointment and come to my home/office to do the installation, or am I responsible for installing the equipment?
  • Do I pay extra if they do the installation and set up?
  • Must I buy all the equipment from the monitoring company? What if I already have some cameras I want to use?
  • How do I get repairs if the equipment stops working?
  • What sort of contract is required? (How many months?)
  • Is there a fee to discontinue the service?

So now, if you’re ready to shop . . .!

Three examples of basic security camera systems

I picked these three best-selling models because they had consistently good reviews while demonstrating the variety of features discussed above. As you can see, prices vary. Click on the images or links for full details and to get exact prices at Amazon.

Reolink, A straightforward yet complete wired set-up with extra high-quality camera and continuous video. Note that when you get to Amazon to shop, you will find a number of “packages” containing this basic component.

Reolink 4K Security Camera System H.265, 4pcs 8MP Person/Vehicle Detection Smart Wired Outdoor PoE IP Cameras, 8MP 8-Channel NVR with 2TB HDD for 24/7 Recording, RLK8-820D4-A

Simplisafe – popular wireless home security system that “understands” Alexa and Google Assistant. No contract required (although professional monitoring is available). (I have to admit that I can’t resist the Simplisafe ad where Robbert says “Entrez vous!” to the pizza delivery guy.) Again, many individual components and different packages.

SimpliSafe 9 Piece Wireless Home Security System w/HD Camera – Optional 24/7 Professional Monitoring – No Contract – Compatible with Alexa and Google Assistant

Ring Doorbell Pro uses existing doorbell wiring. Ring continues to get a lot of chatter on our local neighborhood Nextdoor website. People seem very pleased with their improved security. And prices have come down since we last looked. Remember that this is truly a doorbell, and not a whole house system.

Here’s the basic Pro version to get you started on your shopping.

Ring Video Doorbell Pro – Upgraded, with added security features and a sleek design (existing doorbell wiring required)

If you have experience with any of these systems, or with a different system, please let us know so we can continue to update this guide!

Virginia Nicols
Your Emergency Plan Guide Team

Preparedness Checklist for 2018

Share

Lists work. They’re easy to figure out, satisfying to check off. Here’s one to get us all going toward some new levels of preparedness for 2018.

Review or reminder?

For a few people, this will be review. But for most of us, at least one of these items will cause a grimace or even a slap of the forehead because we know we should already have dealt with it!

There are more ideas and resources below the chart. But take a quick first look.

Which item should be first on your list?

Preparedness Checklist for 2018More resources for items on the list.

  1. Homeowners’ insurance may not cover water damage to the stuff in your basement. Neither may flood insurance! If you rent, what about the items stored in your “cage” in the parking garage? You will never really know what’s covered until you pull out your policy and go over it with your insurance agent. Here’s an Advisory that will give you more questions to ask about any insurance:
    Flood Damage Not Covered By Insurance
  2. What was a good place to head for last year may have changed. Update your plans, particularly if you have children. Pick an assembly place nearby – like the big oak tree at the back of the lot – and another place further down the block or even across town. Can your family members FIND these places without the maps in their phones?
    Get Out Now — Family Evacuation Plan
  3. Every homemaker knows this, and knows how to do it. In a survival kit, just pull and replace everything! (You may discover that more and more canned items now are self-opening. Yay!) On the kitchen shelves, load at the back, eat from the front. Basta.
  4. I finally got far enough ahead on my blood pressure pills to have 10 days’ worth stored in my survival kit. But they’ve been there a while . . . And as we all know, over time pills lose their effectiveness, band aids lose their stick, bottles dry out, tubes ooze. Your first aid kit could actually do you harm if it’s not up to speed.
    First Aid Kit Failure
  5. Seems as though it would be easy to run outside in a fire, doesn’t it? But people are trapped and burned every day. Practice with your family! Make sure you know two exits from every room, how to get down from the second floor. What’s your agreed-upon signal for a home invasion threat? Every individual needs to know how to respond. If all your children know is to come screaming for you, you have NOT trained them properly.
    Escape from Burning House
  6. People around you could turn into rescuers – and even into friends. It can’t hurt to be open to meeting more of them. Besides, it’s just a neighborly thing to do. And if you have a neighborhood emergency response team, invite them to come and find out more.
    Build a neighborhood team
  7. Memorize important phone numbers. Assume phones won’t be available in a car wreck, a storm, or an earthquake. Memorizing is healthy brain activity, too!
  8. Computer companies compete to be your back-up service. But where do they PUT your files, and how to you access them if your computer has been destroyed? Have at least 3 back-up methods: onto your own computer, onto a separate physical hard drive stored off-site, and into the cloud. Test whatever procedure you have put into place. Just having a COPY of something doesn’t mean you can necessarily start right back up to work.
  9. Did you know that if one roommate applies for relief from FEMA, the other roommate may not be eligible? Do you know who would have to sign off for you to get an insurance payout on your house? We all tend to let legal questions linger . . . 2018 is the year to clean legal issues up for a number of reasons, not least of all to get them off your mind.
    Legal problems surface after flood
  10. Emergency preparedness isn’t supposed to be all long faces and determined expressions. It’s supposed to be positive!  What would be fun for you and your family? Learning to tie knots? Identify edible plants? Start a fire without matches? Operate a HAM radio? Take a course in basic self-defense? Do the CERT training? Every one of these skills will improve your knowledge, improve your confidence, and make you better prepared for any emergency!
    Tie the right knot!
    Ham radio operators play key role
    Self-defense for the rest of us

OK, I think that should do it!  Post this list somewhere handy, so you won’t overlook these items. What else should we add to the list? Just let us know in the comments!

Virginia
Your Emergency Plan Guide Team

P.S. While we’re still on the positive aspects of preparedness, don’t miss my most recent Top Ten list!  It’s a collection of comfy camping items that would make ANY trip so much more pleasant — and fun!  Here’s the direct link: https://emergencyplanguide.org/top-ten/


New Threats Emerging

Share

What 2018 is looking like for Emergency Plan Guide

Wet FloorThe Emergency Plan Guide website has been up since 2011. Its main objective has stayed the same since those first days: to help people understand disaster realities and be better prepared to face them.

Three realities continue to sustain the site.

(If you’ve been with us for a while, this will be mighty familiar!)

  1. Emergency Preparedness isn’t top of mind for anybody. When asked, people say they want to be ready – they just don’t think about it on any regular basis. That’s why we came up with the idea of weekly Advisories, filled with tips and reminders. Since 2011 we’ve written hundreds, covering dozens of different topics. (Right now I count 297 in the list of Archives. A number of older Advisories have been retired, and several are being reworked.) People keep subscribing, so the Advisories will keep on coming!
  2. Family preparedness is one thing, workplace preparedness is another. You’ll see that we address both on a regular basis. We also address a third aspect of preparedness that very few other websites even mention – the importance of community and the value of working together as a group to prevent or make it through a disaster. Much of this planning is based on CERT (Community Emergency Response Team) training.
  3. Authorities do their best, but . . . Police and fire departments, local and federal government and non-profit agencies may not arrive for hours, days or even weeks after a disaster hits. We hear about new instances of delay, and we use them to keep reminding our readers that no one is coming to save them – it’s up to us.

OK, that’s three of the core beliefs that drive us. What drives YOU to work on being prepared? What threats are keeping you up at night? Keep reading, please.

Seven trends will be guiding our plans for 2018.

Some of these trends have been around for a while, but have pushed themselves to the top of the heap, demanding more attention.

  1. Technology changes faster and faster. Five years ago we might have written about how to use a compass and a map; today we write about personal locator devices (GPS) that will direct rescuers right to you! Smart phones have become THE primary tool in every survival situation; in the past several months solar rechargers have supplanted batteries as the best way to keep devices functioning. At the same time, more technology also means more security risks. Watch for an upcoming series on hacking threats to your home from the internet.
  2. There’s a new normal for natural disasters. In Texas, three 500-year floods occurred in the last three years! In California, three years of historic drought have been followed by the “most destructive wildfire season ever.” Some areas in the world – like Florida – are “hot spots” where sea level rise is 6 times faster than average. Add “normal” emergencies to these locations and it becomes a nightmare. Shelter in place doesn’t work well for these disasters, so watch for more info on how to prepare for evacuation.
  3. Deliberate cutbacks threaten (FEMA). Proposed budgets, not yet passed, aim at cutting federal emergency funding by nearly $1 billion! Local budgets are cutting police and fire department funding. This leaves citizens on their own more than ever before. We have three books on the drawing boards to strengthen citizen response; the first one should be coming out before the end of this year.
  4. Terrorist threats and hate crimes continue. ISIS may have lost its caliphate, but U.S. home-grown terrorists are alive and well. And hate crimes have risen in the U.S. for the second straight year. I guess we can’t change people’s minds about religion or ethnicity – but we can talk about how to spot a potential crime and what to do when you do. And we will keep talking about steps communities can take to increase safety. (Did you know that after the shooting at Sandy Hook, Connecticut passed new requirements and made money available to improve school safety, but barely 25% of schools are reporting that they have even held fire drills, much less hardened facilities or practiced lockdown drills!?)
  5. Risk of nuclear war reemerges after 3 decades. Almost impossible to contemplate. As older Americans, we remember the drills of the 50s. Watch for more as we struggle to consider the realities of this threat.
  6. Most people cannot retreat to the wilds and live off the land. The last census in 2010 showed 80% of the U.S. population living in “urban areas.” Here in California, that percentage was 95%! Today those urban percentages are only higher. What this means is rural lifestyle, which fosters self-sufficiency and encourages learning and practicing wilderness survival skills, is simply not available to most of us. Yes, we can enjoy learning more of these skills, but a plan to “bug out” to the wilderness is unrealistic. We will address more urban survival skills.
  7. We all face more distractions. Driving, devices, politics, health, family — it’s hard to be clear about objectives, much less to follow through. People are also reading less and less — the average American spends only 19 minutes a day reading! These facts have led us to turn more Advisories into quick read worksheets and skimmable checklists – and almost always, a Call to Action! (Nothing like having a background in direct marketing and advertising.)

Now, when it comes to emergency preparedness, what’s on YOUR mind?

When you sign up to receive our weekly Advisories, I get the chance to see the town your message is coming from. But that’s all I know about you!

Occasionally, people write in with a comment or question, and then we are able to begin a real conversation. (I like that a lot!)

After all, I’m researching and sharing information that I trust will be useful. If it’s not – well, it’s a waste of your time and mine.

So . . .here’s that Call to Action.

Can you please take a moment and send me a quick message with some trends or some topics YOU would like to discuss? I can promise I’ll respond!  (I’ll keep your name private, of course.)

Here’s the link:  Virginia, here’s what’s on my mind . . .

Thanks for being a part of our community. The more we all know, the safer we all will be.

Virginia
Your Emergency Plan Guide Team