Category: Resources

Take Care of Your Tools

Share

“Take care of your tools and they will take care of you.” This comment seems to refer most often to garden tools.

In today’s Advisory from Emergency Plan Guide, though, taking care of tools refers to the computer tools we are using right now – our computers, tablets, phones – all those digital tools that make it possible to share stories, images and, in this case, blog posts!

Now, I want to be able to finish the 31 days of this summer blog challenge without a computer hitch. So when over the past week I received several warnings, one after another, I paid close attention.

And then I thought of you, and knew you would be interested, too!

Take care of your computer tools!

Here are the three warnings I’ve received in the past couple of weeks.

Warning #1 comes from Avast. It’s about a phishing scam that arrives in an official-looking WordPress email. It urgently requests that you update your username, password, etc. Because you’re a good reader (!), you might notice one little strange grammatical quirk in the email, but MOST people won’t notice it.

Anytime you get an email from what you consider a trusted source (most popular phishing emails come from Microsoft, PayPal, Netflix, banks, etc. ) that urgently demands an update or action on a bill or some such, consider it a scam first and then follow up VERY carefully. (Don’t hit that Update Now button!)

Warning #2 comes from Microsoft. It’s about BlueKeep, a 2019 “worm” affecting older versions of Windows, traveling from computer to computer. The windows versions that are vulnerable: Windows 2003, Windows XP, and Windows 7. If you haven’t been taking care of your tools by updating, do it now! (It you are running Windows 8 and Windows 10 it looks as though you aren’t affected by BlueKeep.)

Warning #3 comes from ithemes Security. Actually, it’s two separate warning reports!  The first lists 9 WordPress plug-ins and themes that have vulnerabilities and the second half of the report lists 19 more. A couple of the plugins have been removed by WordPress; the others have a patch that fixes the problem as long as you update. (I found 3 familiar plugins on these lists, and 2 that I currently use, so this isn’t wildly esoteric stuff.) Here are links to the two reports:

How do I get these warnings?

The reason I get these warnings is because I have installed multiple security software packages on my computer network. Some of them are paid, others free.

The software itself doesn’t necessarily catch everything. I certainly have received my share of fake Wells Fargo phishing emails! But I do get a warning bell from time to time, and questionable emails end up in my JUNK file where I can carefully review them. Plus I get regular alerts like the ones described here.

You can also get warnings simply by setting up a Google Alert.

Are you taking good care of your tools? What security software do you use?

Virginia
Your Emergency Plan Guide team


Day 3 of Summer Vacation: A time for some shorter and lighter Advisories as a welcome change-of-pace!


Too humid! Too wet! Too much mold and mildew!

Share
hot and humid bathroom mold and mildew

The weather news is filled with stories about too much water.

So when I found a couple of nasty black spots in our shower, it was a sign that I needed to take another look at water conditions right here in my own home! I plunged into some research. Here are my questions and the answers I found.

I hope you will share this info with family and friends. I’m afraid everyone is likely to find mold or mildew in their home at some point!

Mold or mildew in my shower? Which is it?

Turns out that both mildew and mold are fungi that reproduce via airborne spores. Mildew is the wimpy adolescent, mold is the full-grown bully. Mildew is white or gray and often looks like dust; mold is red, black, blue or green and looks stubborn. Either of these is likely to give off a musty, wet-sock smell – you are likely to smell them long before you see them. Both grow on “organic materials” like wood or wood products like paper or drywall, and plants. (And obviously mold can grow on fiberglass shower walls, too!)

How dangerous are mildew and mold?

Most people exposed directly to mildew – like breathing it in – may experience mild symptoms like sneezing, itchy eyes and coughing. If you have asthma it might flare up.

Mold symptoms are worse if people have a mold allergy.  Afew types of mold do produce toxins – like black mold. (Shiny, black, looks like tar – get out now) – but for most people the problem is when they are allergic and/or already suffer from asthma.

Obviously, people exposed to large amounts of mildew or mold, and who already have chronic lung disease, could experience a severe reaction including infections in their lungs.

What makes mold grow?

Mold spores are always in our environment – you can’t escape them.  They only become dangerous when they find perfect growing conditions: a nice porous organic surface to land on, warmth, oxygen, AND the right amount of water. Not all the sources I found were in total agreement, but FEMA and the CDC say that mold can develop within 24-48 hours of finding those conditions!

So how do I avoid mold in my home?

We’re not talking here about coping with the aftermath of a flood. Rather, the next few paragraphs will be about more ordinary conditions.

Here are specific recommendations:

1-Start by checking for leaks and/or signs of mold.  You will know if your roof or windows are leaking. You may never really have looked for leaks under the sinks or behind the washing machine, etc. Check – if those areas are dry now, clean up any mold and fix the leak. If the area is not dry, you may have to call for professional help to replace rotted or moldy wood. If you discover mold in AC ducts, don’t run the HVAC system until you’ve got them cleaned out by professionals.

2-Wipe up spills immediately. Whether it’s a glass of lemonade, a whole bucket of soapy water, or spaghetti sauce that boils over, wipe it up immediately!  Make sure the area is totally dry and clean before you walk away. If the spill is in the bedroom, clean and dry the area immediately. Use a HEPA vacuum cleaner on your carpet. (HEPA stands for High Efficiency Particulate Air and a HEPA filter traps 99% of particles over 0.3 microns in size.)

3-Note and deal with condensation. Just like in the image at the top of this article, our bathroom mirrors fog up when Joe takes a long shower. Yes, we open the window and run an exhaust fan, but it’s still damp. And that must have contributed to those black spots this week!

In the past, I’ve had bedroom windows get wet from condensation, too!  (Though not in this house.) If you experience condensation, the steps to take include:

  • Clean up moldy spots in shower.
  • Squeegee and wipe dry the glass door and tile walls and/or windows after showering.
  • Make sure you have an exhaust fan – run it for 30 minutes after a shower.
  • Consider a dehumidifier.  See below.

4-Your refrigerator could harbor mold. Forgot that meatloaf in the back of the frig? “Expired” food grows mold! And dripping ice maker tubes can, too. Keep your refrigerator cleaned out – and clean!

5-Check houseplants regularly for mold. Gray stuff in the pot? Repot with new soil, treat with fungicide.

6-Don’t forget closets. You can bring in spores on clothing and shoes, particularly if they are damp and don’t get properly dried and aired out before being put away.

If you discover mold, get rid of it!

Alert: Everything I read about mold suggests that you can take care of small mold growths by yourself, but you need professional help for a big job.  What is “big?”  Probably a mold growth greater than 10 sq. feet in size. You may also need professional help if your water and/or mold damage came from contaminated sources (sewage, flooding), or if you know you have health concerns.

If you plan to do the cleanup yourself, wear the right protective gear. I recommend you click on the links below of any products you don’t already own to see if they make sense for you or family members.

  1. Avoid breathing in the spores by using a respirator. Earlier we  wrote about the importance of N95 respirators for managing particles from wildfire smoke. (The 95 means they block up to 95% of airborne particles.) There are also N99 respirators. Even better for a mold clean-up job. Here’s a 12-pack of N99 respirators from Amazon that have all-important exhalation valves.
  2. Protect your eyes from dust and floating spores.  CERT volunteers often are supplied with safety glasses, but if they are just glasses, or goggles with air holes, they’re not right for this job!  You want safety glasses or goggles that fit all around your eyes.  I personally need a model that fits over regular glasses; this link takes you to over-regular-glasses goggles that actually come in a package with N95 respirators, too. I consider this a smart buy.
  3. Wear gloves. Never touch mold with bare hands!  You’ll want sturdy gloves that come well up past the wrist.  The ThxToms  company makes heavy duty gloves in both rubber and latex. (Their rubber gloves are longer and cheaper!)
  4. Wear long sleeves, long pants, and closed shoes.

As for cleaning materials, you can buy commercial products or use common household cleaners.

Some recommended anti-mold products that are made specifically to kill the mold or mildew and also remove stains. In each case you leave them a while to work their magic and then rinse off.

You may already have on hand one or more of the natural cleaners listed below.

  • Scrub mold spots off with a brush and spray with white vinegar. Let dry. No need to rinse. Use the spray and let dry after every shower.
  • Same approach using a mixture of 1 cup Borax with 1 gallon water, spray on, let dry.
  • As a last resort, mix 1 part bleach to 10 parts water, spray and let dry. Bleach is more toxic.

For all the above, be sure to wear gloves and eye protection and make sure area is ventilated.

A final note about humidity.

Every article I read about mold mentioned the role of humidity in mold’s growth. Of course, humidity is important to our overall health and sense of comfort. Several different sources rated the ideal relative humidity for health and comfort as being about 40-50%. In the winter, humidity may have to be lower than that to avoid condensation.

How do I know how humid it is?

The answer to this question is simple. Buy a hygrometer so you can check! Get a simple one with big print and carry it around with you to test bedroom, bathroom, etc. The one below costs less than $10! (Click the image to get exact price and details.)

And if the relative humidity in your bedroom or bathroom is too high?

A dehumidifier can make all the difference to health and comfort.

Dehumidifiers work rather like refrigerators. They suck in the humid air and run it over refrigerated coils. The water condenses on the coils and drips down into a bucket, and warm dry air is blown back into the room.

The capacity of a dehumidifier is measured in how many PINTS of water it can remove from the air per day! A one-smallish-room may require a 30 pint machine; a large basement might require a 70 pint machine. Here are positively-reviewed examples from Amazon. Click on the links to get details and prices.

hOmeLabs 70 Pint Dehumidifier Featuring Intelligent Humidity Control – Energy Star Rated, Ideal for Large-Sized Rooms and Basements to Remove Moisture-Related Mold, Mildew and Allergens

And a smaller version:

Vremi 30 Pint Energy Star Dehumidifier for Medium to Large Spaces and Basements-Quietly Removes Moisture to Prevent Mold and Mildew, White

Too much humidity, too much mold, too much mildew! Not good! If you have any of these in YOUR home, you will want to make a plan to deal with them starting now.

Good luck!

Virginia
Your Emergency Plan Guide team

P.S. I cleaned up my shower with white vinegar and an old toothbrush. The spots have not returned!


Are you sitting on top of a leaking gas line? Part One of a Series

Share

(Part One of a series aimed at neighborhood or workplace teams)

An often-overlooked threat

Be safe from leaking gas line

Read before you toss as junk mail!

The word “disaster” usually makes people think about natural disasters like tornado, flood, or earthquake.  You’ve probably already talked in your group about how to prepare for these threats.

But unless we’re reminded by notices from our local utility we may never even think about the gas lines that run under or near our homes or places of business.

And if we take the time to learn even more, we will discover that any gas line could be a leaking gas line! Moreover, a big enough gas leak can be deadly.

Time for your group to be asking: Where are the gas lines around us?

Finding out where the gas lines run in your neighborhood will take some effort.

In the years that we’ve been studying our own community we have run up against resistance from a number of sources. As can be expected, cities and gas line operators are concerned about sabotage and/or terrorist activities. They protect the details of their systems from everyone, including residents.

Moreover, a leaking gas line may or may not be repaired even though it has been noted. As you can imagine,  a utility company really doesn’t want you looking over their shoulder when it comes to their maintenance policies!

Still, a good emergency response group wants to understand its community’s risks, and so the group perseveres . . .!

Three places to start your research.

1-The National Pipeline Mapping System (NPMS) is an online map provided by the Department of Transportation. As a member of the public you can search by your State and COUNTY to get an idea of where gas transmission and hazardous gas pipelines are located.

I say “get an idea” because the public viewer is good only to +/- 500 ft.  (If you are actually going to dig, then you need to contact your local pipeline operator – or call 811 – to find out exactly where the pipes are.)

Here’s the link to the map (“Public Map Viewer”):  https://www.npms.phmsa.dot.gov/Default.aspx

2-Your local gas company

Here in California we have two of the largest public utilities in the country, and our local utility provides a map showing transmission and distribution lines. Once again, the authors of the map stress that the maps are accurate only to +/- 500 ft. Still, we can easily identify the “hazardous liquid” line running along the railroad tracks very near our home.

My research on other utility companies shows that there is no consistency. Many of the utility company websites simply refer readers to the National Pipeline Mapping System.

3-Your local pipeline operator

The pipeline operator is not necessarily the same as the utility.

Keep your eye open for pipeline signs. They are not required, nor are they necessarily placed in the same way every time. What they seem to have in common is the gold color.

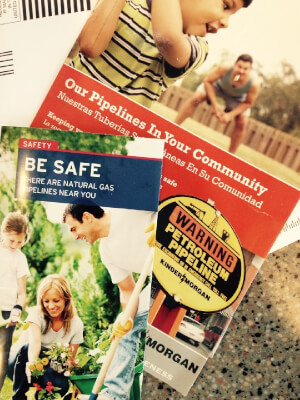
The round warning sign will tell you who the pipeline operator is. (You’ll see a round sign on the brochure in the image above, too.) Write down the name and emergency phone number. You may be able to get further information about that particular pipeline and what it carries from the operator.

Kinder Morgan is the largest pipeline operator in the country. Its website says it transports nearly 40% of all piped natural gas, refined petroleum products, crude oil, carbon dioxide (CO2) and more. I found this map at their website. It shows just their biggest pipes. As you might expect, Kinder Morgan has a number of competitors.

Kinder/Morgan PipelinesThe point of all this is that with some digging (bad joke!) you can discover a lot about where pipelines are in your community and who is responsible for them.

How we got information about our own community.

This Advisory is meant to give you an idea of where to start. Different members of our neighborhood emergency response group took on different tasks in researching our gas pipelines.

  • I tracked down online maps like the ones shown in this Advisory.
  • One member hiked along the nearby railroad tracks and photographed a construction project. His photos show the size and exact location of gas lines.
  • One member went to city hall to get the original construction drawings for our community. These drawings show not only the location but also the size of the various pipes in the network, plus shut-off valves.
  • As a group we queried the management of our community regarding make-up and maintenance of our local system.
  • Our group invited the fire department, the police department and our local utility to special meetings on gas safety. (You will not be surprised to learn that they don’t always agree on where the lines are, what information to share or how to respond in an emergency!)

OK, so we now have an idea of where the pipelines are and what they are carrying.

And we found that gas is leaking from all these systems all the time!

With over 200,000 miles of pipelines, and many of them decades old, it’s to be expected that there will be leaks. In fact, distribution companies track something called “lost and unaccounted for” product.  One report has their measurements ranging from under 1% to over 4%!  (https://www.scientificamerican.com/article/how-much-natural-gas-leaks/)

What causes the leaks? Common causes are simple deterioration, overgrown and over-stressed systems, defective equipment, incorrect hookups, code violations, faulty manufacturing of tanks and/or appliances — and natural ground shifts due to floods, earthquakes, etc.

Most of the time gas that escapes isn’t even noticed (except by the atmosphere, of course, since methane – the main component of natural gas – is 30 times more potent as a heat trapping gas than CO2.)  But any time there’s a leaking gas line, there’s a potential for explosion or fire.

The key is to keep gas from building up until it reaches the level where it can explode — that is, to where it makes up between 5 and 15% of the atmosphere. A whiff of gas won’t explode.  A mix that is too rich won’t explode. There is a 10% window in which it can ignite.

Good to know!

In Part Two we’ll share what we have learned about finding leaks!

Click here to move right on to Part Two.

Virginia Nicols
Your Emergency Plan Guide Team


How do YOU shop for the holidays?

Share

holiday gift

Have you succumbed to the excitement of Black Friday?

Whether yes, or no,  how do you compare to other Americans when you shop for the holidays?

  • According to accounting firm Deloitte, 50% of last year’s holiday shoppers said they prefer shopping online to going into a brick and mortar store. Which do you prefer?
  • And although this is supposed to be the time to shop for the holidays (i.e., gifts for others), apparently much of the early spending is on things people want for themselves rather than what they’re buying for others. What’s on your personal list?

Do you shop for holiday gifts with a purpose?

Here at Emergency Plan Guide our major focus isn’t on selling things, but we we definitely believe in gifts.  That’s because . . .

We see gifts as a way to introduce more people to the importance of being prepared for emergencies.

So, following national trends, we take a few days – and particularly at this time of year! — to aim you toward some online purchases to emphasize the value of preparedness . . .

  • For family members
  • For employees or workplace colleagues
  • For yourself!

Let our Top Ten Lists help you shop for the holidays!

Last week we updated our TOP TEN lists to some of the latest best-sellers in the category of Survival Starter Gifts and also in the category of Exclusive Preparedness Gifts. Two different lists, two different price ranges, two different PURPOSES!

If you haven’t yet, please check them out!  Join in the holiday buying tradition!

And we also are pleased to introduce a whole new online source of interesting and inspiring items –a new website!

Announcing  — a new resource for shopping!

Over the years you’ve seen that we are eager, always curious readers. We go in depth into many topics to be sure we understand the whole science behind it. At the same time, we also enjoy not-so-formal articles and books, and we often include links to them.

Every once in a while we come across a book that is just too good to own and not share!  That’s what started EmergencyPreparednessBooks.com

Spread the word about preparedness

On the site we review books that we’ve enjoyed and books we think are essential for your library.

  • We add a new book every once in a while – you’ll see them under “Latest Additions.”
  • We also have a section with ideas for using books to “Help us spread the word” about preparedness. This section is written in particular for people belonging to neighborhood groups or who are part of a business where preparedness plays a role — or SHOULD play a role!

I invite you to find a few moments to browse through the website, read some of the reviews, learn more about why we created the site, and see if any of these ideas or these books fit your list as you shop for the holidays!

And I welcome any comments or recommendations YOU have for great, inspiring, engaging, educational, exciting or fun books YOU would like us to add to our list for your fellow readers!

Here’s the link to the new site. You’ll recognize it as looking just like the image above!

Thanks – and happy shopping!

Virginia
Your Emergency Plan Guide team


Building a Neighborhood Emergency Preparedness Team

Share

UPDATED SEPTEMBER 9, 2018.

Yes, it’s fun to pull together survival kits for yourself and family members. For some of us, getting more and better survival gear turns out to be a sort of addiction! (A healthy addiction, we believe.) And creating family plans is satisfying, even though they require constant updating.

But once your immediate household is organized, what then?

Building a neighborhood emergency preparedness group

When the emergency hits, are your neighbors going to be knocking on your door, looking for help?

They may. And you may not want or be able to help them.

The only way to solve this problem is to encourage neighbors and co-workers to be as prepared as you are!

We have devoted a lot of our time over the past 15 years to helping our neighbors get prepared, trained and organized.  If you’ve been reading our Advisories, you know about some of what we’ve done.

Now we’re adding one more piece to the puzzle.

Building a Neighborhood Emergency Preparedness Team — getting more attention.

About 3 years ago, we started a whole new section on building a neighborhood group. Here’s how we started that section:

  1. Step One was to pull together all our original material on team-building that we’ve created for Emergency Plan Guide readers. That list starts at the bottom of this post.
  2. Step Two was to reach out to other organizations around the U.S. for their best ideas. In fact, many of our blog posts already link to others’ stories and skills, and we’ve added more and more.
  3. Step Three was to solicit specific input for Emergency Plan Guide readers. We continue to do this, and you can help by referring us to people or sources you know, or by suggesting a topic you’d like to know more about. We’ll track down and share the best info we can find!

Let’s start with resources for those people who have already made the commitment to starting or building a neighborhood group.

We assume that as the leader, you will have found a way to get formal CERT training for yourself.  Not all members of your team may get training, but you need the framework and vocabulary of CERT so that your group can work effectively together and with local first responder teams.

So to start with Step One for building a neighborhood emergency preparedness team . . .

. . .here is a list of some original material from the Emergency Plan Guide collection. Most of this is ready for download as is, with the first couple of handbooks available for purchase.  We hope you’ll find what you need for YOUR group!

Comprehensive training manuals

  • The Neighborhood Disaster Survival Series — our 4 books aimed at building groups in different kinds of neighborhoods. Each book is over 100 pages filled with specific steps and suggestions based on 15 years of growing our own group.  The books are at Amazon, in ebook (downloadable) or paperback.
  • Meeting Ideas — A collection of meeting ideas, with a list of what you’ll need, how best to schedule the activities, what to watch out for, etc. $10 at Amazon. Get more details by clicking the link.

Stand-alone subjects for training or discussion

  • UPDATED! How to Recruit Volunteers — We just updated this list. Download your copy now!
  • How to Hold a Great Meeting — Event-planning basics that you’re probably familiar with, but that can help others on your team get up to speed. Since we started our own group, we’ve been able to provide a great overhead projection and sound system for our guest speakers.  That helps, as long as you have some skilled audio-visual people on hand!
  • Finding Leaders — Every member of your team needs to be able to step up to lead. After all, when the emergency hits, you can’t be sure who will be on hand.
  • Active Shooter Event — Worth a discussion, particularly given recent developments here and abroad.
  • For more, just click on NEIGHBORHOOD in the category listing in the sidebar to the right.

Possible group investments

More to come! (Be sure to sign up to get our Advisories so you don’t miss anything!)

Virginia
Your Emergency Plan Guide Team

P.S. Step Two for Building a Neighborhood Emergency Preparedness Team is to reach out to other organizations. Just last week you saw the results of some of our outreach when we wrote about the Lamorinda California CERT team’s upcoming meeting. Please share what YOUR group is doing!

Where to put Mom? Emergency Preparedness in Care Facilities

Share

What are the chances of you or Mom ending up in a nursing home?

Man with disability in wheelchair

Updated statistics will be coming out after the next census, but right now it looks as though the chances of a senior citizen spending time in a nursing home or skilled care facility are about 1 in 4.

This should immediately bring to mind the 14 people who died last year in Florida when their nursing home air conditioning failed. You may even remember tragic images from Katrina.

Reassure yourself about emergency preparedness in care facilities you are considering!

I’ve been searching for professional advice on this topic, and I found it on one of my LinkedIn groups.  After a series of back and forth messages, Nicholas Thorpe kindly agreed to provide Emergency Plan Guide readers with questions to ask.

You’ll see that his questions fit right in with the way we try to learn more about being better prepared.  Please check out his expert article below, and share with other family members and friends. 

Long-Term Care and Emergency Preparedness — Knowing the Right Questions to Ask

By Nicholas Thorpe,  8/2/2018

When considering long-term care facilities, we all look to ratings, accreditations and high standards.  One of the most overlooked considerations, however, is emergency and disaster preparedness.  Does the facility you are considering have plans in place for adverse conditions, be it man-made or natural disaster?

New rules for emergency preparedness in care facilities are now in effect.

Following Hurricane Katrina, the Center for Medicare/Medicaid Services (CMS) began to work on new rules to govern how emergency preparedness should be handled at various medical facilities. In the fall of 2017, the new rules for emergency preparedness went into effect for seventeen (17) health care provider types (to include long-term care facilities). These rules are meant to correct the lack of preparedness that was seen following Hurricane Katrina and other major disasters.

These seventeen (17) provider types are now required to be in compliance with the emergency preparedness rule as part of their eligibility to receive reimbursement for services and care through Medicare and Medicaid. These rules can be found on the CMS website at New Rules .

My role now in a health care preparedness coalition in central North Carolina is to work with health care facilities so they are better prepared for emergencies and disasters and to help them comply with the new CMS emergency preparedness rule.

Ten questions to ask as you evaluate emergency preparedness in care facilities.

The following questions will help you evaluate the level of emergency preparedness as you consider care facilities for your family member:

  1. Are you regulated by CMS and do you comply with the new Emergency Preparedness Rule?
    1. Have you been surveyed recently?
  2. What methods will you use to contact me should something happen to my family member or following an emergency or disaster?
    1. Do you have any additional methods you can utilize to contact me?
    2. Who/how can I contact the facility to learn the status of my family member during/following an emergency or disaster?
  3. Does your facility have a way to transport residents that is not reliant on local emergency services agencies in the event an evacuation is necessary?
  4. Does your facility have any agreements in place with other sites to relocate residents in the event of an evacuation?
  5. Does your facility have a generator that powers the HVAC system (heating and air conditioning) and refrigeration for the entire facility?
  6. How many extra days of food do you have on site should your supply chain be disrupted?
  7. How is security maintained in the facility?
  8. Has your staff had active shooter response training?
  9. Is your staff trained in providing first aid, CPR, and applying tourniquets?
  10. How often do you practice emergency procedures that aren’t fire drills?

Choosing a facility should not be solely based on how prepared it is for an emergency. How it is prepared, however, should be high on your list of criteria when deciding who should take care of the people who mean the most to you.

Nicholas Thorpe works for the CapRAC Healthcare Preparedness Coalition in Raleigh, North Carolina.  He has completed more than 1,000 hours of emergency preparedness training, trained over 200 first responders and over 1,000 volunteers in emergency management procedures. Nicholas holds a Graduate Certificate in Homeland Security from the George H.W. Bush School of Public Service at Texas A&M University, and a Bachelor of Arts in history with a minor in political science from The American University in Washington, DC.

Please share this important information widely. There are other questions you can add to this list, but these will get the conversation started.

Thanks again to Nicholas!

Virginia
Your Emergency Plan Guide team

A couple of years ago we wrote an article that’s a good companion to this one: Leave the disabled behind? 
This is a topic we’ll be addressing more in the future.


Disaster Survival Series adds 4th title for Small Business

Share

Now available:

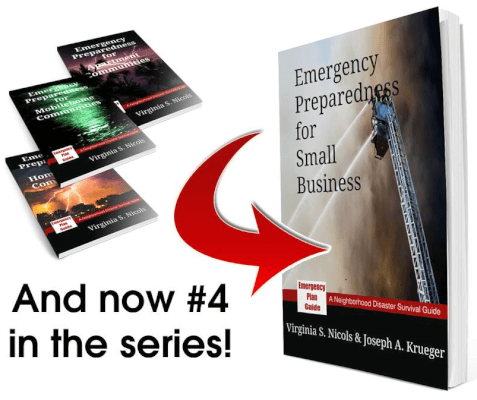
Emergency Preparedness for Small Business

The book that closes the gap in disaster survival between a business and its family communities.

4th book in series

The series expands: Emergency Preparedness for Small Business

No longer do small businesses have to put their business, their lives and their employees’ lives — and livelihood — at high risk in a catastrophic event. Emergency Preparedness for Small Business makes writing a simple Business Continuity Plan manageable and even easy. And we know that having that up-to-date, workable Plan improves the odds of business survival by an order of magnitude.

The foundation already exists.

This fourth book in the Neighborhood Disaster Survival Guide series has one unique purpose — to get business owners and leaders of their workforce community to adopt the widely acclaimed FEMA Community Emergency Response Team (CERT) process as an already-existing foundation for their Plan. CERT is provided free by over 2,500 cities and counties across the U.S. as well as on the FEMA website.

Authors Nicols and Krueger are themselves CERT graduates, and in the book have combined their years of working with business with their years of developing and leading a neighborhood emergency response team.

The first three books in the series were devoted to fulfilling the promise of CERT, giving individual members a way to leverage their training by reaching out and connecting neighbors and even whole neighborhoods.

This book extends CERT basics to the business community.

There’s no longer any excuse.

Joe Krueger says, “Whether you’re at home or at work, there’s no excuse for simply rolling the dice in an emergency. In fact, at work that attitude could be grounds for a lawsuit!”

Now businesses as well as neighborhoods have a simple roadmap for preparing for the natural disasters that threaten, as well as the even-more-frequent man-made ones. Each book presents options and real-life examples, offers step-by-step guidelines and adds references to dozens of other resources. There’s an occasional legal warning, too.

The message to all:

Disasters have surged 400% over the past 20 years – and they are bigger, often overwhelming official First Responders. It’s up to citizens to know what to expect and how to react, because they become the real “first responders!”

All 4 books are available as ebook or paperback at Amazon. Here are direct links:

  1. Emergency Preparedness for Apartment Communities
  2. Emergency Preparedness for Mobilehome Communities
  3. Emergency Preparedness for Homeowner Communities
  4. Emergency Preparedness for Small Business

When the disaster hits, it’s too late for preparing or for training.  Take the first step now.

Urban Survival Tools

Share

Wilderness survival is still — and always — a hot topic. But according to the most recent census, only 14 percent of Americans live outside a metropolitan area — 86 percent of us look to a metro area for jobs, activities and amenities. So when it comes to disaster preparedness, we need urban survival skills!

storm damage

A safe room anywhere?

As far as I can tell, urban or suburban survival translates directly into being prepared to shelter in place.

Let’s take another look at some of the requirements for being able to effectively shelter in place.

First choice for a great place to shelter — a safe room

Even in an urban setting, you may be able to construct a traditional safe room inside your house. If you are in full construction or upgrade mode, you would build your room to code and include safety and comfort features.  You might even go to the effort to make the room unobtrusive or even invisible, with a hidden door.

If you live in an apartment, though, choices are different. For you, the best idea would probably be to turn an existing room or an interior walk-in closet (big enough for everyone)  into a strengthened room that could better withstand a storm or even an incursion by bad people.

In either case, designing and creating a special room would take money — probably anywhere from $1,000 (VERY low end) to as much as $10,000.Whatever your budget, and whatever the home you’re starting with, here are 5 major areas to focus on.

1. Door and walls: reinforced steel door frame, exterior-style reinforced door that opens INWARD, and heavy-duty deadbolt locks. Get the best you can afford that won’t totally overwhelm the space or stick out like a sore thumb. Whatever you do, be sure to secure hinges with 3-inch screws and use 3 inch screws on the strike plate of your lock, too. Here’s an example of a deadbolt lock highly rated by Consumer Reports. The lock is expensive — over $100 — but as Consumer Reports points out, it’s probably not more than your insurance deductible.


Paint the door and trim to match the rest of the house. You may even want to consider a hidden door; take a look at this model, built by the well-known Murphy bed company:

As for walls, they can be reinforced by pouring concrete into the spaces between the studs, or adding a layer of kevlar or steel sheeting and then covering it with drywall.

2. Windows are difficult to reinforce, so plan a safe room with NO windows.

3. Water and sanitation: It would be great if you had a bathroom built in. If not, store water and get a camping potty, realizing you’ll have to empty it at some point. I’m a big believer in 5-gallon buckets for a variety of uses. Here’s one that serves as a portable toilet. (If you already have a bucket, you can probably get an attachable toilet seat for about $10.)

4. Ventilation: If your room is too tight, you won’t be able to breathe. Figure out appropriate ventilation (not requiring fans — remember, the power will be off).

5. Food and other emergency supplies: Your room is a good place to store your emergency supplies — food, emergency radio, lights, first aid, warm clothing, tools, etc. Don’t forget your prescription medicines.

Interested in more about safe rooms? FEMA has produced some very detailed plans, suitable for a professional builder. (Start your search here.)  And Wikihow’s article about building a safe room, here, is a good overview.

In the aftermath of the storm

Assume the storm is over, you and your family are safe, but your home or building has been partly damaged. What might you need in order to make sure it’s habitable for a while, since you have no place else to go?

1, Basic hand tools and construction supplies

If the power is out, power tools are out, too. You’ll need battery operated tools to start — and you’ll soon be down to hand tools. You probably have some of the following tools at home now, or can get them locally. Just be sure to have them BEFORE the disaster threatens. Your local hardware stores will sell out immediately.

And as you shop, consider quality. Poor quality tools are dangerous and ineffective.

This is a simple starter list. The more skill or experience you have, the more you’ll want to add.

With a good hammer, saw and/or hacksaw, and pry bar you can remove debris. I have used tools like these many times, and as a non-professional I’ve found that the right weight and size is really important. Too heavy, you just can’t wield the tool for very long.  Too light, it won’t do the job. Below, you’ll see some examples along with my comments.

  • Hammer 16 oz one piece flat for ripping. We’ve all used hammers, but the standard home hammer has a rounded head (so it doesn’t damage the wood) and a rounded claw (for pulling out nails). If you build a lot, your home hammer probably has a wooden or a rubberized handle to lessen the vibration. If you’re not really into tools, you may have a short handled hammer or tack hammer that you use to hang pictures. But for emergency use you need something different — something  TOUGH and HEAVY enough to rip apart debris. This one looks great, and isn’t expensive. (Click on the image to get current prices.)

  • These days we don’t use hand saws much, since everybody has a power saw. However, in an emergency your power tools will be useless. You’ll need a traditional, all purpose saw. This Stanley version is only 18 inches long, not as long as a carpenter’s serious wood-cutting saw, but I think it would be just right for in-close work.


  • Use leverage instead of your own muscle power!  Again, the right length and weight of a prybar is important. We have several prybars in our shed, from 12 in. long up to 30 in. (and one giant one for rescue). I find that a 24 inch bar is carryable, packable, and still long enough so you can apply the pressure you need.
  • You will definitely want a tarp and tape to keep out the weather. This tarp is big enough but not too big, and it’s not too thick, either. (The heaviest quality might work fine for a semi-permanent install, but in our experience is just too difficult to work with in a temporary emergency situation.) As for duct tape, I just assume you already have some!  (Again, click on the image below to see full details and price for this tarp, and to compare to others.)

Store these materials where you’ll be able to get to them when the storm is over.

2. Specialty tools for dealing with debris

Work gloves – get the right size!  These gloves, for example, come in six different sizes; they have a wrist adjustment, leather palms for a good grip, etc. Actually, Joe and I  have two pairs of gloves each in our Survival Kits, to start with.

3. Dealing with metal

Not everything can be disassembled by force. In an urban setting you may need to open metal cabinets, remove fallen ceiling ductwork, get into utility closets, etc.. To do this, you’ll need to unscrew, unlock or cut wire or metal. (A pair of safety goggles is a good idea, here.)

A very good multi-tool can be easily stored and can serve a number of these construction purposes. (Avoid a multi-tool with hammer. It won’t be heavy enough to do the debris management we’re talking about.)

Some of the very best Swiss army type tools have the usual blades and saws, including metal saws, and also include different size screw drivers plus a ratchet with multiple bits.  There are different models, and prices vary from around $120 to over $200, so it’s a good idea to shop.

Start your shopping by looking at the Victorinox Spirit Plus model, shown below. This is one of the very few products on Amazon that gets awarded five full stars by users. I’d look carefully at this one. It’s pretty pricey (around $150 as I write this), but superior in every way. Click on the image to get current pricing.


As a comparison, the Leatherman Wingman Multi-tool is one we recommend for carrying in your 3-day survival kit.

It has basic blades and screwdriver, and costs $35 – $40. (Click image to get exact pricing at Amazon.) Both the Leatherman and the Victorinox weigh about the same amount – 5-7 oz. – so that’s not a deciding factor.

As always, pick tools appropriate for the person using them.

Good tools leverage the strength of the user, but only when they are properly used. Be sure children know how to use any tools before including them in a child’s survival kit or handing them over for a child to do a job. (As I am sure you  have found, some kids are really very capable — but they need training!)

OK, that’s it for now. In an upcoming Advisory we’ll be talking about staying warm in an urban setting. Stay tuned. . . and in the meanwhile, get those multi-tools!

Virginia
Your Emergency Plan Guide Team


Survive An Airplane Disaster

Share

Announcement from the cabin attendant, “In the unlikely event . . .”

My last airline flight was a short trip from L.A. to San Francisco. It was a Friday evening flight so before we even started taxiing people had removed their coats and shoes, turned off their overhead lights, and curled up to get in a quick hour’s nap after a long week’s work.

"you have 90 seconds to get 370 people through this doorway . . ."

“You have 90 seconds to get 370 people through this doorway . . .”

Alarm bells started going off in my head!

Why?  Because I had just finished reading a series of articles about airline safety and here are some of the details that stuck with me.

Three Airplane Safety Facts

It’s easy enough to learn and remember these. Make sure your family knows them, too.

Fact 1: Most airplane disasters happen between 3 minutes after taking off and 8 minutes before landing.

According to a 2017 Forbes.com article, nearly HALF (48%) of all fatal airline accidents happen during final approach and landing. Taking off and starting to climb accounts for only about 13% of fatalities. These statistics have changed over the years; take-offs have become safer as both engines and runways have been improved. Engines are stronger, making it easier for planes to off the ground. Runways have been extended, and in some cases with break-up-able concrete, so if a plane can’t take off it can at least stop safely.

In any case, during both take off and landing the planes are close to the ground, the crew is busy, and options are necessarily limited.

With all that in mind, I was horrified to see that at take-off most of my co-passengers were NOT thinking about emergencies, had NOT taken a look at the emergency brochure, had NOT checked their flotation device, had NOT noted the number of rows to the nearest exit.

Worst of all, many were barefoot.

If we had to evacuate, these people would be groggy, confused, and naturally hesitant to scramble out in the dark onto a strange, maybe hot or broken surface – or into the ocean!

We were set to fail the 90 second evacuation test.

Airplanes are designed to get everyone out within 90 seconds. To accomplish that, over the years airplane designers have widened the galley ways (to 30 inches), widened evacuation slides to handle 70 people a minute, etc. Planes need to be certified that they can be evacuated within the 90 seconds using only half the emergency exits.

The 90 seconds isn’t an arbitrary number.

It’s about how long you can keep moving to save yourself if you can’t take a good clean breath of air.

And that’s because, in the case of a crash, more people perish from smoke inhalation than from injury

Update: The evacuation rule is also set at 90 seconds because that’s about how long it takes for a fire to develop into a flashover — that is, when everything within the cabin bursts into flame.

Well, our flight didn’t have a problem (after all, I’m writing this) and when we landed, I witnessed an orderly exit. Still, it took a long, long time for everyone to dig out their hand luggage from under the seats and from the overhead racks. And this reminded me of the second thing I learned.

In an evacuation, people naturally want to bring the stuff they boarded with. The problem?

Fact 2: Evacuation slides on modern passenger aircraft are designed to rapidly remove human bodies from a plane that may be as tall as a two story building.

Key word is “rapidly.” A rapid evacuation works only if you JUMP onto the slide. It won’t work if you attempt to sit down to start your slide.

Jumping and falling that fast means you cannot control suitcases, computer bags, or rolling luggage carts. For sure, slowing your fall means you will be plowed into by the 350 lb. guy coming behind you with HIS rolling cart.

Even in evacuation drills, trained volunteers with nothing in their hands get injured sliding that fast and that far.

Luggage on the slide makes injury inevitable.

Fact 3: Once you’re on the ground, the next sensible thing to do is get away from the airplane. Fast!

We have all seen movies where the heroes run away from a burning car, house, or boat and it blows up behind them. (Great special effects.)

This image could just as well be an airplane loaded with aviation fuel.  Do our heroes stop to take a video of the flames behind them . . .?

While we’re on the subject, here are just . . .

A Few More Airline Travel Tips and Good Ideas

Take another look at that photo at the top of this Advisory, then keep reading . . .

Negotiating Emergency Doors and Exit Rows

Apparently getting to and then through an emergency door isn’t always as simple as it looks in that brochure. (“Pull down on handle, lift up door.”) In fact, some airline industry professionals suggest that you anticipate that half the emergency doors won’t be able to be opened at all – due to location of a fire, a damaged frame, whatever. That’s why you need to

  • Identify the two closest emergency exits as soon as you are seated. (Is one in a different section of the plane altogether?) Take a look at the emergency card to see just HOW those doors gets opened. (“Pull down on handle. Pull door inside. Turn door. Throw back outside???”)
  • Count the number of rows to the emergency exits so you can get there in the dark.
  • If you can choose your seat, get one within 5 rows of an exit.

(During my research I came across stories of people attempting to open the emergency doors during flight. Mostly, it’s because they (1) were drunk or (2) had never been on an airplane before. Unbelievable.)

Managing Yourself

In a crash, your goal is to get up and get out right now! Do not sit there checking to see if you are OK or waiting for your breathing to return to normal all while wondering what is going to happen next. Do not try to open the above-the-seat compartments to get luggage.

Remember that 90 second rule and get yourself and family members moving to the nearest exit!

Leave your luggage behind!

You are going to have to launch yourself off the side of the plane. Extra weight and/or encumbrances will slow your passage to the door and threaten your ability to slide safely and to negotiate your landing.

Of course, crew members will guide the evacuation. The more assertive they are, the better it will go, so don’t get huffy at being yelled at. Get off the plane!

Assuming all goes well, be more comfortable!

There are lots of good ideas for traveling comfortably, and they depend on your size, the length of the trip, etc. Here are a few “universal” tips! If you click on the images or links you’ll go right to Amazon, where you can check on details and current pricing, and take a look at other models, too. The items shown here have received consistently high ratings and have features I value.

Great Travel Pillow

I’ve traveled for years – why, I remember the days when a turbo-jet was the big thing!  Every time I’m on a long distance flight, I wish I could sleep better. I’ve just discovered a NEW TRAVEL PILLOW that might solve the problem!  It’s stiff enough to prop up your head and neck, and then is held in place by a soft scarf.  Folds up neatly so you can tuck it into your carry-on bag (unlike one of those fat pillows!). Check it out at Amazon – click the image or the link!


Trtl Pillow – Scientifically Proven Super Soft Neck Support Travel Pillow – Machine Washable Grey

Carry-on Bag

What you can carry on for a long flight is really important. Of course, if you have a big bag, it goes into the overhead rack, and you can’t easily get into it until you land. So I usually prefer two bags. A small one carries important papers, glasses, snack, medicines, etc. and tucks into the larger bag for moving within the airport. When I get to my seat, I take out the small bag and go ahead to put the big one up above.

Having just one bag to manage while traveling through the airport is a lot easier and safer, too. Toting several miscellaneous bags makes using the restroom a REAL nuisance, and also makes you a natural target for pickpockets.

Here are a couple of bags that seem to offer both the size and extra security features I look for. They are made by a company called PacSafe. Naturally, they come in different sizes and colors and configurations, but you can look for these:

  • Easy to reach outside, easily accessible pockets for tickets, etc. or for that “small bag” I mentioned above
  • Fabric and straps embedded with Slashguard, a flexible, stainless steel wire mesh that protects against slash-and-run theft
  • A security hook so you can attach the bag to a table or chair leg as you attempt a nap or eat a quick meal during your layover
  • Lockdown points for zippers to protect against pickpockets
  • RFID blocking pocket for passports, credit cards, etc.

Capacity is measured in liters; sizes start at 15L and run to 45L. The smaller versions are more like day packs; the larger versions more for real hikers, with chest and belly straps. If you plan to carry a computer, be sure to get the right size pack! (Check the height and width measurements, as well as the capacity.)

Here are a couple of examples – a 15L and a 25L. Both have the security features mentioned above.  Click on the images or the links to get exact colors, sizes and prices from Amazon. (There are probably a dozen different bags available from Pacsafe so take the time to be sure you get just what you want.)

Warning. Whereas in the US people manage to get aboard with bulging carry-on bags, in Europe the short-haul carriers are extremely strict. If your carry-on exceeds the allowed size limit, expect a charge! This is why I included the third example, below. The Eagle Creek Convertabrief is handy and practical and not stuffable and therefore not going to bulge! Plus you can open it at security to show your computer, without having to remove the computer. (Note: I checked prices today, and found that purchasing this item on Amazon would save you $50 over what it costs elsewhere. That’s one reason why we’re Associates!)

Pacsafe Metrosafe LS350 Anti-Theft 15L Backpack, Black


Pacsafe Venturesafe 25L GII, Navy Blue


Eagle Creek Convertabrief, Asphalt Black

Travel Document Holder

At different times you need to have a passport, tickets, credit cards and cash handy. Whoever was in charge made these all different sizes, so having them handy is not always easy.

Generally, I try to have the next needed item in an outside pocket, and I keep the other emergency stuff hidden deeper in luggage. Some things I prefer to actually wear — hence, a document holder. (Obviously, if you have a holder under your clothing you’re not going to be able to access it easily.)

I look for belt style document and money holders that have these features:

  • Soft shape and outer material. (Unfortunately, “sturdy” sometimes means stiff, and that is uncomfortable to wear for any length of time.)
  • Easily adjustable belt to go around you based on what you’re wearing under it. And that may depend on the weather! (I don’t like my belt against bare skin.)
  • Waterproof layer to protect against heat and dampness.
  • More than  one pocket so you can find things without having to paw through everything.
  • RFID protection to keep thieves from stealing your credit card numbers.

Here’s a document holder that seems just about perfect. It’s beige, so you can wear it pretty much invisibly under light-colored clothing. It even comes with a unique “insurance policy” against theft. As always, click on the image or link to get current prices at Amazon, where we are affiliates.

Travel Money Belt with built-in RFID Block – Includes Theft Protection and Global Recovery Tags

Compression Socks

I don’t want to overlook this travel item, which has made all the difference for me and members of my family!

These socks keep your feet and legs warm during long flights and help maintain circulation for feet that have any injuries, swollen veins, etc. I first bought them when I knew I’d be standing a lot for a new job; now I wear them regularly, almost as a “pick me up” for a day when my feet feel tired!  For sure, I wear them on long plane flights.

There are all lengths and styles of compression socks, in all price ranges. Most cost between $15 and $30 a pair. I’ve tried flimsy nylon ones. I’ve looked at short ones and tried on some that are so long they would have to be folded over at the top — not a good idea!

I’ve tried the lower tension ones (15-20 mmHg* ) and the more supportive ones (20-30 mmHg *). I own the ones in the picture below and I recommend them highly for travel.

  • Sizing is accurate.
  • Plenty of room in the toe; compression really starts at the ankle.
  • Socks are tall; the amount of compression keeps them up and in position even on my thin legs!
  • They are made with wool. (Some compression sock brands are 100% synthetic.)
  • I like this pattern!  (There are many other patterns; pattern choice does affect price.)


Sockwell Women’s Circulator Graduated Compression Socks-Ideal for-Travel-Sports-Nurses-Reduces Swelling, Medium/Large(8-11), Black Stripe

“In the unlikely event . . .”

Heading back to the subtitle for this Advisory — it’s important to realize that air travel is still statistically safer than other modes of travel.

Update: Aviation deaths have been steadily falling for the last two decades, and 2017 was the safest year in history for commercial airlines, according to industry research. Separate reports by Dutch consultancy T070 and The Aviation Safety Network found “. . .no passenger jets crashes anywhere in the world,” despite more flights being made than ever before. (“Crashes” doesn’t count airplanes downed deliberately by their pilots.)

When there is a crash, though, death statistics can be dramatic. Being aware and taking immediate action may keep you from becoming one of them. In the meanwhile, Bon voyage!

Virginia
Your Emergency Plan Guide Team

P.S. The Number 1 airline fact above – the 3 minute 8 minute rule – came from a book that we have read with great interest. It’s called Spy Secrets That Can Save Your Life: A Former CIA Officer Reveals Safety and Survival Techniques to Keep You and Your Family Protected. The travel safety tips are just a small part of what is fascinating reading about protecting your home and yourself from people out to get you.

P.P.S. * The amount of compression is measured in mmHg, defined this way by Wikipedia: “A millimeter of mercury is a manometric unit of pressure, formerly defined as the extra pressure generated by a column of mercury one millimetre high and now defined as precisely 133.322387415 pascals. It is denoted by the symbol mmHg or mm Hg.”

P.P.P. S. If you want to get regular tips and recommendations, be sure to sign up for our weekly Advisories below. There’s no cost, and you never know when one of our Advisories will give you a great idea or even be enough to save your life.


Active Shooter in the School

Share

Escape From Danger in the Classroom

Run from classroom

Get this video at the link below

Prologue:

If you don’t find time to read this entire Advisory, please take the time to note and to WATCH one or all of the three videos at this school site. Here’s the link

https://www.sausd.us/Page/34190

Each video is on how to respond to an active shooter event in school. One of the videos is for elementary school classes, one for intermediate, one for high school. Each video is about 11 minutes long.

As a teacher, parent, and even as a student, you will find these videos valuable. They were made by the Santa Ana Unified School District (CA). They will give you a basic understanding of what you can do that may save lives.

Strong emotional reaction to a disaster

We’ve found that it’s usually pretty easy to talk or write about preparing for a natural disaster. After all, while ice storms or floods may be dangerous, they aren’t usually associated with evil or diabolic intent.

Of course, when the storm hits, people may experience fear. But preparation can help them get past that fear and start taking actions they know make sense.

When it comes to human-caused violence, or terrorism, though, like what happened on Valentine’s Day in Florida, people react differently. When we think of a person “out to get us,” we may feel fear, but we may also respond with violent anger – at the terrorist, at the terrorist’s family or tribe, at the police or military who are supposed to protect us.

Any of these emotions may help us get past the denial, the shock and numbness that also may accompany the disaster – but what then?

My own emotions have made me address this issue today.

Rather than rage helplessly, I want to share some ways to channel emotions for my own health and perhaps to help others. It comes down to being prepared with a plan.

Having a PLAN can channel emotions and save your life

This week we’ve seen a terrifying example of a terrorist action – the mass shooting of high school students and teachers in Florida. Thanks to on-the-scene video coverage we’ve seen fear – and horror.

Those early student videos also showed how emergency planning and practice saved lives at that school.

Law enforcement’s plan for an Active Shooter

Over the past few years police tactics for handling active shooters have changed. A dozen years ago, police called to a shooter event waited for reinforcements and collected all the facts of the situation before coming up with their plan.

But, since most active shooter evens are over in less than 7 minutes, waiting “to make a plan” makes no sense.

So today, the role of the police is a lot simpler. The first officers to arrive find, engage and stop the shooter as quickly as possible.

The school’s plan for an Active Shooter

In Florida, we also saw that students and teachers knew how to react. And while some students were killed before the plan could be fully activated, many were able to take the actions they had practiced, and save their lives.

I wanted to know what the situation is here in my own town.

Results of my informal quiz

Over the past few days I’ve quizzed several neighborhood children about the drills they have in their schools.

  • The first graders were very vague. Yes, there were drills. With the exception of fire drills, the children were not sure what the drills were for.
  • Middle school children were more definitive. Yes, they said, they had drills. Some enumerated fire drills, earthquake drills, and “lockdown drills,” but some didn’t distinguish. None of the children recognized the expression “active shooter.” They didn’t recognize the expression “Code Red.”
  • High school students – who had actually been locked down three months ago in a potential crime situation at their school – were pretty knowledgeable. They knew about Florida and active shooter was certainly in their vocabulary.

“Closing up the room and keeping away from the windows” didn’t seem adequate to me, though, and that’s what took me to the internet for my research.

Results of my research – the Santa Ana Unified School District videos

I viewed a dozen videos and found the Santa Ana videos to be best.

They build on the traditional Run, Hide, Fight training that has been around since around 2012.

The videos are specific. They start by recommending that teachers do a thorough assessment of the classroom and school in order to:

Identify escape routes

  • Map out multiple escape routes, including breaking out windows and ways to get out of a second story.
  • Identify hiding places and ways to construct barricades.
  • Suggest how everyday classroom objects can be turned into weapons if fighting is the only alternative.

Most important, the videos SHOW kids and teachers in action in a realistic setting.

And my recommendations

If you have children in school, I have some recommendations.

  • WATCH the videos yourself so you can discuss with your kids. Here’s the link again: https://www.sausd.us/Page/34190
  • Quiz your children about the “drills” they have at school. If they are vague, dig deeper.
  • Find out from the school administration what drills are held, what training teachers receive, how often, etc.

Without getting into the politics of gun ownership, it is clear that with the MILLIONS of assault rifles in this country, not to mention handguns and other rifles, an active shooter event could happen at any time. There have been 35 mass shooting events so far this year alone! (defined as 4 or more people wounded or killed)

Your children deserve the best training you can give them.

Virginia
Your Emergency Plan Guide Team

P.S. Since we’re on the topic of emotions vs. logic, I have to say that if having more guns would make us safer, we would ALREADY be the safest country in the world since we have by far the most guns.


Emergency Preparedness Vocabulary to Add to Your Skill Set

Share

New Words

New words for 2017

Did you know that the big dictionaries (Merriam Webster, Oxford English, etc.) routinely add hundreds and sometimes even thousands of words every year?

In 2017 a lot of the new words were what I’ll call “social terms” – words like froyo, troll, mic drop, and dog-whistle. Don’t overlook the word conlang, referring to a “constructed language” like Elvish or Klingon.

I certainly don’t USE these words every day. But I try not to look dumb if someone uses them in my hearing!

But let’s move on for a light-hearted tour of  . . .

Words for emergency preparedness

New words emerge in the narrower world of emergency planning, too. Plus, of course, there are “old” words that resurface for one reason or another.

Here’s a list of words that have reappeared and that I’m likely to hear or even use at any time. How familiar are YOU with them?

Some commonly abbreviated expressions

. . . useful in emergency planning and also in everyday situations.

NSFW – I thought I’d start with this one because if you see it, you may be in trouble. It stands for Not Suitable For Work and refers to internet content (most likely nudity, profanity, etc.) not appropriate for the workplace. Compare to SFW (Safe For Work).

ICS – Emergency professionals throw this around, pronouncing just the letters. They stand for Incident Command System and refer to the standardized way official groups (First Responders, FEMA, etc.) respond to an emergency, or “the incident.”

IoT – OK, we’ve written about this a lot lately so it should be familiar as the Internet of Things, for example, the automated devices that you’re using to control your house — door locks, air conditioning, etc.

SOP – A favorite business expression that is used in emergency response, too. If people know the Standard Operating Procedure they will be able to work effectively together.

EOC – If you take your neighborhood emergency response group on a tour of your city’s Emergency Operations Center you may be disappointed. The EOC is only activated when there’s an emergency.

BIA – So just how much of an emergency would a power outage represent? What about a direct hit from a tornado? Your Business Impact Analysis should give you some perspective.

HVAC – Pronounced “H-Vac” or “HVAC”. I have to include this because some of my friends are Heating, Ventilation and Air Conditioning experts!

MTBF, MTTR, MTBU – Some of my favorites, these expressions always invoke a sense of urgency. (I don’t use them, but people in the world of manufacturing sure do!) Mean Time Between Failures, Mean Time To Repair, and Maximum Time to Belly Up.

Hint: If you use any of these words in a written document, it’s always a good idea to write them out fully “at first use.” It’s awfully distracting to read a report filled with abbreviations you don’t recognize.

Frequently-used but confusing industry jargon

. . . heard on the news and sometimes misunderstood or mispronounced by newscasters.

Cache – This French word refers to a collection of things (like emergency or military supplies) that are hidden away for later use. It’s pronounced “cash” but often is mispronounced by adding a syllable at the end so it sounds like “cashay.” (Cachet, pronounced “cashay,” is a totally different word that marks someone or something as having status or prestige.)

Failover – I have always been confused by this word but I’m trying to conquer that confusion! Failover refers to a process whereby (for example) a computer system, in the event of a failure, automatically switches to a backup or standby system. (Fail -> switch over)

Pandemic – We are all pretty familiar with the word epidemic, referring to the outbreak of a disease that spreads quickly in a community or region. Pandemic also refers to the spread of disease, but is used when the outbreak spreads across a whole continent or even the world.

OK, now we can tuck these words into our own vocabularies!

A brand new word for 2017

Here’s one I’ve never heard or said, but maybe you could use it in a Scrabble game because yes, it’s now in the dictionary.

Listicle – This is one for writers and bloggers. It refers to a published article that is made up of . . . you guessed it, a list! (Why, this Advisory, with some strategic editing, could become a listicle!)

Whew! That’s it for this week. Hope you have found these words as interesting or amusing or puzzling as I have. (Remember, learning new words is recommended for keeping your brain fresh . . .)

Send me your favorite words and I’ll include them next time!  In the meanwhile, if you want more on vocabulary, check out our earlier Advisories, listed below.

Virginia
Your Emergency Plan Guide Team


Lists for Active Preppers and Leaders

Share

The Good Stuff from CERT and NERT

Big FlashlightOver the years Joe and I have been involved in both CERT and NERT training. CERT is Community Emergency Response Team training, a course and refreshers offered by our city. NERT is our informal Neighborhood Emergency Response Team, with its own unofficial and customized training.
At both CERT and NERT get-togethers we end up sharing ideas for useful supplies and gear, and, of course, ideas for how to stay on track.  We’ve documented many of these conversations and trainings in the over 200 Advisories here at Emergency Plan Guide.

Since I have been getting requests for one list or another, I thought I’d just bundle a few of them together in one place for easy reference. So . . .

Here are 7 popular lists for individual and family survival kits.

They should all sound familiar to you!

(Follow the links to get to each Advisory.)

Lists of meeting agenda ideas for group leaders.

If you are looking for ideas for a meeting agenda, just grab one of the Advisories above and use it to stage a “show and tell.” You can bring your own kit and get group members to bring theirs. Always a success!

And don’t forget, we’ve gathered up a collection of something like 50 meeting agenda ideas pulled from all the meetings we’ve held over the years. Here’s the link to the page where you can download them immediately. (And yes, we do charge a little for the books. It helps us continue to buy and share emergency items with our team!)

Three more lists, specifically for Neighborhood Teams’ “Block Captains.”

No matter how your neighborhood group is set up, at the very ground level you’ll have a number of people who have agreed to get to know their “block” of neighbors (a block could be a building, a floor, a department, or actually a block), to check in with them in an emergency, and report on their condition to the designated leader.

We find that Block Captains are the heart of our neighborhood group, so we encourage their active participation by making sure they get their own specialized resources.

1-Block Captain Supplies for CERT graduates

Have you taken the formal CERT training? If so, then you already have received a first set of supplies. For example, our local CERT graduates come away with:

  • A vest with reflective stripes
  • Duffle bag
  • Helmet
  • Flashlight
  • Safety goggles
  • Dust mask
  • Gloves

(Other CERT programs supply their members with different items. The list above is from our local program, only. Amazon.com actually offers a variety of CERT kits starting at around $50 and going up from there. Take a look at all the gear included in these kits to see what you might want to include in yours.)

By the time the class is over, most of our CERT members have added to their bags – first aid items, a few tools, duct and making tape, pens and tablets to write on, headlamps, etc. The duffle bag can get very heavy very quickly; most people keep them in their cars.

2-Block Captain Under-the-Bed Kit

As far as local Block Captain duties are concerned, we have been able to outfit our captains – whether or not they are CERT graduates – with just a few essential items:

  • A reflective vest
  • Walkie-talkie and extra batteries
  • Clipboard, tablet and pen for taking notes
  • Flashlight
  • Whistle
  • A reminder checklist of what to do in an emergency

You can get a Block Captain outfitted with the above items for less than $30. (Most expensive item is the Walkie-talkie/hand-held radio at around $15.) Buying items in bulk can reduce that cost.

And we truly call this the “under the bed” kit. (As I’ve mentioned before, we recommend that all our Block Captains also store shoes under the bed. If something happens, we want to be able to jump into action – safely!)

3-Block Captain Step-by-Step Checklist

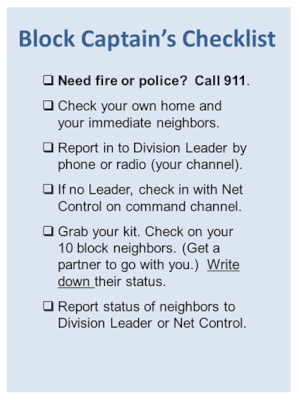
Block Captain ChecklistOur NERT volunteers carry a quick reminder checklist of their primary duty when the community is hit by an emergency. It’s a card similar to the one to the left.

As you can see, this card assumes that the community has already been organized into Divisions; everyone has a walkie-talkie and understands the way channels have been assigned. Your own checklist needs to reflect the vocabulary and set-up of your organization.

In any case, the list needs to be SIMPLE and HANDY. You might consider laminating it to give it a bit more heft.

When we bring a new member aboard, we present him/her with some items at the orientation, and then present the rest when the new Block Captain is introduced to the group. People like to be recognized – and this is an important role they are going to be playing!

And we find that getting free “gear” encourages other people to join in.

What lists or checklists have you found to be helpful as you manage your own preparedness? And do you have suggestions for helping a group get formed and stay interested?  Pass ’em along!

Virginia
Your Emergency Plan Guide team

Nuclear Bomb Threat – What to do

Share

Text - not a drill

If you’re close enough to hear a siren or get a text like the one above, you are in potential danger.

It doesn’t matter whether the danger is coming from a nuclear plant leak, a terrorist explosion or an incoming missile.

Take action immediately. You may have just a few minutes.

  1. Get to shelter. Get deeper into a building or deeper underground to put as much solid material – bricks, concrete, dirt – between you and the radioactive fallout. Obviously, if your shelter is hit directly by a bomb, it won’t protect you.
  2. Stay in your shelter. Radioactivity is worst at the time of the blast, but dissipates pretty quickly. According to the Department of Homeland Security, radiation will have declined to a little as 1% after 2 weeks.
  3. Don’t come out until it’s safe. This may mean 24 hours or it may mean 2 weeks or even longer! You’ll only know it’s safe if you have a way to get emergency communications from official sources.

Basic preparations to take now

Most preparations for a nuclear disaster are pretty simple, and follow the guidelines that we’ve laid out many times. Here’s a quick reminder list.

  1. Have a survival kit that you can grab at a moment’s notice. Take it with you to your shelter. You may want to have a battery-operated walkie-talkie in each family member’s kit so you can stay together in the dark.
  2. Stock your shelter with food and other supplies so you can shelter in place for days if need be. Obviously, if you are traveling or not at home, it will be difficult if not impossible to have enough supplies for a lengthy emergency stay.
  3. Be sure you have an emergency FM radio so you can monitor official transmissions.

Advanced preparations if you are in a target location

Some areas are more likely to be targets than others. For example, right now the emphasis seems to be on Guam and Hawaii, which could be reached by missiles from North Korea.

However, every nuclear reactor in the country – there are about 100 of them – could also be subject to an emergency or terrorist attack, as could different manufacturing, government or military centers.

If you live near one of these “prime targets,” you may want to make more preparations. These could include:

  1. Find out what your local government’s “emergency plan” is for a nuclear disaster. It probably involves evacuation.
  2. Be ready to seal yourself into your house. Bring in pets. Close all windows and doors, shut off fireplace, heater and A/C.
  3. Have a supply of potassium iodide (KI). It’s nonprescription and FDA approved. You’ll need enough for every family member for several days. Pills cost lessz than a dollar each. Be sure to check on expiry date.
  4. Consider having a way to measure the levels of radioactivity yourself. Geiger counters start at around $150. There are also Smartphone apps to measure radiation.

If you want more info and some specific recommendations for these products, please check out an earlier – now updated! — Advisory: https://emergencyplanguide.org/what-threat-do-you-face-from-a-nuclear-reactor-emergency/

Virginia
Your Emergency Plan Guide Team

P.S. If you get caught in an active radiation blast, you’ll need to protect yourself as best you can and then get the radiation — carried through the air like dust — off you. Steps for decontamination are pretty much removing your clothes and then washing off your body and hair.  Here’s an article from NPR that describes the process and the imprecise nature of that process: Decontamination


Intruder! Do we need a security system?

Share
Security Camera catching thief

Home and Business Security Options

Have you seen the ads showing a package thief caught in the act? Or the ad that shows the “escaping teenager” on the roof, caught because she set off an alarm when she opened her window? All these ads are designed to make you realize you need a security system! But while the ads are compelling, they really don’t tell the whole story behind the available technology.

In fact, they don’t make it at all clear where a simple self-contained security camera leaves off and where a comprehensive monitored security system begins.

If you’re a new business owner, or someone newly concerned about security and safety, take a look at the questions and answers below. They’ll help you come up with a shopping list customized for your personal needs.

Disclaimer: security equipment and commercial security “packages” change regularly, so as you shop, be sure you are comparing current offers. This year, many of these items are being featured as special deals, so watch for them!

Questions to ask about security

The first version of this article appeared in Emergency Plan Guide nearly four years ago. In the time since, some things have changed dramatically! The “classic” security camera set up shown in the image below – camera connected to DVR connected to monitor — still exists, of course. But in many cases, wires have been replaced by wireless connections. And now you can get the images sent right to your cell phone or tablet in addition to your computer monitor.

That’s not all that has changed. As you review the following questions, consider what you really need for your location and your circumstances. As you might expect, the more features you want, the more expensive the system.

Security Camera Buyer's Guide

“Do I want wired or wireless?”

Wires are reliable as long as they aren’t damaged or cut. In fact, they may be more reliable than wireless, which can  suffer in extreme weather or because of electronic interference.

And of course, wireless systems can be hacked! (None of the most popular wireless systems has been shown to have flaws, but all can be hacked by a determined pro. Most likely, people wanting to break into your home aren’t hackers — they are thieves! They’ll look for the easiest targets. Make sure you follow all best cyber practices — changing defaults, using unique passwords, updating everything whenever there’s an update. Your system will be too hard to break for that average thief.)

So, whether you choose a wired system or a wireless may depend, then, on your location or your security level requirements. Think it through. Oh, and if components are wireless, they still need to be powered, so you’ll have to consider when and how to replace batteries or install back-up batteries.

“Should I manage the system myself, or have it professionally monitored?”

Basic systems are set up to alert you by phone of activity or of a breach. Activity could be as simple as someone approaching the front door. You could, of course, miss the alert if your phone isn’t operating or isn’t nearby.

A monitored system reacts to a broader set of activities, and when it detects a breach, it reaches out to alert the monitoring company, which then alerts you and/or others, including perhaps police or fire.

Whereas a basic system is pretty much one purchase and a DIY install, a monitored system could involve service personnel to guide you through the installation. Once the threat of COVID is gone, they may actually do the installation for you. This may include installing a number of connectors, monitors and cameras and tying the system in to your home for business computer network. Naturally, you might have to pay for that personal installation service.

You will have to pay for monthly monitoring, as well. Some services wrap the cost of the equipment into the cost of monitoring. Others charge for the equipment up front, so their monitoring fees are much lower.

Costs vary widely. Equipment costs for a home system start as low as $100 for a single camera but are more likely to be twice or three times that much. (Even a simple business location will likely be more expensive in part because there are more rooms and more spaces to monitor.) Monthly monitoring costs may add as little as $10/month but most monitoring companies fees seem to be in the $39 –$59/month range for home services. Some companies even offer “advanced” monitoring that connects directly to police and first responders, saves your video, etc. (Watch for “sign-up specials” you can take advantage of!) Some companies require a contract; others don’t.

“Do I need indoor or outdoor security?” 

Outdoor “barrel” or “bullet” security cameras (as shown in the illustration above) have a hood that protects them from the weather. “Dome” style cameras, with a curved face, are most popular indoors, and can also be weatherproof for outdoor use. (They have an advantage in that you can’t tell which direction the camera is pointing. You’ll often see them in casinos or in other public places.)

The latest models of doorbell security cameras are smaller, best described as a simple box with a small camera lens – not too dissimilar to the camera in your smart phone.

A complete system may have a variety of camera types. The main thing to remember: while an outdoor camera can be used indoors, the reverse is not necessarily true.

“Do I want an alarm only, or do I want to see video?”

The simplest video systems run continuously, without interruption. If something happens, it is caught on the tape. (You’ve surely seen videos showing convenience store robberies, or scenes from street cameras.) When the tape is filled up, it is stored for a given period of time and then written over.

A continuous video creates hours’ worth of images that are difficult to search through if you need footage for insurance or crime purposes.

So, you probably want a motion-activated system for your home or business, something that you can set to complement known traffic patterns. Movement or a change in condition (window being opened, for example) sets off an alarm that can go to your smart phone or computer, or, as already described, to a monitoring service. Movement can also start a camera that takes still photos or video that you can view on a computer screen in your office or send to your smart phone.

 “What quality picture can I expect?”

The question really is, how much detail do you actually need? Do you need to be able to recognize faces on a 6 x 12 foot front porch? Or read license plates 30 yards away in the company parking lot? Think about how far away the object will be and the horizontal distance you want to cover.

The more detail you want, the higher the price of the equipment you’ll need. In many cases, however, you do NOT necessarily need the highest quality.

Having cameras with varifocal lenses will allow you to set the same camera for different uses. Some versions are P/T/Z – can be panned, tilted and zoomed remotely, for utmost flexibility.

“What about nighttime views?”

Most cameras have the infrared night vision built in, and automatically switch from day to night mode. Some cameras are paired with separate, motion-activated spotlights to provide the amount of light necessary for filming.

 “Do I hear and can I speak to the person being filmed?”

The porch camera ads on TV show the homeowner telling the intruder to get lost. (Or you hear a friendly dad’s voice acknowledging the arrival of the kids.) Being able to hear and speak to the person who has activated the alarm are again additional features. They will cost more and require more bandwidth in the system.

LEGAL CAUTION: The above paragraph describes SPEAKING to another person via your security system. RECORDING a person without his or her knowledge is a whole different thing!  In fact, Federal Wiretap Laws specifically prohibit recording unless at least one person in the conversation knows recording is taking place. (In California where we live, both parties must be aware of the taping.) So before you invest in a camera with audio recording capabilities, make sure you know the law in your state. You probably don’t want this capability!

OK, so much for the basic choices. Now . . .

“What additional features might I want?”

Some monitored home security systems offer more than just the surveillance and intrusion features we’ve discussed so far.  Options could include:

  • Panic buttons – Press to call for help if you are threatened in your home. Silent alert goes to monitoring service and to police.
  • Life support systems – Press to call for medical help. This is the so-called “life alert.”
  • Fire and CO alarms — These can be added to the system to alert residents and also the monitoring company in an emergency of this type.

And the final important question . . .

“What kind of customer support will I get – and what will it cost?”

Are you buying from a third-party distributor or the manufacturer? The amount or quality of support will vary dramatically. Before you buy, make sure you will have access to full documentation, at least, and check on the terms of the guarantee.

If you decide on a monitored service, you’ll want to know even more details before you sign on the dotted line. For example . . .

  • Will the company set an appointment and come to my home/office to do the installation, or am I responsible for installing the equipment?
  • Do I pay extra if they do the installation and set up?
  • Must I buy all the equipment from the monitoring company? What if I already have some cameras I want to use?
  • How do I get repairs if the equipment stops working?
  • What sort of contract is required? (How many months?)
  • Is there a fee to discontinue the service?

So now, if you’re ready to shop . . .!

Three examples of basic security camera systems

I picked these three best-selling models because they had consistently good reviews while demonstrating the variety of features discussed above. As you can see, prices vary. Click on the images or links for full details and to get exact prices at Amazon.

Reolink, A straightforward yet complete wired set-up with extra high-quality camera and continuous video. Note that when you get to Amazon to shop, you will find a number of “packages” containing this basic component.

Reolink 4K Security Camera System H.265, 4pcs 8MP Person/Vehicle Detection Smart Wired Outdoor PoE IP Cameras, 8MP 8-Channel NVR with 2TB HDD for 24/7 Recording, RLK8-820D4-A

Simplisafe – popular wireless home security system that “understands” Alexa and Google Assistant. No contract required (although professional monitoring is available). (I have to admit that I can’t resist the Simplisafe ad where Robbert says “Entrez vous!” to the pizza delivery guy.) Again, many individual components and different packages.

SimpliSafe 9 Piece Wireless Home Security System w/HD Camera – Optional 24/7 Professional Monitoring – No Contract – Compatible with Alexa and Google Assistant

Ring Doorbell Pro uses existing doorbell wiring. Ring continues to get a lot of chatter on our local neighborhood Nextdoor website. People seem very pleased with their improved security. And prices have come down since we last looked. Remember that this is truly a doorbell, and not a whole house system.

Here’s the basic Pro version to get you started on your shopping.

Ring Video Doorbell Pro – Upgraded, with added security features and a sleek design (existing doorbell wiring required)

If you have experience with any of these systems, or with a different system, please let us know so we can continue to update this guide!

Virginia Nicols
Your Emergency Plan Guide Team

Emergency Communications Revisited

Share

Cell phone no signal

Hard to imagine: “Puerto Rico residents still without communications, now into third week . . .”

But it was hard to imagine that the U.S. would be hit by back-to-back-to-back hurricanes and flooding, too.

Emergencies happen. Overnight they can turn into disastersAnd if you’re caught in the middle, you want to know what’s happening and be able to reach out to let others know what’s happening.

It’s time to take another look at personal emergency communications.

What you’ll grab first – your cell phone!

Since most people have their phone within reach 24/7, it’s likely to be your first choice in an emergency. Phones can connect with family, receive electronic alerts, and come up with what to do in case of disease, traffic jams, etc.

Cell phone tip: Pre-program your cellphone with important emergency numbers (police, fire, utilities) and create a “group” with family members so you can reach them all quickly.

Your cell phone is an important tool, as long as it’s working.

Three reasons why your cell phone may not work in an emergency:

  1. Cell phone towers are pretty sturdy, but can be damaged and even knocked down by big winds or a big earthquake. Result: no service at all.
  2. Service can be overwhelmed by too many people trying to use it at once – ex., the Boston Marathon. Result: busy signal.
  3. Your phone may, and eventually will, run out of battery unless you have made provisions to keep it charged.

Three ways to have a better chance of getting through. 

  1. Text or tweet instead of calling. These messages need far less bandwidth and can be “stored” in the system until they’re deliverable.
  2. Send your message or call your out-of-town family contact instead of local friends or family members. Naturally, this arrangement has to be set up in advance.
  3. Carry a battery back-up for your phone – one of the power banks or a solar charger – to give yourself a better chance of eventually getting through. Some emergency radios can charge a phone, too. (Want more on batteries, power banks or solar chargers? Here’s an Advisory covering these devices.)

 No cell phone? Don’t forget to try a land-line.

When a power outage has crippled communications, a simple phone attached to a landline may still have a dial tone. Of course, you have to know whatever number it is you want to call!  (That’s why you have memorized a few numbers, right?)

And as we’ve said many times, the operator answering your cell phone 911 call only knows approximately where you are, particularly if you are in a high-rise building. A landline pinpoints your location.

Facing a longer term outage?

Puerto Rico has been cut off for weeks. But not EVERYONE there is cut off!

Three kinds of emergency communications are being used there by people who were prepared in advance of the storm.

  1. Short-reach walkie-talkies. Depending on the quality of the instrument, the weather and the terrain, battery-operated walkie-talkies can connect people across the street or across town.We recommend that all families and neighborhood emergency response groups consider getting their members walkie-talkies (with extra batteries). Even small children can master their use easily. See a couple of examples below, and take another look at our updated Walkie-Talkies Reviews to see if you are considering adding walkie-talkies to your emergency supplies: https://emergencyplanguide.org/reviews/Best Walkie-Talkies/ 
  2. Wider-reach HAM radios. This is the one option mentioned more than any other by the professionals in my LinkedIn group. Over 3,000 ham radio operators have been active in Puerto Rico since the hurricane hit. They have been assisting the American Red Cross to gather records about survivors, transmit personal messages to families, and help dispatch power authority crews. (Article: Amateur Radio Volunteers Aiding Storm-Ravaged Puerto Rico, US Virgin Islands)You can get started with a HAM radio for less than $100, but realistically you’ll probably want a better device and additional equipment (power supply, antenna, etc.) so budget for more. Joe is a licensed HAM operator and wrote more about the radios and training, here: https://emergencyplanguide.org/getting-serious-about-emergency-radio-operations/
  3. Satellite phones for world-wide connection. As the name suggests, these phones use satellites to carry their calls. When cell towers are down or you are so far from civilization that there are no towers (mid-ocean? Antarctica?), this might be your best bet for staying in communication.As you might imagine, it costs a lot more to own and use these phones. Prices for most devices themselves (some rather like a clunky cell phone, others more complex, like a computer with handset) range from $500 to $1500 or more. Prices for actually using the phones start at around $40/month at the low end, or you can buy by the minute. More details here. https://emergencyplanguide.org/ultimate-emergency-communications-device/

Examples of hand-held emergency radios

Most emergency radios are compact, though they are heavier than a regular cell phone. And, they will require practice before you can tune them successfully. Don’t think they are terribly expensive.  Most of them cost less than the latest Apple iPhone.  Some examples are below. Click on the image to go directly to Amazon for full details and current pricing. (We are Amazon affiliates. I’m happy to refer you there because items are almost always available and prices are often better than anywhere else.)

Baofeng -- Basic 2-way dual band HAM radio; VHF and UHF; costs around $70-80. Yaesu -- Mid-range quad band HAM radio. Submersible. Yaesu makes several; this one costs around $500. Irridium Satellite Radio. Click on image and go to Amazon where you should read the reviews, particularly the one about Alaska. Cost around $1,000.

And here are a couple of examples of walkie-talkies. We own and have used both models; the Uniden is what the members of our Neighborhood Emergency Response Team use and practice with every month. Click on the image to get details at Amazon.


Good basic walkie-talkies. Great for local group, family or workplace. Easiest-to-manage buttons. Cost around $40 a pair.I like these because they're yellow and not so hard to locate in an emergency! Alkaline or rechargeable batteries; NOAA weather channels. Cost around $70 a pair.

If a radio and/or battery charging device sounds as though it makes sense to you, get started on your purchase now. It’d be hard to find someone selling one during a disaster.

Virginia
Your Emergency Plan Guide Team

P.S. An upcoming Advisory will be on serious solar panels designed to drive all these communications devices.  If you haven’t signed up to get ALL the Advisories, do so now! (Fill out the form below!)