Category: General

Drowning Incident – True Story from Yesterday

Share
Child drowning

As a preparedness fan, I subscribe to the twitter feed of our local police force’s PIO (Public Information Officer).  One of yesterday’s notices was simple. It said that emergency personnel had responded to a drowning incident.

EMTs arrived to find the father attempting to resuscitate his 11-year-old son. The EMTs took over and revived the boy, who was taken to the hospital, expected to fully recover.

As you read that paragraph, did you create a picture in your mind? Can you imagine the desperation of the father? What if that had been YOUR child drowning? Would you know what to do in that situation?

After I read the report, I felt obliged to review how to handle drowning. Turns out that it’s NOT THE SAME as CPR for someone who has suffered a heart attack! Drowning is a problem with getting enough air, it’s not just a problem with the heart stopping. So you need to do the breathing AND the compression associated with traditional CPR.

Here’s a quick review of the steps to resuscitate a drowning child:

  1. Call 911 or appoint someone else to call. (“You, guy in the red shirt, call 911!”)
  2. Take the child out of the water.
  3. Lay child on back, check for breathing and responsiveness. (Clap. Call the kid by name.)
  4. If no breathing, START RESCUE BREATHING.  Close nose, cover child’s whole mouth, breath twice into the child and watch for chest to rise.
  5. Begin chest compression. Lean on both hands, on line between nipples. Press hard and fast. 30 presses, 2 breaths. Keep it up until professional help arrives or child begins to breath on his own.

Now this is just a quick overview. If you have any questions, or if you have small babies, please do more research. I got basic info from WEB MD – here’s the link to the full article: https://www.webmd.com/first-aid/drowning-in-children#2

And if you plan a summer outing near a big pool or the ocean, please review this blog post I wrote last year. It makes it clear that people  who are drowning don’t LOOK like they are drowning, and you might overlook the danger until it’s too late!

Every year over a dozen people drown right here in our town. I don’t know the statistics for your community, but there shouldn’t be any! Drowning is preventable.

Please be careful out there!

Virginia
Your Emergency Plan Guide team


Day 14 of Summer Vacation: A time for some shorter and lighter Advisories as a welcome change-of-pace!


Do you see threats everywhere?

Share
woman covers face, sees threats everywhere
Threats everywhere?

I find myself muttering this question under my breath when I hear neighbors complaining about how long it’s taking for the power to come back on even after a scheduled, temporary blackout!

I ask the question of myself from time to time, mostly when I don’t want to try something physical I would have been perfectly willing to try a few years back. (I asked it about 5 times before I agreed to go skydiving with my daughter in 2018!)

Then, when I saw the quote below, it really struck home. It comes from a report from the American Association for the Advancement of Science. Like many things scientific, you have to read it twice to get the full import.

 “. . .when we run out of legitimate threats to face, we begin to call things that we judged to be harmless in the past as now a threat.”

So yes, the quote itself feels a bit complicated. I tried summing it up this way:

“Are you becoming a wimp?

If either of these quotes strikes a chord, you are going to really appreciate a recent post written by LaRae Quy: How to be resilient when times get tough.

It’s long, it’s inspiring – and it has some very specific recommendations. . . all designed to KEEP YOU — and perhaps your neighbors — FROM SEEING THREATS EVERYWHERE.

Enjoy! And let us know what you came away with!

Virginia
Your Emergency Plan Guide team


Day 11 of Summer Vacation: A time for some shorter and lighter Advisories as a welcome change-of-pace!


Dear New Summer Friends

Share
Woman sitting quietly in outdoor setting
Time for a summer break

For my new summer friends — and my older friends, too!

Let me introduce myself . . .

I’ve been active as a “prepper” for over 15 years. It all started when I took a CERT  (Community Emergency Response Team) course sponsored by the city I live in.

Since then I’ve revisited my roots – My parents were pioneers in Alaska during the 30s – and caught up finally with my older brothers — Eagle Scouts in the 50s.

And, of course, I’ve added my own particular brand of activism based on a professional career as copywriter and marketer. Mostly that’s taken the form of helping build a local neighborhood Emergency Response Team right here in my senior retirement community.

And then there’s my writing.

About 8 years ago I started this website, meant to cover all aspects of sensible Emergency Preparedness. Since then I’ve populated it with hundreds of original articles (I call them “Advisories”) about preparing for potential threats, assembling supplies and gear, and getting neighbors involved. Happily, a number of people seemed to like the articles and they keep coming back for more!

Last year, I called on all this history — including words of wisdom from the friends — and wrote 4 books on the topic. Then just last month, I added a 5th title to the list! (See the sidebar.) 

Lots of writing! Maybe too much? 

Lots of thinking and researching disasters! Lots of drafting and redrafting (and learning how to manage a website, too.) When one of my subscribers wrote last week that she was just overwhelmed, I had to admit that it was time for me to take a summer break, too.

Then Digital Maestro Paul Taubman showed up with a summer blogging challenge. This was surely a sign that I should take this opportunity to segue to some shorter and lighter articles. Oh yes, they will still be about emergency preparedness – but in a lighter vein.

So welcome to Summer Vacation!

I hope you’ll read and enjoy and actually follow up on the summer Advisories that make sense for you and your family. You can sign up below to be sure you get all of them. And I invite you to let me know it there are topics you’d like to hear more about.

The way I see it, the more we all know, the safer we all will be!

Virginia
Your Emergency Plan Guide team

Personal Information Databases and Your Privacy

Share
Privacy - Image of person being examined by magnifying glass

My shocking personal information story

Last weekend I got a text message from my daughter. She had been online and had found one of the personal information databases that had my name in it.

There are a couple dozen popular sites like the one she checked. They all offer background and personal information about anyone, usually including phone number, address (and past addresses), email address, relatives, pictures, social connections, court records, etc. While you usually can get one or two pieces of information just by typing in someone’s name, for a fee you can get all the records.

Well, my daughter got my whole record and sent it to me. IT WAS SO, SO INACCURATE!  Wrong birth date. Unknown foreign “friends.” Places I’d never been to! When I got to the (false) court records I shut the phone in horror!

(Now my daughter being who she is, she sent me specific instructions of how to cancel the account, which I was able to do within 24 hours. At no charge.)

Still, it was a shock. While I spend a lot of time online, I simply don’t use personal information databases and have never looked myself up.

But since we talk about cyber-security a lot here at Emergency Plan Guide, it seemed important to share more about it today. These personal information databases are legal. They have found information about you without breaking any laws. There have been no “leaks.”

But your privacy is certainly threatened by them.

The Big-Daddy Personal Information Databases in all our lives – the Credit Bureaus

Most everyone is familiar with the credit bureaus that track 9 of every 10 adult Americans: Experian, Transunion and Equifax. A fourth seems to have been added to this list: Innovis.

While we often speak of “your credit rating,” or your “credit score,” you really have one from each company.  

But each credit report will be different. Why?

All four companies track money that you owe: mortgages, bank loans, car loans, student loans, and credit card debt. Credit bureaus also get information from public records, like property tax rolls or court records.

But businesses are not required to report the loans they make to you, so many businesses report to only one or two of the credit bureaus. That explains the variations in the reports

Action item: Check your credit reports.

If you haven’t checked your credit scores lately, you may want to. According to the Federal Trade Commission “You’re entitled to one free copy of your credit report every 12 months from each of the three nationwide credit reporting companies. Order online from annualcreditreport.com, the only authorized website for free credit reports, or call 1-877-322-8228. You will need to provide your name, address, social security number, and date of birth to verify your identity.”

According to the Innovis website, they offer a free credit report, too.

I have checked my own records in the past. Every time I found errors. Once it was a misspelling that dropped someone else’s debt into my file. If you see debts you don’t recognize, or other strange information, you can work with the credit bureaus to get your report cleaned up.

The “people-finder” sites track even more personal information.

Wikipedia says there are close to 4,000 “information brokerages.” This probably includes the credit bureaus. All of these companies are for-profit organizations that make money by charging for certain services and by selling your personal information to marketers – and to each other.

The people-finder sites are giant personal information databases. They start with names and aliases. They list addresses where you have lived and currently live. Some have reverse directories – enter an email and they’ll give you a phone number to go with it, or enter a phone number and you’ll get an address.

That is just the start. You may find lists of your children. Other relatives and ex-relatives. Lists of friends. Where you’ve traveled. Property you own. If you’ve been in trouble with the law or owe taxes. If you are a sex offender. Have declared bankruptcy. You may find photos of yourself!

How much of this information do you want to be available to anyone willing to shell out a few dollars? What if there are errors in the data? How can you protect your privacy?

When I found out about being on one of these sites, I immediately jumped into action to find out more.

How the people-finder information databases work:

  • You usually can’t get a complete look at your people-finder record  — or the record of someone else — without paying at least $1 for a “trial.” If you sign up for a trial, read the fine print. Trials typically turn into a “regular monthly subscription” unless you cancel within the specified time, which may be just a few days.
  • If you want to update or clean up your record at the people-finder site, you will run into challenges. They get your information by scraping the web – that is, by finding publicly available info. Obviously, you can’t “change” public information, although you can delete some of it. (Looks as though you can’t delete court records that aren’t officially expunged.)
  • Once the site is updated, you will be offered the option to subscribe for a monthly fee to monitor your account to keep it clean and also to be able to search for other people. Subscription prices seem to vary starting at as little as $5/month (for a multiple-month contract) but most are more in the $20-30/month range, with an extra fee for what has been termed the “juicy stuff” – criminal records, tax records.
  • Like me, you may want to close the account and remove all the information. Every site’s requirements for opting-out of the site are different – but from what I am reading, it is possible but your patience will be tried. You should not have to pay anything to get off the site but you may have to jump through hoops.
  • Even after you are successful at having the account closed, it may reappear again in the future when they “find” new information . . .

Here are some of the sites I came across in my research.

 I used an old email to check on a couple of them and found myself in every one I looked at. My photo was there, too! I am not recommending any of these sites — they are just to help you get started on your own research!

  • Peoplefinder
  • Beenverified
  • Mylife
  • Instant CheckMate
  • Spokeo
  • Anywho
  • Truthfinder
  • Whitepages
  • People
  • Peoplesmart
  • Intelius
  • US Search
  • Radaris
  • SeekVerify
  • Pipl

Can you remove yourself from these online databases?

How to get off the credit bureaus. The only way to get off them entirely is to become one of the 26 million or so people in the U.S. that have no debt profile. That means they have no credit cards. No mortgage. No car payment.

Most of us couldn’t function without at least some of these. So the best thing to do is to be sure your credit report is at least accurate.

How to get yourself off the people-finders. It looks to me as though getting totally off is impossible. You would need to have no online banking accounts. No social media accounts. No websites. You’d have to avoid using public wi-fi, and if you went online, use a Do Not Track browser. (Apparently Google does have a Removal Tool but it sounds as though they make it tough to use.)

Best thing to do here? Go to as many of the people-finder sites you can and ask that your information be deleted. Go there regularly. This is a lot of work.

Hire a “reputation manager” to help?  You can hire a “reputation manager” company that will search out negative info on your behalf, then remove or suppress it. Some of these companies specialize in business reputation management, others work for individuals. Fees for their services depend on the complexity of your situation, but customized plans seem to start at around $400 – 500/month.

“Privacy is dead. Get over it.”

You have probably heard this quote. It is attributed to the co-founder and CEO of Sun Microsystems, Scott McNealy – and he said it way back in 1999!

Obviously, the more we rely on digital communications to run our lives – essentially everything on the Internet of Things — the less privacy we will be able to maintain. Is there an answer – or is the genie out of the bottle, never to be returned?  I’m afraid the genie is dancing in triumph right now!

But in being conscious of what data you’re making available by participating in the digital society, you can at least be better prepared for what might come!

Virginia
You Emergency Plan Guide team

P.S. I am not an expert in this topic. If it interests you, YOU need to become your own expert. If you already have stories to tell, please share them with us by leaving a comment below!

P.P.S. We have written pretty regularly about security and privacy. Here’s an earlier Advisory that talks about why home electronic devices are so vulnerable to hacking.

Take an Insurance Inventory

Share
How to file insurance claim after fire? You need an insurance inventory.
“How will we ever remember what we lost?”

Take an Insurance Inventory Before You Need It

After last week’s Advisory about spring cleaning, with the comments on updating insurance, I felt obliged to take action and create an inventory of our stuff, once and for all. First, I looked for some advice about how to begin. Here’s what I have discovered so far about inventories.

What goes into an inventory?

I started by looking at several paper inventory sheets that are meant to be filled out by hand or, in some cases, by computer. Here are examples.

Example of insurance inventory sheets.

What layout do I prefer?

What you see immediately is that there is no one format that works for every home or every business.

Determine what information to include.

What I did find, though, is that if you are doing an insurance inventory you want to include at least these items, in whatever format you prefer:

  • Date of the inventory
  • Item type
  • Item description (manufacturer, brand)
  • Where item is located now
  • Cost when originally purchased

If you are doing a business insurance inventory, you will want to include this information also:

  • Make/model
  • Serial number
  • Warranty
  • Current value

Organize by category or location?

Some people lump all similar items together in categories– for example, they’ll do a list of electronics, one for books, one for appliances, one for musical instruments, etc.

Others organize the inventory by location – everything in the living room, office, kitchen, etc.

However you do it, don’t forget things you own that are not inside the home! For example, do you have items in a bank safety deposit box? A storage unit? Digital items stored only in the cloud? What about patio furniture, tools in the garage, etc.?

Just this far in, and the thought of writing it all down seems overwhelming.

So I looked into other options.

Video-tape an insurance inventory!

This makes sense. Go through the house or office, starting outside the entrance and going through every room, carefully filming everything and commenting on the tape as you go.

Depending on how much stuff you have, you may need or want to supplement video with still shots.

Here’s some thinking I did for two sample categories in my house.

Office inventory

In our office, I will start by panning around to show furniture, certificates on the wall, book cases, file cabinets and the supplies closet.

Then I’ll stop the filming to prepare the desks and supply cabinet for the REAL inventory – opening drawers and boxes so supplies and files are visible, and then taping the whole area again.

Our network setup (routers, modem, controller) is worth another whole series of shots with commentary.  Same with phones, computers, monitors and printers.

Special collections

You can guess that we have a lot of emergency supplies and equipment.  Some of this will show up in the office, but most is stored on shelves in the laundry room and two different closets!  I’ll have to go through these to film emergency radios, HAM radios, emergency lanterns, batteries and more batteries. We also have survival kits, CERT helmets and miscellaneous camping gear. Lots of stuff for the insurance inventory!

Note about collections. This I already knew! If you have valuable collections (art, jewelry, collectibles) you may want to get them appraised and add a rider to your policy to be sure they are adequately covered. Most regular homeowner policies have a surprisingly low limit on specialty items. There’s also a limit on coverage for home business equipment that may not be enough for you.

You get the idea!

In an emergency, if the house were flooded, tumbled by an earthquake or simply trashed by intruders, just these two categories alone – office and emergency — would be almost impossible for us to reconstruct without help from pictures!

Moreover, without some picture proof, we would be unable to put together a decent and fair insurance claim. And guess what – You may be asked for a list of what is missing within the first 24 hours of the incident!

Can I make an inventory using my phone?

If you are like me, you turn to your cellphone for a lot these days.  Can you use your phone to create the insurance inventory video?

Take photos.

There are apps (iOS, Android or both) designed specifically for inventories using photos. Take a picture, then label (tag) and put into a folder and file.  You can add just about as much info as you want; the app may even calculate the total value of the items in the inventory! Some apps allow you to transfer your inventory data to a spreadsheet or pdf. And at least one app creates QR labels so you can stick them to moving boxes!

As you can imagine, many of the inventory apps are free; the ones with the most options have a monthly or annual fee.

Make a video.

Since I am not an accomplished thumb typist, I looked at option 2 –narrating a video of my stuff.

Depending on the phone, the video will be limited by . . .

  • how much total storage the device has
  • how much data is already on the phone (programs, photos, etc.)
  • what resolution video you’re shooting.  (Higher resolution takes up more space.)

Use a camcorder.

Personally, if it comes to taking pictures, I think I would opt for using a camcorder. I have an old camcorder and it fits a lot better in my hand. I can see just what I am filming. It also has a better microphone.

It used to be that camcorders were considered “expensive.” Take a look at these models – way less than half as much as a new smart phone!  (Of course you can spend thousands of dollars on high-quality cameras for film making. We’re talking here about easy-to-use models perfect for everyday – and for inventories.)

The first one is very small, very compact, fitting right into your pocket. It offers zoom and wide angle. You can choose resolution: higher resolution uses up your battery faster. You can connect the camcorder to the TV and show your videos, or send to your computer. Click on the image or the link to get to Amazon for full details and prices. Obligatory disclaimer — we are Amazon Associates.

Sony – HDRCX405 HD Video Recording Handycam Camcorder (black)

Right in the middle of my research for this Sony camcorder at Amazon, I also got an ad from a big box store for the exact same item. There was a price difference of $40!  (Amazon was the better deal; well under $200.) It pays to shop!

Here’s a second example, with more zoom power, a two-channel microphone and what I would call movie effects.  Probably more fun for family and sports videos! Again, under $200 at Amazon.

Panasonic Full HD Camcorder HC-V180K, 50X Optical Zoom, 1/5.8-Inch BSI Sensor, Touch Enabled 2.7-Inch LCD Display (Black)

Final point. Protect your inventory.

Your inventory is useless if it is washed away in the flood, burned up in the fire, or stolen along with the collectibles. Be sure to keep extra copies off premises (with a family member?), in a fireproof safe and/or saved online in the cloud.

Now I have to admit that I haven’t actually STARTED on my inventory yet. But now I know what the next steps will be. How far along on an inventory are you???

Virginia
Your Emergency Plan Guide team


Inventory Worksheet for a Resilient Community

Share
Resilient community after a hurricane
How well will your community fare in a disaster???

The emphasis from FEMA these days seems to be on building “resilient communities.” 

This includes improving cooperation among the various community agencies and organizations like cities, counties, fire departments, hospitals, the Red Cross, CERT programs, etc.

It also means a new focus on individual citizen and neighborhood preparedness. Here’s a new resilient community element that has been added to the CERT program in our city.

As CERT grads, we are being asked to serve as ambassadors to reach out more deeply into our community.

At Emergency Plan Guide we’re of course delighted with this development! We’ve been doing this grass roots work for years, and we welcome new resources!

Today, I’d like to share an inventory worksheet that our CERT team received after the orientation to the new outreach program.

An inventory worksheet can add important knowledge for a more resilient community.

Have you received or used a similar worksheet? Perhaps you’ve found out some of what we have . . .

  • In our experience, people are hesitant to share information about personal skills and/or equipment until they have developed a certain level of trust with their neighbors. I think you’ll get better response by planning the inventory exercise only after your group has been established for a while and people know each other.
  • As always, we think you’ll improve participation in the list exercise by introducing it with stories that apply to your neighborhood or property. When people see a photo or take a walk out to the back gate that’s always chained shut, then they will be more comfortable sharing that they own bolt cutters!
  • Having a prepared list is great to start the discussion about a resilient community, but we have found that other important items emerge only after discussion. So now we use a “short list” as a starter and let the group brainstorm and build its own list on a white board or easel.  Then we share our “custom list” with all current members of the group.

No matter how you build it or introduce it, though, getting a list of skills and equipment is important. And you’ll want to update it regularly because people come and go and they tend to buy and get rid of stuff. In any case, and to continue the discussion,

Here’s the inventory worksheet we were given by our CERT program.

Inventory worksheet
Click here for a full sized, easier to read image!

Leverage your inventory worksheet for even more benefits to your community.

Here are more discoveries we’ve made using the inventory exercise. Perhaps they will emerge in your group, too.

  • When you know what equipment is located in the neighborhood you’ll have a head start on preparedness and won’t have to plan to buy more, often expensive, items.
  • Knowing where people with special skills or equipment are located means your neighborhood can have quick access to these assets, maybe saving lives that otherwise would be lost. (Make a map, and have a discussion about confidentiality.)
  • People who own equipment usually know how to use it. They may be pleased to lead a training session on that equipment for the benefit of the whole group. (We’ve had trainings on gas sniffers, fire extinguishers, and furniture bracing, for example.)
  • A discussion of equipment and skills may reveal gaps in your group’s preparedness “coverage.”  Can you create a sub-committee to seek out a donation, find special training, or establish a new partnership from within the community?
  • Neighbors may be inspired to sign up for more training – like the full CERT training or to become a HAM radio operator — thereby adding significantly to the strength of the team. What would YOU like to learn more about?

This worksheet was the first training piece that our CERT outreach group received, and we haven’t finished with it yet. But I wanted to get it out to you right away in case you find a way to use it with your group.

And if you do, can you please write back and let us know how it is working! We all look forward to hearing from you.

Virginia
Your Emergency Plan Guide Team

P.S. This list isn’t exhaustive. A few items that aren’t here but that might find their way onto a customized inventory could be boats, golf carts, and pop-up tents! What items does your group come up with? 

P.P.S. If you are just starting a CERT outreach program in your community, you might want a copy of the “Start-Up Suggestions” we provided for our own Southern California program leader. I’d be happy to send you a copy. Just drop me a line.


Help Your Neighborhood Prepare for Disaster

Share


The Constant Challenge

I write often about CERT – the Community Emergency Response Team – and the great training that CERT provides.

People who become CERT graduates are almost always up to speed on what’s going on with the weather. CERT grads have basic emergency equipment including radios and walkie-talkies. They are people you can count on when things go wrong.

But CERT grads just aren’t enough to help most neighborhoods prepare or get through a major disaster because there aren’t enough of them!

So when the disaster hits, you’re going to be counting not on First Responders, not on CERT grads, but on your neighbors – trained or untrained!

Here in my neighborhood, we’ve built a neighborhood emergency response  team with the help of CERT grads – but we’re constantly trying to strengthen neighborhood resilience just by getting more neighbors involved in planning for disaster.

Earlier this month I wrote an article on the issue for our neighborhood newsletter. I tried to make the message a friendly one – not just about emergencies and disasters!

I’ve received some positive feedback so I thought I’d share my article here. Maybe you can cut and paste and use some of it for YOUR neighborhood? Can you pull out a couple of the suggestions as the basis for a meeting?

Do with it what you will!

I just hope it will be useful to help your neighborhood prepare for disaster!

Here’s the article.

won't you be my neighborWon’t you be my neighbor?

Over the past year we’ve witnessed so many tragedies and none worse than what’s still happening now in Northern California – thousands of homes destroyed, dozens of people dead, and 3 still missing more than a month after the start of the Camp fire.

We’ve heard great stories of neighbors helping neighbors in disaster situations.

Some of the stories are awe-inspiring.

  • The Cajun Navy towed their private boats from Louisiana to Florida and launched them to help pluck hurricane victims from floodwaters.
  • Neighbors with chain saws worked hour after hour to clear roads after devastation caused by Hurricane Florence.
  • A food truck owner drove 50 miles into a disaster area and fed everyone as long as the food lasted.
  • People spontaneously added clothing to a pile in a Walmart parking lot to create a place where displaced families could collect necessities.

There are many stories just like these – stories of ordinary people finding the will to step up in a disaster.

At the same time right here at home we’re lucky to have stories of neighborhood volunteers who help out all the time!

Here in our neighborhood we see residents who are willing to give time and energy to make a difference for our community throughout the year. We can look back and count dozens of activities, groups meetings, special events – all organized for us by caring volunteers.

But here’s The Constant Challenge. . .

This group of dedicated volunteers is reaching fewer and fewer people – partly because we lose community members, and partly because new residents are not being integrated. And as always, because no disaster has actually hit us, people find it easy to postpone taking any preparedness steps.

For the New Year, our homeowners association has made a commitment to build an even stronger neighborhood.

Building a stronger neighborhood starts with knowing your neighbors.

This means knowing names, having the name and phone number of a neighbor’s emergency contact or family member, maybe exchanging emergency keys. It means keeping a watch out for water leaks, escaped pets, etc.

When you know your neighbors . . .

  • You know who “belongs” in the neighborhood and who might be an intruder – and if you should call the police.
  • You notice when you haven’t seen a neighbor for several days, so you can do a quick check or make a call to a family member.
  • If a neighbor is having a problem getting around, you are ready to add a few items to your shopping list to help them out.
  • You have someone to call if you can’t get home to care for your pet.
  • In a major emergency, you know you won’t be overlooked or forgotten even if you don’t get an official “alert”  – because your neighbors know you are there!

Here’s the first step:

Just introduce yourself and learn the names of at least a half dozen of the people who live around you!

For the next step:

Exchange a simple form that lists names and contact information.

We’ll come up with a sample form in our next article, so watch for it. In the meanwhile, get out there and meet that first new neighbor!

* * * * * *

OK, that’s the first article in the series I’m intending to write for my community. The next article will have that little emergency contact form I mention. It will also have a place for people to list pets, medical conditions, etc. But sharing that kind of info doesn’t happen at the first meeting. It requires trust – so we’ll start with just introductions.

I’ll let you know how things go here.  Please let us know what steps you’ve taken in your community to help involve neighbors!

Virginia
Your Emergency Plan Guide team

P.S. If you’re new here, you may not realize that our main emphasis at Emergency Plan Guide is on what we call “wholistic” planning! We believe that the impact of every big emergency extends well beyond your family. We are all in this together — and the more we work together, the safer we all will be. Does this sound like something you agree with?  If so, take a look at our Neighborhood Disaster Survival guidebooks. Each offers a path to organizing an emergency response team within your neighborhood,whether it’s made up of apartments, mobile homes or single family homes.

Better Business Security Over the Holidays

Share

better business security

Closed and Shuttered for the Holidays

Thanksgiving is over;  Christmas shopping has started in earnest. And many of us are looking forward to some time off over the upcoming holidays.

Before dashing out and locking the door behind you, take a moment to consider the increased chance of criminal activity that takes place precisely during these next four to five weeks. (Increases are seen mostly in robbery – taking by force  —  and larceny – no force involved.) It’s worth a close look at better and better business security.

What should you as business owner* be doing to protect yourself and the company?

1-Review cyber security procedures with all employees.

It’s easy to get distracted – and attracted! – by online sales, personal schedules, party planning, etc. During this busy period, don’t get suckered into fraudulent requests for payment or funds transfer, pfishing emails, or using an unsecured hotspot (coffee shop!) for a quick business transaction. Don’t let your kid use the work computer you’ve brought home!

Cyber QuizHave a list of cyber security policies and go over it with everyone. (Your IT team should have prepared such a list. If not, here’s a basic business cyber security quiz we’ve put together, updated for 2018.)

2-Take another look at your physical surroundings with holiday security in mind.

Decorations — We go through these reminders every year for the residents who live in our community. They also work for better business security.

Put up safe decorations!  No live candles, period. Use outdoor–rated electrical wires for outdoor lighting. Don’t overload circuits. Keep cords out of high-traffic areas. Be sure holiday lights aren’t left burning overnight.

Locks and lighting – Holidays attract thieves. Be sure all your workplace security equipment is working: outdoor and emergency lights, locks and access control systems, panic buttons, surveillance cameras. Don’t forget to let your security company know your holiday schedule. And be sure to provide them with appropriate contact names and numbers (knowing that a lot of people will be out of town). (A lot of these surveillance items are being featured in special deals online this year. CLICK HERE for an Advisory that will help you figure out what you need so you can get the best prices. )

3-Keep people out of trouble.

We all tend to get excited during the holidays, and it’s easy to forget some of the basics. One prime example – letting strangers in or inviting friends into the building when they usually don’t belong there. As you lock up each night, check to be sure no one is lingering in restrooms, storage rooms, etc.

And if you’re hiring temporary employees during the holiday period, do criminal background checks on them before allowing them onto the team.

You may find it’s time to do a review of all aspects of security at the front door. Our Advisory about that topic is a popular one.

4-Review your policies for dealing with cash.

Lots of sales and lots of shopping mean people are carrying more cash than usual. Your business may be handling more end-of-year purchases than usual, whether cash or credit. Take steps to protect current business activity so you don’t come back to problems in January. Some suggestions for better business security involving cash:

  • Insist on careful credit card use.
  • Periodically remove extra cash from registers and put in a safe. (No safe? Consider installing one now. The Advisory about security at the front door mentions a couple of different model options.)
  • Don’t openly carry cash to the bank. And make deposits before it’s dark.
  • Check records for suspicious refunds, discounts, over rings, etc.
  • If you’re open longer hours than usual, be sure to keep back doors locked and alarmed. Keep parking lot lights on until after employees have left.

5-Protect the Company from a Holiday Party Disaster.

I suspect we’ve all heard the stories of companies being sued because at the holiday party, under the influence of alcohol, some employees act inappropriately, embarrassing photos get posted on Facebook, or a driver leaving the party under the influence is involved in an accident.

Every one of these incidents could result in a crushing lawsuit.

I attended a New Year’s party a couple of years ago that had some good ideas about better business security as it relates to employment law.

My friends (actually, my employer) hired a professional bar tender who poured the drinks and was prepared to stop pouring for people who had too much to drink. They closed the bar a good hour before the party was over and switched to serving coffee. When we came in the door, we were quizzed about designated drivers, and reminded that taxis would be available. And the party had some very important clients there, too, which kept the atmosphere more businesslike than it might have been otherwise. It was a great party that got repeated the next year!

After the holiday you deserve the chance to come back to work refreshed and ready for the new year. Good business security will help kick off 2019 that much more easily!

Virginia
Your Emergency Plan Guide team

* Occasionally I get an email from a reader saying something like, “I am not a business owner so I’m not interested in this topic.” Yes, some of these Advisories are addressed to business owners. But nearly all of them, just like this one, have implications for all the employees. If there’s a break-in, a theft, or a lawsuit at the place you work, it could easily become a disaster for the whole company, not just the owner! Please share these suggestions with your business’s owner if it makes sense.


Are you vulnerable to landslides?

Share

Southern CaliforniaCalifornia Landslide

Santa Barbara County, California – Landslide Photo – USGS

Landslides can occur in all 50 states. They can be sudden and shockingly deadly. Are you vulnerable?

It’s Wednesday November 28th. I’m watching the weather reports today. Here’s a sample of the local headlines  – this one from ABC. today:

Storm system will bring rain to SoCal starting Wednesday evening with heavier downpours expected overnight and into Thursday morning, causing flooding concern for residents in the recent burn areas.

This led me to an older news report. This one was also from California, back in January 2018:

For days, officials advised residents in areas burned by the Thomas fire that a coming storm could bring major mudflows. Several neighborhoods were under a voluntary evacuation order. Many residents decided to stay. Some assumed the threat was overblown just weeks after the fire triggered similar calls to evacuate.

And the result: At least  21 people were killed by the flooding and debris flows at followed the heavy rains.

Have you experienced heavy rains yet this season? If yes (or even if no), are you vulnerable to landslides?

Take a look at this map from the US Geological Survey, showing regions of vulnerability. As you can see, they are mostly along the west coast of the US and also in the eastern mountains.

The bright red Appalachian Mountains area is labeled as having 15% of the land vulnerable to mud and landslides!

vulnerable to landslides

How do you protect against landslides?

Much of the following information was provided via resources suggested by one of Emergency Plan Guide’s readers. Thanks, Bradley Davis at DisasterWeb.net. !

Learn more about your risks beforehand.

  1. Check on detailed maps like the one above from the USGS to see if you are vulnerable to landslides, and if so, just how vulnerable you are. Maps are based on geographic features, soil properties and historic and anticipated rainfall.
  2. Second, be aware of recent fires that may have raised the risk in an area that otherwise might not have been so risky. Note: you may be traveling into a higher risk area that will make you more vulnerable. Find out what’s been going on there recently!
  3. Check with your insurance agent to find out if you have coverage for mudflows. Unless you have Flood Insurance, you probably don’t!

Be ready to evacuate.

Have an evacuation plan and evacuation kits. You may have very little notice so be prepared to leave IMMEDIATELY and know where you’re headed or at least how to get in touch with other family members. (That out-of-state emergency contact, remember?)

Take action now to protect your property.

You can’t stop the rain. But you can take steps to control and redirect water on your property. Some examples:

  1. Consider plants and trees that have deep roots, to control erosion and to help absorb and filter water.
  2. Landscape to include depressions/channels to direct runoff. The water needs to end up on your property, remember.
  3. Build a “rain garden” to catch and hold water, where it can soak into the ground within 24 hours. Plants in the garden need to be wet-soil tolerant and have deep roots. Get professional assistance in planning this depression. Find more info and great photos of rain gardens at the Groundwater Foundation.
  4. Divert water from rain spouts so it doesn’t collect and make puddles.
  5. Build up grass and natural barriers at the perimeter of your property to keep water out or redirect it.
  6. Install permeable paving and porous surfaces in driveways and walkways.

Know the signs of impending danger.

As always, be alert to your surroundings. Some indications that land may be starting to shift, signalling a potential landslide . . .

  • Strange sounds – trees cracking, rocks clashing, water flowing rapidly.
  • New cracks or bumps in roads, on slopes.
  • Soil moving away from foundations, road bed dropping.
  • Saturated ground where it is usually dry.
  • Tilted trees, decks, fences or walls.

Watch the weather reports, and be ready to leave at a moment’s notice!

Finally, if you do have to evacuate as a result of landslide, before you head back in . . ..  

Even if things look OK at first, be cautious before you assume anything. Check with authorities that are on site to see if Personal Protective Equipment is required or desirable. (Direct Relief,  a disaster relief organization, is providing coveralls to victims of California fires right now.)

At the very minimum, wear heavy rubber boots, long pants and long sleeves, heavy work gloves, and use a mask (N95) to protect against breathing in contaminated dust and/or ash.

Approach your “re-entry” step by step.

  • If your home suffers structural damage, take photos and contact your insurance agent. Keep receipts for any clean up and repairs.
  • Utilities may be off or damaged. Check for gas leaks, broken wires or the smell of burning insulation. Check for broken water and sewer pipes. Call on professionals for help turning these back on.
  • Everything that got wet may be a health hazard. Disinfect (Bleach is the best) and then dry. Wear gloves, mask and eye protection against dust, chemicals, mold.
  • Watch out for rashes as a result of exposure to debris. Watch for “trench foot” as a result of having wet, cold feet hour after hour.
  • Any cut or even breathing contaminated air may turn into a serious infection. Check your condition frequently and don’t delay in seeking medical advice.

When many people are displaced and living in local shelters, the chance of contagious diseases is also increased. Again, use respiratory and eye protection to help prevent the spread of germs, and be aware of hygiene at all times.

Wow. So how vulnerable are you?

What started out as an extended weather report has turned into quite a lengthy discussion. If you are outside of a potential slide area, perhaps you can forward this Advisory to friends elsewhere. If you’re not SURE whether you are in a slide area, head back to the USGS and see if you can dig into their maps for more detailed info about YOUR location.

If you’ve been affected by recent fires in California, you may also want to check out some of the FAQ (Frequently Asked Questions) at the USGS. Here’s one specifically about wildfires and debris flows. And here’s even more detail about Southern California susceptibility.

The latest weather update . . .

So I just checked with the National Weather Service. They have issued a FLASH FLOOD WATCH  for my area and in particular for burn scar areas, for tomorrow, Thursday morning through Thursday night.

Here’s the message:

Heavy rainfall could cause debris flows in recent burn areas according to rainfall thresholds provided by the USGS. Debris flows are extremely dangerous and happen suddenly often with little time to act. It may even not be raining at your location to be impacted by a debris flow. You should monitor the latest forecasts. Heed any advice given from local authorities.

This is real life.

Virginia
Your Emergency Plan Guide team

How do YOU shop for the holidays?

Share

holiday gift

Have you succumbed to the excitement of Black Friday?

Whether yes, or no,  how do you compare to other Americans when you shop for the holidays?

  • According to accounting firm Deloitte, 50% of last year’s holiday shoppers said they prefer shopping online to going into a brick and mortar store. Which do you prefer?
  • And although this is supposed to be the time to shop for the holidays (i.e., gifts for others), apparently much of the early spending is on things people want for themselves rather than what they’re buying for others. What’s on your personal list?

Do you shop for holiday gifts with a purpose?

Here at Emergency Plan Guide our major focus isn’t on selling things, but we we definitely believe in gifts.  That’s because . . .

We see gifts as a way to introduce more people to the importance of being prepared for emergencies.

So, following national trends, we take a few days – and particularly at this time of year! — to aim you toward some online purchases to emphasize the value of preparedness . . .

  • For family members
  • For employees or workplace colleagues
  • For yourself!

Let our Top Ten Lists help you shop for the holidays!

Last week we updated our TOP TEN lists to some of the latest best-sellers in the category of Survival Starter Gifts and also in the category of Exclusive Preparedness Gifts. Two different lists, two different price ranges, two different PURPOSES!

If you haven’t yet, please check them out!  Join in the holiday buying tradition!

And we also are pleased to introduce a whole new online source of interesting and inspiring items –a new website!

Announcing  — a new resource for shopping!

Over the years you’ve seen that we are eager, always curious readers. We go in depth into many topics to be sure we understand the whole science behind it. At the same time, we also enjoy not-so-formal articles and books, and we often include links to them.

Every once in a while we come across a book that is just too good to own and not share!  That’s what started EmergencyPreparednessBooks.com

Spread the word about preparedness

On the site we review books that we’ve enjoyed and books we think are essential for your library.

  • We add a new book every once in a while – you’ll see them under “Latest Additions.”
  • We also have a section with ideas for using books to “Help us spread the word” about preparedness. This section is written in particular for people belonging to neighborhood groups or who are part of a business where preparedness plays a role — or SHOULD play a role!

I invite you to find a few moments to browse through the website, read some of the reviews, learn more about why we created the site, and see if any of these ideas or these books fit your list as you shop for the holidays!

And I welcome any comments or recommendations YOU have for great, inspiring, engaging, educational, exciting or fun books YOU would like us to add to our list for your fellow readers!

Here’s the link to the new site. You’ll recognize it as looking just like the image above!

Thanks – and happy shopping!

Virginia
Your Emergency Plan Guide team


Simple Survival Signals Can Help Speed a Needs Assessment

Share

Survival signal flare

Wham! Your neighborhood is hit by an emergency! Before you do anything else, you check immediately on your own condition and the condition of the place where you are.

Then, if you are a member of a CERT or NERT team, you set out to check on others and help come up with a Needs Assessment(Our team members, like others, use checklists to record and walkie-talkies to report on how many people have been impacted, who is injured and to what degree, and what’s the status of neighborhood structures.)

The full needs assessment may take quite a while.

  • You and a partner can try to hurry to every single house on the street, interviewing residents and noting damage. But that may be beyond your physical capability.
  • You can try to call everyone on the street. However, even if you know all their phone numbers, that, too, would take a long time — dialing, hearing their story, answering questions, leaving messages, etc. (Besides, in a big emergency the phones may be down or overloaded.)
  • If you had a drone, and knew how to make it function, and it was daytime, you could send it up to view the houses. Of course, you wouldn’t be talking to residents.

Time is of the essence!

Here are three simple survival signals that might speed the needs assessment in your neighborhood.

These signals are in use by various neighborhoods in our Southern California area. Obviously, every region/neighborhood is different. But if one of these makes sense for you, or a version of one makes sense, bring it up with your group. Of course, not one of these will work without NONE of the signals works unless people have been  have come up with different ways to SIGNAL they are OK. All of these “systems” have come into play after group discussion, and they only work if people have been trained to use them in advance of the emergency.

Simple Survival Signal #1: White Towel Over the Mailbox

In closely-spaced neighborhoods like ours, we can stand at one corner and see all the way down the street to the corner. Many residential neighborhood developments around the country are laid out similarly.White towel signals OK

In an emergency, if people would SIGNAL THEY ARE OK by putting a white towel over the mailbox. A quick glance would tell rescuers to head to the next house.  (Note how the white towel in the photo stands out!)

Advantages of the white towel system:

  • Everyone has a white towel or rag or can get one. (White cloths are sold inexpensively in packages, as rags.)
  • Towel won’t be damaged by getting wet or dirty.
  • White towel is visible day or night.

Disadvantage of this system:

  • Won’t work if you don’t have mailboxes or other structure at curb in front of each house.

Simple Survival Signal #2: Red Card, Green Card in the Window

At a recent meeting sponsored by the Earthquake Alliance here in Southern California, we were shown a great printed resource designed to be handed out to everyone in a neighborhood. It’s an oversized tri-fold brochure printed on heavy paper, with all kinds of interesting facts and tips about preparing for disaster.

Two of the panels are signaling devices. One has a big OK in Green. On the reverse is printed a big red HELP! In an emergency you put the appropriate sign up in your window to let first responders/neighbors know what’s what. (The image shows two of the brochures so you can see both red and green panels.)

Emergency Signal SignAdvantages of the colored card system:

  • A sign inside the house won’t get blown away or damaged by weather or vandals.
  • This sign is big enough and heavy enough that it won’t be accidentally tossed.
  • Resident won’t have to go outside to place signal.

Disadvantages of this system:

  • All residents in the neighborhood would need to be provided with the signs (cost).
  • Someone has to design, write and print the signs, which would be different for every region.
  • Window sign is probably only visible from directly in front of the house or window.
  • Probably not visible at night.

The green/red signal doesn’t have to be printed. It could be as simple as two pieces of construction paper, one red and one green. Store them near the front window, of course.

Simple Survival Signal #3: Survival Whistle Calling For Help

Ok, what if you are trapped under fallen debris? You certainly can’t place the red (HELP!) card in the window. And depending on ambient noise, time, etc., you may quickly become exhausted calling for help.

But nearly everyone would be able to use a whistle to signal their need for help – as long as they can get the whistle to their mouth.

The universal signal: three loud, short blasts followed by a pause, and then three more loud, short (3 seconds?) blasts.

Advantages of having a survival whistle:

  • Whistles are small, light-weight and easy to carry – on a key chain, connected to your purse, on a lanyard fastened to your backpack, etc.
  • Whistle can be large, small, colorful or discreet. You can find the style you like.
  • Whistles can be used for other purposes, too – calling kids, scaring away animals, warning drivers, etc.
  • Nearly every whistle I’ve ever seen costs less than $10.

Disadvantages of a survival whistle:

  • A poor quality whistle will NOT serve. A cheap whistle (the kind with a round “pea” inside) can jam. (I have experienced this!) The sound made by cheap whistles can also be too soft. You want 90 to 120 decibels of sound.
  • Super loud whistles may require earplugs.
  • Even though they cost less than $10, buying whistles for a whole group can become expensive.

There are so many whistle choices! I personally have a half-dozen or so different whistles, because I keep seeing ones I want to try! A couple of them are just to fat or ugly to make me feel like carrying them. (I use them for show and tell at our meetings!) But I have found a couple that I really like, and I have them with me all the time. Check out the whistles below for yourself, your family (great little surprise gifts) or your group. Click on the images or the links to go directly to Amazon.

Perfect for EDC — Every Day Carry

I really like this brass whistle! It’s neat, attractive, sleek, reaches 120 decibels.  It’s truly mini — small enough to fit in the palm of my hand. Of course, I’d want to attach it to a key chain or add some sort of lanyard; the gold ring looks sturdy and well made. AND the whistle costs less than $5 as I write this!

Mini Whistle Premium Emergency Whistle by Outmate-H62 Brass Loud Version EDC Tools

Businesslike and flexible

The whistle below comes as a two-pack, with carabiner and lanyard included for a variety of fastening options. Still, it’s not too bulky. This is the loudest of the three examples. Its stainless steel double-tube design can achieve 150 decibels — that sound carries farther, too! Also less than $5 each.

Michael Josh 2PCS Outdoor Loudest Emergency Survival Whistle with Carabiner and Lanyard for Camping Hiking Dog Training (Gold)

Fun and sporty

This third example also comes as a 2-pack. The whistles are dual tube, made of colorful, unbreakable plastic, waterproof. (Plastic doesn’t stick to your lips in the cold, either.) Matching lanyards are also sporty, would attach well to backpack, sports equipment. These whistles might not blend in  so swell with business attire (!), but look great for sporting events, camping, etc.  Loudness: 120 decibels.

HEIMDALL Safety Whistle with Lanyard (2 Pack) for Boating Camping Hiking Hunting Emergency Survival Rescue Signaling

I hope you’ll take a serious look at these simple survival signal ideas, and share them with your neighbors. And let us know how your tests work!

Virginia
Your Emergency Plan Guide team

P.S. Of course, you will likely turn to your cellphone as your very FIRST signalling tool in an emergency. Even if the phone does work, it would take a long time to dial up all your family and neighbors. Better? Pre-program your phone so you can send a TEXT MESSAGE all at once to a group, with just the push of a button!  (If the president can do it, we can too.) I’m researching programs for this right now. Do you have any recommendations?


I have a favor to ask

Share

A favor for Emergency Plan Guide

Hello Valued Friend!

At Emergency Plan Guide, we’re kept up at night (literally, sometimes!) thinking about how to make everything we write better.

Not better in terms of grammar or vocab, but better at giving you what you are interested in and what you can use to solve your problems.

We’ve learned, though, that what we think you want may be off the mark!

And since we want our site to be as great as it can possibly be, can you do us a favor?

Can you take just two minutes right now to let us know . . .

  1. What kinds of info would you like more of?
  2. What preparedness problems do you face that just WON’T go away?
  3. Any experts you’d like to hear more from?

Or maybe you have a story of your own you’d like to share?

Whatever you can tell us will be a big help as we plan our next articles.

Just jump to our CONTACT US page and write away!  (We’ll keep your reply confidential, of course.)

Thanks so much! We look forward to hearing from you.

Virginia and Joe
Your Emergency Plan Guide team

P.S. Had a 4.4 earthquake here in southern California last night. Parts of the upper Midwest have been hit by torrential downpours and thunderstorms. Hawaii is mopping up after record rainfall from Hurricane Lane – with another storm forming. Stay alert out there!

Disaster Survival Series adds 4th title for Small Business

Share

Now available:

Emergency Preparedness for Small Business

The book that closes the gap in disaster survival between a business and its family communities.

4th book in series

The series expands: Emergency Preparedness for Small Business

No longer do small businesses have to put their business, their lives and their employees’ lives — and livelihood — at high risk in a catastrophic event. Emergency Preparedness for Small Business makes writing a simple Business Continuity Plan manageable and even easy. And we know that having that up-to-date, workable Plan improves the odds of business survival by an order of magnitude.

The foundation already exists.

This fourth book in the Neighborhood Disaster Survival Guide series has one unique purpose — to get business owners and leaders of their workforce community to adopt the widely acclaimed FEMA Community Emergency Response Team (CERT) process as an already-existing foundation for their Plan. CERT is provided free by over 2,500 cities and counties across the U.S. as well as on the FEMA website.

Authors Nicols and Krueger are themselves CERT graduates, and in the book have combined their years of working with business with their years of developing and leading a neighborhood emergency response team.

The first three books in the series were devoted to fulfilling the promise of CERT, giving individual members a way to leverage their training by reaching out and connecting neighbors and even whole neighborhoods.

This book extends CERT basics to the business community.

There’s no longer any excuse.

Joe Krueger says, “Whether you’re at home or at work, there’s no excuse for simply rolling the dice in an emergency. In fact, at work that attitude could be grounds for a lawsuit!”

Now businesses as well as neighborhoods have a simple roadmap for preparing for the natural disasters that threaten, as well as the even-more-frequent man-made ones. Each book presents options and real-life examples, offers step-by-step guidelines and adds references to dozens of other resources. There’s an occasional legal warning, too.

The message to all:

Disasters have surged 400% over the past 20 years – and they are bigger, often overwhelming official First Responders. It’s up to citizens to know what to expect and how to react, because they become the real “first responders!”

All 4 books are available as ebook or paperback at Amazon. Here are direct links:

  1. Emergency Preparedness for Apartment Communities
  2. Emergency Preparedness for Mobilehome Communities
  3. Emergency Preparedness for Homeowner Communities
  4. Emergency Preparedness for Small Business

When the disaster hits, it’s too late for preparing or for training.  Take the first step now.

Can you trust your fire extinguisher?

Share

Comparing fire extinguishers

Comparing fire extinguishers. How long will they last? Are they rechargeable?

Your CERT investment

How are you using your CERT training? (Check all that apply.)

  • I’m adding more and better gear to my green CERT bag.
  • I’m working on immediate family members to develop better “situational awareness.” Not always with much success.
  • When the subject comes up, I encourage neighbors and co-workers to take the training.
  • I have joined a neighborhood emergency response group.
  • I have decided to START a neighborhood emergency response group.

As you may have gathered by now, Joe and I don’t think getting CERT training is enough. Oh, yes, it’s valuable.

But “saving” it just for yourself or your family is like getting a double barreled shotgun and only ever using one barrel. Or getting bunk beds and only ever sleeping in one. Or getting . . . well, you can come up with another example of letting half of a really good thing go to waste!

In this case, it’s wasting all the good information that will help OTHER PEOPLE save themselves in a disaster.

Because that’s our philosophy, we’re always thrilled when we hear from people that they have made a successful effort to share good information.

A Better Return on Investment

Two weeks ago I heard from an Emergency Plan Guide Advisory reader that her mobilehome park was having a big Disaster Team meeting with several speakers. She reported that over 70 people had already signed up! Why? . . . free pizza, salad and beverages provided by Park Management!

Naturally that news made me want to share the meeting that we held last week in our community. We didn’t get 70, but almost that many people. And what made it different was the sponsorship of our local hardware store.

Plan a successful emergency response team meeting

Over the years I’ve written up “lesson plans” for neighborhood meetings and events. So here’s another one that perhaps you can use to “spread the word” in your own community. If the woman in the picture actually buys a fire extinguisher, we may have saved a home — or even a neighboring home!

All the meeting ideas presented in the Meeting Idea Books follow the same format:

  • Title
  • Objective
  • Procedure
  • Materials Needed
  • Comment

Title: We can call this one: “Building a Stronger Community.”

Objective: To encourage people to pick up a few everyday tools and equipment appropriate for day-to-day repairs AND emergencies.

Procedure: Joe and I approached the manager of our local Orchard Supply Hardware (OSH) about putting on a special “pilot” program for our community. We wanted to get people to the store to buy some important emergency preparedness items.

After a tour of the store, and a number of discussions with OSH and our team leaders, we agreed on the following format:

  • We would promote a “show and tell” meeting at our clubhouse.
  • The store would send a sales person to our meeting along with a number of examples of emergency equipment – fire extinguishers, multi-tools, lanterns and flashlights, smoke alarms, pre-built emergency kits, etc.
  • Members of our neighborhood team would also bring and demonstrate emergency items they own – pet container and pet survival kit, headlamps, various bottled water supplies, etc.
  • Nothing would be for sale. Rather, all attendees would receive a one-time DISCOUNT COUPON. All they had to do is take it to the store, shop from their list, and get the discount at the counter.
  • We’d have a door prize and refreshments.

Materials needed: The store selected (with our input) all the items they wanted to show, and brought them complete with price tags. Our team members brought their own things, some of which were not available at OSH. All we needed to create from scratch were the various promotional items for the meeting – flyers, newsletter article, email announcement – and the discount coupon. For the meeting itself we needed several tables for display, cups and napkins for the refreshments, plus two microphones (one for the M/C, one for the person doing the demonstration).

Comment: Our goal was to host a “community meeting” and not a commercial for the store. We made sure all advertising emphasized our Emergency Response Group. And having a mix of OSH and team speakers and show and tell items kept everything well balanced.

As much as I thought this meeting might be “ho hum,” (How many times can you talk about fire extinguishers?!) we got more than the usual number of thank you notes! We kept the speakers on track. And afterwards people crowded around the tables to pick up and examine ALL the articles, including those fire extinguishers and packets of water!

We haven’t heard yet about sales success, but I did send the store some ideas for follow-up meetings plus bullet points for a press release.

All in all, the meeting did what I hoped it would do – reach out to some new neighbors, introduce some new emergency preparedness ideas, and above all, demonstrate that we are a community and as a community – the more we all know, the safer we all will be!

If you are trying to come up with an idea for a meeting in your neighborhood or perhaps at work, try a variation on this one.

Virginia
Your Emergency Plan Guide team

P.S. We have held similar events in the past. At one meeting some years ago, The Home Depot and Costco both came and took orders that they delivered a week later.

P.P.S. Fire extinguishers were the hot item at that earlier meeting, too!

Summer water dangers

Share

White water rafting

Joe almost drowned.

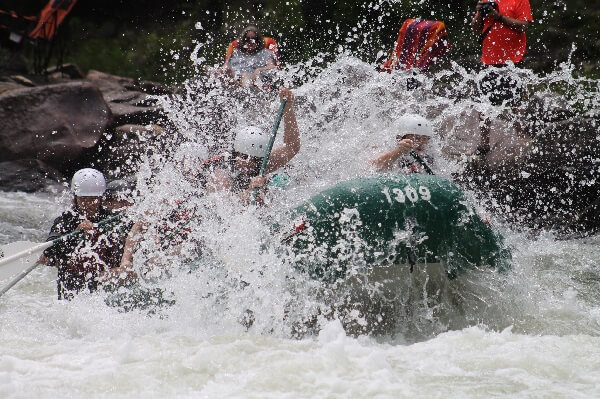
It was summer in West Virginia and we were eagerly looking forward to our fourth river rafting trip. We had previously gone rafting in California so this would be a different sort of adventure.

Oh, it turned out to be different all right!

The rafting company was operated by the usual mix of tanned young outdoor types, who got us suited up with some smelly half-damp life vests and loaded us into a clumpy bus for the 20 minute ride to where we would put in.

I seem to recall that the trip included some Class III and just one set of Class IV rapids.  That’s where the raft simply rose up on one side and flipped Joe right out. We all laughed a bit and watched as he was swept ahead of us downriver. We couldn’t catch up right away so he rode the rapids the whole way, feet up in front to keep them from getting snagged, just as he was supposed to.

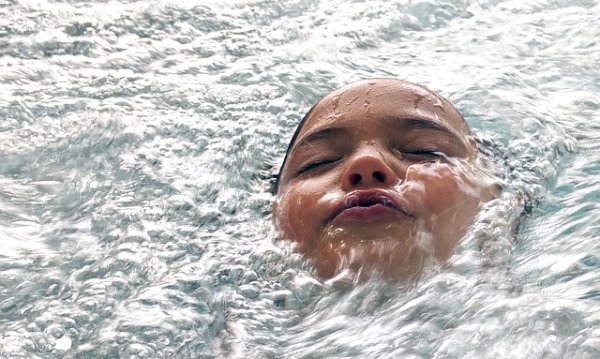
What we didn’t realize was that his life jacket wasn’t supporting him. Because it was already partly water-logged, and probably too small, every time he got his feet up his face went under. At the bottom of the rapids we finally pulled the raft up beside Joe. He stared up at us blankly, his chin under water, unable to speak or even reach out. Thank goodness the guide saw what was happening, reached over the side, grabbed the front of the vest with both hands and hauled Joe headfirst right over herself into the boat.

For the next 15 minutes Joe lay face down, gasping and coughing and hardly moving while the guide scrambled and got us a place to land. He didn’t say anything at all for the next couple of hours either, as we finished the run. (No more rapids.)

OK, you know he is now recovered. After all, that was a good 20 years ago. But we have never again gone rafting; the memory is just too painful for him.

What’s the point of the story? There are actually 2 of them.

  • First, someone could be drowning and you might not even know it.
  • Second, even a strong swimmer can be let down by bad equipment.

Here’s more . . .

Drowning doesn’t look like drowning.

I was reminded of our rafting story when I came across a super article last week published in one of my LinkedIn groups. It was written in 2010 by a Coast Guard rescue swimmer named Mario Vittone, published in the Coast Guard magazine, then republished and read 574,000 times since then! Here’s the link: http://mariovittone.com/2010/05/154/

If you don’t have time to read it right now, some highlights:

  • Drowning is NOT what we see on T.V. – screaming, wild splashing, arms waving. In fact, drowning is deceptively quiet. That’s why we read so often of children drowning just a few yards from their parents or other adults. In fact, the CDC said 10 percent of parents watch their children drown because they don’t know it’s happening!
  • Drowning people cannot call out. They are desperate for just one breath in before going under again.
  • Drowning people cannot reach for a float or pole. They instinctively press down with their arms on the surface of the water to try to raise themselves.

Other signs: mouth at water level; head tilted back with mouth open; hair over eyes or face; eyes unable to focus; not using legs.

Joe fit all the symptoms. He was drowning.

Please become number 574,001 on the list of people who have read the WHOLE STORY  and know what to do in the 30 seconds or less you have to save someone.

Bad equipment is like no equipment.

If you’re using rental life vests – known as Personal Flotation Devices or PFDs — check them out thoroughly for fit and floatability. And, of course, the same with any life vests you intend to buy for your family.

Fit: My granddaughters are very young. They love their water wings and are fearless around deep water. However, like all kids they GROW. That means their parents are replacing not only swimsuits at least once a season, but also life vests/water wings and all other water paraphernalia.

It turns out that life vests may be measured by weight or by chest size or both. The vest that Joe was wearing on the river trip was measured by his chest size only – not by his total weight! A mistake!

For children, the most common mistake is a vest that is TOO BIG. It it’s too big, it can slide off or be so uncomfortable the kid takes it off.

For adults, particularly big ones with a belly measurement bigger than your chest measurement, using only chest size may suggest a vest that is TOO SMALL for you.

Take the time to be sure you have the right size!

Function: Different life vests are available for different water sports. For example, you can find vests specifically for learning to swim, for boating, paddle boarding, fishing, kayaking, etc. Then there’s a whole other series (tighter!) designed for more active water sports like waterskiing, wakeboarding or wake surfing. And there are newer waist vests that only inflate when you want to inflate them.

As always, one size or style doesn’t fit all. And people, being people, won’t wear a vest that is too uncomfortable. Shop to pick the best style for your body and your water plans – and always start with a vest that is U.S. Coast Guard approved.

Floatability: Joe’s vest may have been the right size, but it had not been properly taken care of. The nylon was ripped and inside foam was already water-logged, which meant the jacket could not keep his nose and mouth above water.

Now, not all vests are designed to do this even when they are new – so once again, take the time to figure out where you’ll be in the water (close to shore? raging river? out in the middle of Lake Superior?), what you’ll be doing (sailing? snorkeling? jumping off the rocks?) and who is likely to be nearby to help.

Here are some examples of life vests to get you started on your shopping. I picked these because they got good reviews from other buyers and because they offer features I’d want. I’ve given an idea of cost at Amazon — where we are associates — but be sure to click on the image or link to get the accurate price and delivery details. Different colors may cost different prices, and sometimes the best price doesn’t include shipping. Again, these are all-round, everyday vests. The cost of specialty vests for a particular sport can quickly reach $100 or more.

1-Infant/toddler swim vest that won’t accidentally come off.

For an infant or toddler weighing less than 30 pounds, this jacket has features you’d want to look for: a strap that goes between the legs so the vest can’t ride up or slip off; a grab handle at the top so you can easily scoop the baby out of the water. The most popular and cheapest model is blue. I’d choose red because it would be more visible in the water. On the day I searched for this, the cost was right around $20. US Coast Guard-approved, of course.

Classic Vest Infant/Red

2-Vest for child learning to swim.

The Body Glove vest below, with chest vest and arm bands, is designed to help a kid learn to swim. It is NOT a classic life vest like the red one above. Rather, it’s meant to be used where watchers are close by to give an immediate hand in case of trouble. What I think would be important is the fact that the child can’t take this off by him or herself! (Fastens in back.) For a child weighing 30-50 pounds. And naturally there are other “motifs” including mermaid and pirate. Great presents!  Prices range from $20-30.

Body Glove 13226H  Kids 13226M Paddle Pals Motion Swim Life Jacket, Race Car

3-Life jacket for active kids.

The kids I know would not be happy wearing a stiff or bulky life jacket and would surely find a way to get it off. This one they might leave on because it is slim and smooth and has 5 “built in” hinges for flexibility and comfort. (The flex-back jackets seem particularly popular for adults, too.) This fits kids from 50-90 lbs, comes in a different color scheme, too. (There are a number of vendors selling this jacket; only some are eligible for Amazon’s Prime. Check carefully.) Price on this one was $40-$50 the day I shopped.

Full Throttle Youth Hinged Rapid-Dry Flex-Back Vest, Blue/Green, Size Youth

4-Classic life vests for adults.

There are lots of choices for adults. The first one here seems to be a good all-round life vest. It features light-weight flotation foam covered with a smooth nylon shell. You can adjust buckles for comfort, and the vest has open sides for even more comfort. Cost is around $30.

Now, it says the vest is designed for adults weighing 90 pounds or more, but if I were BIG, I’d probably be looking at the second vest below, the red one, also made by Stearns.

Stearns Adult Watersport Classic Series Life Vest, Yellow

Compared to the Watersport Classic, the Classic vest from Stearns comes in larger sizes: “Oversized” and “Universal.” Read the instructions and dimensions to be sure to get the right one. This costs a few dollars less than the Watersport model above (three sets of buckles instead of 4?).

Stearns Adult Classic Series Vest, 3000001412, Red, Universal

In the U.S. there are about 10 deaths a day from drowning, and another 1 of drowning as a result of a boating-related incident.

You and family members will ALWAYS be around water, one way or another. Learn to swim. Learn more about water safety so you don’t become a statistic – and learn how to save someone who’s in trouble so they don’t become a statistic, either. There’s a simple “How to save someone from drowning” lesson here.

Oh, and don’t let our story about river rafting deter you. It is REALLY EXCITING and GREAT FUN! Just be sure your equipment is sound!

Virginia
Your Emergency Plan Guide team